Thermaltake Level 10 System Case: Gaming Tower

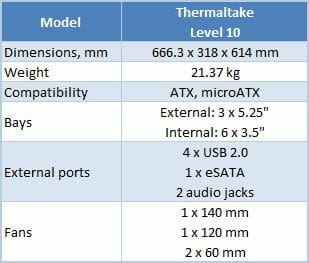
This case measures over 60x60x30 cm. It weighs over 20 kilograms. It costs around $800. What is it? Well, it is Thermaltake Level 10 systems case, the main hero of our today’s review.
What’s the difference between a system case for a gaming computer and a regular PC enclosure? Well, the former is supposed to ensure good cooling and compatibility with top-end graphics cards. An aggressive exterior design is a plus.
That’s what you’d expect from a conventional gaming system case, though. Thermaltake’s Level 10 is far from conventional and its developers even call it a gaming station, probably suggesting that other terms wouldn’t convey the whole spectrum of emotions this highly original and quite expensive product is expected to provoke in a consumer.
So, let’s try to figure out whether the Level 10 is really so very special and worth every cent of its $800 price.
Closer Look at Thermaltake Level 10
Being the result of collaboration between Thermaltake and BMW Groups Designworks USA, the Level 10 is definitely not a conventional system case. The closest thing you may think of is a chest of drawers designed as a mixture of cubist and hi-tech styles. It looks like a set of individual boxes that have no obvious relation to each other and, in fact, it really is such a set of boxes. Almost each computer component that can be placed apart from the others has an individual compartment for itself whereas the dimensions of this system case, especially in its packaging, are hardly smaller than those of a regular chest of drawers.


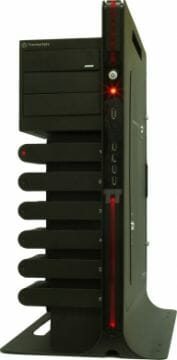
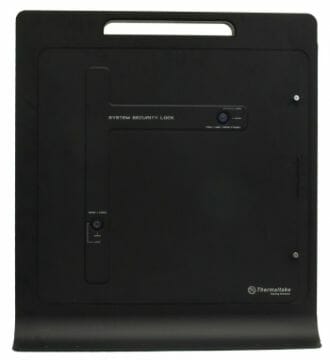
The Level 10 is made from pressed aluminum and painted matte black. The pair of cooling fans, the Power and Reset buttons and the labels of the front-panel connectors are highlighted in red. Besides, there is a red-highlighted line going along the backbone of the Level 10 and a red indicator next to each occupied disk bay (this indicator is turned on by a button located behind the disk bay; the button is pressed by the installed hard disk).
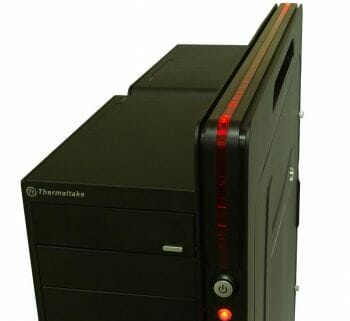
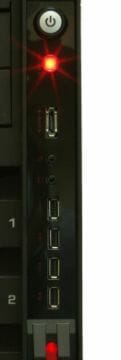

I must note that for all the abundance of highlighted details, the illumination doesn’t irritate the eye. Its brightness is comfortable enough even in darkness and may be hard to notice at first sight in daylight. The Reset button is the only exception. Its LED is excessively bright if you are looking straight at it. However, a computer case usually stands aside from its user, and the highlighting of this button is rather soft when viewed at an angle.
Overall, the Level 10 design is absolutely offbeat, yet very impressive, especially under mild ambient lighting or in darkness.
The thickness of the aluminum parts varies greatly throughout the product. The removable side panel is 1.5 millimeters and the chassis is 2.5 millimeters thick. The sides of the disk bays are as thick as 3.1 millimeters. The bays themselves are 2 millimeters and the top panels of the bays are only 1 millimeter thick. The steel elements of the system case (the mainboard mounting plate, the trays in the disk bays, the power supply bay, the back panel and the 5.25-inch bay) are 0.8 to 1 millimeter thick.

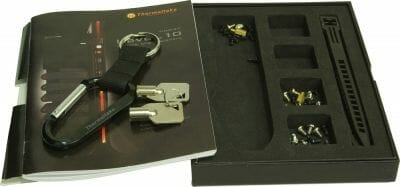
The accessories are packed into a neat box with Thermaltake and BMW Groups Designworks USA logos. Besides various screws, it contains a karabiner with manufacturer’s logo, a couple of keys for the side panel, and a set of reusable plastic straps.
I should also note that my sample of the system case has been tested before. You can spot some visible evidence of that in the photographs.
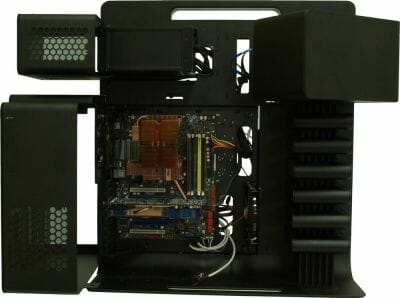
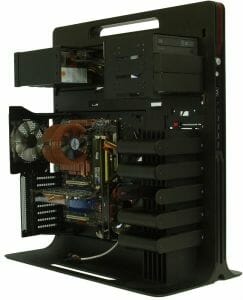
So, this chest contains as many as nine drawers. Power supply and 5.25-inch bays are at the top. The biggest compartment for mainboard and expansion cards is in the middle. On one side of it there is a column of six individual disk bays. Besides that, there is a large compartment for cables behind the removable side panel. Let’s now check out each of these elements one by one.
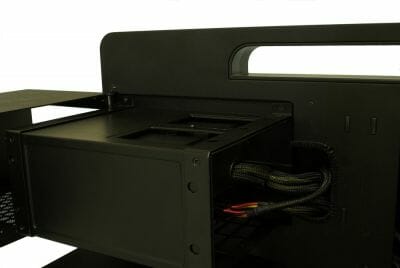
In order to install your power supply, you have to take off the cover of the appropriate bay, unfasten a couple of screws that hold the retention mechanism, put down the PSU and fasten it with four screws and a stopper plate. The installation procedure and the design of the PSU bay itself do not seem to be very complex, yet there are nuances you should know about.
The PSU length is limited to 210 millimeters. Some PSUs, for example Chieftec’s Super G-DF, are longer.
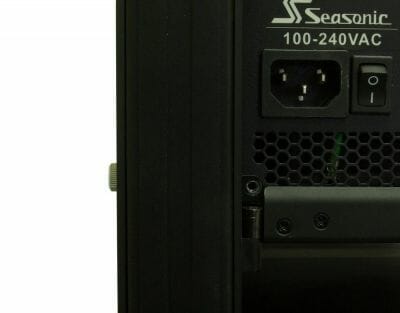
The bottom screw of the PSU (the one which is closer to the system case’s backbone) makes it difficult to put the bay cover back in its place. The cover can be easily fitted without that screw but if you want to use the latter, you have to apply some effort, which may result in scratches.
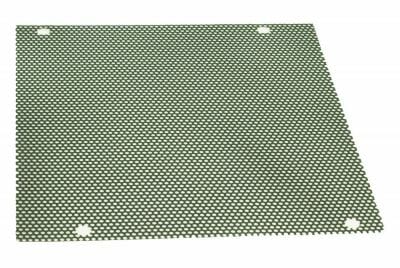
The quality of the dust filters is rather low. They are but thin flexible sheets of plastic with perforation. The mesh size is too large for them to be really effective as dust filters.
The open 5.25-inch bays share a single compartment for three devices although they might have been implemented as individual compartments. On the other hand, few users utilize all of the 5.25-inch bays of their computers and 5.25-inch devices do not need as much cooling as other components, so I can understand the developer’s reasoning. It would make the design of the system case more complex and make it even larger than it is without bringing about any tangible benefits.
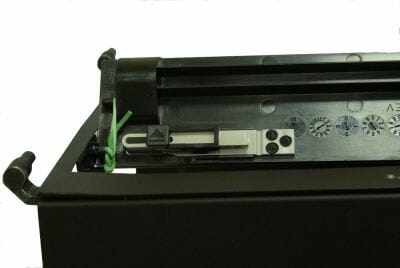
5.25-inch devices are fastened in their bays with screws, like elsewhere in this system case. The top bay is meant for an optical drive and has a spring-loaded faceplate that can be adjusted to the position of the drive’s eject button. It is impossible to remove the faceplate to leave the drive’s own front panel visible because the metallic fastening frame of the faceplate is going to get in the way of the optical drive.
As opposed to the mainboard and power supply compartments, the cover of the 5.25-inch compartment doesn’t open up by 90 degrees. If you try to throw it open, like the covers of the other bays, you may scratch the metal and even bend it.
I should also note that there is quite a long distance from the mainboard to the optical drive bay, so you may even need to look for long SATA cables (this depends on the position of the SATA ports on your mainboard).
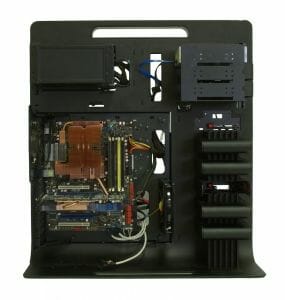
The biggest “drawer” accommodates a mainboard with expansion cards and CPU cooler. There is no technical way to put these components apart as yet.
Like with the PSU bay, there are limitations regarding the size of components you may use. Particularly, the maximum height of the CPU cooler is limited to 150 millimeters whereas the maximum length of the expansion cards is limited to 310 millimeters. This is going to be enough for the majority of coolers and graphics cards but there are exceptions that will not fit in. Unfortunately, most of the exceptions, like the Level 10 itself, are enthusiast-targeted products. For example, the Level 10 will not be able to accommodate tower-design CPU coolers with 140mm fans or dual-processor Radeon HD 5970 graphics cards (the rest of graphics cards, including the newest dual-processor Radeon HD 6990 and GeForce GTX 590, are going to fit in nicely).
If necessary, you can get beyond the size limitations by removing the 140mm intake fan from the mainboard compartment.
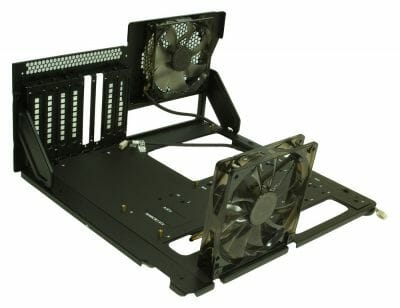
The mainboard mounting plate is removable. It is fastened with four long thumbscrews. I personally think it easier to assemble everything right in the system case, but someone may prefer otherwise.
There is an additional expansion-slot bracket in the back panel of the system case for a total of eight rather than seven such brackets. This is meant for dual-slot graphics cards in the first place, but if you do want to build a CrossFireX or SLI configuration in this system case, you should be aware that you will need long power cables for your graphics cards. For example, my power supply has a 60-centimeter PCIe power cable, which is longer than average and sufficient for any conventional system case irrespective of the position of the PSU bay. In the Level 10, however, it could but barely reach to the graphics card in the top PCIe x16 slot. So, you are going to need a power supply with long graphics card cables or use power adapters in order to power up your multi-GPU configuration.
When it comes to cooling, the Level 10 doesn’t differ much from conventional system cases. It has a 140mm intake fan (1000 RPM at a specified 16 dBA of noise) and a 120mm exhaust fan (1300 RPM at a specified 17 dBA of noise). The fans are manufactured by Thermaltake’s traditional supplier Hong Sheng. The only difference from conventional products is that the cables from the power supply, hard disks and optical drives are put outside and do not interfere with your assembling the system and with the air flows. Frankly speaking, such a conservative cooling system looks rather odd in an extravagant system case like this one. Even affordable products for about $100 can boast 20cm and larger fans nowadays. Here, the exhaust fan is optimal because a larger fan just wouldn’t fit (a 14cm fan might be installed there if the compartment were a little wider). The front-panel fan occupies some space that may be required by the graphics card and is not secured properly in its place (its retention frame can easily be turned around with your fingers). Its efficiency can hardly be higher than that of a side-panel fan that would be free from such drawbacks. As opposed to conventional system cases, the intake fan doesn’t have to cool hard disks in the Level 10.
Level 10 developers have also neglected the time-tested solution in which an exhaust fan is installed in the top panel above the CPU cooler. With the Level 10’s layout, such a fan would bring the hot air from the mainboard compartment to the power supply fan, but I guess that would be a justifiable sacrifice in order to cool the CPU more effectively. The power supply would be cooler anyway than in a conventional system case with a top PSU bay.
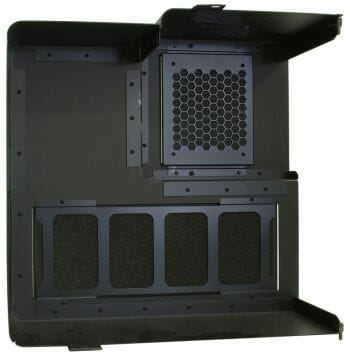
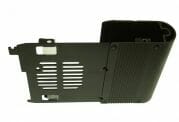
Dust protection of the mainboard compartment is rather poor. The dust filters (one is in front of the 140mm intake fan and another is opposite the CPU cooler) have the same dubious design as the filter in the PSU compartment. Moreover, the cover of the compartment has gaps which have no filters at all (you can see them in the photo of the cover).
The compartment cover is padded with a layer of foam rubber but I doubt the efficiency of this solution in terms of noise reduction.
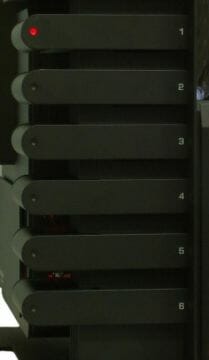
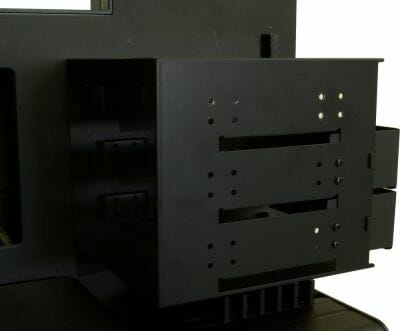
There are separate bays for up to six hard disk drives. Each bay is cooled individually. A couple of 60x60x15cm fans (2500 RPM, 19 dBA, manufactured by Hong Sheng) are installed for the two topmost bays. The rest of fans have to be purchased and installed separately.
Installing additional fans is quite a difficult process, by the way. You have to remove each bay by unfastening four screws, one of which is located most inappropriately for a screwdriver (the head of the screw is partially covered by the edge of the system case, and the wires from the front-panel indicators and outputs get in the way). Then you install your fan and mount the disk bay back in its place. You can make it easier to access the four screws by taking off some more elements of the system case, but that means you have to deal with a dozen screws more in order to reach those four. I guess Thermaltake should have installed fans into all the bays back at the factory. Considering the sky-high price of the product, this wouldn’t make any difference in terms of the price tag but the user would be spared the trouble of installing the fans himself.
Perhaps the developers have decided not to install those fans in order to reduce noise (subjectively, these fans are noisier than the two larger system fans or than my CPU and graphics card coolers in idle mode) but the fans might have been turned on only if a hard disk is installed into the appropriate bay, just as with the highlighting. Alas, the 60mm fans in the Level 10’s HDD bays are working constantly irrespective of whether the HDDs are present or not.
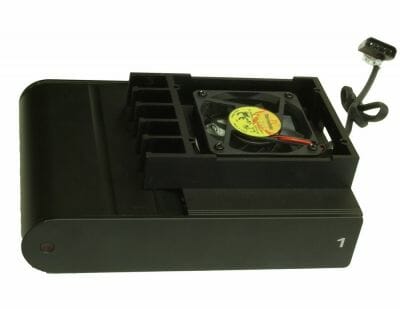
Interestingly, the user manual says that the HDD bays are equipped with intake 60x60x15mm fans. However, the fans are actually set to exhaust the air out of the bays. They cannot be set to take air in because of the recess for the fasteners’ heads in the fan frame: the fastening screws go deeper when the fan has the intake orientation and prevent you from installing a 3.5-inch HDD into the bay. Thermaltake must have thought it too much of a trouble to correct the user manual or replace the fastening screws with shorter ones.
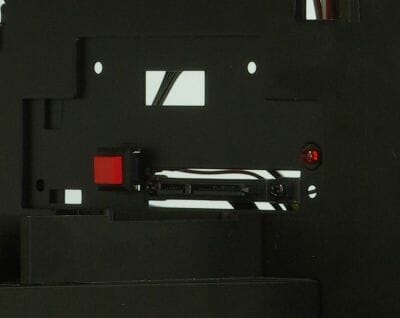
The two top HDD bays have SATA power and SATA data connectors. To connect them, you just push the bay with HDD backward. This allows to hot-swap HDDs. The bottom four bays do not have this feature, though. You have to use data and power cables with them, which requires your taking the side panel off.

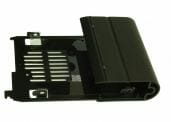
The disk bays have an aluminum “fairing” which is visible when the bay is installed and a steel plate for mounting the hard disk. A piece of transparent film is glued to the steel plate, which is meant to reduce vibrations from the HDD. Every bay is compatible with 2.5-inch devices: you only have to use the bottom mounting holes of your HDD (3.5-inch HDDs are fastened by means of the side mounting holes). It is impossible to install PATA disks into any of the bays because the cutouts for power and data cables are not compatible with them. This can hardly be regarded as a drawback, though. PATA drives have become really obsolete already.
The SATA cables from the front eSATA connector and the two disk bays with hot swap feature look identical, so it is rather hard to make out which one goes where.
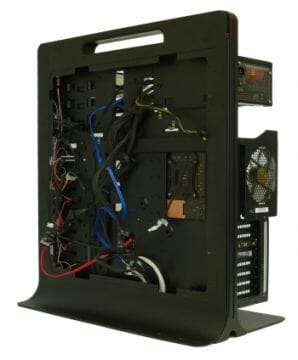
The last but not least feature in the Level 10 design is the compartment for cables which in fact connects the numerous individual compartments into a single whole. The mainboard mounting plate has a cutout opposite the CPU socket that may allow you to replace a CPU cooler with back-plate without taking the mainboard out of the system case.
The compartment isn’t wide but sufficient for all the cables. You only have to make sure that cables do not get in the way of the side panel locks (one lock closes the HDD bays and the cover of the 5.25-inch compartment; the other lock closes the mainboard and power supply compartments). Even if cables make the panel bulge in some places, closing the lock will instantly flatten the panel.
The covers of the HDD bays and compartments do not fit tight but I didn’t hear any noise from vibrations or anything. On the other hand, the loose covers may eventually become noisy after one or two years of daily work. After all, the Level 10 is obviously meant for a long period of use.
Test Methods
We test assembled system cases at a constant ambient temperature of 23°C maintained by an air conditioner. As we assume that most users prefer low-noise computers, we set the speed of the CPU and system fans (those connected to the mainboard’s 3-pin connectors) into Silent mode (the quietest mode in the mainboard’s BIOS). If the system case has its own speed controller, we switch it to minimum speed, too. We do not change the default configuration of air flows determined by system case design.
The following components are installed into the system case:
- Core 2 Duo E6850 processor at 3.00 GHz
- Zalman CNPS9500 AT cooler
- ASUS P5E Socket 775 mainboard
- Western Digital Raptor WD740GD hard disk (10,000 RPM, SATA)
- Western Digital Raptor WD740ADFD hard disk (10,000 RPM, SATA)
- 2GB DDR2-800 SDRAM Patriot PDC24G6400LLK
- HIS HD 3870 IceQ3 Turbo H387Q512NP graphics card (Radeon HD 3870)
- Seasonic M12D SS-850EM power supply (850 W)
- Microsoft Windows 7 Home Premium 32-bit SP1
The CPU temperature is read with Core Temp 0.99.8. The temperatures of the HDDs, GPU and mainboard are measured with CPUID Hardware Monitor. There are the following test modes:
- Idle
- IOMeter (IOMeter’s Access Time test running on all the HDDs to load them fully)
- Linpack (Linpack-based IntelBurnTest 2.0 runs in the hardest stress mode, loading both CPU cores; we measure the peak temperature of the hottest core throughout the duration of the test)
- MSI Kombustor (full-screen mode, DirectX 9 rendering, 1280×1024 with 8x MSAA, Xtreme burn-in)
Every temperature is read after the system has worked for half an hour in the current test mode.
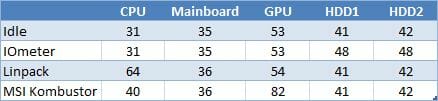
The following table shows the temperatures of the components if the system is assembled without an enclosure (“open testbed”).
The noise level is evaluated subjectively.
Test Results
We have only two HDDs in this test: a WD740GD as a system disk in the top bay with a fan and a WD740ADFD in the topmost of the fan-less bays.
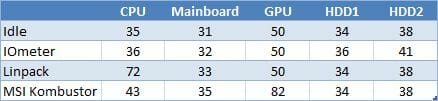
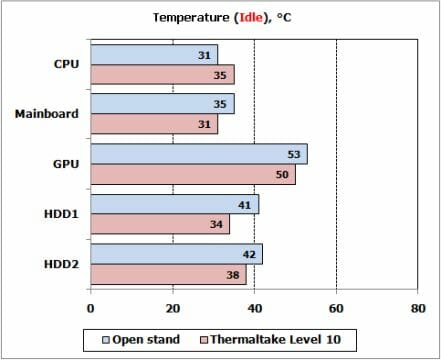
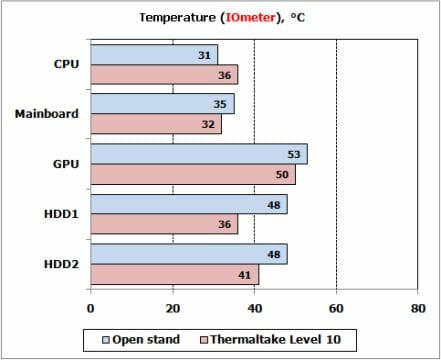
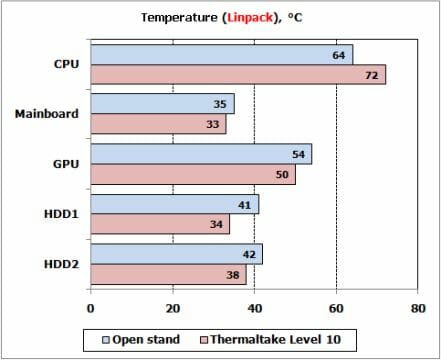
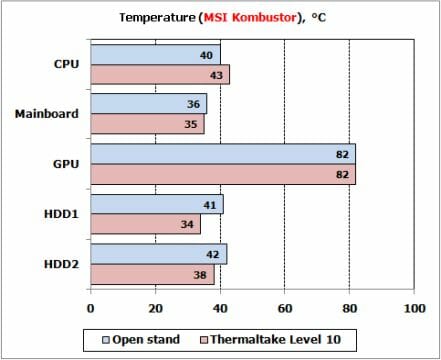
The diagrams suggest that the Level 10 is quite competitive to the open testbed in terms of cooling. It is better or equal to the open testbed in every temperature, except for the CPU one.
Take note of the HDDs: even the one in the unventilated bay feels good whereas the disk bay with a fan keeps the temperature of the hot Raptor very low.
The Level 10 fails in terms of CPU cooling. The open testbed proves to be better by 9°C at maximum load. This difference is too large for a system case targeted at enthusiasts.
As for the noise factor, it would take a very naïve person to believe the specified numbers of noise for the system fans (on the other hand, the manufacturer doesn’t specify the distance from which that noise was measured). Anyway, the pair of two large fans in the mainboard compartment is only audible when you put your ear next to the system case.
The fans in the HDD compartment are more noticeable due to the higher volume as well as higher frequency of their noise, yet are still rather hard to hear. The noise insulation of the chassis varies: the thick metal of the disk bays suppressed the noise of the high-speed Raptors quite successfully, so they were much quieter than on the open testbed. The aluminum covers of the other compartments are not so good in terms of noise insulation, so you may want to select quiet components.
Conclusion
It’s time to sum up the highs and lows of this highly unusual system case.
Highs:
- Original exterior design
- High-quality materials
- Handy front-panel connectors
- Eight expansion-card brackets
- Good cooling at acceptable level of noise
- Dust filters (even though not perfect ones) in front of the intake fans
- Good cooling of hard disks (even excellent cooling in the bays equipped with fans)
- No mess of cables (even if the user doesn’t really take the trouble of avoiding it)
Lows:
- It takes a lot of time and effort to assemble a computer system in the Level 10
- A few shortcomings in its design make the assembly process even harder
- Limited expansion opportunities for a system case of that size
- Outdated active cooling system (which affects the CPU in the first place)
- The covers of the compartments and disk bays do not fit tight in their places
- Poor dust filtering
- Very long power cables are necessary for SLI or CrossFireX configurations and for 5.25-inch devices
- Incompatible with liquid cooling systems
- Very high price
We can’t say that Level 10 doesn’t cool well or is too loud, but it is not exceptional in either of these aspects. There are a lot of products that can cool components better at lower noise and cost much less. So, a pragmatic user may consider Level 10 to be far from success. Moreover, it cannot possibly fit into a standard niche of a computer desk and is going to occupy quite a lot of room on your floor. It is also too heavy to be frequently moved around.
Overall, this model resembles a concept car that sports unique exterior with lots of exciting engineering solutions. Unfortunately, they must have run out of time at some point that is why they had to borrow a few ideas from mass production products (at least, that’s the only explanation of the not very effective active cooling system I can think of). And as is often the case with concept cars, the eye-catching and breath-taking design is not very good in terms of ergonomics.
So, who can be interested in this product? I guess the target audience of the Level 10 includes wealthy computer enthusiasts who are bored with conventional system cases. Despite several drawbacks we pointed out and its insanely high price, Thermaltake’s Level 10 has been around for quite a while, which indicates that the mentioned target audience is not so small after all.