Cooler Master X6 Elite CPU Cooler Review

This Cooler Master cooler is not very expensive, but boasts quite a few interesting technical implementations. Will they be enough to make this cooler look good against the background of the price segment leader? Let’s find out!
Air-based CPU coolers are manufactured by a score of companies nowadays, so new products are announced and released on a daily basis. However, it doesn’t seem possible to make a really big step forward in terms of cooling performance unless the manufacturers start using innovative materials and cutting-edge technologies. That’s why most new coolers are actually clones which can only differ from their respective originals in such details as fans or a couple of original features that are usually meant to attract the potential customer rather than increase the product’s efficiency or reduce its noise. One such cooler is Cooler Master’s X6 Elite. We’ll take a look at it in this review.
Packaging and Accessories
The cooler is shipped in a medium-sized box designed in Cooler Master’s traditional style.
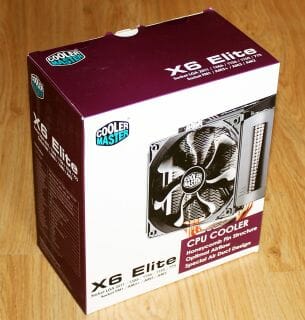
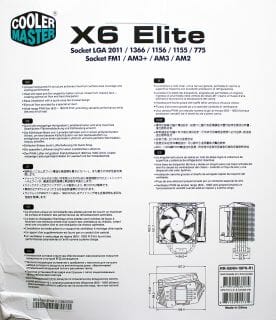
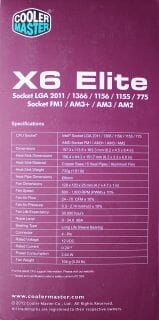
The X6 Elite is depicted on the front of the box whereas the back and side panels provide you a list of compatible CPU sockets, a description of key product features and the cooler’s specifications.

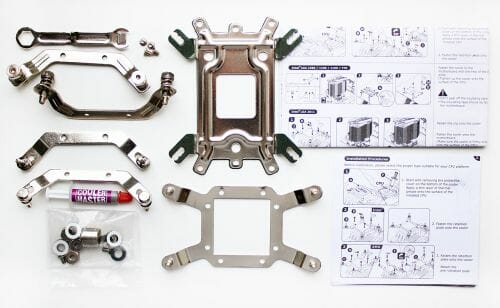
The cooler is laid on a polyurethane-foam tray inside the box. Its accessories are on top of it, including fasteners, a key, some thermal grease and user guides.
The recommended price of the Cooler Master X6 Elite is $42.99. Its warranty period is 2 years. It is manufactured in China. Cooler Master also offers an ordinary version of the X6 which differs from the Elite version in such details as the fan, the nickel plating of the base and heat pipes, and the plastic cap.
Design and Functionality
Let’s now take a closer look at the new product from Cooler Master.
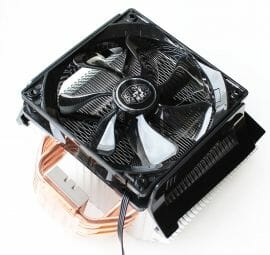
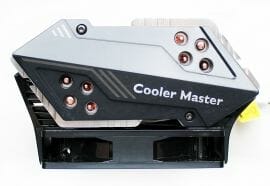
It is an attractive-looking tower-design cooler that weighs 836 grams and measures 163.3 x 157.3 x 113.8 millimeters.
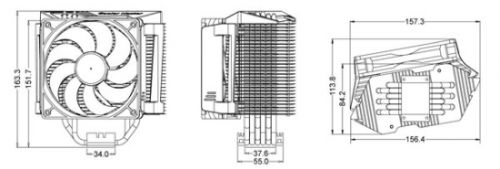
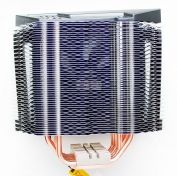
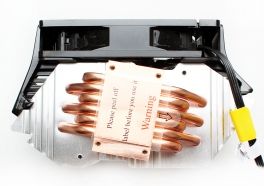
It is based on six copper heat pipes, 6 millimeters in diameter, which pierce a copper base. There are 54 aluminum fins, 0.5 mm thick and 1.8 mm apart from each other, press-fitted on the pipes.
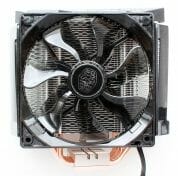
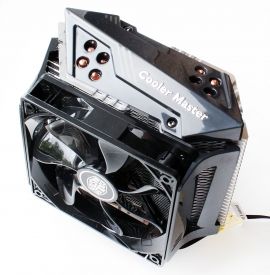
A 120mm fan is installed on one side of the heatsink. The latter is topped by a decorative plastic cap with the manufacturer’s name.
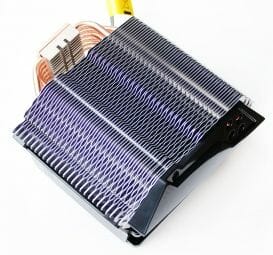
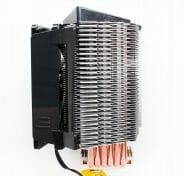
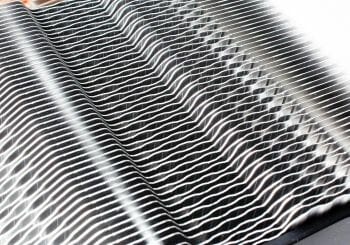
We can see three special features in the X6 Elite design. First of all, its heatsink has a honeycomb structure: the fins are bent in such a way as to resemble honeycomb cells. Cooler Master claims that this helps enlarge the heatsink’s useful area by 20% and improve the cooler’s performance.
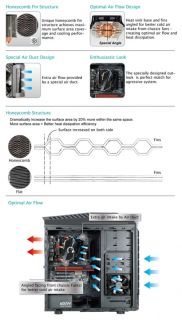
The second key feature of the X6 Elite is that the base is turned around relative to the heatsink fins. When installed, the cooler is not going to face the back or top panel of the system case directly, but will take an in-between position instead. Again, Cooler Master claims that this ensures more optimal air flows and, consequently, higher cooling performance.
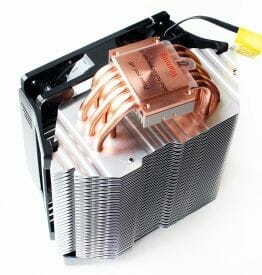
On the other hand, we must note that the fins are simply press-fitted on the pipes while the pipes are connected to the base with thermal glue. These are the cheapest and simplest, yet also the least efficient, means of connecting metallic parts in CPU coolers.
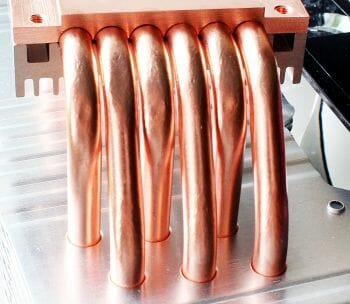
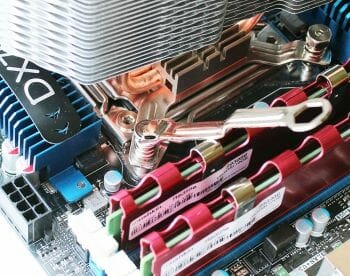
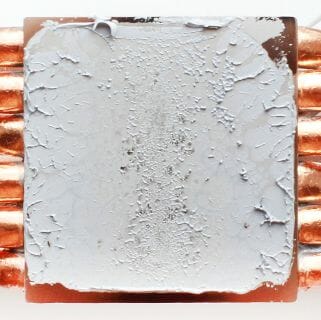
The heat pipes are shifted relative to each other in the heatsink, which is a popular solution. The cooler’s copper base is finished well, even though not to a mirror shine:
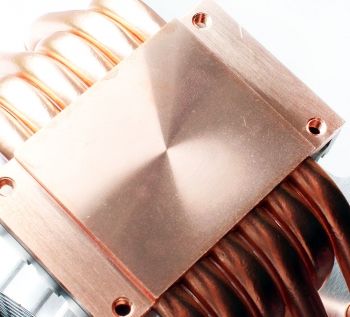
More importantly, the contact surface of the cooler’s base, measuring 36×34 millimeters, is exceptionally flat. The thermal grease imprint is just perfect.
Now, the third key feature of the X6 Elite is called Air Duct (they might have called it “f-duct” as an allusion to the F1 Mercedes Petronas AMGF W03). It refers to the two plastic pieces on the fan that are also used for fastening the latter.
These plates are supposed to form two additional tunnels for the outside air to flow into the heatsink from the sides. The explanation looks dubious to us, though, because the fan might be installed on conventional silicone pins so that the sides of the heatsink were open to get as much air as needed.
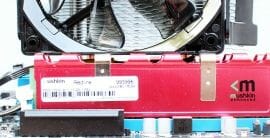
The speed of the 120mm XtraFlo series fan is PWM-regulated from 600 to 1800 RPM producing an air flow of 24 to 70 CFM at 9 to 34.6 dBA of noise. The fan can produce a static pressure of 0.3 to 2.14 millimeters of water. The sleeve bearing is specified to last 30,000 hours (or 3.4 years) continuously. The electrical specs can be read from the fan’s label:
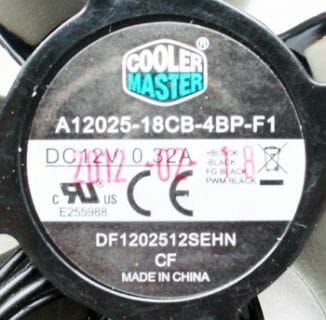
We can only add that the fan could start up at 6.5 volts and consumed no more than 3.8 watts. Its 4-pin cable is 300 millimeters long.
Compatibility and Installation
The Cooler Master X6 Elite is compatible with every modern PC platform. The installation procedure is detailed in the included manual. You can download an electronic version of the manual from the official website (2.5 MB PDF file).
It was very easy to install the cooler on our LGA2011 testbed. First, you attach the included fasteners to the cooler’s base. They already have spring-loaded screws at their ends.
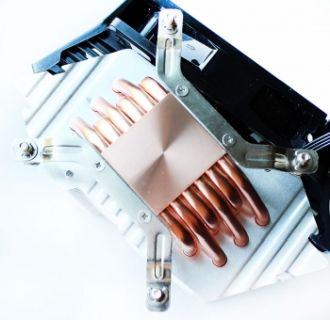
Then you apply some thermal grease, mount the cooler on the CPU and fasten it with the included key.
That’s all! The X6 Elite is ready to work on your CPU. The distance from the bottom fin of the cooler’s heatsink to the mainboard is 50 millimeters, but the fan hangs 5 millimeters lower and touches the low-profile heatsinks on the memory modules in the two nearest slots.


Otherwise, the Cooler Master X6 Elite had no conflicts on our mainboard.

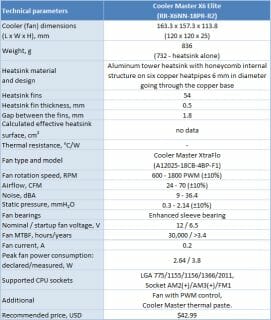
Technical Specifications and Recommended Pricing
Testbed Configuration and Testing Methodology
We tested all coolers inside a closed system case with the following configuration:
- Mainboard: Intel Siler DX79SI (Intel X79 Express, LGA 2011, BIOS 0494 from 04/24/2012);
- CPU: Intel Core i7-3960X Extreme Edition, 3.3 GHz, 1.2 V, 6 x 256 KB L2, 15 MB L3 (Sandy Bridge-E, C1, 32 nm);
- Thermal interface: ARCTIC MX-4;
- Graphics card: Asus Radeon HD 6770 DirectCU Silent (EAH6770 DCSL/2DI/1GD5) GDDR5 128 bit, 850/4000 MHz (with a passive heatsink from the DeepCool V4000 VGA cooler);
- System memory: DDR3 4 x 4GB Mushkin Redline (Spec: 2133 MHz / 9-11-10-28 / 1.65 V);
- System drive: Crucial m4 256 GB SSD (SATA-III,CT256M4SSD2, BIOS v0009);
- Drive for programs and games: Western Digital VelociRaptor (300GB, SATA-II, 10000 RPM, 16MB cache, NCQ) inside Scythe Quiet Drive 3.5” HDD silencer and cooler;
- Backup drive: Samsung Ecogreen F4 HD204UI (SATA-II, 2 TB, 5400 RPM, 32 MB, NCQ);
- System case: Antec Twelve Hundred (front panel: three Noiseblocker NB-Multiframe S-Series MF12-S2 fans at 1020 RPM; back panel: two Noiseblocker NB-BlackSilent PRO PL-1 fans at 1020 RPM; top panel: standard 200 mm fan at 400 RPM);
- Control and monitoring panel: Zalman ZM-MFC3;
- Power supply: Xigmatek “No Rules Power” NRP-HC1501 1500 W (with a default 140 mm fan).
For the primary tests and summary diagrams we overclocked our six-core processor with the clock generator frequency set at 125 MHz, the multiplier set at 35x and “Load-Line Calibration” enabled to 4.375 GHz. The nominal processor Vcore was increased to 1.385 V in the mainboard BIOS. After that we tested the new cooler at even higher frequency and voltage settings. Turbo Boost was disabled during this test session, and Hyper-Threading technology was enabled to increase the heat dissipation. The memory voltage was at 1.65 V and its frequency was 2000 MHz with 9-10-10-28 timings. All other parameters available in the mainboard BIOS and related to CPU or memory overclocking remained unchanged.
All tests were performed under Windows 7 Ultimate x64 SP1 operating system. We used the following software during our test session:
- LinX AVX Edition version 0.6.4 – to load the processor (memory – 4500 MB, Problem Size – 24234, two 11-minute cycles);
- Real Temp GT version 3.70 – to monitor the processor core temperatures;
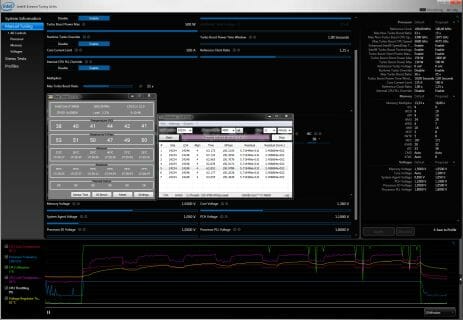
- Intel Extreme Tuning Utility version 3.1.201.5 – for monitoring and visual control of all system parameters during overclocking.
So, the complete screenshot during the test session looks as follows:
The CPU was loaded with two consecutive LinX AVX test runs with the settings as indicated above. The stabilization period for the CPU temperature between the two test cycles was about 8-10 minutes. We took the maximum temperature of the hottest CPU core for the results charts. Moreover, we will also provide a table with the temperature readings for all cores including their average values. The ambient temperature was checked next to the system case with an electronic thermometer with 0.1 °C precision that allows hourly monitoring of the temperature changes over the past 6 hours. The room temperature during our test session varied between 24.8-25.4°C.
The noise level of each cooler was measured between 1:00 and 3:00 AM in a closed room about 20 m2 big using CENTER-321 electronic noise meter. The noise level for each cooler was tested outside the system case when the only noise sources in the lab were the cooler and its fan. The noise meter was installed on a tripod and was always at a 150 mm distance from the cooler fan rotor. The tested cooling systems were placed at the edge of the desk on a sheet of polyurethane foam. The lowest noise reading our noise meter device can register is 29.8 dBA and the subjectively comfortable noise level in these testing conditions was around 36 dBA (do not mix it up with low noise level). The fan(s) rotation speed was adjusted in the entire supported range using our in-house controller by changing the voltage with 0.5 V increment.
We are going to compare our today’s hero, Cooler Master X6 Elite, against our traditional leader in the sub-$45 segment – Thermalright TRUE Spirit 140 with one default TY-140 fan:
Cooler Master X6 Elite was also tested with an alternative fan – Scythe Slip Stream 140, but it didn’t improve the cooling efficiency in any way. The design of Cooler Master X6 Elite doesn’t allow installing a second fan. I would also like to add that the rotation speed of all fans was controlled using the same special controller I mentioned above with ±10 RPM precision.
Performance Tests
Cooling Efficiency
The results of our performance tests can be found in the table as well as in the following diagram:
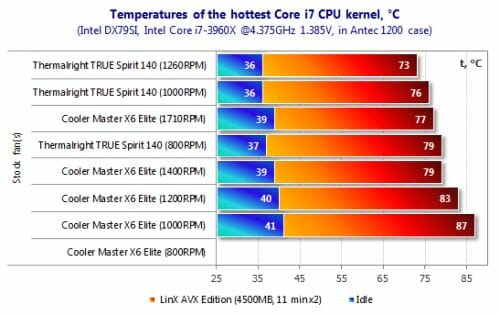
Like the recently tested Thermaltake Frio Advanced, the new Cooler Master X6 Elite cannot compete with the Thermalright TRUE Spirit 140 in performance, being inferior at any speed of the fans. The best that the X6 Elite can do is beat the TRUE Spirit 140 when the former works at the maximum 1720 RPM and the latter, at 800 RPM. Working at 1400 RPM, the X6 Elite equals the TRUE Spirit 140 at 800 RPM. On the other hand, when both coolers work at the maximum speed of their fans, the difference is only 4°C, which is not too much. But at the minimum 800 RPM the X6 Elite couldn’t cope with our six-core CPU overclocked to 4375 MHz and thus fell behind the TRUE Sprit 140 by more than 12°C.
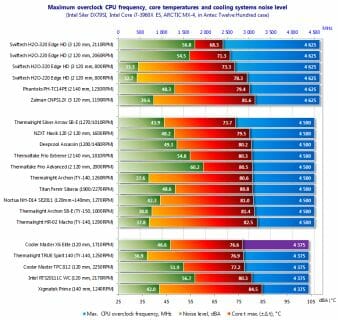
You can compare it with products we tested previously in the following table and diagram. Each cooler was tested in its default configuration in the quiet mode and at the maximum speed of the fan(s) with the CPU overclocked to 4.375 MHz at a voltage of 1.385 volts.
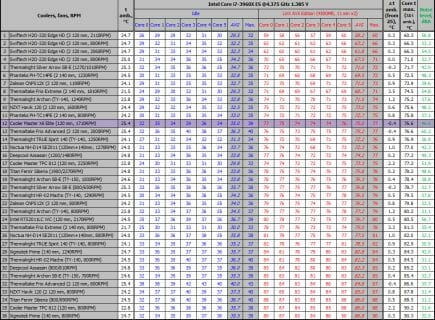
Despite its unassuming performance, the Cooler Master X6 Elite is quite high up in the standings. Considering the noise factor, it is better than the Thermaltake Frio Advanced, for example. But, unlike the Thermaltake, the Cooler Master couldn’t keep the CPU stable at the higher clock rate and voltage. Therefore, the table and diagram with the best overclocking results look like this:
Acoustic Performance
We measured the noise level of our coolers throughout the entire speed range of their fans. Here are the results.
We’ve mentioned the Thermalright Frio Advanced above, so we include it into this diagram for the sake of comparison. Unfortunately, the Cooler Master X6 Elite is unable to please us with silence. According to the graph, its fan should rotate at 750 RPM to be subjectively comfortable, but the cooler can’t be silent at any speed of the fan. The problem is the rattling of the fan. The rattle can be heard at any speed, even at low ones. This must be a defect of our particular sample because the same fan in the Cooler Master Hyper 212 EVO used to be much quieter. Anyway, this is an unpleasant fact. The X6 Elite is quieter than the Thermaltake Frio Advanced at 900-1000 RPM but the rattle is there still.
Conclusion
The Cooler Master X6 Elite is yet another mediocre cooler. It has a uniquely shaped heatsink and fins, a cute PWM-regulated fan and a stylish plastic cap. It supports all modern platforms and features a simple and reliable fastening mechanism. Unfortunately, its cooling performance is just average while its noise level is rather high due to a rattling fan. On the other hand, the Cooler Master X6 Elite is preferable to the Thermaltake Frio Advanced thanks to its lower price and somewhat higher performance. It is sad that Cooler Master didn’t solder the parts of the cooler to each other instead of using press fitting and thermal glue as this might have made it far more efficient. As it is now, we have doubts whether the X6 Elite can be interesting to end users.