Asus P8Z77-V Mainboard Review: Mainstream LGA 1155 Mainboard from Asus

The functionality and features of this mainboard could have been fit for a flagship board of the past, but today it is just enough to place this product in the very mainstream segment, making it the junior model from Asus on Intel Z77 Express chipset. And it is probably the first time that we see wireless support implemented in a far not the top mainboard model like that.
In our recent reviews of LGA1155 mainboards we focused on entry-level models, but the ASUS P8Z77-V that we’re going to discuss today is neither simple nor inexpensive. There is logic in our choice of the subject, though. This model has the same name as the numerous family of ASUS mainboards based on the Intel Z77 Express chipset but has no index like Pro, Deluxe or Premium, which distinguish top-end products, and no index like LX, LK or LE, which mark entry-level mainboards in ASUS’s product range. Thus, the ASUS P8Z77-V can be viewed as the junior model among the top-end ones. It also seems to be the basic mainboard for the entire family, that’s why we are interested in its capabilities. Packaging and Accessories
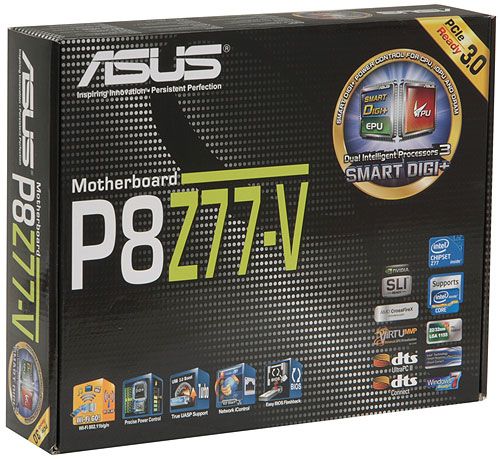
The ASUS P8Z77-V is shipped in a standard box whose design is unified for the entire series. The mainboard’s name is printed in large letters on the front together with logos of its technologies and features. On the back of the packaging we can see a picture of the mainboard, a brief list of its specifications and some information about its key features.
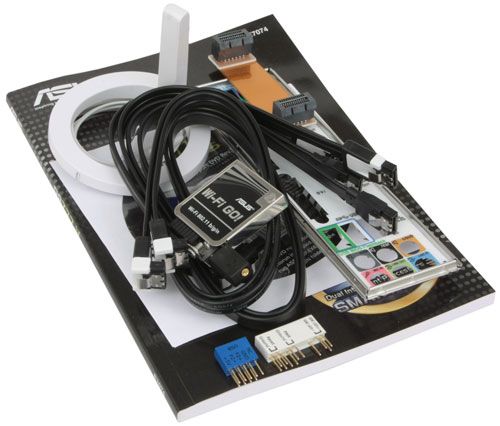
The product comes with a surprising number of accessories which include:
- Four Serial ATA cables with metal connector locks, two of which are specifically designed for SATA 6 Gbps devices (with white inserts in the connectors);
- A flexible bridge for two-way Nvidia SLI graphics configurations;
- “Asus Q-Connector” kit including adapters for easy connection of the system case front panel buttons and indicators and a USB 2.0 port;
- Wi-Fi GO! Module;
- Wi-Fi ring antenna;
- I/O Shield for the back panel;
- User manual;
- “Exclusive Features” brochure with instructions for Wi-Fi GO!, Fan Xpert 2, Network iControl and USB Charger+ utilities;
- “Exclusive Boot Features” brochure with instructions for Fast Boot, Asus Boot Setting, Direct BIOS Access and Windows 8 BIOS Boot Settings functions;
- Wi-Fi GO! manual;
- A brief assembly guide with instructions in several languages;
- DVD disk with software and drivers;
- “Powered by Asus” sticker for the system case.
Nearly all of them are included with some other ASUS mainboards. The only new addition is the Exclusive Boot Features brochure which contains information about Fast Boost, ASUS Boot Setting, Direct BIOS Access and Windows 8 Boot Settings.
Design and Functionality
The ASUS P8Z77-V can please with eye with its classic design. There’s nothing extraordinary about it, yet we can find a number of divergences from the top-end ASUS solutions like the P8Z77-V Premium or P8Z77-V Deluxe as well as from the entry-level P8Z77-V LK and P8Z77-V LX.
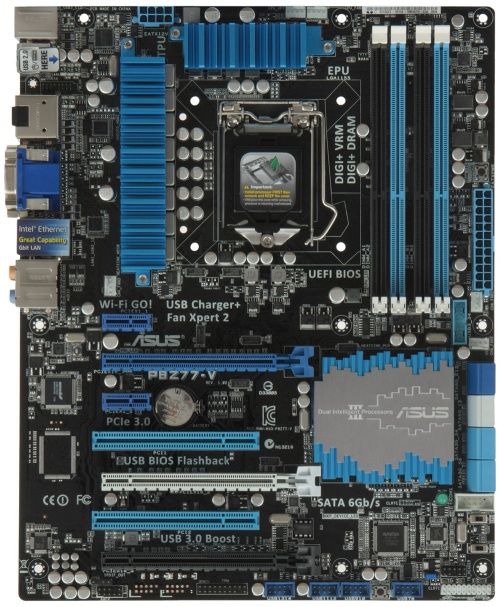
Compared to the less advanced models, the power system is reinforced, incorporating eight CPU power phases. There are four more phases for the CPU-integrated graphics core and two phases for system memory. The hottest components are cooled with heatsinks which are securely fastened with screws. This SMART Digi+ voltage regulator works together with Dual Intelligent Processors 3: TurboV Processing Unit and Energy Processing Unit. As a result, there is a large number of setup options in the BIOS’s Digi+ Power Control page.
The mainboard’s disk subsystem capabilities are enhanced, too. Besides the chipset’s four SATA 3 Gbit/s (blue connectors) and two SATA 6 Gbit/s (gray connectors) ports, an additional ASMedia ASM1061 controller is responsible for two more SATA 6 Gbit/s ports (dark-blue). The two PCIe 3.0/2.0 x16 slots support multi-GPU configurations based on AMD CrossFireX and Nvidia SLI technologies, sharing 16 CPU-integrated PCIe lanes. The black-colored PCIe 2.0 x16 slot can be used for a graphics card, too, but at x4 speed. There are also two PCIe 2.0 x1 and two PCI slots for expansion cards.
As opposed to its more advanced cousins, the ASUS P8Z77-V has no additional PCIe switches, so there are certain limitations concerning its PCIe lanes. For example, the additional ASMedia ASM1061 controller is attached to the same PCIe lane as the second PCI Express 2.0 x1 slot, so you can use either one or another, but not both of them simultaneously. That’s not a big problem, though, because a discrete graphics card is going to block the second PCIe 2.0 x1 slot with its cooler anyway. The third PCIe 2.0 x16 slot (black) can work at x4 speed but defaults to x1 because it shares its PCIe lanes with the PCIe 2.0 x1 slots and the additional ASMedia ASM1061 controller. You should be aware of these restrictions if you’re going to build a multi-GPU configuration.
The ASUS P8Z77-V is shipped with a Wi-Fi GO! module which is not available at all with entry-level models. Top-end ASUS mainboards come with a different version of it, which supports 2.4 and 5GHz frequency bands at speeds up to 300 Mbps and additionally provides Bluetooth. The Wi-Fi GO! module of the P8Z77-V only works at 2.4 GHz and supports data-transfer rates up to 150 Mbps using Wi-Fi 802.11b/g/n. It’s easy to tell the two versions of the wireless module apart: the more advanced module has two external antennas while the other, only one.
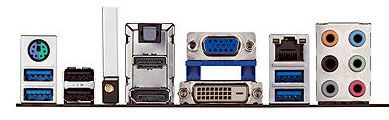
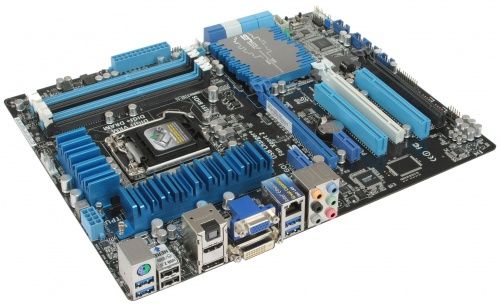
The following connectors are available on the mainboard’s back panel:
- Universal PS/2 connector for keyboard and mouse;
- Four USB 3.0 ports (blue connectors), two of which are implemented via ASMedia ASM1042 controller. Another two ports and one more internal pin-connector for two additional USB 3.0 ports are provided by Intel Z77 Express chipset;
- Two USB 2.0 ports, another eight ports are laid out as four onboard pin-connectors;
- Wi-Fi GO! Module;
- D-Sub, DVI-D, HDMI and DisplayPort video outs;
- A local network port (network adapters are built on Gigabit Intel 82579V controller);
- An optical S/PDIF and six analogue audio-jacks provided by eight-channel Realtek ALC892 codec.
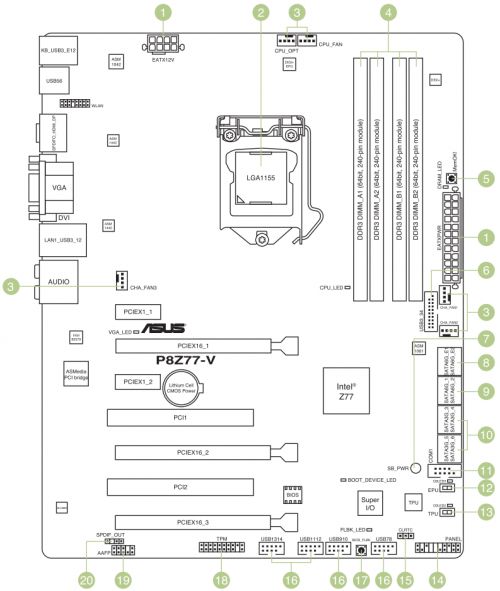
Like many other ASUS mainboards, this model has broad and handy Q-Slot latches on its graphics slots and single-sided Q-DIMM larches on the memory slots. As opposed to the more advanced models, it lacks Power, Reset and Clear CMOS buttons, but has a USB BIOS Flashback button (which enables the namesake BIOS update feature) and a MemOK! button (which allows the mainboard to start up successfully in case of problems with system memory). The mainboard doesn’t offer a POST indicator, but the Q-LED indicators (CPU, DRAM, VGA, Boot Device) can help you quickly understand at what stage the startup process has been halted.
The TPU (TurboV Processing Unit) switch can be used to overclock the CPU automatically while the EPU (Energy Processing Unit) switch enables power-saving modes. The mainboard offers five fan connectors, all of which are of the 4-pin variety. Two of them are meant for CPU fans and can only regulate 4-pin fans. The system fan connectors can lower the speed of both 4-pin and 3-pin fans.
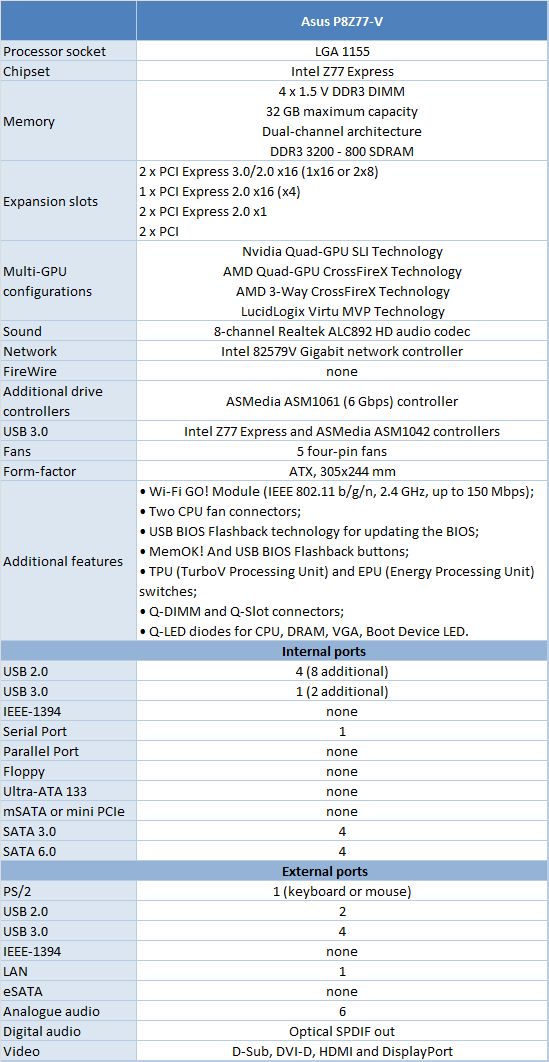
For your convenience we summed all the technical specifications up in the following table:
BIOS Functionality
In our previous reviews of Asus products we have already talked about Asus EFI BIOS – an overall very successful implementation of the UEFI standard (Unified Extensible Firmware Interface). Therefore today we are going to briefly refresh your memory of the major BIO sections and their parameters and settings.
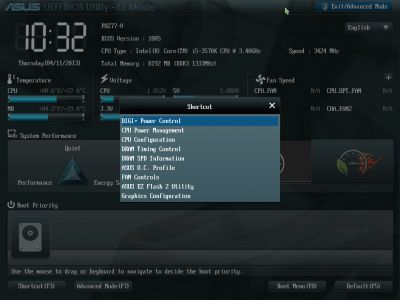
By default, there is “EZ Mode” enabled in the BIOS. It performs mostly informational functions, because there are barely any configurable parameters there. You can check the basic system settings, some monitoring data, select an energy-efficient or performance mode and set the order of boot-up devices by simply dragging and dropping them with the mouse pointer.
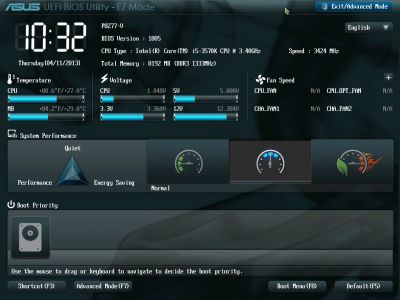
You can quickly switch from “EZ Mode” to “Advanced Mode” by pressing F7, or use the F3 hot key to jump over to one of the most frequently used BIOS sections.
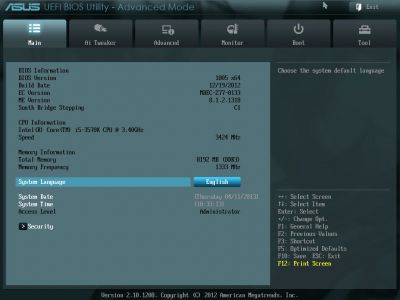
You can switch from “EZ Mode” to “Advanced Mode” every time you enter the BIOS, or press F3 key which also works if pressed while in any other BIOS section, yet it could be much more convenient if you made “Advanced Mode” a default setting. In this case the first section you see will be the familiar “Main” section, where you can receive some basic system information, change the interface language and set up date and time. In the “Security” sub-section you can set the user and administrator passwords.
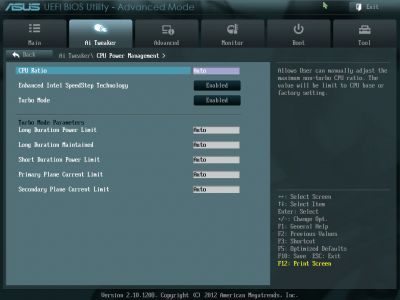
Most of the overclocking-related options are traditionally gathered in the “Ai Tweaker” section. The main section window allows you to change the frequencies, multipliers and voltages. You don’t need to go over to the “Monitoring” section to check the current voltages, as they are all listed right here next to each of the parameters used for changing these voltages, which is highly convenient. The voltages may be set above or below their nominal values.
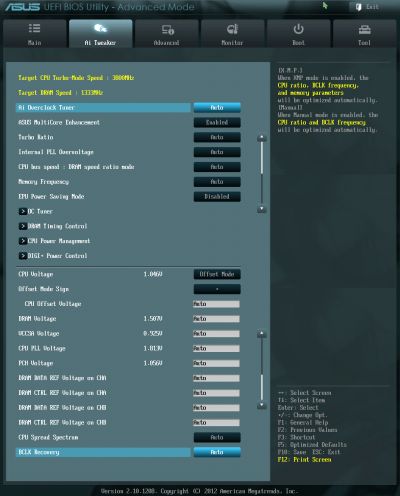
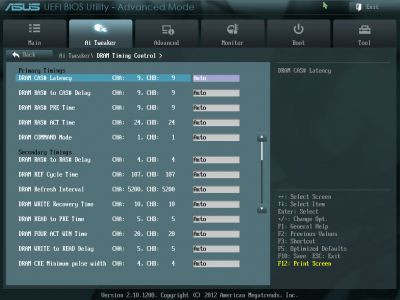
As usual, some parameters are singled out into individual sub-sections in order to unload the main section a little bit. “OC Tuner” parameter only looks like a sub-section, but in reality it helps to automatically overclock the system. The memory timings can be configured on an individual page. They are indeed very numerous, but still very easy to work with. You can see all timings that the mainboard sets for each of the two memory channels. And you can adjust only a few selected timings, such as the main ones, for example, leaving all other settings at defaults.
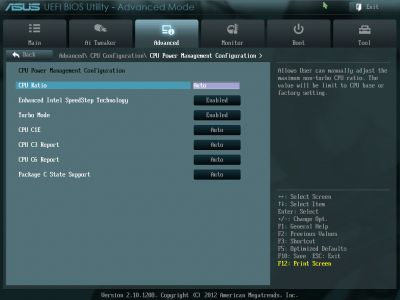
The “CPU Power Management” sub-section allows configuring the parameters affecting “Intel Turbo Boost” technology. However, you do not have to do that, because the board will automatically adjust everything to match your selected overclocking goals.
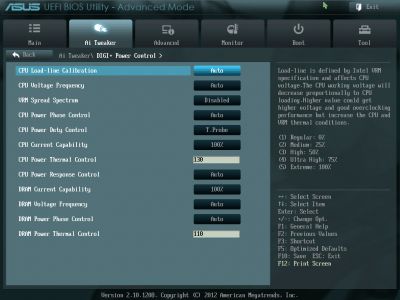
You can’t help noticing numerous options related to the power and energy-efficiency of the digital DIGI+ voltage regulator. You can configure Asus’ proprietary power-saving technologies that allow changing the number of active phases in the voltage regulator circuitry depending on the CPU utilization right in the BIOS. “CPU Load-Line Calibration” technology that prevents the CPU Vcore from dropping under heavy load may be not only enabled or disabled, but also adjusted to deliver the desired effect.
The functionality of the parameters in the sub-sections of the “Advanced” section is pretty self-explanatory.
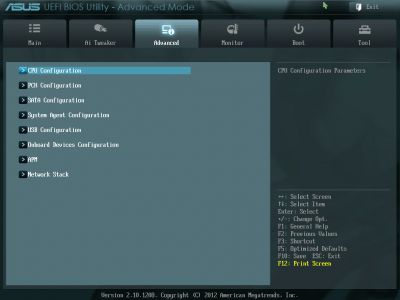
The “CPU Configuration” sub-section reports the basic info about the processor and allows managing some processor technologies.
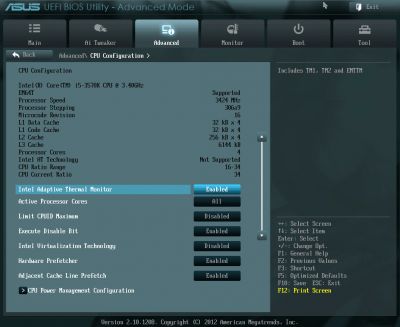
All parameters related to power-saving are singled out on a separate page called “CPU Power Management Configuration”.
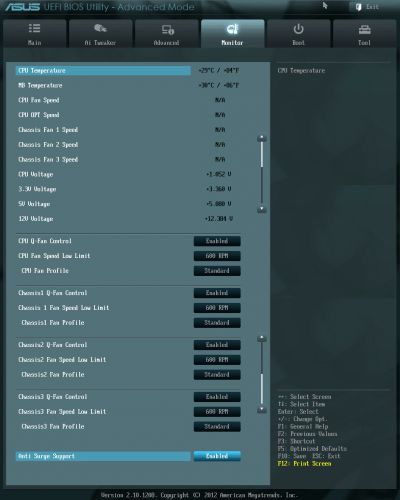
“Monitor” section tells us the current temperatures, voltages and fan rotation speeds. You can select one of the preset modes for the processor and two case fans from a pretty standard list including “Standard”, “Silent” and “Turbo” modes. You can also select the parameters manually. Unfortunately, both processor fans can only be adjustable if they have four-pin connectors.
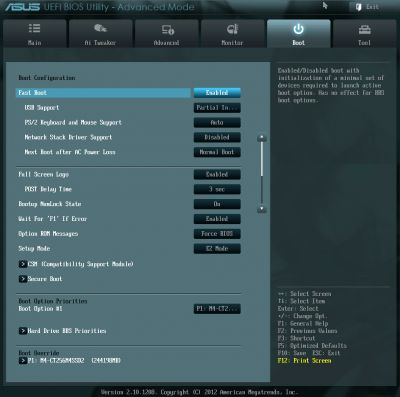
The “Boot” section allows you to adjust your boot-up parameters that will be applied on system start-up. By the way, this is where you have to replace the default “EZ Mode” with “Advanced Mode”.
Now let’s quickly refresh the functionality of the “Tools” section.
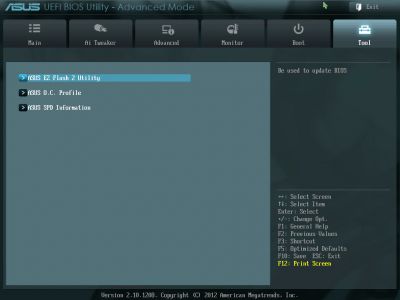
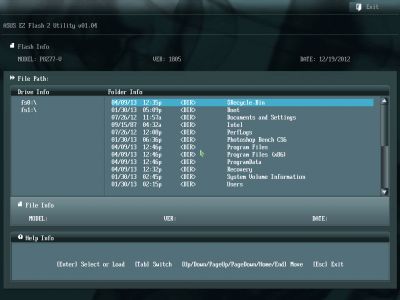
The built-in “EZ Flash 2” utility for BIOS reflashing is one of the most convenient and functional programs of the kind. Unfortunately, they have eliminated the option that allowed saving the current BIOS version before reflashing a new one.
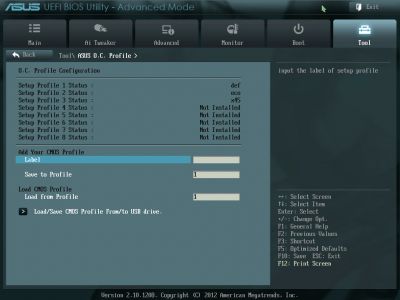
Asus mainboards allow saving and then quickly loading eight full BIOS settings profiles. Each profile may be given a brief descriptive name reminding you of its contents. They still haven’t fixed the issue that doesn’t allow you to save disabling of the startup image in the settings profile, but they brought back the ability to exchange BIOS settings profiles with other users, which was lost upon transition to the EFI BIOS. From now on the profiles may be saved onto external media and loaded from them.
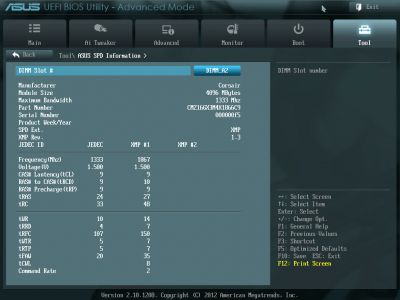
Just like on mainboards from many other makers we can read the information in the memory modules SPD, including the XMP (Extreme Memory Profiles).
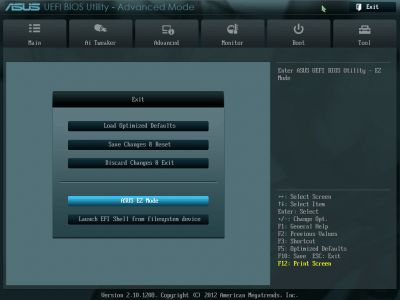
The last section is called “Exit”. Here you can apply the changes, restore the defaults or go back to the “EZ Mode”.
Testbed Configuration
We carried out our tests on a testbed that included the following components:
- Asus P8Z77-V rev. 1.02 mainboard (LGA 1155, Intel Z77 Express, BIOS version 1805);
- Intel Core i5-3570K CPU (3.6-3.8 GHz, 4 cores, Ivy Bridge rev.E1, 22nm, 77 W, 1.05 V, LGA 1155);
- 2 x 4 GB DDR3 SDRAM Corsair Vengeance CMZ16GX3M4X1866C9R (1866 MHz, 9-10-9-27 timings, 1.5 V voltage);
- Gigabyte GV-R797OC-3GD graphics card (AMD Radeon HD 7970, Tahiti, 28 nm, 1000/5500 MHz, 384-bit GDDR5 3072 MB);
- Crucial m4 SSD (CT256M4SSD2, 256 GB, SATA 6 Gbps);
- Noctua NH-D14 CPU cooler;
- ARCTIC MX-2 thermal interface;
- Enhance EPS-1280GA 800 W PSU;
- Open testbed built using Antec Skeleton system case.
We used Microsoft Windows 8 Enterprise 64 bit (Microsoft Windows, Version 6.2, Build 9200) operating system, Intel Chipset Device Software driver package version 9.3.0.1026, AMD Catalyst 13.1 graphics card driver.
Operational and Overclocking Specifics
Today’s mainboards are generally well-designed and user-friendly products and you don’t have to install a lot of expansion card but can limit yourself to the graphics card only. So it was quick and easy for us to put our testbed together. We didn’t even have to update the mainboard’s BIOS since it had come to us with the latest version 1805.
By the way, the P8Z77-V offers the USB BIOS Flashback feature which is missing on its junior cousins (and on other manufacturers’ mainboards, too). Some mainboards require that you install an OS to update their BIOS because they lack a BIOS-integrated update tool but here you don’t even have to assemble your PC – no CPU, no memory and no monitor is required. You only have to connect the power, attach a USB flash drive with firmware to a mainboard’s USB port, press the USB BIOS Flashback button and wait for the update procedure to complete. This solution solves a lot of BIOS-related stability and compatibility problems, like when the system wouldn’t start up because the mainboard couldn’t identify your latest CPU. USB BIOS Flashback is going to save you a lot of trouble in such cases whereas ASUS and its tech support may have some rest.
There are two things you should know about this feature, though. The first one is that the flash drive must be connected to a certain USB port. It is mentioned in the user manual and indicated on the included I/O shield, so that you didn’t miss it. And the second thing is that you have to rename the firmware file you copy to your flash drive. For example, the file with the latest BIOS for the P8Z77-V is called “P8Z77-V-ASUS-1805.CAP” but you have to rename it into P8Z77V.CAP for the USB BIOS Flashback feature to recognize it. It’s easy and the renaming rules are described in the document “Z77/H77 BIOS Renaming Rule for USB Flashback”, downloadable from the ASUS website, but you can also use a simple program for that. It’s called “Bios Renamer for USB BIOS Flashback”. Just copy it to the folder with your new BIOS file, launch it and it will rename the file as necessary.
When starting up, the ASUS P8Z77-V shows a standard ASUS picture where we’ve already despaired to find any hotkey prompts besides the Del key which can be pressed to load the BIOS interface.
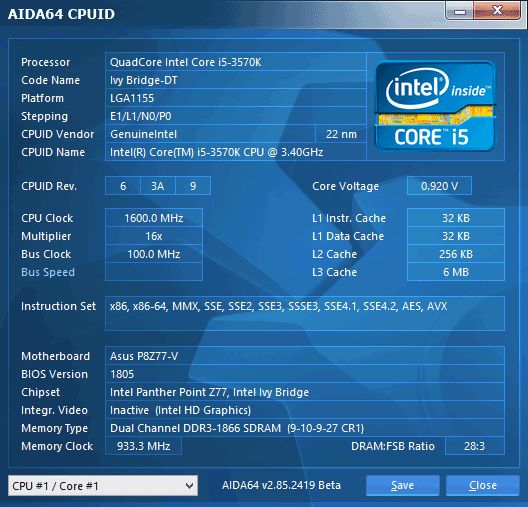
If the startup picture is disabled, the mainboard reports the amount and clock rate of system memory correctly but shows the default rather than the real clock rate for the CPU. ASUS’s Republic of Gamers products don’t have this problem and it’s odd that it persists with ordinary ASUS mainboards. Another long-time error is that your turning off the startup picture is not saved in BIOS profiles. This is typical of all ASUS mainboards irrespective of the particular series (standard, Republic of Gamers or The Ultimate Force).

Well, today’s mainboards start up so fast that it’s hard not only to read what they output on the screen but even to press the button to enter their BIOS. That’s why the ASUS P8Z77-V comes with the Exclusive Boot Features brochure which describes features like Fast Boot, ASUS Boot Setting, Direct BIOS Access and Windows 8 BIOS Boot Settings. As you know from our ASUS P8Z77-V LK review, the ASUS Boot Setting utility can be used to automatically load the BIOS interface from Windows. As for us, we just turned off the Fast Boost option in the mainboard’s BIOS (it’s in the Boot section) for the duration of our tests.
In our review of the Gigabyte GA-Z77-D3H we called it a problem-free mainboard. The same can be said about the ASUS P8Z77-V. All of the power-saving technologies available in Intel CPUs are enabled on it by default and work correctly. Additionally, you can turn on EPU Power Saving Mode using a corresponding BIOS option or an onboard switch. The CPU worked at its default settings indeed, in full compliance with its official specs, and we could easily accelerate it by enabling ASUS MultiCore Enhancement, which increased the CPU’s frequency multiplier to the maximum level as normally permitted by the Intel Turbo Boost technology for single-threaded load only. To reach higher performance, you can also use the OC Tuner option, which overclocks the CPU automatically, but we tried to find optimal settings manually and easily made the CPU stable at its maximum clock rate of 4.6 GHz. We also increased the memory frequency to 1866 MHz and adjusted memory timings as was necessary.

We want to remind you that we prefer “sustained” overclocking, which means that the overclocked system can be used continuously. We don’t disable any features or controllers. We keep Intel’s power-saving technologies up and running so they lower the CPU’s frequency multiplier and voltage, disable unused CPU subunits and switch the CPU into power-saving modes at low loads.
We only had one inconvenience with the ASUS P8Z77-V because, like the majority of other mainboards excepting ASRock and Gigabyte ones, ASUS mainboards cannot regulate 3-pin CPU fans. That’s why we had to use a Zalman ZM-MC1 adapter to adjust the speed of the CPU fans manually as we wanted.
Performance Comparison
As usual, we are going to compare the mainboards speeds in two different modes: in nominal mode and during CPU and memory overclocking. The first mode is interesting because it shows how well the mainboards work with their default settings. It is a known fact that most users do not fine-tune their systems, they simply choose the optimal BIOS settings and do nothing else. That is why we run a round of tests almost without interfering in any way with the default mainboard settings. For comparison purposes we also included the results from our review of the following mainboards: ASRock Z77 Extreme11, Asus P8Z77-V LK and Gigabyte GA-Z77-D3H. The results in the diagrams were sorted out in descending order and the numbers for Asus P8Z77-V are highlighted with a darker color for your convenience.
Nominal Mode
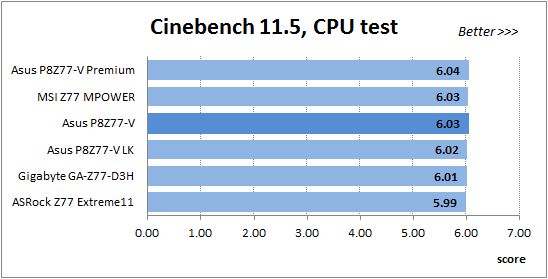
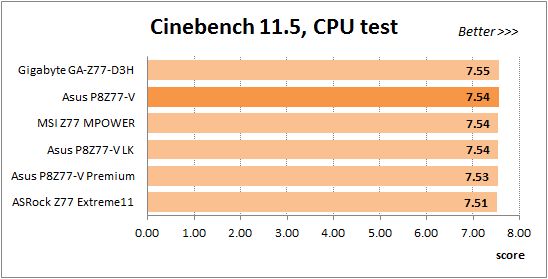
We used Cinebench 11.5. All tests were run five times and the average result of the five runs was taken for the performance charts.
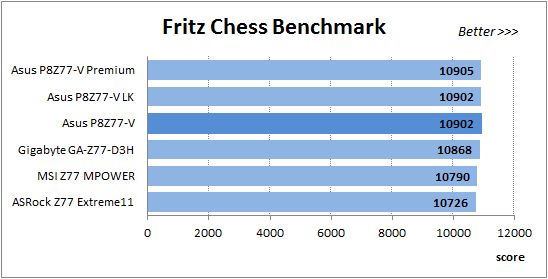
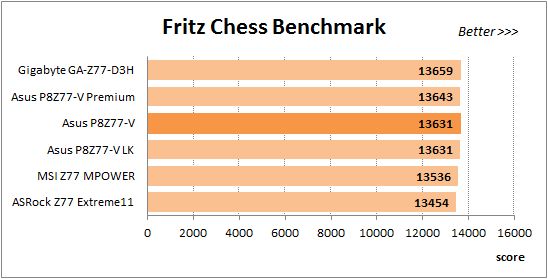
We have been using Fritz Chess Benchmark utility for a long time already and it proved very illustrative. It generated repeated results, the performance in it is scales perfectly depending on the number of involved computational threads.
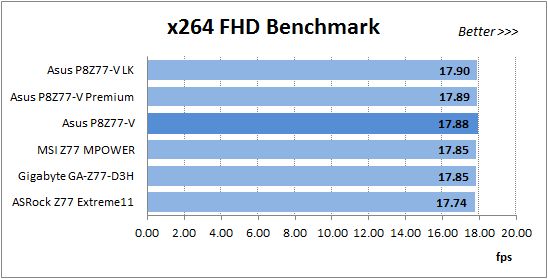
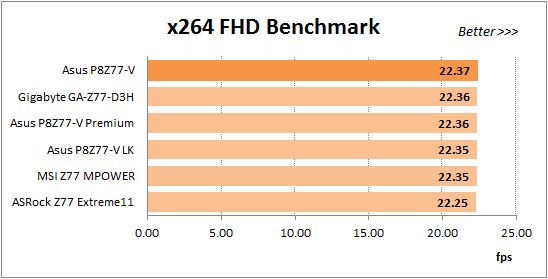
x264 FHD Benchmark v1.0.1 (64 bit) allows us to compare the system performance against the results in the database. The average results of the five test runs are displayed on the following diagram:
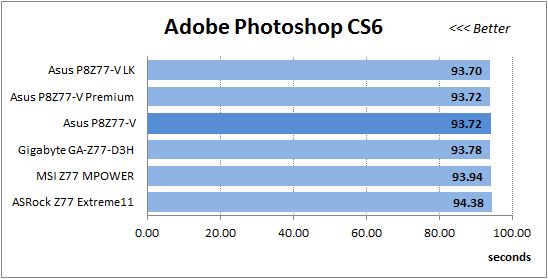
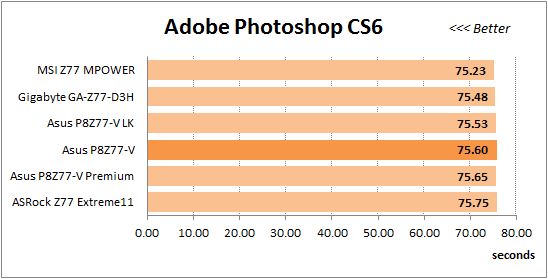
We measured the performance in Adobe Photoshop CS6 using our own benchmark made from Retouch Artists Photoshop Speed Test that has been creatively modified. It includes typical editing of four 24-megapixel images from a digital photo camera.
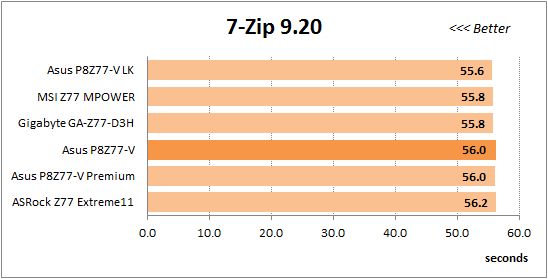
In the archiving test a 1 GB file is compressed using LZMA2 algorithms, while other compression settings remain at defaults.

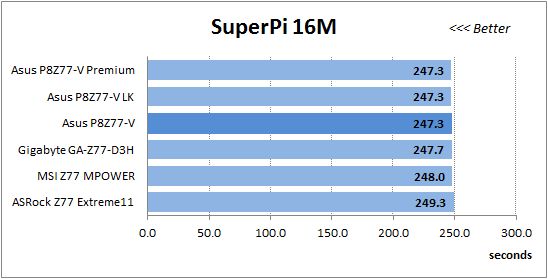
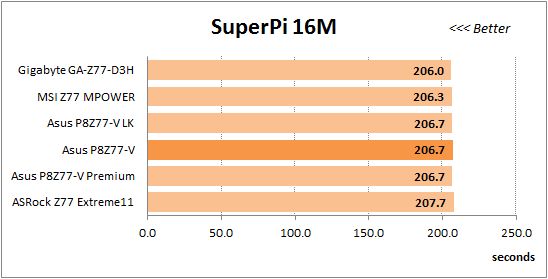
Like in the data compression test, the faster 16 million of Pi digits are calculated, the better. This is the only benchmark where the number of processor cores doesn’t really matter, because it creates single-threaded load.
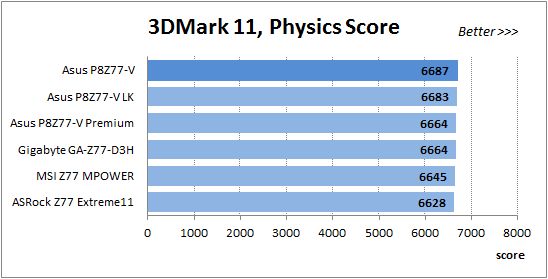
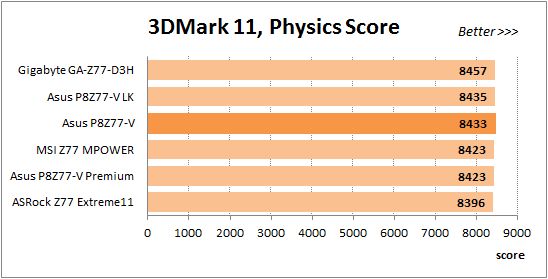
The next diagram shows only CPU tests from the 3DMark11 suite – Physics Score. This score is obtained in a special physics test that emulates the behavior of a complex gaming system working with numerous objects:
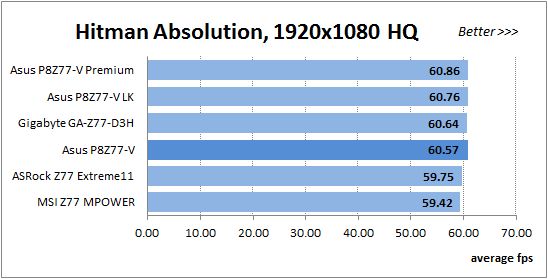
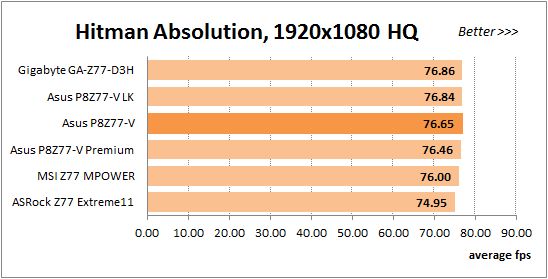
The benchmark integrated into the Hitman Absolution game turned out very convenient. It can be launched directly from the game, from the game launcher utility and even from the command prompt. In order to get the minimal acceptable results, we had to use the lowest image settings and use one of the lower resolutions.
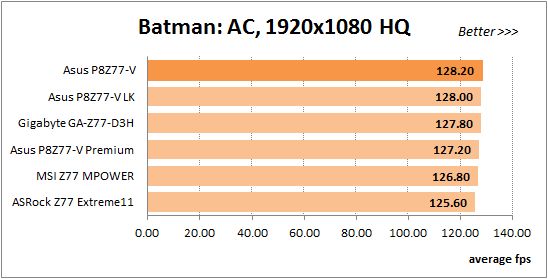
Batman: Arkham City game also reacts eagerly to any changes in the CPU clock frequency, but it uses DirectX 11. We ran game’s integrated benchmark five times with high image quality settings and then take the average of the five runs for the diagrams.
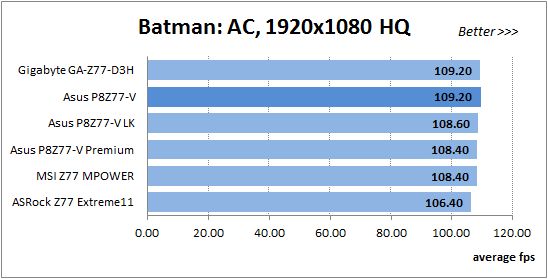
The P8Z77-V configuration can be the slowest (as in 7-Zip 9.20) or the fastest (as in 3DMark 11 Physics Score) among the tested platforms, but the difference is small in every case since similar mainboards are prone to deliver the same performance under identical conditions.
Overclocked Mode
As for overclocking, we test all the mainboards at the same settings for the sake of comparison. That’s why we choose the CPU clock rate of 4.5 GHz. However, the ASRock Z77 Extreme11, ASUS P8Z77-V and Gigabyte GA-Z77-D3H could actually overclock the CPU to 4.6 GHz, so they are going to have a small advantage in real life.
The overall picture remains the same. The ASUS P8Z77-V is still comparable to the other ASUS mainboards and doesn’t differ much from the other makers’ products.
Power Consumption
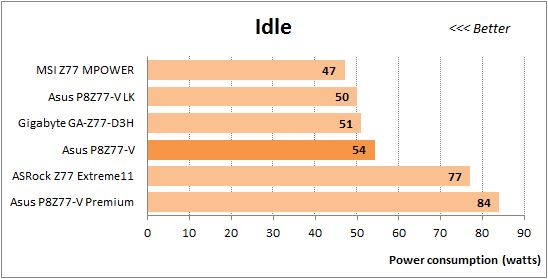
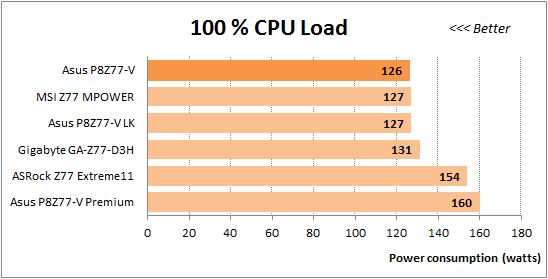
We performed our power consumption measurements using the same Extech Power Analyzer 380803. This device is connected before the PSU and measures the power draw of the entire system (without the monitor), including the power loss that occurs in the PSU itself. In the idle mode we start the system up and wait until it stops accessing the hard disk. The power consumption in case of single-threaded CPU load is measured while running the Pi-digits performance test, and in case of multi-threaded load – while running the Fritz Chess Benchmark test. We also used Hitman Absolution game to create complex load. The results on the diagrams are sorted out in ascending order and the results of Asus P8Z77-V are highlighted with darker color for your convenience.
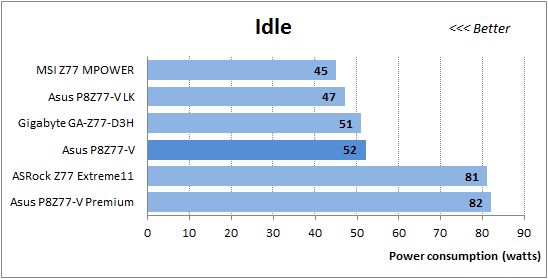
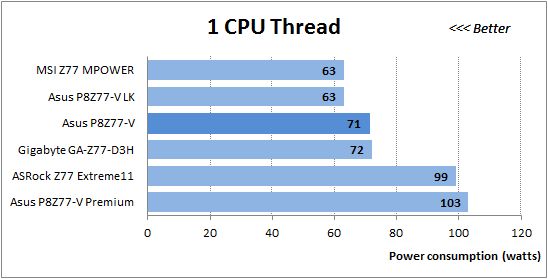
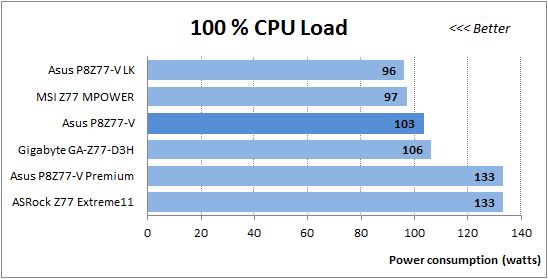

It is one of the advantages of the P8Z77-V mainboard that CPU-related power-saving technologies work correctly on it and are turned on by default. You don’t have to manually enable them. However, the power consumption of this model isn’t low. It is comparable to that of the Gigabyte GA-Z77-D3H and higher in comparison with the economical ASUS P8Z77-V LK and MSI Z77 MPOWER.
The ASUS P8Z77-V needs much less power than the flagship models from ASRock and ASUS but their power requirements are not typical of ordinary products because they have an additional PCI Express switch.
Now let’s compare how much power the systems need when overclocked.
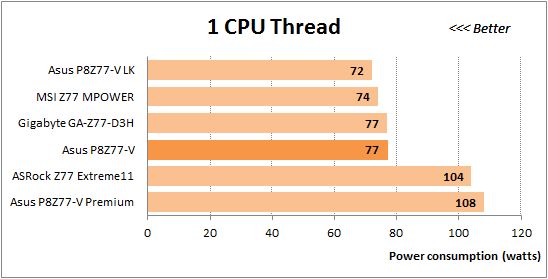
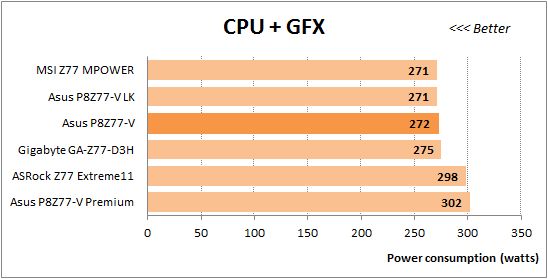
The results get closer to each other. The ASUS P8Z77-V expectedly needs less power than the two special models but its power draw is higher compared to the ASUS P8Z77-V LK and MSI Z77 MPOWER.
Conclusion
We mentioned a few downsides in our description of the P8Z77-V but most of them are typical of all or at least many other ASUS mainboards. We mean the uninformative startup picture and the wrong CPU clock rate reported during the POST procedure. Turning the startup picture off is not saved in BIOS profiles and the mainboard cannot regulate the speed of 3-pin CPU fans depending on temperature. We also mentioned certain limitations peculiar to this particular model. The chipset doesn’t offer too many PCIe lanes and the mainboard has no extra PCIe switches, so you have to compromise. You cannot use the third PCIe 2.0 x16 slot, the PCIe 2.0 x1 slots and the extra SATA 6 Gbit/s controller simultaneously. These downsides, however, are not so serious and do not interfere with the mainboard’s functionality.
As for advantages, the ASUS P8Z77-V comes with numerous accessories, has a user-friendly PCB design and offers a lot of capabilities. Its advanced digital power system SMART Digi+, working together with the Dual Intelligent Processors 3 technology, provides flexible voltage regulation options, which is important for good overclocking. The mainboard allows using a CPU-integrated graphics core but you can also run one or several discrete graphics cards, combining them in AMD CrossFireX or NVIDIA SLI configurations. The P8Z77-V features additional SATA 6 Gbit/s and USB 3.0 controllers. It has handy Q-DIMM and Q-Slot connectors, Q-LED indicators, MemOK! and USB BIOS Flashback technologies. Its capabilities would have made it a flagship product just a few years ago, but now you can get all this with a basic mainboard, which the least advanced of ASUS’s top-end Z77-based offers. It is also the first time we see such a humble product support wireless technologies. Thus, the P8Z77-V is going to make an optimal choice for many categories of users.
Choosing the junior model from among top-end offers often makes sense not only with mainboards but also with CPUs and graphics cards. The opposite approach can work, too: take the most advanced of entry-level products and you get about the same range capabilities. We’ll talk about one such mainboard in our upcoming review.
In conclusion we would like to award Asus P8Z77-V our Recommended Buy title: