ASUS Z87-Deluxe Motherboard Review: High-class platform for LGA 1150

Asus Z87-Deluxe is good and balanced model for powerful LGA 1150 system. It has additional SATA 6 Gb/s and USB 3.0 controllers, Wi-Fi 802.11a/b/g/n/ac and Bluetooth support dual Gigabit Ethernet, two CPU fan headers and two POST-codes indicators. However we had seen some problems with it.
Intel makes it extremely easy to pick up a full-featured LGA1150 mainboard by limiting your choice to only one model. The DZ87KLT-75K is the only mainboard from Intel based on the Z87 chipset and offering the broadest functionality. But when it comes to ASUS, the choice is far from obvious. ASUS supplies a number of very different top-end models, each with its own unique advantages. Of course, it would be perfect to have a mainboard with all the advantages packed into a single device, but since there is none we have to compromise. So, what would we choose?
We’d put aside the ASUS Sabertooth Z87 first. Although this model and the entire TUF (The Ultimate Force) series are very attractive to us – TUF mainboards come with a 5-year warranty after all – the Sabertooth Z87 is a mainstream rather than top-end product in its functionality. The only thing that makes it different from regular mainstream mainboards is a set of technologies that improve its reliability and durability.

The Republic of Gamers series is headed by the ASUS Maximus VI Extreme, the most feature-rich and the most expensive LGA1150 mainboard from ASUS. It comes with a bundled OC Panel which can be used for overclocking on an open testbed. After the computer is assembled, it can be installed into a free 5.25-inch drive bay to serve as an info display.

There is one peculiarity about the mainboard’s numerous capabilities. Thanks to an additional switch, it is optimized for multi-GPU configurations, but the performance benefits will only be felt starting from three GPUs. So if you plan to run only one or two graphics cards, you won’t be using the full potential of your Maximus VI Extreme.
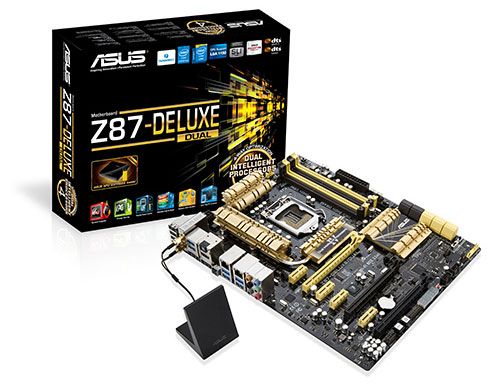
Well, you don’t actually have to browse through ASUS’s special product series to pick up a special mainboard. The top-end model of the ordinary series is the incredibly functional Z87-Deluxe/Dual with additional SATA 6 Gbit/s and USB 3.0 controllers, wireless interfaces (Wi-Fi 802.11a/b/g/n/ac, Bluetooth, and NFC), two network adapters, two POST code indicators, and two Thunderbolt ports. It means that if you don’t have any Thunderbolt peripherals, you will hardly appreciate this particular mainboard.
But as you have already guessed, ASUS offers so many mainboards that it’s easy to find one that suits your needs perfectly. So, instead of the Z87-Deluxe/Dual, you may be interested in the related model called Z87-Deluxe. Besides the similar-sounding name, the latter has similar design and functionality. Being as sophisticated as its elder cousin, it only lacks the NFC Express module and Thunderbolt.
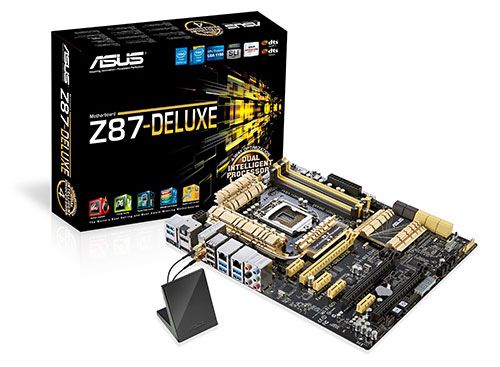
The lack of excessive features means a lower price. So in this review we are going to take a look at the Z87-Deluxe, which seems to be the most optimal LGA1150 mainboard from ASUS in terms of price and functionality.
Packaging and Accessories
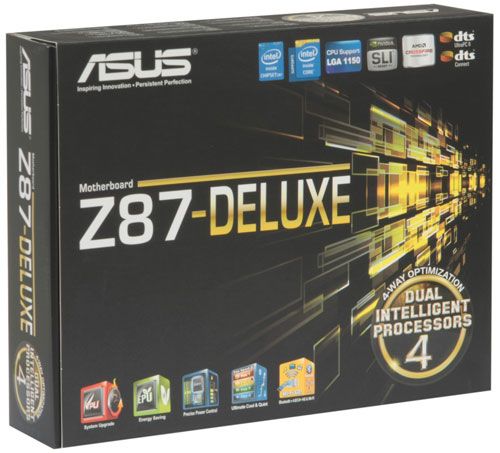
Contrary to our expectations, the ASUS Z87-Deluxe is shipped in a standard-sized box. As is often the case with top-end products, the front of the box can be flipped back, providing a view of the mainboard through a large window. You can see the product’s model name and logotypes on the front flap. Below it and on the back of the box there is a picture of the mainboard, a list of its specifications, and a description of certain features.
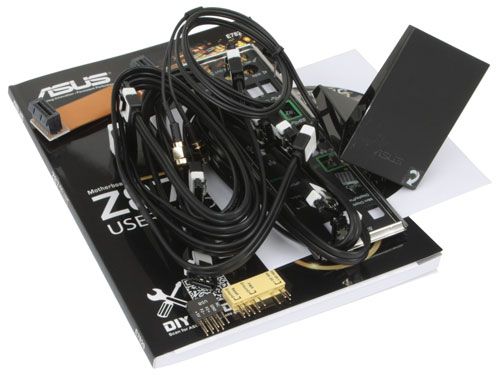
The mainboard resides on a kind of cardboard tray. The following accessories can be found below it:
- Six Serial ATA cables with metal connector locks. Three cables have L-shaped connectors and three have straight connectors. All cables are specifically designed for SATA 6 Gbps devices (with white inserts in the connectors);
- A flexible bridge for two-way Nvidia SLI graphics configurations;
- Stylish Wi-Fi folding antenna;
- I/O Shield for the back panel;
- “Asus Q-Connector” kit including adapters for easy connection of the system case front panel buttons and indicators and a USB 2.0 port;
- User manual;
- Informational brochures about “Wi-Fi GO!” and “Dual Intelligent Processors 4”;
- DVD disk with software and drivers;
- “Powered by Asus” sticker for the system case.
Design and Features
There’s a logo of the Dual Intelligent Processors 4 technology on the mainboard’s box which promises 4-Way Optimization. This includes the DIGI+ power system with flexible settings for CPU and memory voltage. The TurboV Processing Unit (TPU) allows you to overclock your computer automatically while the Energy Processing Unit (EPU) will help you find the balance between performance and energy savings. Fan Xpert 2 ensures appropriate cooling at minimum noise.
The mainboard also supports the 5X Protection technologies we know from our review of the ASUS Z87-K model. 5X Protection covers a number of engineering solutions that make the mainboard more reliable and long-lasting such as protection against overloads, short circuits and electrostatic discharges. The digital voltage regulator DIGI+ delivers stable power while the solid-state capacitors and the steel I/O Shield coated with a thin layer of chromium oxide (to prevent corrosion) increase the service life of the mainboard.
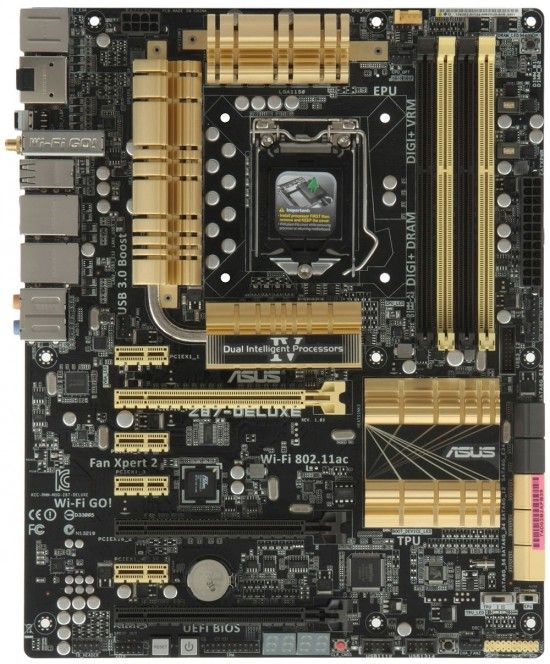
The digital power system incorporates 16 phases. Its hottest components are cooled with two heatsinks. Moreover, there are two metal plates on the reverse side of the PCB opposite them, which prevent the PCB from bending and help dissipate the heat. One of the heatsinks uses a heat pipe to connect to the central heatsink. The latter doesn’t cool anything but enlarges the heat transfer area. All of the heatsinks, including the chipset one, are secured with screws. It must be noted that the heatsinks remain rather cool even at high CPU loads. The four DDR3 slots have a dedicated 2-phase power system and can take in up to 32 gigabytes of system memory working at clock rates up to 3000 MHz.
Besides the six SATA 6 Gbit/s ports (yellow connectors) provided by the Intel Z87 chipset, two additional ASMedia ASM1061 controllers offer four more ports (dark connectors), so the mainboard gives you a total of ten SATA 6 Gbit/s ports. The two PCIe 3.0 x16 slots can share the CPU-integrated PCIe lanes (1×16 or 2×8) whereas the third PCIe 2.0 x16 slot is based on the chipset’s PCIe lanes and works at x4 speed. AMD CrossFireX and Nvidia SLI are both supported. The expansion opportunities also include four PCIe 2.0 x1 slots. A PLX PEX 8608 switch is installed on the mainboard to provide eight additional PCIe lanes for the numerous extra controllers and expansion slots.
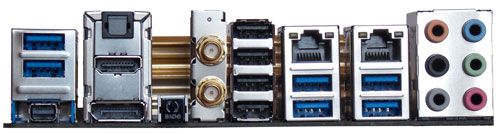
Overall, there are the following ports and connectors on the back panel:
- Mini DisplayPort, HDMI and DisplayPort video outs;
- Six USB 3.0 ports (blue connectors) which powered by Intel Z87 chipset with ASMedia ASM1074 splitter. Two additional USB 3.0 ports can mounted by internal pin-connector.
- “USB BIOS Flashback” button;
- Wi-Fi/Bluetooth module (AzureWave AW-CE123H);
- Four USB 2.0 ports, another four ports are laid out as two onboard pin-connectors;
- Two local network ports (network adapters are built on Gigabit Intel WGI217V and Realtek RTL8111GR controllers);
- An optical S/PDIF and six analogue audio-jacks provided by eight-channel Realtek ALC1150 codec.
Based on a Broadcom chipset, the AzureWave AW-CE123H module supports dual-band Wi-Fi 802.11a/b/g/n/ac (2.4 and 5 GHz) and Bluetooth V4.0 (or Bluetooth V3.0+HS). The 802.11ac standard is not yet ratified, yet it can ensure a higher data-transfer rate than Wi-Fi 802.11n and there is already quite a lot of 802.11ac-compatible equipment available.
The mainboard supports USB BIOS Flashback, which has no counterparts on products from other brands. Some mainboards require that you install an OS to update their BIOS because they lack a BIOS-integrated update tool but here you don’t even have to assemble your PC – no CPU, no memory and no monitor is required. You only have to connect the power, attach a USB flash drive with firmware to the special USB port, press the USB BIOS Flashback button and wait for the update procedure to complete. This solution solves a lot of BIOS-related stability and compatibility problems, like when the system wouldn’t start up because the mainboard couldn’t identify your latest CPU. USB BIOS Flashback is going to save you a lot of trouble in such cases.
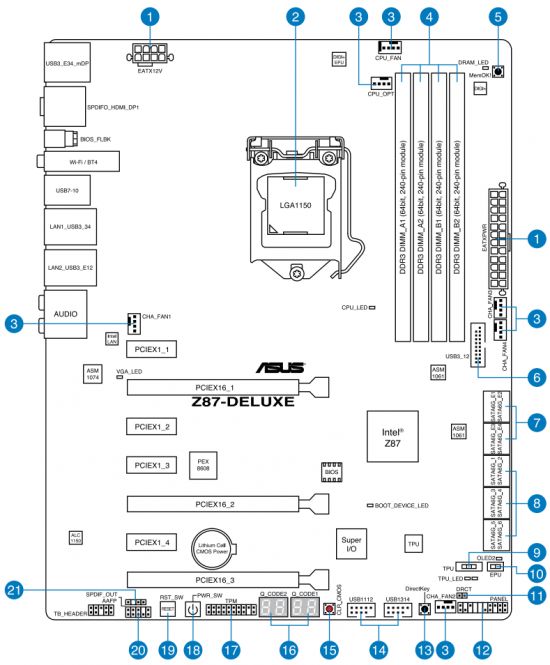
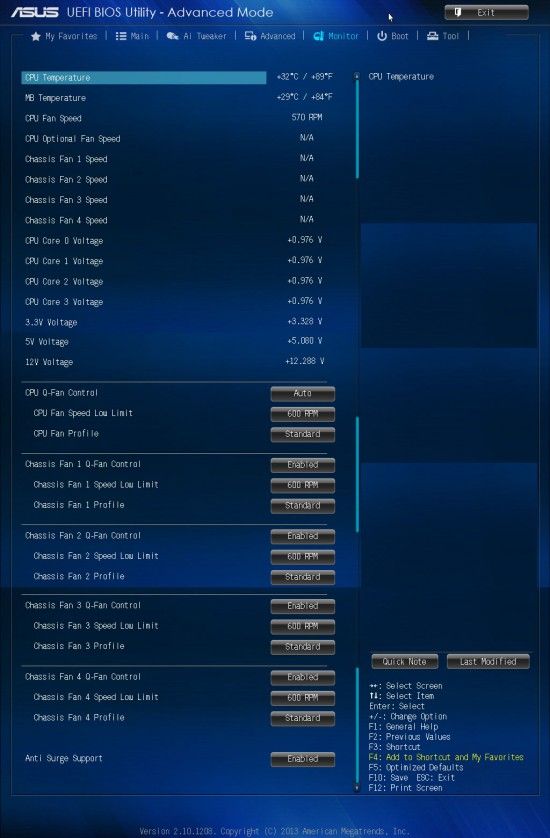
The ASUS Z87-Deluxe has two connectors for CPU fans and four connectors for system fans. Each connector is of the 4-pin variety. The CPU fan connectors can only regulate 4-pin fans whereas the system ones can lower the speed of 3-pin fans as well. Besides the highlighted Power and Reset buttons and the back-panel USB BIOS Flashback button, there is a MemOK! button for when the mainboard cannot start up due to memory-related problems and a Clear CMOS button for resetting BIOS parameters. There is also a DirectKey button, which loads the BIOS interface, but it is inconvenient to use when the mainboard is inside a closed computer case. Now its function is duplicated by the 2-pin Direct Connector you can route outside as a separate button or connect to the infrequently used Reset button of your computer case.
We’re already familiar with the two onboard switches: EPU (Energy Processing Unit) and TPU (TurboV Processing Unit). The former enables a power-saving mode whereas the latter helps overclock your computer. The TPU switch has three positions now. In one position the CPU is overclocked via its frequency multiplier and in the second position the base clock rate is adjusted as well.
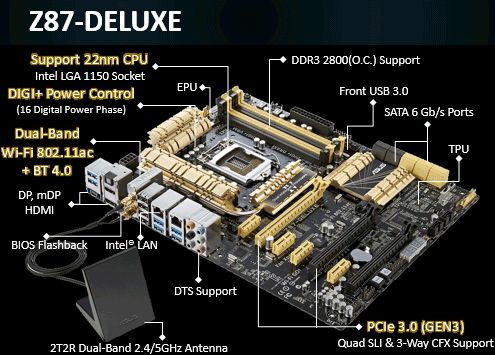
The Q-Design technologies are meant to simplify the process of building and running an ASUS-based computer. These include a soft-padded I/O shield (Q-Shield), POST code indicators (Q-Code; there are two indicators on this mainboard, but the majority of 4-digit codes are reserved for the future, so only one indicator shows the bulk of the information), Q-LED indicators (for faster, even though less accurate, CPU, DRAM, VGA and Boot Device diagnostics), single-sided memory slot latches (Q-DIMM) and a set of adapters for connecting the USB 2.0 header and the computer case’s buttons and indicators (Q-Connector).
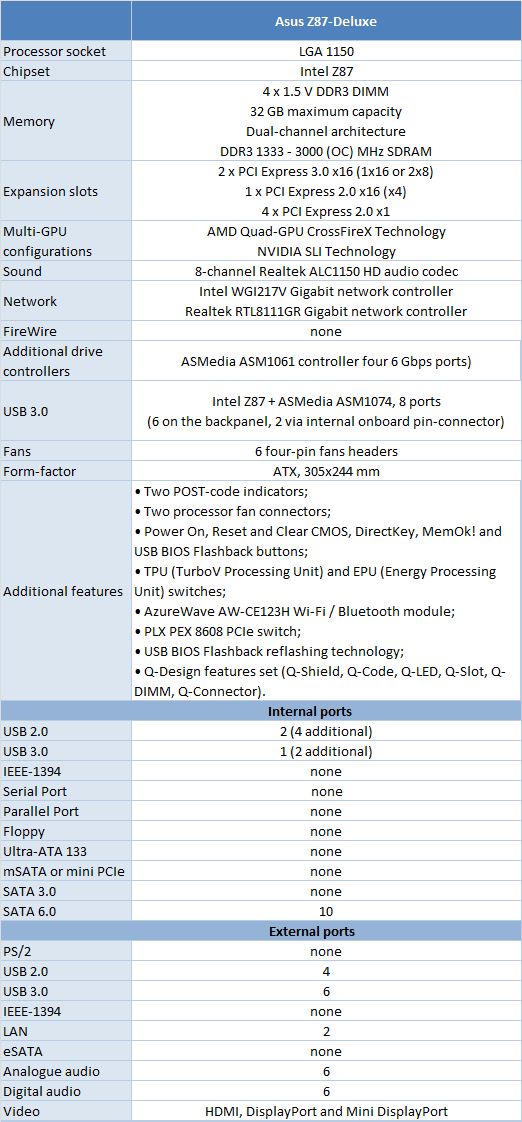
We’ve collected the key specs of the ASUS Z87-Deluxe in a single table:
BIOS Options
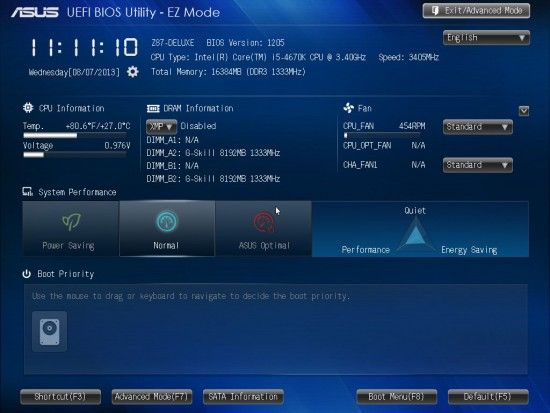
We first examined the new capabilities of ASUS’s EFI BIOS in our ASUS Z87-K review but there have been some changes since then. The predominantly green background has been replaced with blue. The font is now taller and slimmer. As before, the BIOS interface opens in EZ Mode by default. It provides basic system information and allows to choose a power-saving or high-performance operation mode. You can also specify the order of boot devices by simply moving them with your mouse. After setting up the fans and the system date and time, you can apply XMP profiles to memory modules and check out information about the connected storage devices. Besides the speed of the fans and the temperature of the CPU, the mainboard reports the voltage supplied to the CPU (instead of the basic input voltage VCCIN as in the earlier BIOS version). The F7 key is used to switch from EZ Mode to Advanced Mode whereas the F3 key lets you quickly go to any of the most frequently used BIOS sections.
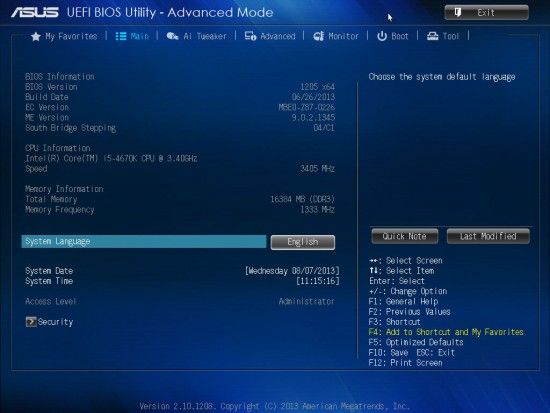
You can switch from EZ to Advanced Mode or press F3 every time you enter the BIOS (by the way, this hot button works in the other BIOS sections as well), yet it may be easier to make the BIOS open in Advanced Mode by default. In this case, you will see the familiar Main section where you can read some basic system information, change the interface language and set up date and time. User and admin passwords can be specified in its Security subsection.
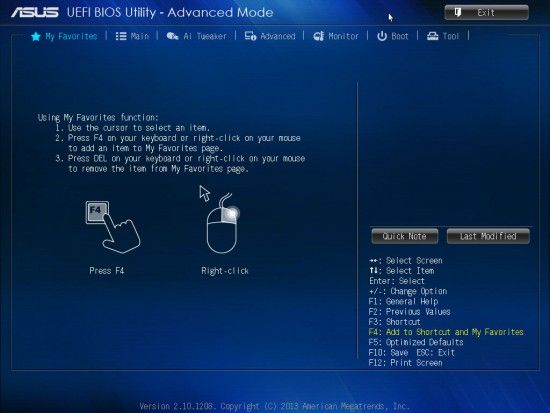
The Main section is not the first on the list as it is now behind the new My Favorites section. As its name suggests, it helps collect all frequently used BIOS options in one place. The section is empty by default, only containing information about how to add or remove options with your mouse or keyboard. There are some limitations. For example, you cannot add used-defined settings such as interface language or boot device order. You cannot add options like SPD data and system date and time. You can’t even add individual options which contain submenus such as the OC Profile subsection for loading BIOS profiles or the CPU Power Management Configuration option which leads to a page with CPU power-saving modes. The list of options displayed upon your pressing the F3 key has no such limitations and you can edit it in the same way by removing and adding entries. So, you have to use both the My Favorites section and the quick access menu, which is not very convenient. Moreover, like other sections, My Favorites cannot be set as the start BIOS screen.
Most of the overclocking-related options are collected in the Ai Tweaker section. It has become even larger than before, including more info parameters at the beginning, more cache frequency multipliers in the middle, and more voltage-related options at the end of the section. Moreover, you don’t even see all of the options because they are set up by the mainboard automatically. But as soon as you get down to manual setting-up, you will find a lot of previously hidden parameters.
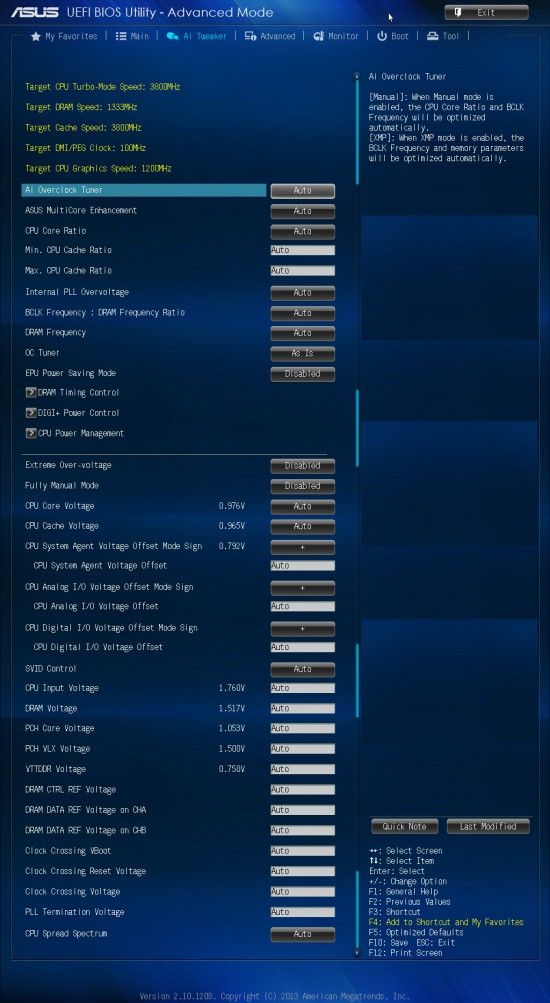
For example, if you change the Ai Overclock Tuner option into XMP (to automatically apply your memory subsystem parameters) or to Manual, there will appear options to change the base clock rate and control the frequency multipliers of the CPU. The voltages can be set higher or lower than the default level. The CPU voltage can now be changed in three different ways: by fixing it at a certain level, by adding or subtracting a certain value (offset mode) and in adaptive mode. We discussed the differences between these three ways in our ASUS Z87-K review.
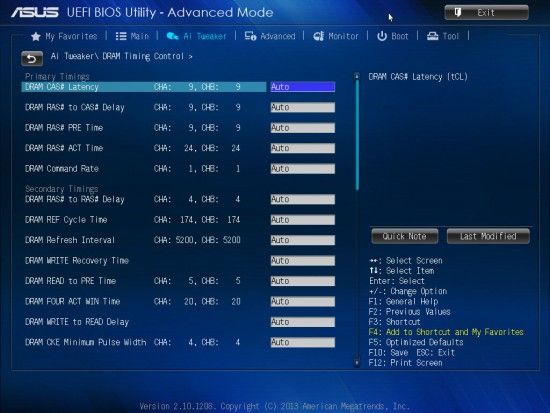
Some of the setup options are available in individual subsections in order not to clutter the main section. There is a separate page for memory timings. There are a lot of options here, yet they are quite easy to use. You can see all the timings set up by the mainboard for each of the two memory channels. You can adjust just some of them, leaving the others at their defaults.
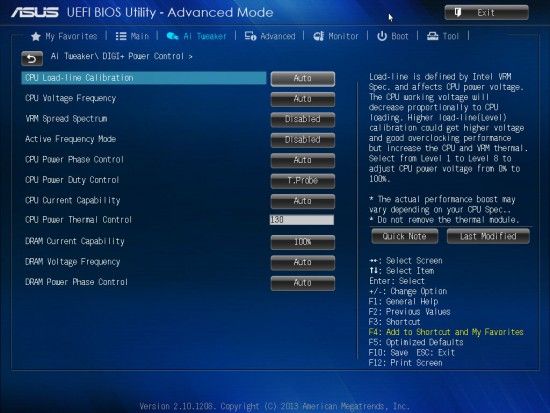
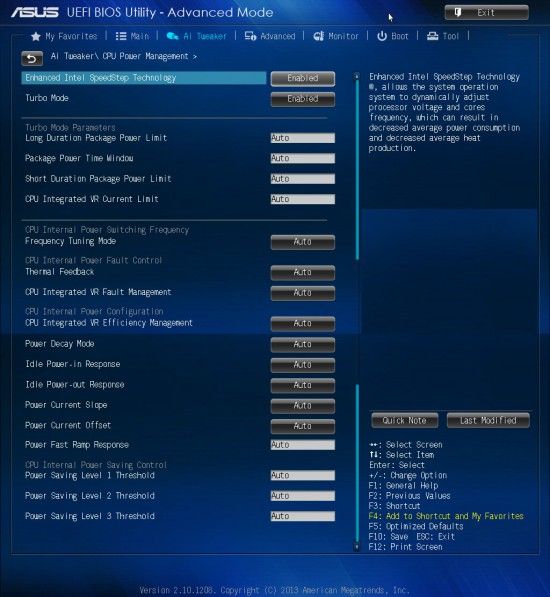
There are quite a lot of options related to power supply and the digital power system called DIGI+. You can control ASUS’s exclusive power-saving technologies right here, in the BIOS. One of them allows changing the number of active phases in the CPU voltage regulator depending on load. CPU Load Line Calibration can now be not only enabled or disabled but also set to a certain level (it helps counteract the voltage drop occurring on the CPU under load).
The CPU Power Management subsection now contains more options. You can manually set up a number of parameters of the CPU-integrated voltage regulator to increase the response time and lower the power consumption in idle mode.
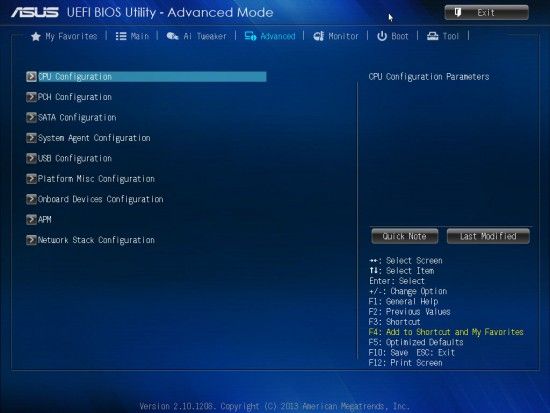
The options of the Advanced section should be familiar to you and their names are self-descriptive.
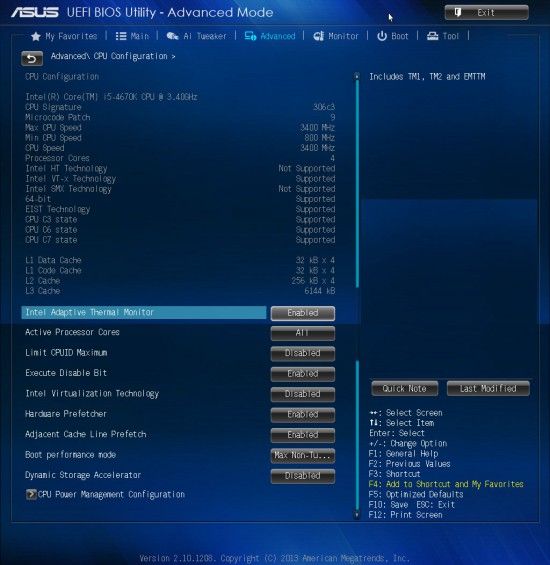
The CPU Configuration subsection reports you basic information about the CPU and allows to control some CPU-related technologies.
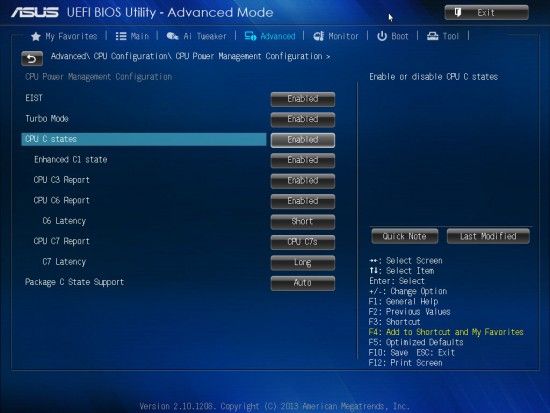
Power-saving technologies can be managed on the CPU Power Management Configuration page. There are only three options here by default because CPU C States is set at Auto and the rest of the options are hidden. We changed CPU C States to Enabled to show you how many there are. They can affect the computer’s idle power draw, so you may want to specify them manually instead of letting the mainboard do that.
The Monitor section is where you can check out the current temperatures, voltages and fan speeds. The ASUS Z87-K could not report the CPU voltage. It only showed the basic input voltage VCCIN, which is always 1.8 volts. But now we can see what voltage is supplied to each of the four CPU cores. You can select a speed regulation mode for any of the fans supported by the mainboard: Standard, Silent or Turbo. Or you can set them up manually, too. The two CPU fans can only be regulated if they have 4-pin connectors.
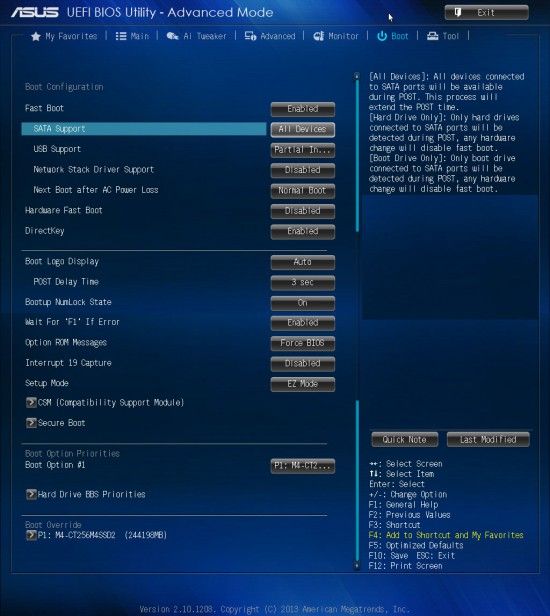
System startup options can be found in the Boot section. It’s here that you can change the start mode from EZ to Advanced. While setting the mainboard up for the first time, you may want to disable the Fast Boot parameter to make it easier to enter the BIOS interface. Take note of the new SATA Support option – it helps the mainboard boot up even faster by not polling unused SATA ports.
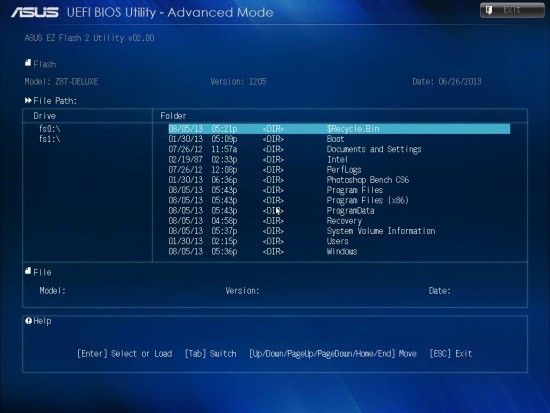
Next goes the Tools section. The integrated BIOS update tool called EZ Flash 2 is perhaps the handiest and most functional among the utilities of its kind. It supports NTFS partitions, so you can read firmware right from the HDD. The NTFS support is only implemented in the BIOS update tools from ASUS and Intel as yet. Unfortunately, the option of saving the current BIOS prior to updating it has been removed altogether.
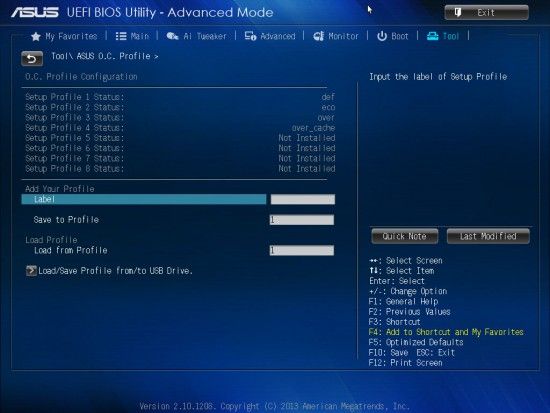
ASUS mainboards allow you to store and load up to eight profiles with full BIOS settings. Each profile can be given a descriptive name. BIOS profiles can be shared by saving and loading them from external disks. The profiles do not save the option of turning the startup picture off.
Like on mainboards from many other brands, we can now see the information written into the memory modules’ SPD unit, including XMP profiles.

The Exit section goes last. It allows you to save your changes, load default BIOS settings, or switch back to EZ Mode.
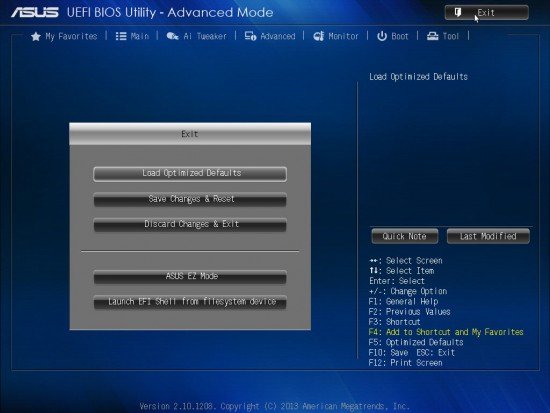
In the center right of the screen, above the list of active hotkeys, there are two buttons: Quick Note and Last Modified. The former lets you write down some notes for yourself and the latter shows a list of your last changes which is retained even after you reboot your computer. So you can always check out which BIOS changes you made the last time. You don’t even have to enter the BIOS interface for that as the Save to USB option lets you save that list on an external drive.
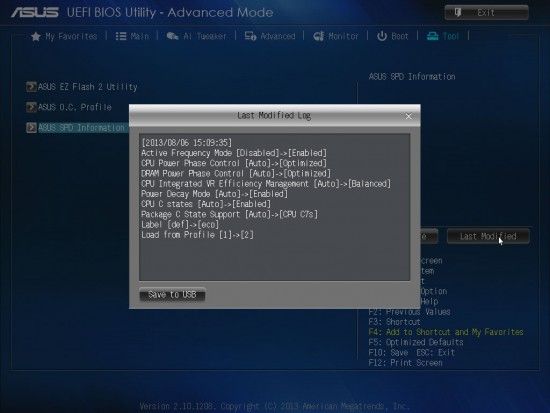
Similar to the Last Modified feature, the popup BIOS Setting Change window is also very handy, showing the list of changes to be applied. We really miss this opportunity now on other mainboards because it provides an easy way to control your changes before applying them. This window also makes it easy to compare the current settings with what is written in the BIOS profiles. By loading a profile you will see all of its differences from the current settings in the BIOS Setting Change window that opens up.
Summing it up, ASUS’s EFI BIOS only called for a correction of certain errors and the new version is indeed better than before. Some changes are not significant like the enhanced functionality of the previously useless EZ Mode. Others are more important, like the new My Favorites section, the opportunity to write down notes and edit the list of frequently accessed BIOS options you can open up by pressing F3. The Last Modified feature will come in handy, too. The popup window BIOS Setting Change is also useful, showing a list of BIOS changes to be applied.
Some errors have persisted through years, though. For example, ASUS mainboards do not save your turning off the startup picture in BIOS profiles. This is just a small nuisance, yet it has not been corrected for ages. Gigabyte has successfully implemented the regulation of 3-pin CPU fans and ASRock has also come up with a solution to this problem, but ASUS doesn’t offer this capability with its mainboards. The opportunity for choosing what pages to show when you enter the BIOS interface was introduced many years ago in the BIOS of Biostar mainboards and is currently available on mainboards from many brands, but not from ASUS. The My Favorites section may be easily overlooked if you move sequentially from the barely useful EZ Mode to the Main section and further, but the order of sections cannot be changed. Some of the major mainboard makers allow the user to compile his favorite BIOS options into a special page but ASUS’s My Favorite page has limitations about what options you can add to it. The important power-related options of the CPU Power Management Configuration page are hidden in the depths of the Advanced section, although they would be more appropriate in the Ai Tweaker section. Many years ago, when these options were included into the CPU Configuration subsection, the latter was duplicated in the Extreme Tweaker section in the BIOS of ASUS’s ROG series mainboards. This duplication was lost with the transition to UEFI BIOS and was never implemented in ordinary ASUS mainboards. And finally, EPU Power Saving Mode which is responsible for ASUS’s exclusive power-saving technologies has lost its setup flexibility. You could select the required level of power savings but now you can only turn it on or off (and additionally choose a system-wide operation profile in EZ Mode).
Despite our criticism, ASUS’s EFI BIOS is good overall. Feature-rich and user-friendly, it has been improved even more recently. Besides the new font and color scheme, it now offers new options. You can use SATA Support to accelerate your boot time by not polling unused SATA ports or save your BIOS changes (from the Last Modified list) to an external drive.
Some downsides we had noticed earlier have been corrected. For example, you couldn’t learn the CPU voltage in ASUS’s BIOS, but now you can check out the voltage on any of the CPU cores. So, considering that the new BIOS modification is indeed new, we hope that it will be improved and enhanced in the future.
Exclusive Software
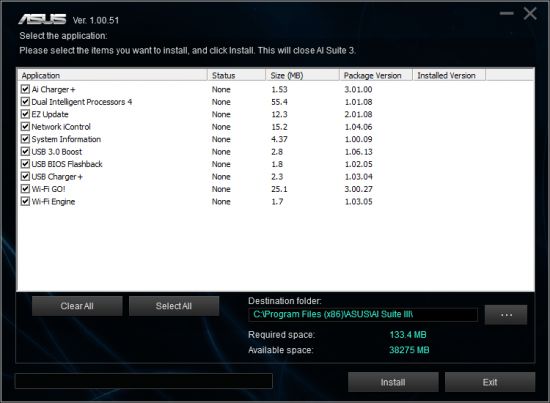
A few years ago, ASUS replaced its various software tools with the unified AI Suite. The downside is that you have to download quite a heavy software pack even if you only plan to use but one utility. It is not a big problem with today’s high-speed data transmission channels, though, and there are quite a lot of advantages. Thanks to the single installer and shell, AI Suite is easy to install, update, launch and remove. The utilities it contains serve different purposes but have a unified interface and are designed to work together. The contents of the suite have changed over time, so here we will give you a brief description of the utilities included into AI Suite III.
As usual, you have to download the whole AI Suite III but you can install only specific utilities. Moreover, you can choose the destination path while installing whereas many exclusive utilities from other manufacturers are only installed on the system disk.
After the OS boots up, you will see a power mode notification in the bottom right corner of the screen. You will see it again when you move your mouse pointer to it. This notification panel is supposed to help you quickly switch between the different modes, but we couldn’t make it work.
The start screen of the 4-Way Optimization program shows you the status of the following features: TPU (TurboV Processing Unit), EPU (Energy Processing Unit), DIGI+ Power Control, and Fan Xpert 2. The window is interactive, so when you move your mouse pointer to the fan icon, you will see a graph of its speed/temperature correlation. The icons on the right help you choose a power-saving mode, but this feature didn’t work in our case.
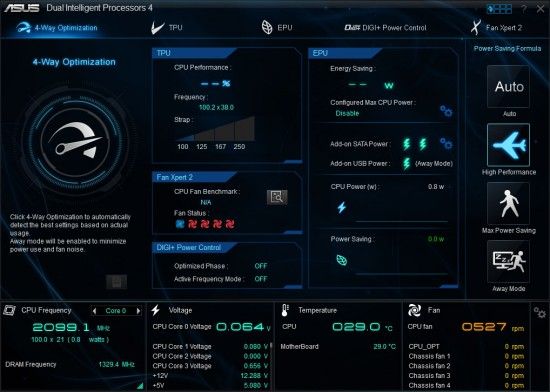
Depending on the specific AI Suite III utility, the contents of the window will change, but the regularly updated info panel in its bottom part will always report the current monitoring data. If you click the small triangle in the CPU Frequency section, you will be able to track the load on the CPU cores. The gear icon on the right will open a settings window where you can set up permissible adjustment ranges for voltages, temperatures and fan speeds.
By clicking on the 4-Way Optimization section on the left, you can overclock your computer automatically. You only have to specify the location of fans connected to the system connectors.
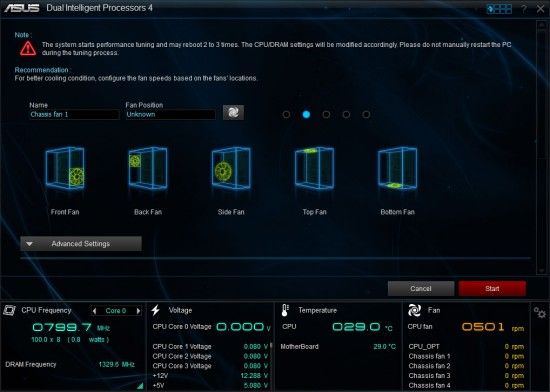
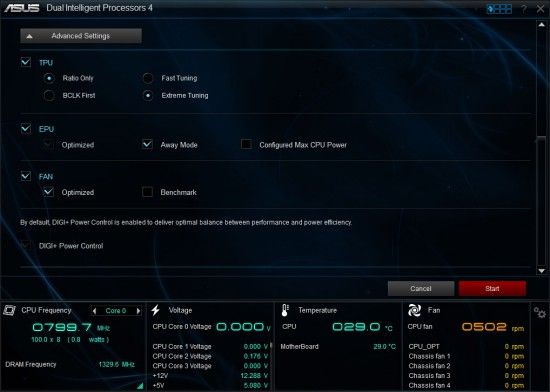
In the Advanced Settings window you can set up TPU, EPU and Fan Xpert 2 preferences for the automatic overclocking feature.
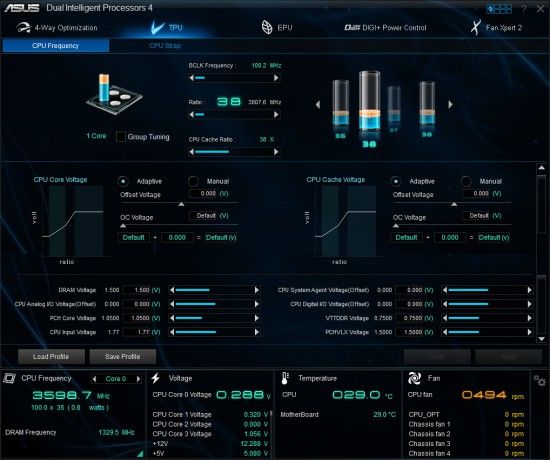
Automatic overclocking is handy as it requires no effort on your part and takes little time but you can achieve better results by choosing optimal parameters manually. You can do this by using the TPU feature that goes after 4-Way Optimization. In the top part of the window, you set up frequency multipliers for the CPU cores and check out the results of your changes visually. Similar graphs below will indicate the outcome of your changing CPU and cache memory voltages. Lower still, there are options for adjusting the rest of the voltages. They are hidden by default, as you can see in the smaller screenshot below, while the scrollbar on the right can be easily overlooked. This is perhaps the only flaw in the program interface. The CPU Strap tab at the top lets you change the base clock rate.
The next utility, EPU, is for setting up power-saving modes using the Auto, High Performance, Max Power Saving and Away Mode tabs.
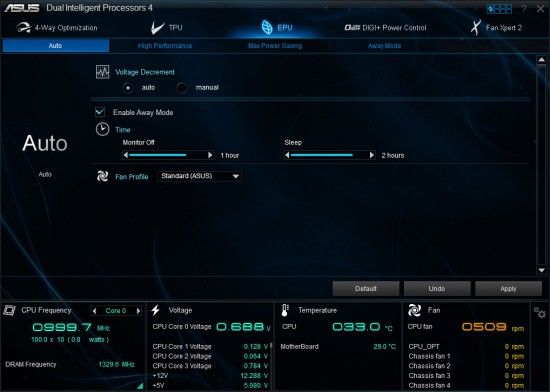
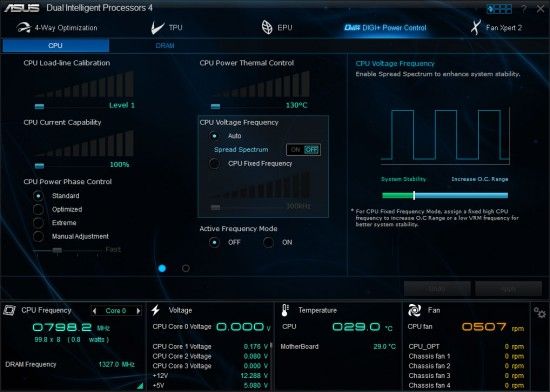
The DIGI+ Power Control window has two parts. The left part contains CPU or memory (the DRAM tab) power options. In the right part, the purpose and effect of each option are described and illustrated.
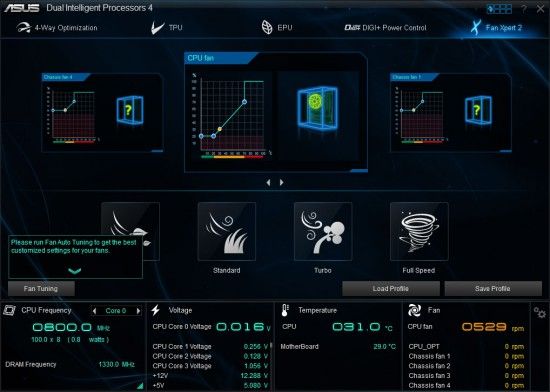
The Fan Xpert 2 utility helps you choose one of the predefined fan regulation modes or manually set up the speed of each fan. The window in the bottom right recommends you to calibrate your fans first.
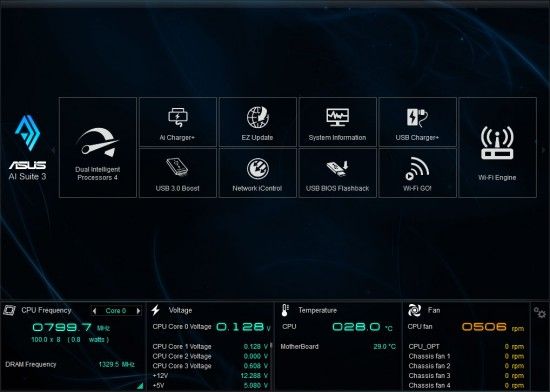
You can easily access the rest of the AI Suite III tools. The icon in the top right corner of each window will open a list of the installed utilities: to quickly recharge mobile gadgets, look for updates, report system information, speed up USB 3.0, prioritize your network bandwidth, update your firmware, simplify communication with mobile devices, and transform your computer into a wireless access point.
We’ve always been very skeptical about exclusive software bundled with mainboards. It is usually a set of diverse utilities that look primitive and have limited capabilities. Or they may look too gaudy, yet work imperfectly as well. AI Suite III changes our view as this unified set of software tools, with a proper user interface and broad functionality, can indeed simplify your experience of using the mainboard. It is not without bugs, yet the developers work to eliminate them by issuing updates. It’s up to you to choose the utilities you need, but we guess you should give them a try anyway. The only thing we didn’t quite like is that AI Suite III loads automatically and we couldn’t change that.
Testbed Configuration
We performed all our tests on a testbed built with the following components:
- ASUS Z87-Deluxe mainboard (LGA1150, Intel Z87, BIOS version 1205);
- Intel Core i5-4670K CPU (3.6-3.8 GHz, 4 cores, Haswell, 22nm, 84 W, LGA 1150);
- 2 x 8 GB DDR3 SDRAM G.Skill TridentX F3-2133C9Q-32GTX (2133 MHz, 9-11-11-31-2N timings, 1.6 V voltage);
- Gigabyte GV-T797OC-3GD (AMD Radeon HD 7970, Tahiti, 28 nm, 1000/5500 MHz, 384-bit GDDR5 3072 MB);
- Crucial m4 SSD (CT256M4SSD2, 256 GB, SATA 6 Gbps);
- Scythe Mugen 3 Revision B (SCMG-3100) CPU cooler;
- ARCTIC MX-2 thermal interface;
- Enhance EPS-1280GA 800 W PSU;
- Open testbed built using Antec Skeleton system case.
We used Microsoft Windows 8 Enterprise 64 bit (Microsoft Windows, Version 6.2, Build 9200) operating system, Intel Chipset Device Software driver package version 9.4.0.1017, AMD Catalyst 13.4 graphics card driver.
Working at Default Settings
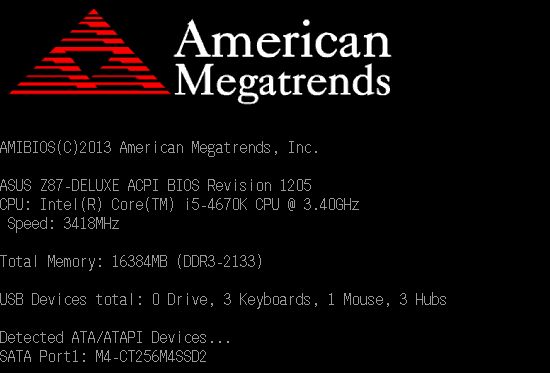
We assembled our testbed with the ASUS Z87-Deluxe using only one expansion card (the graphics card) and had no problems starting it up. Using the BIOS-integrated utility ASUS EZ Flash 2, we updated the firmware to the latest version 1205. As is typical of ASUS mainboards, the startup picture only mentions that you can press Del or F2 to enter the BIOS interface. ASUS persists in not telling us anything about the other active hotkeys. For example, you can press Tab to remove the picture whereas F8 will open a menu for choosing an out-of-order boot device.

If you disable the startup picture with the Tab key or in the BIOS, you won’t see any prompts, either. What you will see is information about the mainboard’s model name, BIOS version, CPU model, the amount and frequency of system memory, the number and type of USB devices, and about the connected disks. The real CPU clock rate is not reported, though. The mainboard doesn’t count in any CPU overclocking you’ve done or any changes to the CPU frequency multiplier due to the Intel Turbo Boost technology.
Well, today’s ASUS mainboards start up so fast that you have barely enough time to punch the button to enter their BIOS, let alone read anything from the screen. So, in order to load the BIOS interface automatically, you are supposed to use the special DirectKey, which would be indeed perfect if it were not for certain peculiarities in its implementation.
It was in our review of the MSI Z77 MPOWER that we first encountered a button with similar function. Pressing the GO2BIOS button on the MSI mainboard loaded the BIOS interface without any user’s intervention upon the next restart. You could press it whenever you liked – when the computer is turned on, when you’re in the BIOS interface or when you’re working in the OS.
ASUS’s DirectKey works differently. It duplicates the Power button but adds the option of entering the BIOS interface automatically. It is handy to turn your computer on with this button and go right to the BIOS, but restarting is more required when you’re setting your mainboard up for the first time. Supposing that you’ve changed some BIOS options, rebooted your computer and seen that your settings are not what you want. You want to correct them. On the MSI mainboard, you just press the GO2BIOS button, restart and find yourself in the BIOS interface. On the ASUS mainboard, you press the DirectKey, so the computer shuts down. Then you turn it on again and go to the BIOS. The step of turning the computer off and on seems to be unnecessary here. Moreover, the DirectKey is not handy when the mainboard is already inside a computer case. The Z87-Deluxe corrects this by duplicating the button with the 2-pin Direct Connector which you can connect to the computer case’s Reset button or output as a separate button.
Windows users will find the ASUS Boot Setting utility to be the easiest way to go right to the BIOS, though. As we explained in our ASUS P8Z77-V LK review, it allows to enter the BIOS interface right after restarting, without any user actions and without turning the computer off and on. The utility is not part of AI Suite III, but it’s small and can be downloaded separately. Well, when you set up your mainboard for the first time, you may want to temporarily disable the Fast Boot option (in the BIOS’s Boot section) to have no problems entering the BIOS interface.
It looks like ASUS has got itself into trouble by making its mainboards start faster. As a result, they had to introduce the ASUS Boot Setting utility and implement additional DirectKey buttons and connectors on their top-end mainboards. They even had to print an Exclusive Boot Features booklet to explain how ASUS mainboards start up. Ironically, these methods don’t solve the problem although it can be done easily. Like on mainboards from other brand, the Fast Boost option should just be turned off by default. The mainboard would still start up quickly enough in that case and the user would be able to accelerate the process when he likes.
Haswell-based LGA1150 CPUs are more economical at low loads than their LGA1155 counterparts but none of the mainboards we’ve tested provides this advantage by default. You have to manually enable all of Intel’s power-saving technologies, which is not so easy on the ASUS mainboard. You have to go to the Advanced section, then to the CPU Configuration subsection, and then to the CPU Power Management Configuration page. For additional savings by means of ASUS’s exclusive technologies, enable EPU Power Saving Mode. Moreover, top-end ASUS mainboards, including the Z87-Deluxe, offer a lot of CPU Power Management options that help lower the computer’s power draw in idle mode.
Many mainboards do not ensure the standard operation mode for the CPU by default. They drop the CPU frequency multiplier to the base level at high loads, although it should be higher thanks to Intel Turbo Boost. To correct this, you must increase the power consumption limits (in the CPU Power Management part of the Ai Tweaker section in ASUS’s BIOS).
CPU Overclocking Details
ASUS mainboards do not provide any hotkey prompts and do not report the CPU clock rate correctly when starting up. They make it difficult to enter their BIOS interface and don’t enable all of the available power-saving technologies by default. They also do not ensure the standard operation mode for the CPU at high loads. That’s not an inspiring start for our tests of the ASUS Z87-Deluxe. And, as a matter of fact, we expected to find more problems as we tried to overclock the mainboard.
In our ASUS Z87-K review we told you about two methods of automatic CPU overclocking: Ratio Only and BCLK First. There are three ways to enable such overclocking: OC Tuner (in the BIOS), 4-Way Optimization (from AI Suite III), and the onboard TPU switch. In the Ratio Only mode the CPU is overclocked by increasing its frequency multiplier whereas in the BCLK First mode the base clock rate is increased as well. Any automatic overclocking is imperfect, though. You can always do better by doing everything manually and gain advantages in terms of frequency or power consumption. We had no doubts the Z87-Deluxe was going to overclock well since the simpler ASUS Z87-K had overclocked our CPU without any problems before. And the top-end model has a more advanced power system and more flexible setup options. There was one hitch, though.
The ASUS Z87-K was the first LGA1150 mainboard we used to test Haswell-based CPUs. The Haswell’s integrated voltage regulator increases voltage too much in overclocked mode at high loads. To prevent this, we had to fix the voltage at a certain level. In this case, some of the CPU’s power-saving features stop to work: the CPU’s multiplier is lowered at low loads but the voltage doesn’t drop. Other ways of increasing the voltage (in the offset or adaptive mode) were no good because the integrated regulator would set the voltage too high at high loads. We had even suspected that this effect accompanied any overclocking, but it turned out to be only due to increased voltage rather than increased frequency. The Gigabyte GA-Z87-D3H helped us realize this fact and the frequency of 4.3 GHz was quite good for an Intel Core i5-4670K.
It is extremely easy to overclock Haswell-based CPUs in an energy-efficient way on Gigabyte mainboards. You only have to fix the voltage at a certain value and increase the clock rate to the desired level. As we tested mainboards from other brands, we found that ASRock, Intel and MSI products could be overclocked in the same way as well, with some reservations. ASUS mainboards, on the contrary, would increase the CPU voltage as soon as you increase the voltage. This is a long-time feature and its purpose can be easily explained. Mainboards from other brands will not be able to start up if an inexperienced user increases the CPU frequency but doesn’t increase the voltage whereas the ASUS mainboard will start up by automatically increasing the latter. This feature interfered with our overclocking in the past but we could bypass it by increasing the voltage by 0.001 volts. This doesn’t affect the behavior of any CPUs except for the Haswell, though. The Haswell’s integrated voltage regulator notices this difference and increases voltage to extremely high levels and high loads. And if we don’t increase the voltage ourselves, the mainboard does that as soon as we raise the CPU frequency.
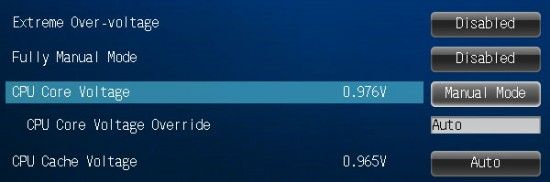
Fortunately, ASUS has reacted to the new situation quickly. The ASUS Z87-Deluxe adjusts CPU voltage in a different way. If the CPU clock rate is increased, but the CPU Core Voltage option is Auto, everything remains as before: the voltage will be increased automatically. In our case, with an Intel Core i5-4670K processor and a frequency multiplier of x43, the voltage would peak up to 1.224 volts even at moderate loads. This is already too high. At high loads, the voltage would go up to 1.3 volts and higher, provoking overheat. So, to avoid this, you have to change CPU Core Voltage to Manual. In this case, the mainboard and the integrated regulator don’t increase the voltage anymore, so the latter remains at 1.135 volts even at high loads on our CPU overclocked to 4.3 GHz – just like on the other mainboards we tested.
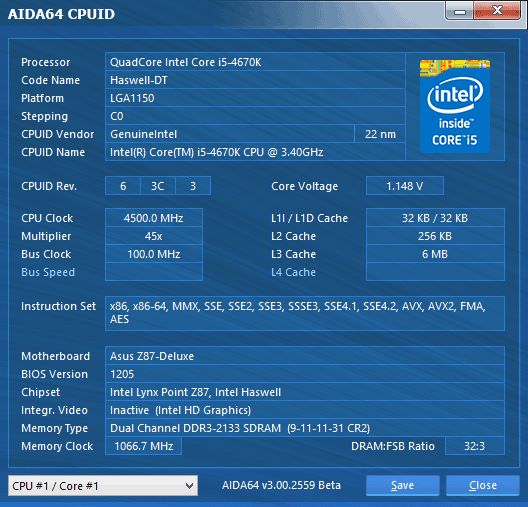
Energy efficient overclocking is only possible if you don’t increase voltage. It will ensure higher performance and, despite the increased power consumption, you can expect long-term savings due to the reduced amount of energy spent for each computation. Energy efficient overclocking is going to be environment-friendly as we showed in our Power Consumption of Overclocked CPUs review. However, when we test mainboards, we want to check them out under different conditions and loads, so we choose what overclocking method ensures the highest results. Higher clock rates and voltages mean harsher test conditions and it is under such conditions that we can better see any flaws or problems in mainboard design. That’s why we overclock our CPU to 4.5 GHz in our mainboard reviews, fixing the voltage at 1.150 volts and using the XMP settings for our memory modules.
When we overclock by fixing the CPU voltage at a certain level, some of the power-saving technologies get disabled. The CPU’s frequency multiplier is lowered at low loads but its voltage always remains high. Anyway, we stick to this overclocking for the duration of our tests, especially as it doesn’t affect the computer’s idle power draw much.

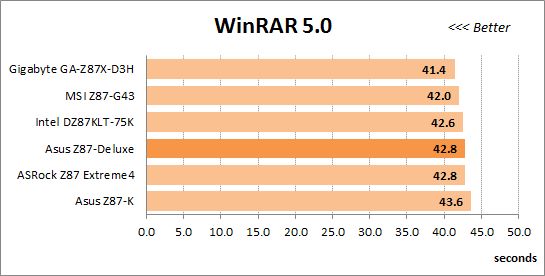
The overclocking results seem to be the same as with the other mainboards, but the CPUID screen from AIDA64 doesn’t show one important parameter – the clock rate of the CPU’s L3 cache. Haswell-based CPUs have a dedicated multiplier for the clock rate of the ring bus, which is also the clock rate of the L3 cache and memory controller. Although the cache clock rate can be set up independently, it equals the CPU’s clock rate with each tested mainboard. When our Intel Core i5-4670K works in its default mode, the cache memory frequency varies dynamically in a range of 800 MHz to 3.8 GHz. The same is true for the ASUS Z87-Deluxe. However, when the CPU is overclocked, the cache memory frequency doesn’t change anymore. It becomes constant at 3.8 GHz whereas on the other mainboards it drops to 800 MHz in idle mode and goes up to 4.5 GHz at high loads, in sync with the CPU clock rate. We carried out some tests and made sure that, despite the difference, the cache memory frequency didn’t affect the performance of the mainboard in most applications except for archiving. The ASUS Z87-K was slow with the WinRAR archiver, both at its default setting and in the overclocked mode. Let’s see what we have with the ASUS Z87-Deluxe but, to make our performance tests accurate, we manually set the frequency range of 800 MHz to 4.5 GHz for the cache memory.
Performance Tests
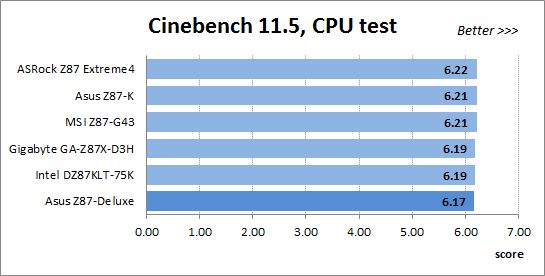
We usually benchmark mainboards in two test modes: at the default settings and with the CPU and memory overclocked. The first mode is interesting because it shows how well the mainboards work with their default settings. It is a known fact that most users do not fine-tune their systems, they simply choose the optimal BIOS settings and do nothing else. But this time we was needed to correct some settings for all motherboards, excluding Gigabyte GA-Z87-D3H, which works as specified by Intel. For Asus Z87-K we had manually set CPU turbo multipliers to prevent drops frequencies at high load, for ASRock Z87 Extreme4 we had disable Power Saving Mode, for MSI Z87-G43 we had disable Enhanced Turbo, and for ASUS Z87-Deluxe and Intel DZ87KLT-75K we had manually increase processor power limits.
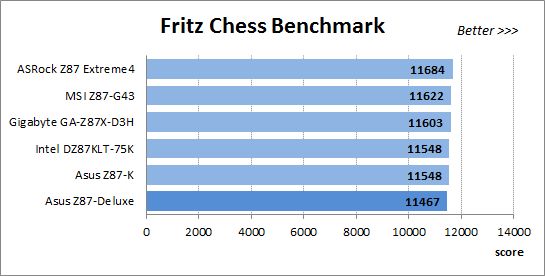
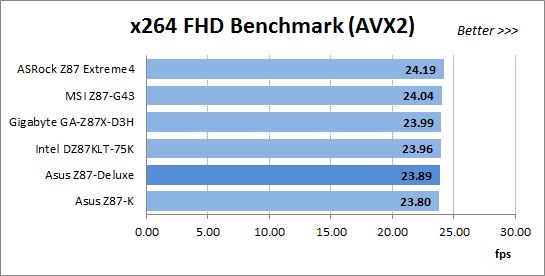
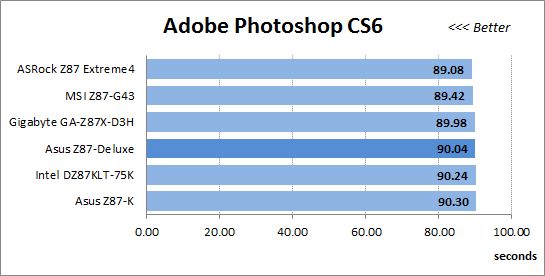
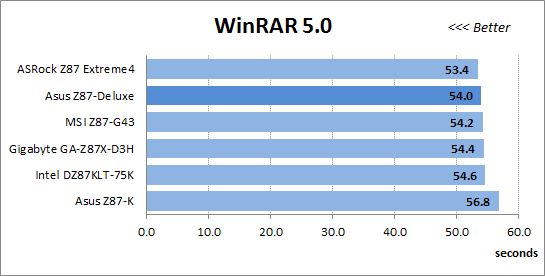
The results in the diagrams were sorted out in descending order and the numbers for ASUS Z87-Deluxe are highlighted with a darker color for your convenience.
Nominal Mode
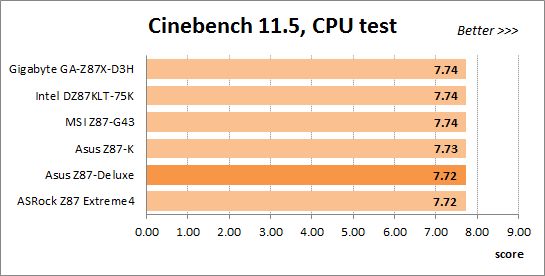
We used Cinebench 11.5. All tests were run five times and the average result of the five runs was taken for the performance charts.
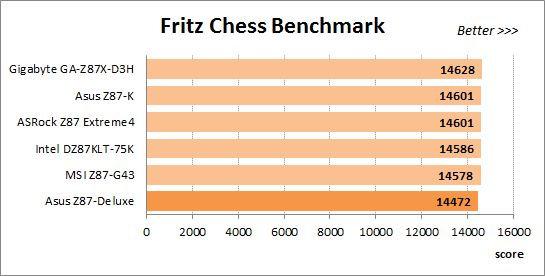
We have been using Fritz Chess Benchmark utility for a long time already and it proved very illustrative. It generated repeated results, the performance in it is scales perfectly depending on the number of involved computational threads.
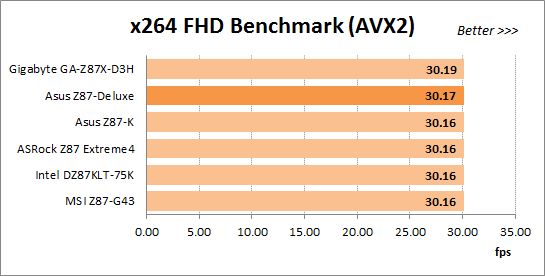
x264 FHD Benchmark v1.0.1 (64 bit) allows us to compare the system performance during video transcoding against the results in the database. So far this is the only utility in our testing suite that supports AVX2 instructions implemented in Haswell processors. The average results of the five test runs are displayed on the following diagram:
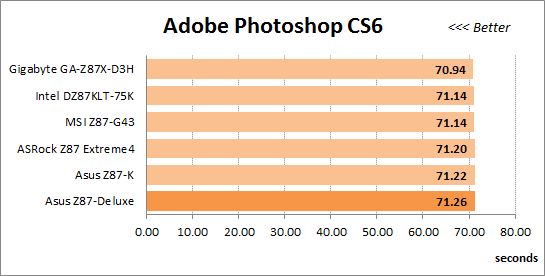
We measured the performance in Adobe Photoshop CS6 using our own benchmark made from Retouch Artists Photoshop Speed Test that has been creatively modified. It includes typical editing of four 24-megapixel images from a digital photo camera.
In the archiving test a 1 GB file is compressed using WinRAR archiving tool with maximum compression level.
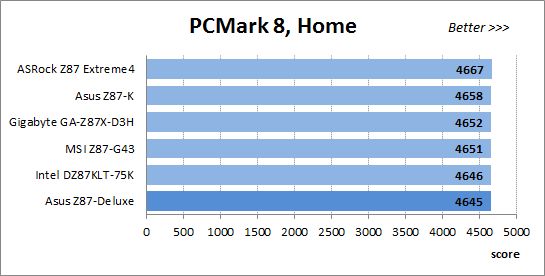
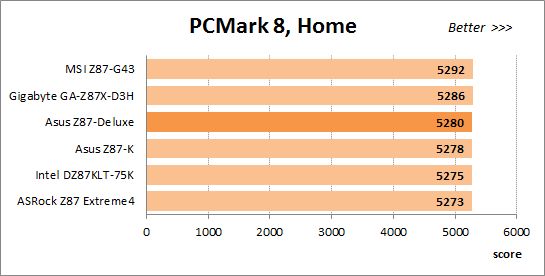
The recently released PCMark 8 suite allows us to assess the overall system performance, the efficiency of its storage sub-system, measure the battery life of a mobile device. We use the “Home” test package that includes typical home use applications: web browsing, creating and editing documents, simple games, photo editing, video chatting.
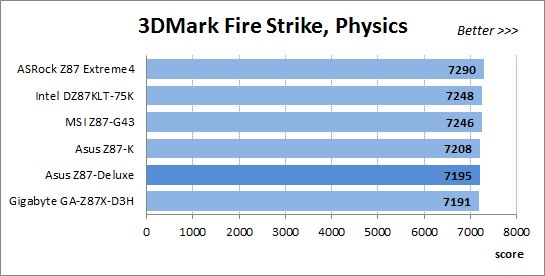
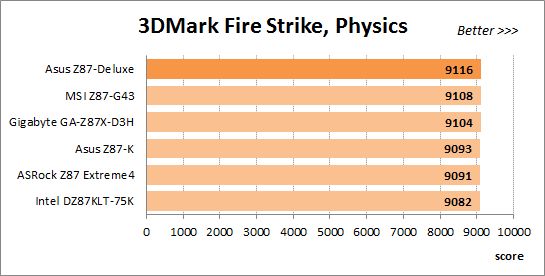
The next diagram shows only CPU tests from the 3DMark Fire Strike. This score is obtained in a special physics test that emulates the behavior of a complex gaming system working with numerous objects:
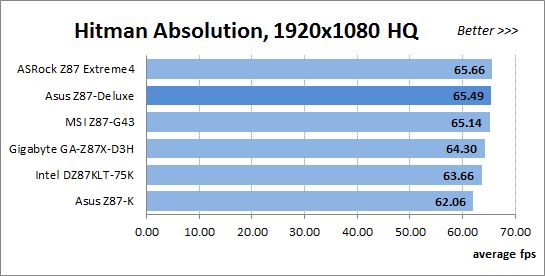
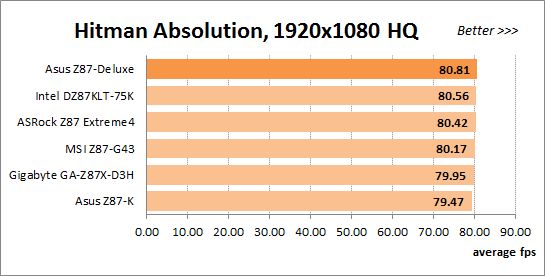
The benchmark integrated into the Hitman Absolution game turned out very convenient. It can be launched directly from the game, from the game launcher utility and even from the command prompt. We use maximum quality settings from the “Ultra” profile and a pretty high screen resolution.
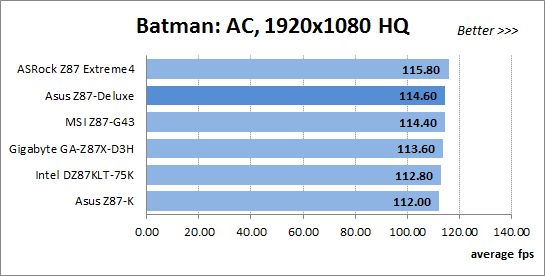
Batman: Arkham City game also reacts eagerly to any changes in the CPU clock frequency, and it uses DirectX 11. We ran game’s integrated benchmark five times with “Very High” image quality settings and then take the average of the five runs for the diagrams.
Overclocked Mode
Now let’s see what we have with the CPU and memory overclocked. We reached the same overclocking results with every mainboard, so the CPU worked at 4.5 GHz and the memory worked at 2133 MHz with timings of 9-11-11-31-2N. The Intel DZ87KLT-75K was the only one to work with timings of 9-11-11-31-1N.
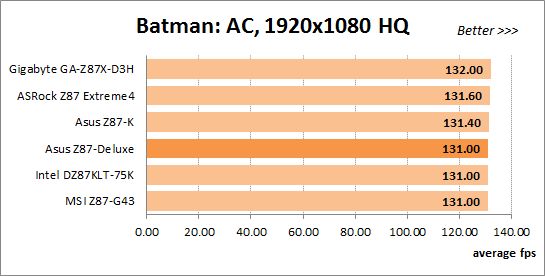
The ASUS Z87-Deluxe doesn’t show anything exceptional in our tests, but the good news is that it is not as slow as the ASUS Z87-K. This may be due to our manually setting the cache memory frequency in sync with the CPU clock rate.
Similar mainboards should deliver similar performance under the same conditions, which is what the ASUS Z87-Deluxe does. The ASUS Z87-Deluxe may be slower or faster than its rivals, yet the difference is never too large.
Power Consumption
We performed our power consumption measurements in nominal and overclocked modes using Extech Power Analyzer 380803. This device is connected before the PSU and measures the power draw of the entire system (without the monitor), including the power loss that occurs in the PSU itself. In the idle mode we start the system up and wait until it stops accessing the hard disk. The results on the diagrams are sorted out in ascending order.
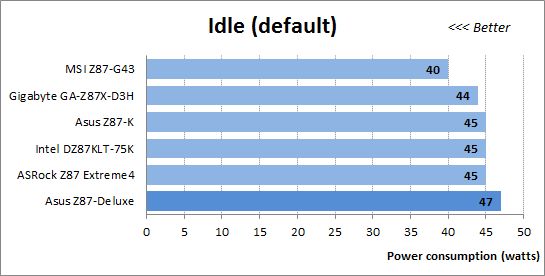
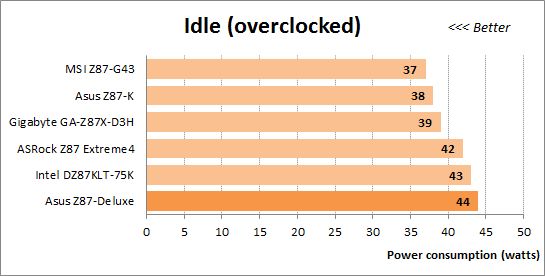
The mainboards are comparable in terms of their idle power consumption except that MSI is somewhat more economical and the ASUS Z87-Deluxe is less economical than average.
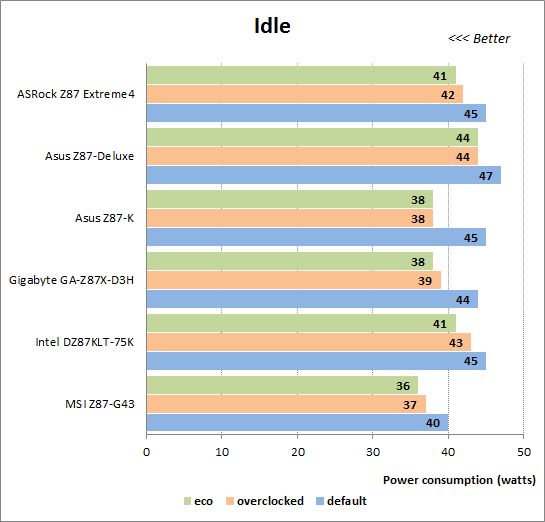
For all their downsides, Haswell-based CPUs should be given credit for requiring less power in idle mode in comparison with their LGA1155 counterparts. Unfortunately, we can’t see that when the mainboards work at their default settings, so we have an additional test mode called Eco. It means the same default settings but we manually switch all options referring to Intel’s power-saving technologies from Auto to Enabled in the mainboards’ BIOSes. This helps improve the results, lowering the power consumption of our configurations considerably. Unfortunately, the ASUS Z87-Deluxe is still less economical than the others, even though we turned on every option of the CPU Power Management subsection, some of which are supposed to lower the mainboard’s idle power draw and have no counterparts in the other mainboards’ BIOSes.
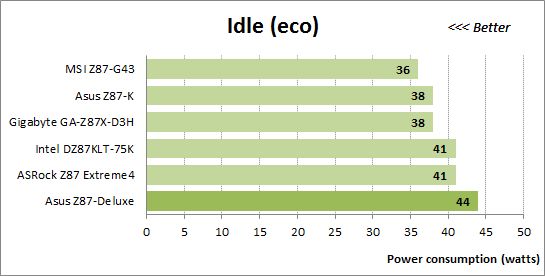
We want to remind you that we install an AMD Radeon HD 7970 graphics card into our test configurations. If we instead used the CPU-integrated graphics core, the overall power draw would be lower than 30 watts. Haswell-based CPUs are indeed very economical when idle, so it is a shame that the mainboards do not ensure this advantage by default. You have to correct their BIOS options for that.
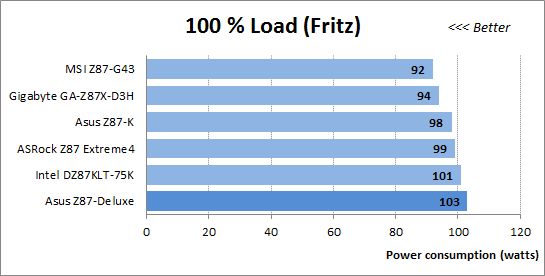
The high load on our Haswell is created by the LinX utility, a frontend for the Intel Linpack test, with support for AVX instructions. It is heavier on the CPU than ordinary applications, yet it is just an application nonetheless. It is quite possible that there are some other programs that can be just as heavy. That’s why we stick to using LinX for the purpose of checking the computer out for stability and when measuring its power consumption.

The numbers are high, but they are close to the highest power consumption possible at all. To measure the power draw of our configurations under typical applications, we used the Fritz benchmark. It doesn’t really matter which exactly application you use for that purpose. Any ordinary program that can run on four CPU cores will produce the same or comparable results. So it turns out that we shouldn’t worry about the high power draw under the AVX-using LinX. The typical power consumption is about 100 watts but can even be lower with the most economical mainboards.
By the way, you have to count in the graphics card’s power draw to calculate the overall system consumption. We use CPU loads in our power consumption tests, but if we load the AMD Radeon HD 7970, the total power draw will be close to 250 watts at default settings and even higher at overclocking.
Now let’s see how much power the mainboards need in idle mode when overclocked.
We don’t have a special Eco mode here because we always use as many power-saving technologies as possible while overclocking. Instead, we show you a summary diagram with the power consumption of each mainboard at different settings. The results are paradoxical. The overclocked systems (working at increased CPU voltage) need as much power as in the Eco mode and less than at the default settings. It just proves once again how important it is to enable all power-saving technologies if you want your computer to be energy efficient.
The overclocked systems need much more power at high loads compared to themselves at the default settings. The high frequencies and increased voltages show up then.
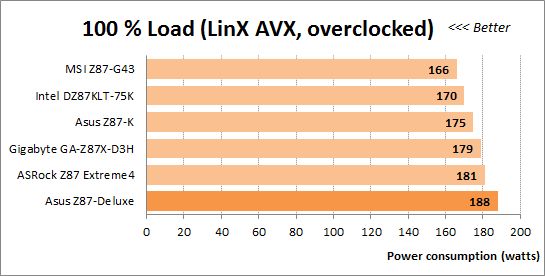

We were not very pleased with the power consumption of the Intel DZ87KLT-75K in our previous review as it would need more power than expected. However, we thought that the DZ87KLT-75K, being a top-end mainboard itself, would look better in comparison with other top-end products. And indeed, the ASUS Z87-Deluxe is top-end and comparable to the Intel in functionality, but consumes more power at any loads and at any settings. Well, for all their indisputable advantages, ASUS mainboards have never been very economical.
Conclusion
We’ve mentioned a number of downsides about the ASUS Z87-Deluxe throughout this review. Like all ASUS mainboards, it doesn’t provide any prompts about active hotkeys and doesn’t report the correct CPU clock rate when starting up. You may find it difficult to enter its BIOS interface. Not all of its power-saving technologies are enabled by default. And the CPU doesn’t work in its standard mode at high loads.
We had no problems with the mainboard’s overclocking features, though. ASUS mainboards turned out to support energy-efficient overclocking of Haswell-based CPUs without volt-modding, so the power-saving technologies were not disabled. As for its performance, the mainboard is about as fast as similar products from other brands.
We like the new options of ASUS’s EFI BIOS, especially the popup BIOS Setting Change window that show the list of changes to be applied. Besides various fine-tuning and overclocking options, top-end ASUS mainboards, including the Z87-Deluxe, offer a number of unique BIOS options in the CPU Power Management section which lower the mainboard’s power draw in idle mode. Despite this, the Z87-Deluxe turned out to have the highest power consumption among all the Z87-based mainboards we’ve tested so far.
Some of the errors in ASUS’s BIOS we had noticed earlier have been corrected, but BIOS profiles still do not save your turning off the startup picture. The mainboard cannot regulate the speed of 3-pin CPU fans. The power-saving options of the CPU Power Management Configuration page are hard to access whereas the My Favorites section contains a limited number of options and cannot be used as the start screen. Other sections can’t serve as a start screen, either. EPU Power Saving Mode with exclusive power-saving features has lost its flexibility.
Other mainboards have downsides of their own, even more serious ones, so we think the ASUS Z87-Deluxe is a good mainboard overall. Moreover, we think it is more balanced than other top-end LGA1150 products from ASUS. It features additional SATA 6 Gbit/s and USB 3.0 controllers, supports Wi-Fi 802.11a/b/g/n/ac and Bluetooth, has two Gigabit Ethernet adapters, and offers two CPU fan connectors and two POST code indicators. Its Q-Design technologies simplify the process of building a computer with this mainboard. USB BIOS Flashback allows to easily update the mainboard’s firmware. And the AI Suite III software is really useful, unlike utilities offered by many other mainboard makers. So, if you’re choosing from ASUS’s top-end mainboards, you should certainly consider the ASUS Z87-Deluxe.
Asus Bioses are total crap ! God damn USB 3 Live Stick Boot Problems ? How do i install god damn OS ? Maybe switch back to Burn DVD’s ! At least This works !!! Il switch to some Workstation Mobos ! This crap of Bioses on Asus Mobos is over problematic and useless !
This mobo is full of … PROBLEMS ! USB boot doesn’t work properly no mater what u do. I regret for buying this piece of crap. Asus produces over expensive shit hardware. If u can’t install OS on it then it is completely useless. UEFI crapware. Asus should rewrite this piece of shit Bios – mobo was pretty expensive. I rather go and buy workstations instead.