Gigabyte G1.Sniper and GA-X58A-OC: LGA1366 Mainboards for Gamers and Enthusiasts

The terms “gaming mainboard” and “overclocking mainboard” are very popular these days, but they somehow remain pretty vague and unclear. It turned out Gigabyte have their own idea of what the real gaming and overclocking mainboards should be like.
First LGA1366 mainboards appeared back in 2008 and since then they have already become somewhat obsolete. That is why mainboard makers initiated a second wave of Intel X58 Express based products. The major difference between the new boards and the older models became the support of such new interfaces as USB 3.0 and SATA 6 Gbps. Gigabyte did exactly the same thing and rolled out an entire family of new LGA1366 mainboards starting with the UD3R model and going up to UD9. However, they didn’t stop there and besides the common mainboards, began offering products in the new gaming series called “G1-Killer” as well as a special overclocking board.
In fact, the terms “gaming mainboard” and “overclocking mainboard” are very popular these days, but they somehow remain pretty vague and unclear. This is why they may often be applied to almost any contemporary mainboard. Today any mainboard with at least two graphics card slots supporting ATI CrossFire and Nvidia SLI configurations is positioned as a gaming product, even though most gamers do perfectly fine with just one graphics accelerator. The boards that were specifically designed with gamers in mind are Asus RoG (Republic of Gamers) and MSI Big Bang. As for overclocking, even some entry level mainboards have overclocking-friendly features and all manufacturers always stress their products’ unprecedented overclocking potential. It turned out Gigabyte have their own unique ideas of true gaming and overclocking mainboard. Well, it is going to be even more interesting to see what these ideas are with the help of a gaming Gigabyte G1.Sniper mainboard from the G1-Killer series and Gigabyte GA-X58A-OC mainboard for overclocking fans.
Closer Look at Gigabyte GA-X58A-OC
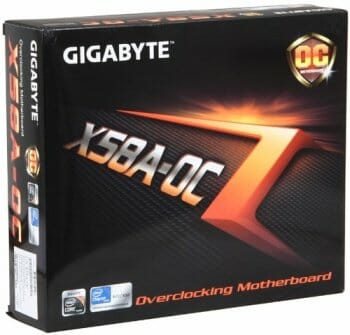
The box with Gigabyte GA-X58A-OC inside is of pretty standard size, but its design is dramatically different from what we saw on regular mainboards packaging. No bright multi-color images, no numerous logo icons, just the model name and a modest but significant description: “Overclocking Motherboard”.
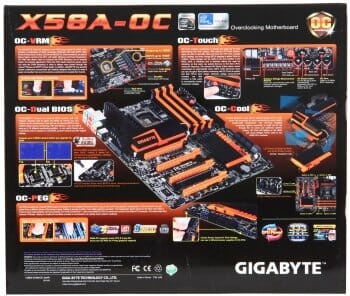
There is a mainboard photo on the back of the box with a brief description of its selected peculiarities, which we are going to dwell on later in our article.
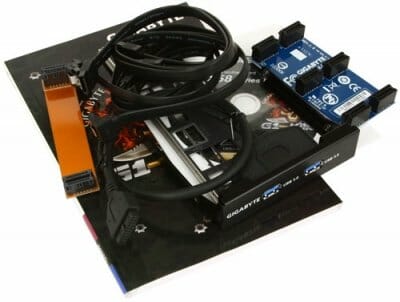
The accessories bundle is quite ordinary. Here is the detailed list of everything inside:
- Four SATA cables with metal connector locks, two with L-shaped locks and another two with straight ones;
- A flexible bridge for two-way SLI graphics configurations;
- A hard bridge for three-way SLI graphics configurations;
- A flexible bridge for two-way CrossFireX graphics configurations;
- A set of adapter-cables for manual voltage monitoring with a voltmeter;
- I/O Shield for the back panel;
- User manual;
- A booklet with brief assembly instructions in 18 languages;
- DVD disk with software and drivers;
- “Dolby Home Theater” and “Gigabyte” logo stickers for the system case.
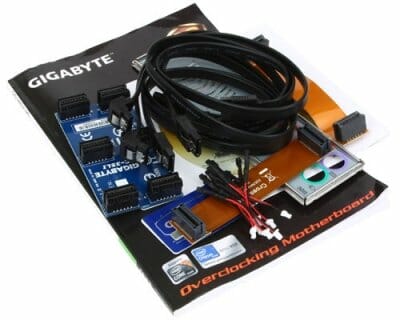
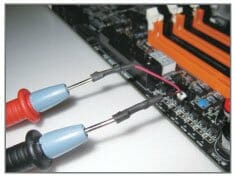
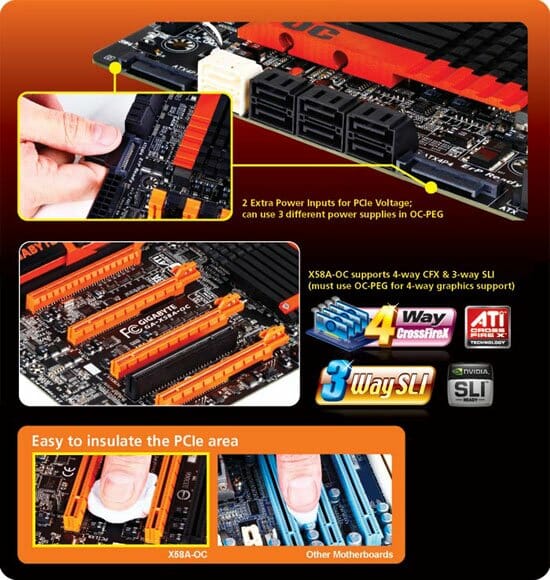
The only unique thing is the 2-Way CrossFireX bridge and a set of adapter-cables for manual voltage monitoring with the help of a voltmeter. Special bridges for ATI CrossFire graphics configurations rarely come even with graphics and hardly ever with mainboards. As for the sables, the board has a row of control spots, which allow users to manually take important voltage readings off them at any time. If we need to know the current voltage in any of the primary knots, then the best way to obtain the reading would be with a voltmeter probe. However, if you need to constantly monitor the voltages, then it is easier to use adapters, to free your hands.

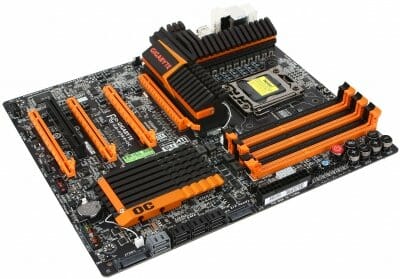
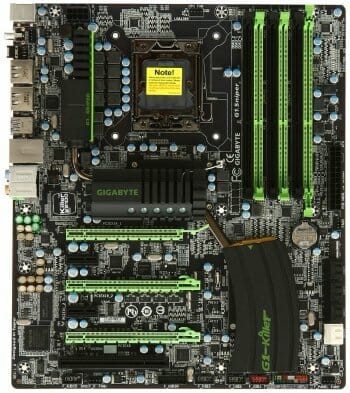
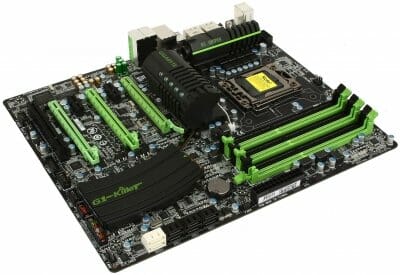
Now we should check out the stylish black-and-orange exterior of Gigabyte GA-X58A-OC mainboard and discuss all of its unique exclusive features.
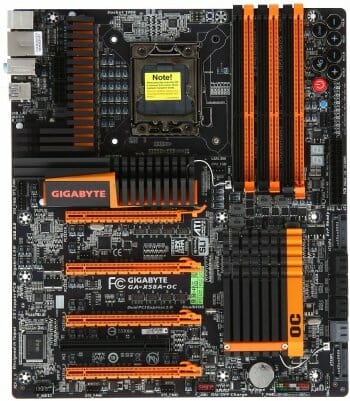
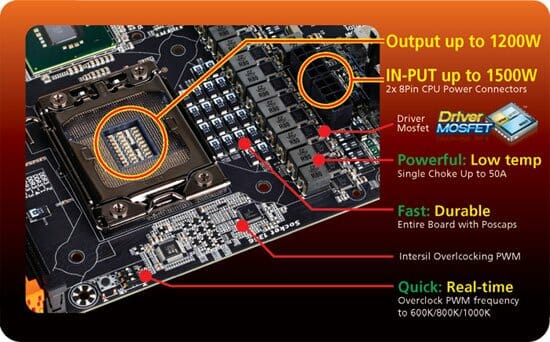
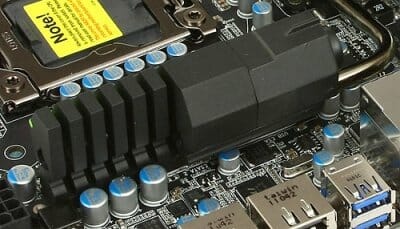
Let’s start by saying that they have updated all of their electronic components. We already know that the latest Gigabyte mainboard models have processor voltage regulator circuitry built with Driver-MOSFET, where two MOSFETs and a control unit are combined inside a single chip. We saw small rectangular tantalum capacitors on some MSI mainboards, and here we see them all over the place. Take a closer look and you won’t find even one single cylindrical shaped solid capacitor on this board, not to mention the practically fully retired electrolytic ones. Besides, the board is equipped with two eight-pin ATX12V processor power connectors, and the available DIP-switch allows changing the processor voltage regulator frequency.
A little above the processor socket you can find a small black Clear CMOS button for resetting the BIOS parameters. However, most of the buttons – and this mainboard has a lot of them – are located to the right of the memory DIMM slots.
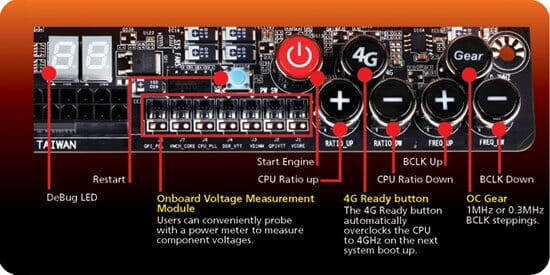
The mainboard is equipped with a POST-code indicator panel, then we see a row of contact spots for manual voltage monitoring with a voltmeter, and right above them a small blue Reset button. The large red button will power the mainboard on, the “4G” button will automatically overclock your processor to 4 GHz frequency. Two buttons with a “+” and “-“ on them allow changing the processor clock frequency multiplier and base clock on the fly. The “Gear” button allows adjusting the frequency increment from 1 to 0.3 MHz.
There is one PCI and four PCI Express 2.0 x16 slots for expansion cards. Two of the graphics card slots work at full speed, and the other two share the bandwidth with them, so if you use four graphics accelerators, then the slots will work at only half the speed. The additional power supply, which is recommended if there are more than one graphics cards in the system, is implemented in a very unusual way. There are two power connectors next to the Serial ATA ports, which look like SATA power connectors. These connectors are indeed the ones delivering additional power to the graphics cards. Moreover, they also specifically stress that there is enough free space around the processor socket and graphics card slots for isolating material used with extreme cooling systems in order to protect the PCB from condensate.
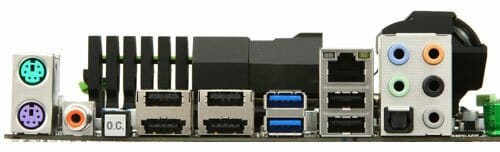
The back panel looks very unusual. We only see two PS/2 keyboard or mouse connectors, two USB 2.0 ports (two more can be connected to a single onboard pin-header), two USB 3.0 ports (blue connectors) implemented via EtronTech EJ168A controller, one local network connector (network adapter is based on Gigabit Realtek RTL8111E controller), and only three analogue audio outs delivered by an eight-channel Realtek ALC889 codec.
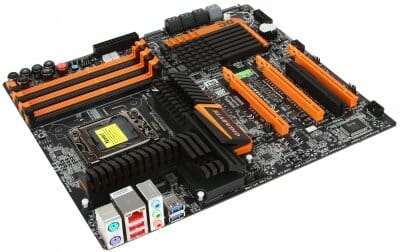
Since the back panel is only half full, the heatsinks of the cooling system get very close to it and this way some of the hot air can be removed from the system case. The heatsinks are pretty large, with ribbed profile, heatpipes and orange highlighting. But it was strange to see that only chipset North and South Bridge heatsinks were screwed to the PCB, while the voltage regulator heatsink was fastened with regular plastic push-pins. There are seven four-pin fan connectors on this mainboard, out of which only the processor and one of the system fan connectors allows adjusting the rotation speed of the three-pin fans.
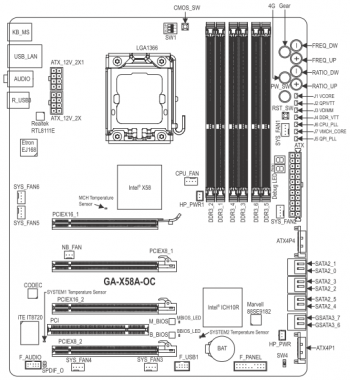
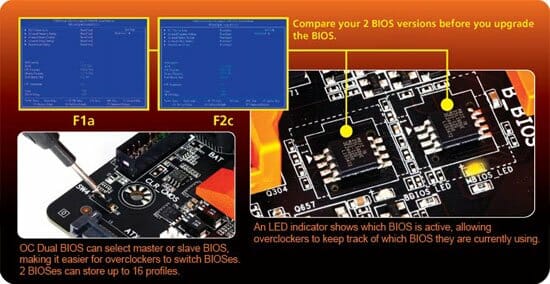
The overall layout of the Gigabyte GA-X58A-OC mainboard is of exceptional quality, which is always the case with Gigabyte products. We were particularly pleased to see that the location of thermal diodes responsible for system and North Bridge temperature are marked. I also have to mention that SATA 6 Gbps is implemented via Marvell 88SE9182 controller. Besides, many years ago Gigabyte mainboards were the first ones to start using two BIOS chips, the primary and the reserve one, but only now they also integrated a switch that allows you to decide which of the two chips will be the primary one and will boot the system.
Gigabyte GA-X58A-OC has very few additional controllers and a significantly limited number of ports and connectors. This mainboard can obviously become a good base for a personal computer, but it will serve best as an open testbed. Especially with all the buttons and indicators that allow changing operation modes rapidly.
Closer Look at Gigabyte G1.Sniper
The box with Gigabyte G1.Sniper is absolutely enormous! It is larger than anything I have seen over the past few years and maybe even the largest box ever. Once I saw this monster, I immediately started checking out the specs, because some Gigabyte’s flagship mainboards are designed in XL-ATX form-factor with extended length, which imposes certain additional limitations. However, my concerns turned out unnecessary, because it was indeed an ATX mainboard, which was simply packed this way. By the way, since this gaming board series from Gigabyte is called G1-Killer, the military theme starts right from the packaging, which is designed in a rusty-style with machine gun cartridge belts on it.

On the back of the box we see bullet holes, a photo of the mainboard inside and a brief description of some of its features.

The mainboard is bundled with the following accessories:
- Four SATA cables with metal connector locks, two with L-shaped locks and another two with straight ones;
- A flexible bridge for two-way SLI graphics configurations;
- A hard bridge for three-way SLI graphics configurations;
- Additional bracket with two USB 3.0 ports to go into the 3-inch bay of the system case;
- I/O Shield for the back panel;
- User manual;
- A booklet with brief assembly instructions in 10 languages;
- DVD disk with software and drivers;
- “Dolby Home Theater” and “Gigabyte” logo stickers for the system case.
I would like to point out a very useful additional bracket with two USB 3.0 ports for the 3-inch bay of the system case. It will offer you very convenient access to this contemporary interface. However, all these are more or less standard components. Besides them, you will also get a large double-sided G1-Killer series poster and a set of case stickers with the series logos, bullets and bullet holes.
Now let’s take our Gigabyte G1.Sniper out of the box and take a real good look at it:
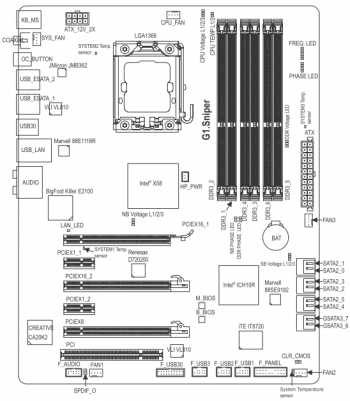
Had it been an ordinary mainboard, we would have started our story with the eight-phase voltage regulator circuitry. The number of active phases in this circuitry may change dynamically depending on the CPU utilization, which is displayed by a row of Phase LEDs. Although you have to install Dynamic Energy Saver utility for this technology to actually work. Processor voltage regulator is built with highly integrated components, where two MOSFETs and a control unit are combined into what is known as Driver MOSFET. However, I am pretty sure that the first thing to catch your eye on this mainboard was its uniquely designed cooling system, which components are all shaped in accordance with the military theme as weapons parts, even the ammo cartridge, i.e. the chipset South Bridge heatsink, is fully loaded. Just in case they did put a reminder on the packaging that all these parts are styled like weapon parts for aesthetic purposes only and cannot be used to assemble a real gun.
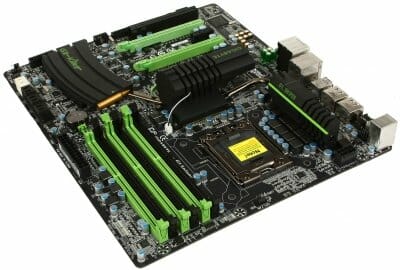
Everything looks very beautiful, the heatsink in the middle even has highlighting. However, in their attempt to create an unforgettable visual effect, the developers got carried away and forgot that the primary function of a heatsink is to dissipate heat efficiently. In fact, this cooling system has a few advantages over the one on Gigabyte GA-X58A-OC overclocker mainboard. First of all, all three heatsinks, and not just two, are tied together into a single cooling contour with heatpipes. Besides, all three heatsinks, and not just two, use secure screw-on retention. However, the heatsinks do not have to be huge, but they need sufficient effective heat-dissipating surface to be able to cool well, and that hasn’t been done properly. For example, I was pleased to discover that the barrel-shaped heatsink over the processor voltage regulator components was barely warm to the touch. However, as you can notice, the heatpipe between this heatsink and the next one over the chipset North Bridge doesn’t go beyond the middle of it.
I touched the part of the heatsink with ribbed profile, so it has large heat dissipating surface, but the heatpipe doesn’t go that far. At the same time the part of the heatsink shaped like a gun barrel with a sight turned out extremely hot, just like the rest of the cooling system. As a result, even in nominal more we had to use the same 80×80 mm fan that we normally use only during overclocking.
The chipset provides the board with six SATA 3 Gbps ports, an additional Marvell 88SE9182 controller delivers another two SATA 6 Gbps ports. Expansion cards can be installed into one PCI, two PCI Express 2.0 x1 and three PCI Express 2.0 x16 slots. When there are two graphics cards in the system, the slots will work at their full speed. The second and the third slot share 16 PCI Express lanes that is why with three graphics cards the speed layout will change to x16/x8/x8.
If we do not take into account the unique over-the-top cooling system, there won’t be anything on that board that we haven’t yet seen on regular non-gaming ones. Gigabyte G1.Sniper differs from them due to Creative CA20K sound processor supporting X-Fi Xtreme Fidelity and EAX Advanced HD 5.0. It uses its own memory allocated by a 128 MB DDR chip right next to it and special Nichicon Muse capacitors also utilized in integrated sound amplifiers.
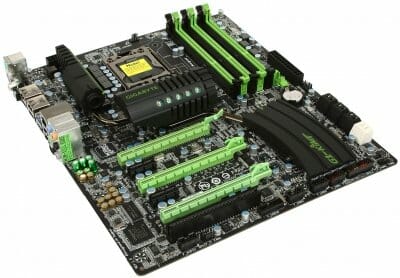
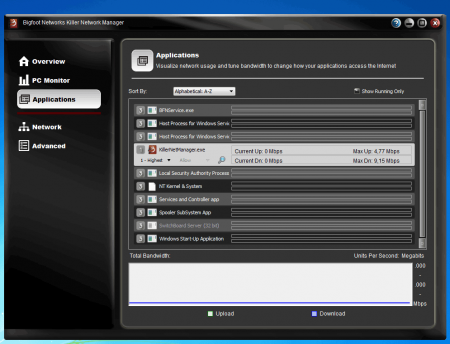
Besides, they replaced the regular network controller with Bigfoot Killer E2100 Gigabit network processor with 1 GB of proprietary DDR2 SDRAM. This controller takes network traffic processing off the CPU’s shoulders. And you wanted to configure your priorities, you would need to install Bigfoot Killer Network Manager utility first.
The mainboard back panel has the following ports and connectors:
- Two PS/2 connectors for keyboard and mouse;
- Coaxial and optical S/PDIF together with five analogue audio-jacks provided by eight-channel Creative CA20K2 sound processor;
- O.C.Button for automatic system overclocking;
- Six USB 2.0 ports (including a pair of eSATA/USB Combo ports), six more are laid out as three onboard pin-connectors;
- Two USB 3.0 ports (blue connectors) implemented via Renesas (NEC) D720200F1 controller and two VLI VL810 hubs, which also provided an additional internal pin-connector for two more USB 3.0 ports;
- Two eSATA/USB Combo 3 Gbps ports implemented via additional JMicron JMB362 controller;
- A local network port (network adapter is built around Gigabit Bigfoot Killer E2100 network processor).
The components layout shows that the board is covered with numerous LEDs, which have to be mentioned here. We have already pointed out a row of LEDs called the Phase LED, which shows the number of active phases in the processor voltage regulator circuitry, however, there are similar pairs of LEDs showing the utilization of the system memory or chipset North Bridge. A row of diodes called the Frequency LED will show the overclocking progress: the higher is the base clock, the more LEDs will light up. Overvoltage LED group will glow green, yellow or red to show the voltage of the CPU, memory, chipset North and South Bridge. Temperature LED will light up yellow when the CPU temperature is between 61 and 80°C and will switch to red if it goes beyond that. Finally, LAN LED will light up during POST if there are problems with the network controller.
So, the major features that really distinguish Gigabyte G1.Sniper from regular mainboards are Creative CA20K2 sound processor and Bigfoot Killer E2100 network processor.
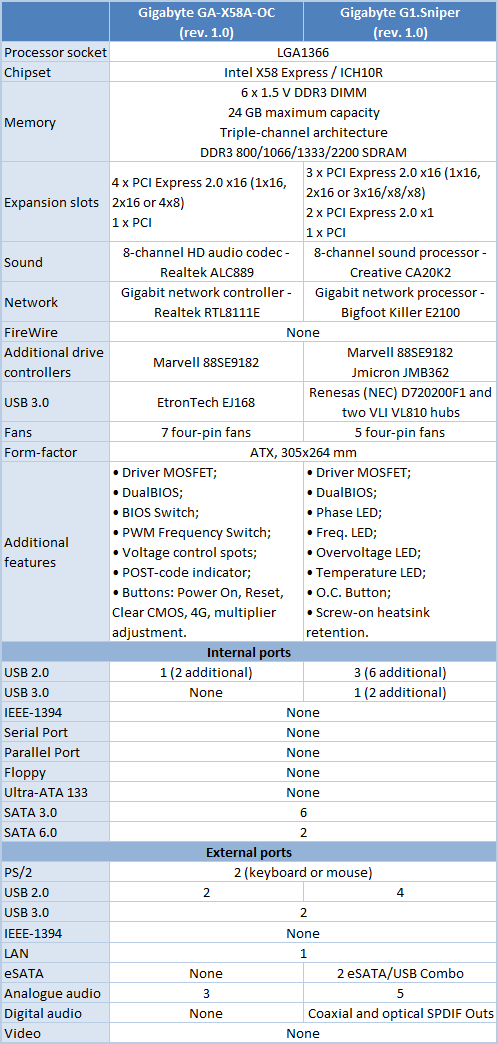
Technical Specifications Comparison
Gigabyte G1.Sniper and GA-X58A-OC mainboards are too different to be compared against one another, but for your convenience we put their technical specifications into one table:
BIOS Functionality
I would expect the BIOS of an overclocker mainboard to differ from the BIOS of regular boards. However, we didn’t notice any serious differences that is why we are going to post only the screenshots of the Gigabyte GA-X58A-OC BIOS and point out any differences in the Gigabyte G1.Sniper BIOS in those few sections where they actually exist. Just in case, let me remind you that you can get full access to all settings in Gigabyte mainboards BIOS only by pressing Ctrl-F1 in the main BIOS window.
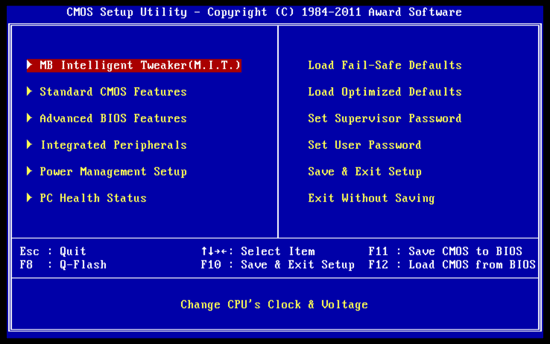
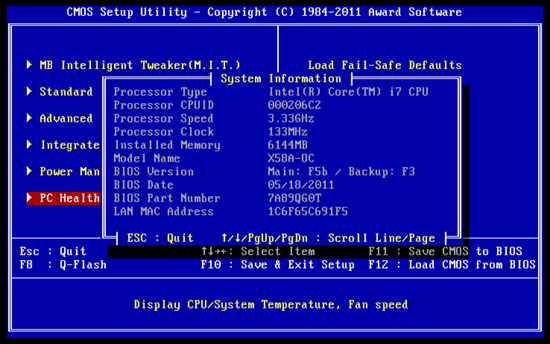
It is very convenient to see “MB Intelligent Tweaker (M.I.T.)” as the first item on the menu list. This section contains all parameters related to overclocking and system performance fine-tuning. The start-up page of this section only shows you the list of available sub-sections and reports basic system info:
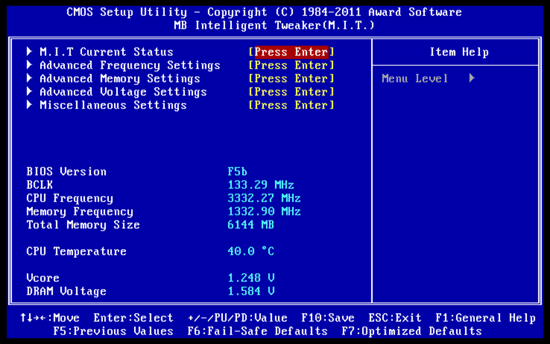
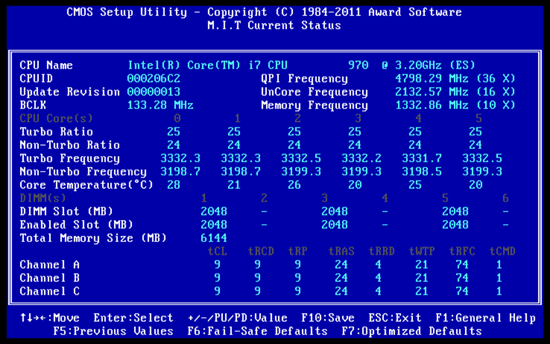
Then we see a purely informational sub-section called “M.I.T. Current Status” that displays the current system settings.
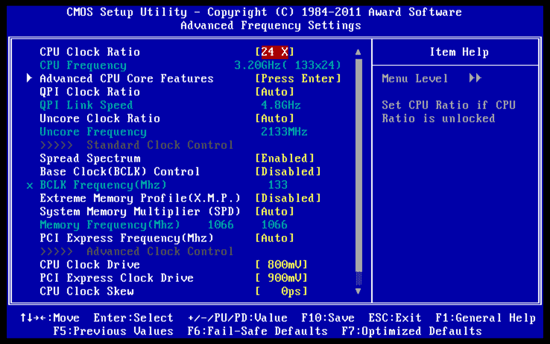
The “Advanced Frequency Settings” sub-section allows adjusting frequencies and multipliers. You will also be able to track all parameter changes by looking at the informational parameters and their values.
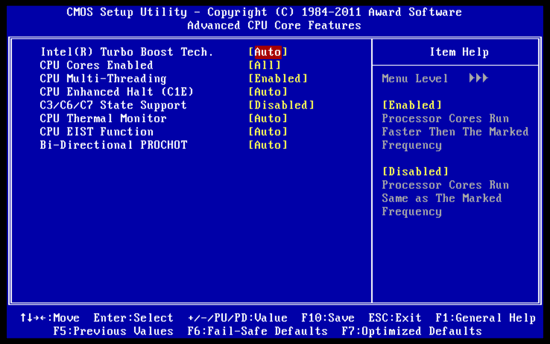
All settings related to processor technologies are gathered on a separate page called “Advanced CPU Core Features”. IT was pretty strange to see that all power-saving technologies were disabled by default.
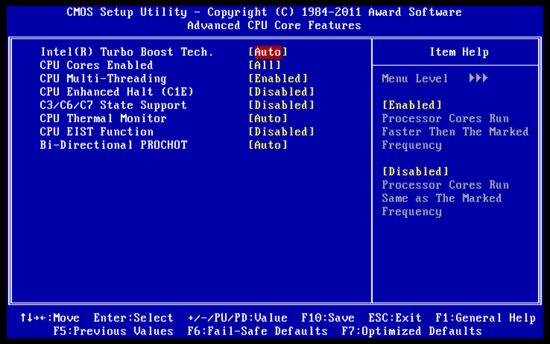
Things are also messed up (although not that badly) on the corresponding BIOS page of the Gigabyte G1.Sniper mainboard: its ability to switch to deep power-saving mode is disabled by default. As a result, both mainboards will consume more power than necessary in idle mode and Intel Turbo Boost technology will work only partially. Even when only one processor core is utilized, its clock frequency multiplier will increase only by 1x and not by 2x, as it should. It means that during the tests in single-threaded applications both Gigabyte mainboards will fall behind their competitors, which work correctly in this mode.
“Advanced Memory Settings” sub-section allows fine-tuning the memory sub-system.
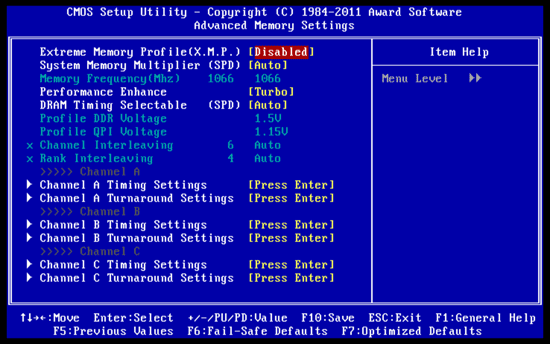
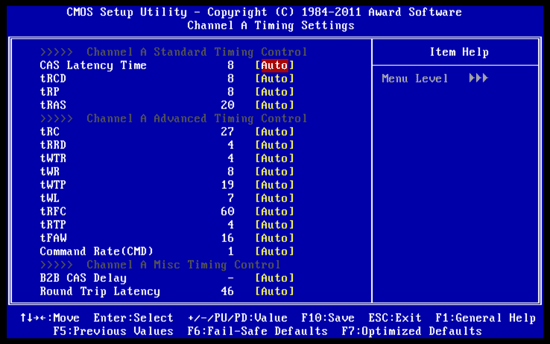
Numerous memory timings have been moved to individual pages. The timings may be set for all three memory channels simultaneously or for each of them individually.
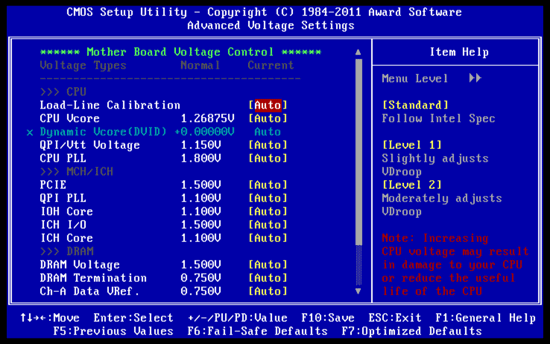
“Advanced Voltage Settings” sub-section allows adjusting the voltages. The processor voltage may be locked at a certain value or may be increased by adding a certain value to the nominal setting. In the latter case, even if you change any of the voltages during overclocking, the mainboard will leave all Intel power-saving technologies up and running. In idle mode the mainboard will lower not only the processor clock frequency multiplier, but also the CPU Vcore. There is also an option that allows you to vary the counteraction to the processor core voltage drop under heavy load in two steps. By the way, you can not only increase the voltages, but also set them lower than the nominal, which may come in very handy in some cases. For example, if you need to have your CPU work at lower frequencies or if you use low-voltage memory modules.
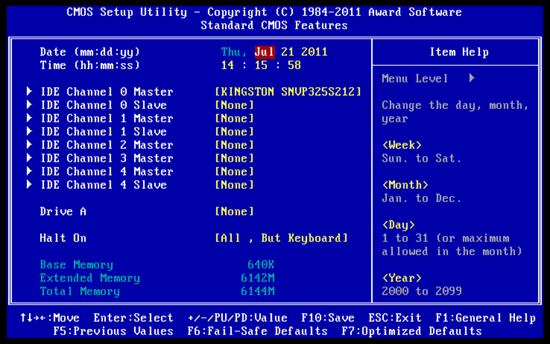
The contents of the “Standard CMOS Features” are as standard as its name.
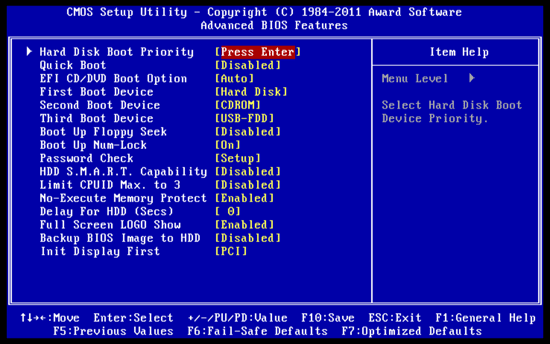
“Advanced BIOS Features” section offers you to choose the boot-up devices order and adjust a few other parameters:
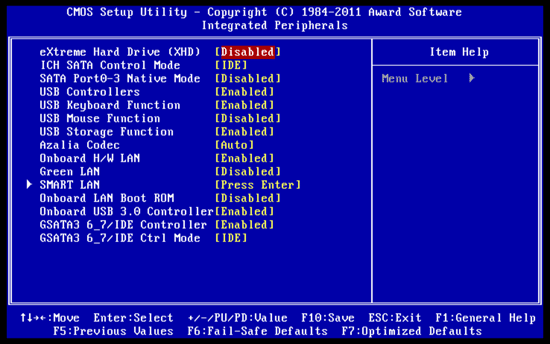
“Integrated Peripherals” section has a long list of options for configuring additional onboard controllers.
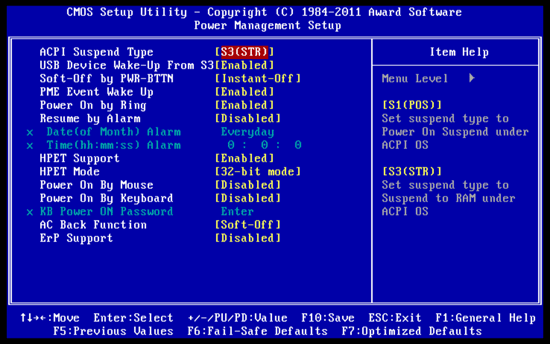
“Power Management Setup” has pretty common parameters:
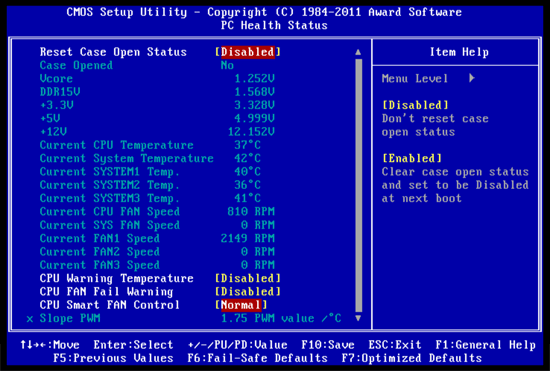
“PC Health Status” section reports data on the current voltages, temperatures and fan rotation speeds. Gigabyte GA-X58A-OC can adjust the rotation speed of three-pin fans, too. A while ago, it could only be done automatically, but they have recently introduced an option for manual adjustment in the BIOS. Besides the CPU fan, the system can also automatically adjust the rotation speed of a three-pin fan plugged into the SYS FAN4 connector.
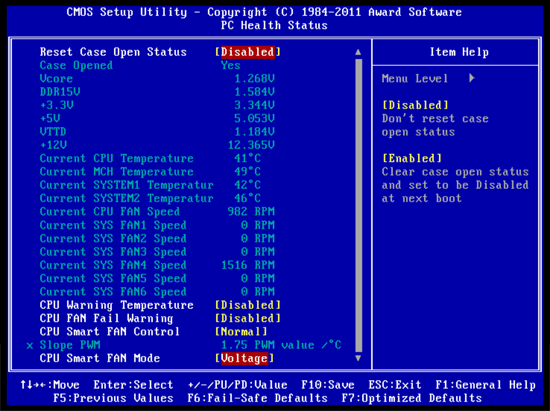
And Gigabyte G1.Sniper mainboard for some reason lost its ability to adjust the rotation speed of a three-pin processor fan, and there is no parameter in the BIOS that would allow you to select the adjustment mode. I have to say that you still can automatically slow down some of the three-pin fans connected to the mainboard, but only in the two fan connectors out of five – SYS FAN and FAN3.
You can get access to some additional features if you use specific functional keys in the main window of Gigabyte’s BIOS. By pressing F8 you will launch integrated Q-Flash Utility for BIOS updating, and by pressing F9 you will display system information on your screen.
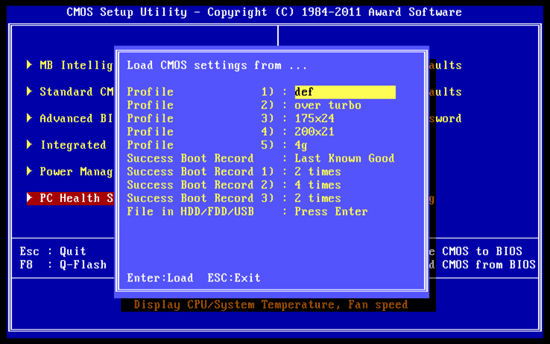
You can also press F11 to save one of the eight full BIOS settings profiles. Each profile may be assigned a descriptive name, and if you are trying to overwrite a profile, you will be warned. You can load a profile from a menu by pressing F12. Besides manually saved profiles, the mainboard automatically saves all configurations that passed the startup POST successfully and they can also be restored if necessary. You can also save and load profiles using external media.
We have been very well familiar with the looks and functionality of the Gigabyte’s BIOS pages. Everything is well thought-through and easy to use. We hardly have any serious complaints about anything. However, we have a few requests. For example, the built-in Q-Flash Utility for updating the BIOS doesn’t yet know how to read BIOS from storage devices formatted as NTFS, while many other mainboard makers have already implemented this feature. Also, the BIOS could use a few options for configuring Gigabyte’s proprietary technologies, such as dynamic adjustment of the number of active phases in the CPU voltage regulator circuitry depending on the CPU utilization. Other mainboard makers have already done it, and Gigabyte mainboards still require Dynamic Energy Saver utility to be installed.
Testbed Configuration
We carried out our tests on a testbed that included the following components:
- Mainboards:
- Gigabyte G1.Sniper v1.0 (LGA1366, Intel X58 Express, BIOS F4b);
- Gigabyte GA-X58A-OC v1.0 (LGA1366, Intel X58 Express, BIOS F5b);
- Intel DX58SO2 (LGA1366, Intel X58 Express, BIOS 0817);
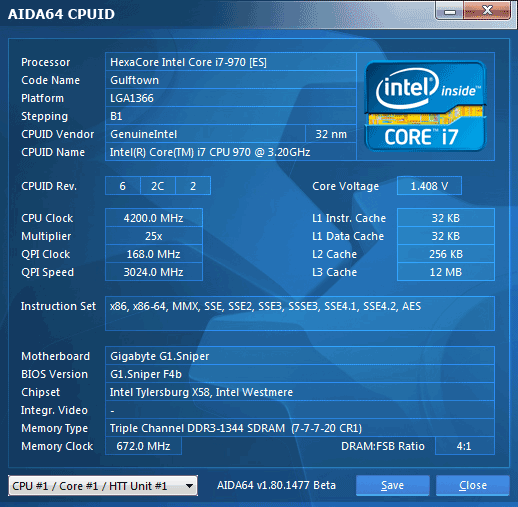
- Processor: Intel Core i7-970 (Gulftown, 6 cores, 3.2 GHz, 12 MB L3 cache, 130 W);
- Memory: 3 x 2048 MB DDR3 SDRAM Kingston KHX12800D3LLK3/6GX (1600 MHz, 8-8-8-24 timings, 1.65 V voltage);
- Graphics card: MSI N570GTX-M2D12D5/OC (Nvidia GeForce GTX 570, GF110, 40 nm, 786/4200 MHz, 320-bit GDDR5 1280 MB);
- Hard drive: Kingston SSD Now V+ Series (SNVP325-S2, 128 GB);
- Cooling system:
- Scythe Mugen 2 Revision B (SCMG-2100) CPU cooler;
- Additional 80×80 mm fan for cooling of the area around the CPU socket during overclocking experiments;
- Thermal interface: ARCTIC MX-2;
- Power Supply Unit: CoolerMaster RealPower M850 (RS-850-ESBA);
- System case: Open testbed built using Antec Skeleton system case.
We used Microsoft Windows 7 Ultimate SP1 64 bit (Microsoft Windows, Version 6.1, Build 7601: Service Pack 1) operating system, Intel Chipset Software Installation Utility version 9.2.0.1030, Nvidia GeForce/ION Driver 275.33 graphics card driver.
PerOperational and Overclocking Specificsformance
First I have to say that the system assembly with Gigabyte G1.Sniper went smoothly, but Gigabyte GA-X58A-OC didn’t want to take our Scythe Mugen 2 CPU cooler. Either the processor socket on this board was too close to the chipset North Bridge, or the retention holes for the North Bridge cooler are too far apart, but one of the North Bridge heatsink retention screws was in the way of the cooler backplate. I had to remove the screw completely, although later I still put it back in and tightened over the backplate. Of course, it is an isolated case and there may be absolutely no problem with a different processor cooler. However, I can’t think of any other mainboard where my Scythe Mugen 2 cooler wouldn’t fit.
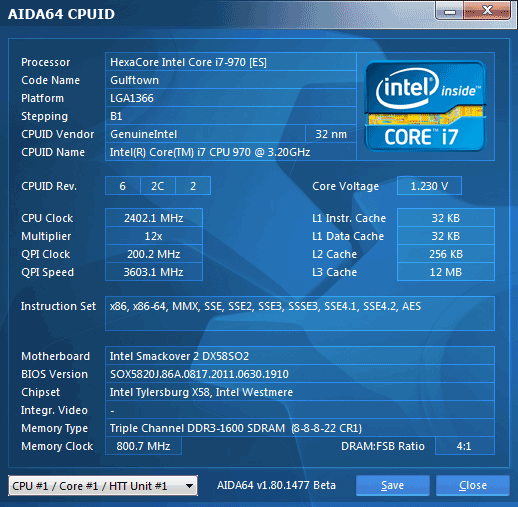
Now I have to introduce to you my new Intel Core i7-970 processor, which is now part of our upgraded testbed. I used to work with a quad-core Intel Core i7-930 for testing Intel X58 Express based mainboards, but when LGA1155 processors came out, it became hopelessly outdated. Our article called “Core i7-990X Extreme Edition vs. Core i7-2600K” clearly showed that only six-core LGA1366 processors in some applications are capable of competing successfully against the new-generation CPUs, so it doesn’t make any sense to continue using quad-cores. Unfortunately, the six-core choices from Intel are limited to 1000-dollar Core i7 Extreme Edition and the only other CPU with reasonably high price – Intel Core i7-970, that is why our choice was pretty much pre-determined. However, a new Intel Core i7-980 has recently come to replace it. Its nominal clock frequency multiplier is 1x higher and that is the only difference between the new Core i7-980 and the older Core i7-970 model.
So, Intel Core i7-970 has six cores, supports Hyper-Threading technology, which allows it to use 12 computational threads simultaneously, is based on a 32 nm Gulftown core and features 12 MB L3 cache. Its nominal clock frequency multiplier is 24x, so with the base clock of 133 MHz its works at 3.2 GHz frequency. However, I doubt you will ever see this value, unless you try really hard. In idle mode the CPU lowers its Vcore, just like its fellow brothers, and its clock multiplier drops to 12x bringing the frequency down to 1.6 GHz.

And under heavy load Intel Turbo Boost technology increases the clock multiplier to 25x, so most of the time the CPU works at 3.33 GHz.

However, if the load is average and only one core is actually utilized, the clock frequency multiplier will rise to 26x and its clock speed will increase to 3.46 GHz.

However, these are only the nominal operational modes. If you remember, the power-saving technologies on Gigabyte GA-X58A-OC are all disabled by default that is why the processor doesn’t change the clock frequency multiplier, doesn’t lower the core voltage and works at 3.33 GHz and 1.25 V Vcore all the time.

Our preliminary tests showed that the CPU could be overclocked to 4.2 GHz. There are several different ways of obtaining this frequency. The easiest way is to limit the clock multiplier by 25x by disabling “C2/C6/C7 State Support” parameter in the BIOS and increasing the base clock to 168 MHz. The disadvantage of this approach is that the CPU will stop switching to deep power-saving modes and the idling system will consume more power than necessary. In our case, we also had a problem with memory. The Kingston KHX12800D3LLK3/6GX modules that we used could work at 1600 MHz, but could hardly overclock at all. At 168 MHz base clock the memory frequency could be set at 1680 MHz, but our modules were incapable even of that tiny increase. As a result, we had to drop the memory speed to 1344 MHz, which is pretty slow by today’s standards.
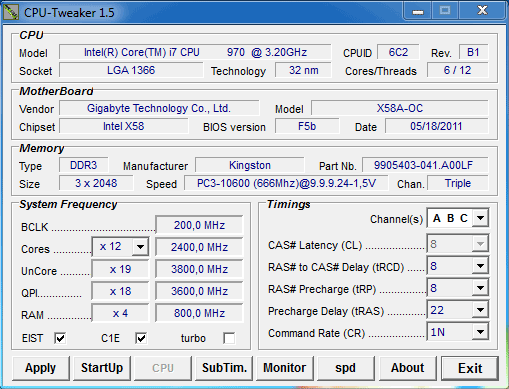
There is another way. We can disable Intel Turbo Boost technology, so the CPU clock frequency multiplier will stop increasing. And with the x24 multiplier we can get 4.2 GHz resulting clock if we raise the base clock frequency to 175 MHz. In this case the memory frequency will also be higher – 1400 MHz. However, we think that the third approach when we lower the processor clock frequency multiplier would be the best. We disable Intel Turbo Boost technology, lower the multiplier to 21x, but increase the base clock to 200 MHz. In this case, we can even leave the memory frequency at its nominal value of 1600 MHz. So, during our tests we used this particular approach and Gigabyte GA-X58A-OC did very well, although we did have to spend some time on finding the optimal voltage settings.

We do not approve of “screenshot overclocking”, when you can take a screenshot of the CPU working at a certain frequency, but there is no real long-term stability. This type of record-breaking hardly has any practical value. We always overclock our systems with intention to use them in this mode. Note that we never use any shortcuts like disabling additional controllers, for example. And we always do our best to keep all power-saving technologies up and running, if circumstances permit. So, in this case power-saving was in place and the processor core voltage and clock frequency multiplier dropped in idle mode.

We are going to compare Gigabyte mainboards against Intel DX58SO2. This board made a great impression during our test session. It was convenient to work with, was very energy-efficient, overclocked our quad-core processor very well. It did just as good with a six-core processor, and as it seemed to us back then, it repeated the results previously obtained on Gigabyte GA-X58A-OC.

Just like in the previous case all power-saving technologies worked normally. The only difference from the GA-X58A-OC mainboard was the fact that all these technologies were enabled by default.
However, the gaming Gigabyte G1.Sniper board turned out a disappointment. When we increased its base clock to 200 MHz, it couldn’t even load the operating system, not to mention any tests. When we overclocked it using a different method, at 175 MHz base clock and 24x multiplier, the OS loaded fine, but we couldn’t get our system to run stably in this mode. As a result, we had to work with the 168×25 overclocking method, which was the least efficient of all because of higher power consumption in idle mode and too low memory frequency.
The board still managed to overclock our test CPU to its maximum without losing processor power-saving technologies, but it is hardly a consolation in this situation.

By the way, they didn’t have to cover the O.C. Button on the mainboard back panel intended for automatic system overclocking with a protective plastic cap. This button turned out practically useless. You can press it without fear, because in this case the base clock is only increased from 133 MHz to 140 MHz. This 5% boost is hardly of any practical value and you won’t even notice a speed increase. So in the end we were certain that Gigabyte G1.Sniper mainboard would end up scoring really low because of all the little issues we pointed out. However, the results of our performance tests changed everything.
Performance Comparison
As usual, we are going to compare the mainboards speeds in two different modes: in nominal mode and during CPU and memory overclocking. The first mode is interesting because it shows how well the mainboards work with their default settings. It is a known fact that most users do not fine-tune their systems, they simply choose the optimal BIOS settings and do nothing else. That is why we run a round of tests almost without interfering in any way with the default mainboard settings. But today this approach was only applicable for Intel DX58SO2, which we have included into the article for comparison purposes. The CPU works the way it is supposed to only on this particular mainboard, while on Gigabyte GA-X58A-OC all power-saving technologies are disabled by default, and in the BIOS of Gigabyte G1.Sniper the switching to deep power-saving modes is also off. As a result, Intel Turbo Boost technology will only partially work on these mainboards: even when only one processor core is utilized, its clock frequency multiplier will only increase by 1x instead of 2x as it normally would. It means that during tests in single-threaded applications both Gigabyte mainboards will be slower and in idle mode both of them will consume more power than necessary. This comparison is obviously not going to be in Gigabyte’s favor, so we made an exception and manually enabled all power-saving technologies before commencing the tests.
However, it would be incorrect to claim that Intel DX58SO2 mainboard is a perfect ideal product. While reviewing this board I overlooked the fact that it didn’t use information from the memory modules SPD and used its own settings instead. The Kingston KHX12800D3LLK3/6GX memory modules that we use work at 1600 MHz frequency with 8-8-8-24-1T timings only when their voltage is increased to 1.65 V. to ensure that the computer starts successfully at the DDR3 nominal voltage of 1.5 V, the modules are introduced to the system as 1333 MHz memory with 9-9-9-24-1T timings. Both Gigabyte mainboards used these specific parameters, while on Intel mainboard the memory by default worked at 1066 MHz with 8-8-8-20-1T timings. One of the reasons why I didn’t uncover this issue when I reviewed Intel DX58SO2 was because for comparison purposes I chose Asus P6X58D-E. We didn’t detect any performance differences, but only because Asus mainboards also do not use the SPD settings for the memory and configure all parameters on their own. It could be that Asus mainboard set the same frequency and timings. So, we decided not to correct the memory frequency and timings on Intel DX58SO2 this time. On the contrary, we were curious to see how it would affect the performance. Note that the results of our testing participants are arranged in a descending order on the diagrams.
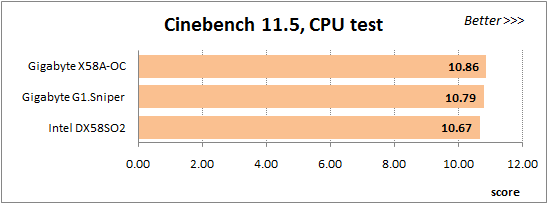
We used Cinebench 11.5. All tests were run five times and the average result of the five runs was taken for the performance charts.

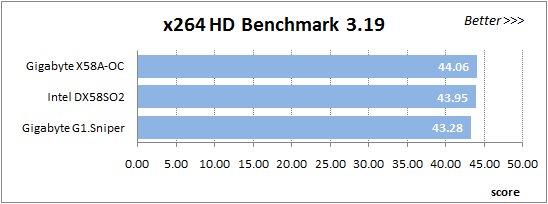
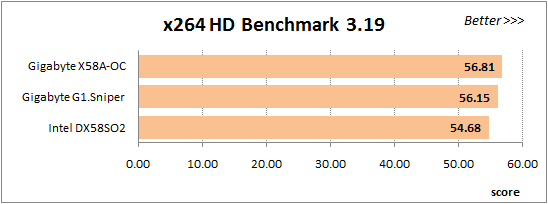
A small video in x264 HD Benchmark 3.0 is encoded in two passes and then the entire process is repeated four times. The average results of the second pass are displayed on the following diagram:
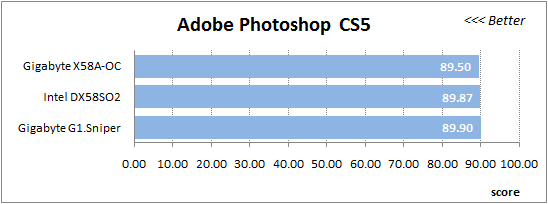
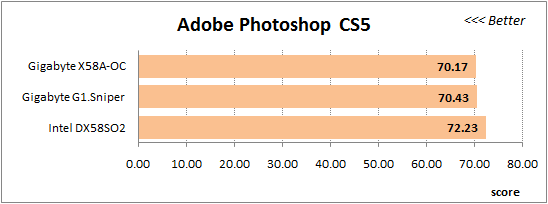
We measured the performance in Adobe Photoshop using our own benchmark made from Retouch Artists Photoshop Speed Test that has been creatively modified. It includes typical editing of four 10-megapixel images from a digital photo camera.
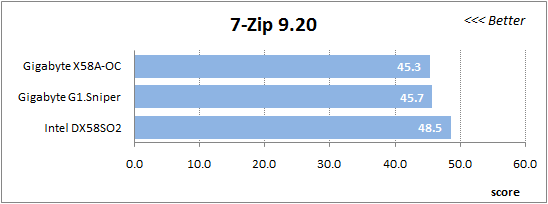
In the archiving test a 1 GB file is compressed using LZMA2 algorithms, while other compression settings remain at defaults.
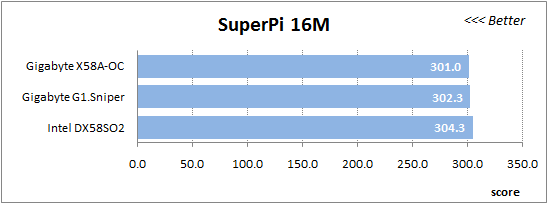
Like in the data compression test, the faster 16 million of Pi digits are calculated, the better. This is the only benchmark where the number of processor cores doesn’t really matter, because it creates single-threaded load.
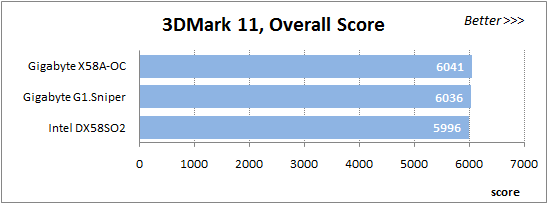
There are good and bad things about complex performance tests. However, Futuremark benchmarking software has become extremely popular and is used for comparisons a lot. The diagram below shows the average results after three test-runs in 3DMark11 Performance mode with default settings:
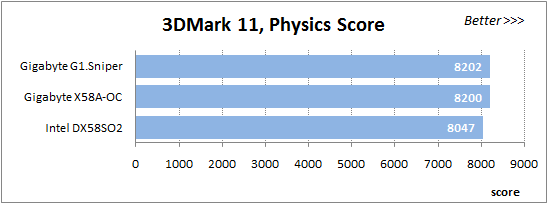
Since we do not overclock graphics in our mainboard reviews, the next diagram shows only CPU tests from the 3DMark11 – Physics Score.
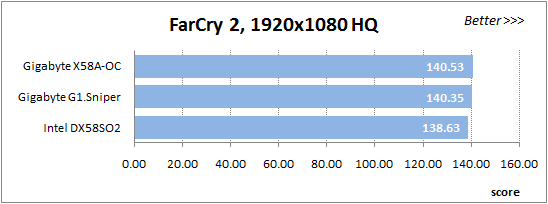
We use FC2 Benchmark Tool to go over Ranch Small map ten times in 1920×1080 resolution with high image quality settings in DirectX 10.
Resident Evil 5 game also has a built-in performance test. Its peculiarity is that it can really take advantage of multi-core processor architecture. The tests were run in DirectX 10 in 1920×1080 resolution with high image quality settings. The average of five test runs was taken for further analysis:
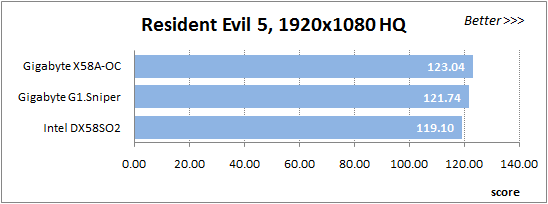
The performance difference is not very dramatic, but Intel mainboard is often the last of the three, because its memory worked at a slightly lower frequency and the more aggressive timings couldn’t really make up for that. We see a slight lag of about 6-7% in 7-zip test, which is extremely sensitive to the memory sub-system parameters. However, do not forget that we manually fully enabled Intel Turbo Boost on both Gigabyte mainboards. This allowed them to avoid disaster in single-threaded SuperPi and Adobe Photoshop tests.
And now let’s run the same exact tests in overclocked mode. The differences in system settings are recorded in the following table:

All mainboards overclocked our test processor to 4.2 GHz, but the gaming Gigabyte G1.Sniper board could accomplish it only at a lower base clock frequency and therefore its memory also worked at a lower speed. As we have expected, overclocking parameters on Gigabyte GA-X58A-OC and Intel DX58SO2 were identical, sow e expected them to perform at about the same speed with Gigabyte G1.Sniper falling behind. However, in reality things turned out totally different.


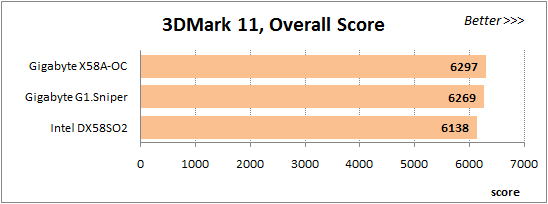
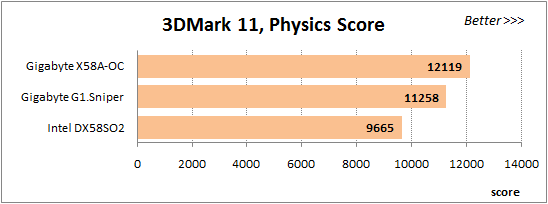
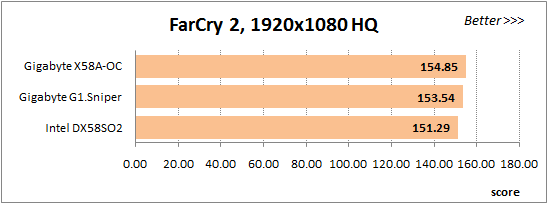
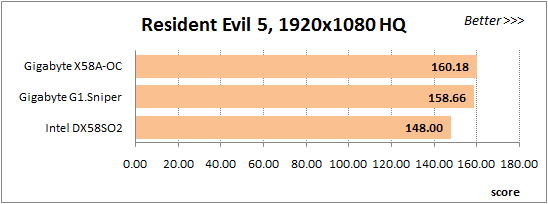
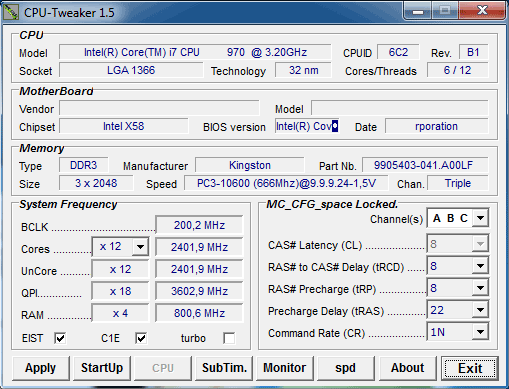
The gaming Gigabyte G1.Sniper is indeed always behind overclocker Gigabyte GA-X58A-OC, which is quite logical judging by the overclocking results. However, despite our high expectations, Intel DX58SO2 was unable not only to maintain the same performance level as the overclocker mainboard, but it simply turned out the slowest board of the three, even though the overclocking settings of the gaming board are way worse. All this seems very strange at first glance. However, the explanation is simple enough. The AIDA64 screenshots that we used as illustration of our overclocking achievements do not show one very important parameter – the frequency of the North Bridge built into the processor also referred to as Uncore, which contains memory controller and L3 cache memory. All frequencies on an LGA1366 platform are derived from the base clock by applying different multipliers to it. The Uncore multiplier should be at least twice as high as the memory clock multiplier and by default I equals 16x. It means that with the nominal base clock of 133 MHz, the frequency of this unit is 2133 MHz. When we overclocked our system to 200 MHz base clock, overclocker Gigabyte GA-X58A-CO board increased this multiplier to 19x thus raising the Uncore frequency to 3800 MHz.
The gaming Gigabyte G1.Sniper board turned out even more aggressive than the overclocker one and raised the Uncore multiplier to 20x.

Intel DX58SO2 worked in the same conditions as Gigabyte GA-X58A-OC. It lowered the clock frequency multiplier to 12x thus reaching the lowest Uncore frequency and therefore finishing last.
Actually the fact that we overlooked such an important parameter as Uncore frequency and let the mainboard set it on their own is a serious omission on our part. All boards set their Uncore frequency by themselves and although all of them allow users to manually configure multipliers, we could have easily corrected the Uncore values. However, the obtained results are extremely valuable, because they once again showed us that leaving some important parameters in Auto mode is not just unreasonable, but sometimes even harmful.
Power Consumption
We performed our power consumption measurements using an Extech Power Analyzer 380803. This device is connected before the PSU and measures the power draw of the entire system (without the monitor), including the power loss that occurs in the PSU itself. In the idle mode we start the system up and wait until it stops accessing the hard disk. Then we use LinX to load the CPU. For a more illustrative picture there are graphs that show how the computer power consumption grows up depending on the number of active execution threads in LinX. The mainboards on the diagrams are sorted in alphabetical order.
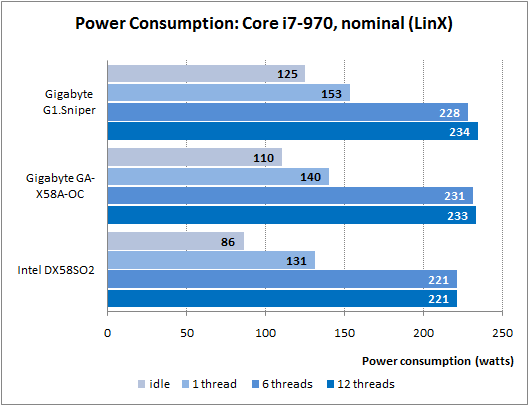
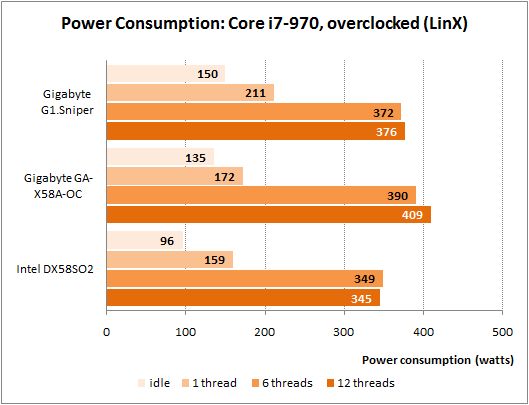
I would like to remind you that we enabled all power-saving modes manually on Gigabyte mainboards, because by default they are not working for some reason. Unfortunately, even this measure didn’t help: the difference between Gigabyte and Intel mainboards is noticeable under any type of work load, but in idle mode when there is no load the difference is simply enormous. However, a common home system is indeed idling most of the time, so it is a very serious issue for both Gigabyte mainboards.
Conclusion
Overall, the results of our today’s test session for the gaming Gigabyte G1.Sniper and overclocking Gigabyte GA-X58A-OC mainboards turned out pretty interesting. We were particularly surprised by the second board. I have to admit that I didn’t expect to see anything like that at all. In my understanding an overclocking mainboard is a board which allows fast and easy overclocking. I am aware that many won’t agree with me. For example, DFI mainboards with numerous complex and undocumented BIOS options also used to be considered overclocking-friendly. By putting a lot of time and effort into finding the optimal settings in constant trial and error you could in the end achieve slightly higher overclocking success than you would on a regular board without spending too much time on it. I was subconsciously expecting something like that from Gigabyte GA-X58A-OC, but it turned out totally different. Its BIOS was exactly the same as the BIOS of other Gigabyte mainboards. Its design was pretty surprising, as it had a minimal amount of onboard controllers and a very limited number of ports and connectors. It can certainly be used for a PC, but mostly for overclocking experiments in an open testbed. Especially, since it is loaded with all sorts of buttons and switches that allow changing the operational modes quickly and easily. There are also some drawbacks. Namely, we had some problems with the processor cooler installation, which means we may not be the only ones out there. It was a little unclear why they would have a 4G button for automatic overclocking, which will hardly ever be utilized by overclocking professionals. It would make much more sense on a gaming Gigabyte G1.Sniper, because its own O.C.Button is pretty useless.
The gaming Gigabyte G1.Sniper board made a more restrained impression. It has a few unique features that distinguish it from the regular mainboards, such as integrated Creative CA20K2 sound processor and Bigfoot Killer E2100 network processor. However, if they focus on the sound quality, then they should have made a separate module instead of integrating the sound card onto the board. As for the network processor, the traffic routing may be performed by the router or a separate program, such as ROG GameFirst on Asus mainboards, for instance. Does a special network processor really unload the CPU? However, LGA1366 processors are only available in quad- and six-core form and they are capable of processing 8-12 threads at the same time. There are hardly any games out there that can load these processors 100% especially if it is an online game and most of the load falls on the graphics accelerator. I assume that the CPU can manage the network traffic. We won’t deny the benefit of having a special network processor, but the real need for it is a little doubtful. Besides, we didn’t particularly like the uniquely beautiful, but not very efficient cooling system on Gigabyte G1.Sniper board and its very average overclocking potential.
Both Gigabyte mainboards discussed in this review suffer from the same pretty serious drawback: they both have very high power consumption. In fact, it is not a deal breaker for the overclocking Gigabyte GA-X58A-OC, which is intended for occasional use and setting new overclocking records, but for a gaming Gigabyte G1.Sniper it does matter a lot.
Overall I have to stress that both mainboards are not mainstream solutions, they are targeted for very specific user groups – those in love with online games and high-quality sound and those who dedicate their time to extreme overclocking. So, you have to seriously consider your usage model in order to decide whether any of these unique products are the right one for you.