Gigabyte GA-Z77-D3H Mainboard Review: Not So Complex LGA 1155 Mainboard

There are a lot of mainboards out there with a variety of onboard controllers and an extensive list of functions. Of course, there are simpler and even more affordable mainboards, but perfection like Gigabyte GA-Z77-D3H is a very rare occurrence among them.
Having decided to add a few entry-level models to the long list of Z77-based products we had tested, we started out by reviewing the ASUS P8Z77-V LK mainboard. It is only natural that the next one should be from Gigabyte, but what model exactly? We’ve always been fond of the seemingly simple and comprehensible nomenclature of Gigabyte’s mainboards, yet there may occasionally be some difficulties. It’s easy to rank several models from the same series if their names begin with “UP4”, “UP5” and “UP7”, but it’s hard to quickly grasp the difference between two mainboards whose names end in “HD3” and “D3H” (but there is a difference in functionality, and it’s quite substantial). Anyway, we’re going to tell you about one of them today. It is called Gigabyte GA-Z77-D3H.
This model has no exact counterpart among ASUS products. On one hand, like the mentioned ASUS P8Z77-V LK, it is equipped with an additional controller to implement two back-panel USB 3.0 ports and relies on the capabilities of the Intel Z77 Express chipset otherwise. But on the other hand, like the ASUS P8Z77-V LX, it doesn’t implement the chipset’s ability to share CPU-integrated PCIe lanes between two graphics slots. It may seem that the simpler Intel Z75 Express chipset might be used just as well for that functionality, but that’s not so. Even if we disregard the fact that Gigabyte, and most other mainboard makers, does not offer any products with the rather useless Z75 Express, the GA-Z77-D3H has one important feature that wouldn’t be possible with it. We’ll tell you all about this and other features in our review, but first let’s take a look at the product’s packaging and accessories.
Packaging and Accessories
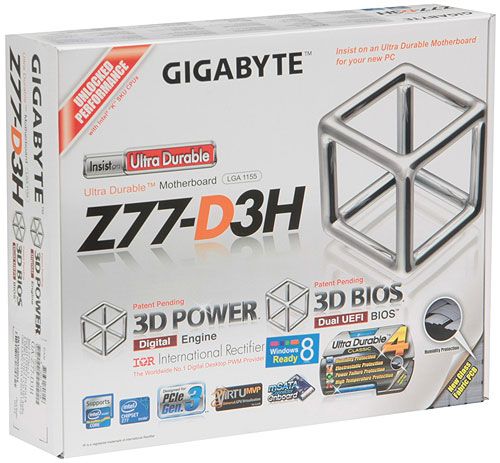
We can see an example of Gigabyte’s traditional mainboard packaging here. There’s a model name and a few logotypes referring to the mainboard’s capabilities and technologies on the front of the box. A picture of the product can be found on the back together with a list of basic specifications and illustrated descriptions of a few key features.
The mainboard is additionally wrapped into an antistatic pack inside. Above it and separated from it with a sheet of cardboard, we find the following accessories:
- Four SATA cables with metal connector locks, half with two L-shaped locks and another half with one straight and another L-shaped lock. Tow cables are specifically designed for 6 Gbps devices (black);
- I/O Shield for the back panel;
- User manual;
- Brief installation guide in different languages;
- DVD disk with software and drivers;
- “Gigabyte” logo sticker for the system case.
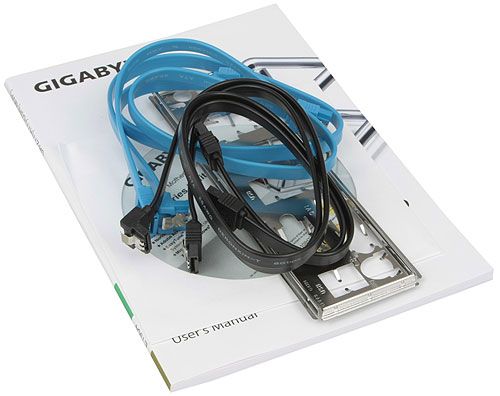
Only ASUS mainboards used to come with special cables for SATA 6 Gbit/s devices (with white inserts on the connectors) but now such cables are included with Gigabyte products as well. Frankly speaking, we don’t know how the special SATA 6 Gbit/s cables differ from ordinary ones. They look the same, except for color, and use the same 26AWG wires, but the black cables have the 6 Gbit/s label whereas the blue ones don’t.
PCB Design and Functionality
A few years ago Gigabyte switched to black as the color of its premium mainboards. We didn’t like that change since black lacked originality. Black mainboards can be found from different brands whereas blue had been the unique and easily recognizable color of Gigabyte. Black also makes the product look rather gloomy and less informative. It is only recently that Gigabyte began to differentiate memory slots belonging to different controller channels as black and gray, but expansion slots remain all black. Of course, the color of a PCB and slots doesn’t affect a mainboard’s functionality. It only helps create the first impression, so we can put up with it.
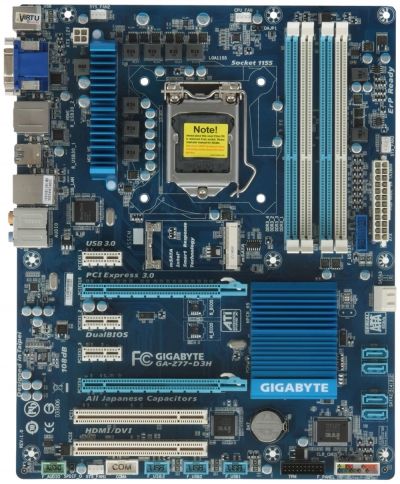
The first impression from the Gigabyte GA-Z77-D3H is different, though. Being an entry-level product, it still pleases the eye with Gigabyte’s very own blue-and-white color scheme.
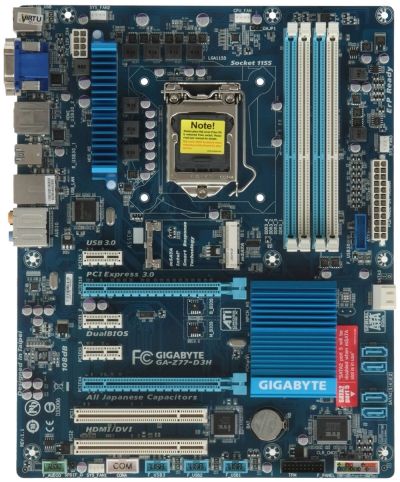
The mainboard has a digital power system, called 3D Power, which lets you flexibly and accurately control voltage on the CPU as well as on the CPU-integrated graphics core. Some of the hot components of that system are covered with an additional heatsink which is secured with screws. Featuring Gigabyte’s Ultra Durable 4 Classic technology, the mainboard has protection against high temperature, voltage surges, electrostatic discharges and high humidity. The Classic version of the Ultra Durable 4 technology lacks double-thickness copper interconnects.
The Gigabyte GA-Z77-D3H doesn’t use the ability of the Intel Z77 Express to share CPU-integrated PCIe lanes between graphics slots and only offers one PCIe 3.0/2.0 x16 slot for a discrete graphics card (it always works in full-speed x16 mode). NVIDIA SLI is not supported but you can build a multi-GPU configuration by using AMD CrossFireX and the second PCIe 2.0 x16 slot (which only works in x4 mode and disables the PCIe 2.0 x1 slots). There are also two PCI slots for expansion cards.
The mainboard has no additional disk controllers, so its two SATA 6 Gbit/s (white-colored) and four SATA 3 Gbit/s (blue-colored) ports are based on the chipset. A red sticker on the mainboard warns you that the fifth SATA 3 Gbit/s is going to be unavailable if you use the mSATA connector located between the CPU socket and the graphics slot. There are quite a lot of Gigabyte mainboards with Intel 7 series chipsets that offer a free mSATA slot. It is a special feature and advantage as it allows to install a small SSD and enable Intel Smart Response technology to accelerate your hard disk by using the SSD as its cache. Of course, an mSATA SSD can also be used individually or you can enable Intel Rapid Start technology instead. However, Intel Smart Response is the most useful and demanded capability for the mSATA slot. That’s why the simpler Intel Z75 Express wouldn’t do here, by the way. It just doesn’t support Intel Smart Response. As a side note, we can tell you that the GA-H77-D3H and GA-H77-D3H-MVP mainboards also offer this functionality by using the Intel H77 Express chipset.
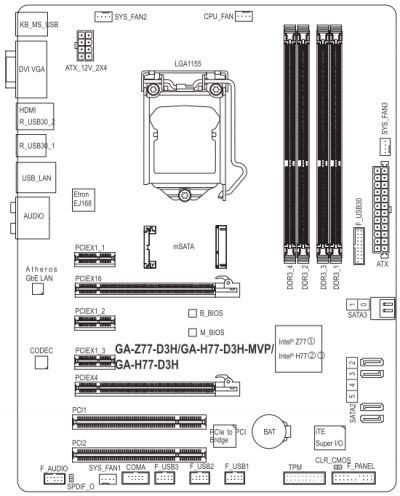
Typically for Gigabyte, the GA-Z77-D3H is equipped with two BIOS chips. The DualBIOS technology is implemented in such a way that only one chip is in use while the other serves as a backup copy. Then, we can spot four 4-pin fan connectors on the chart. It is another special feature of Gigabyte products that they retain the ability to regulate 3-pin CPU fans which most other mainboards have lost already. Among the other three connectors, only the one labeled SYS_FAN1 can lower the speed of a 3-pin fan. We can note one inaccuracy about the picture. It shows ordinary latches on the graphics slots but the latter are actually equipped with broad and handy ones. Well, ours is a revision 1.1 sample while you may meet a Gigabyte GA-Z77-D3H revision 1.0 which looks almost the same and has the same functionality. The only notable differences are the graphics slot latches and that the ATX12V power connector is 4-pin rather than 8-pin.
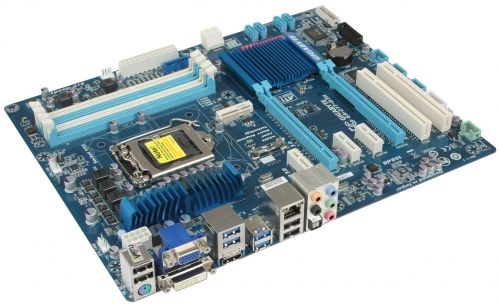
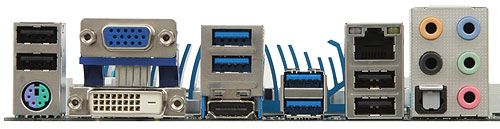
We can see the following connectors occupying the mainboard’s back panel:
- Universal PS/2 connector for mouse or keyboard;
- Four USB 2.0 ports, another six are available as three onboard pin-connectors;
- D-Sub, DVI-D, HDMI video Outs;
- Four USB 3.0 ports (blue connectors), two of which are built via Etron EJ168 controller, and another two including one internal onboard pin-connector for two more USB 3.0 ports were implemented through the Intel Z77 Express chipset;
- A local network port (network adapter is built on Atheros AR8161 Gigabit network controller);
- Optical S/PDIF and five analogue audio-jacks provided by eight-channel VIA VT2021 codec.
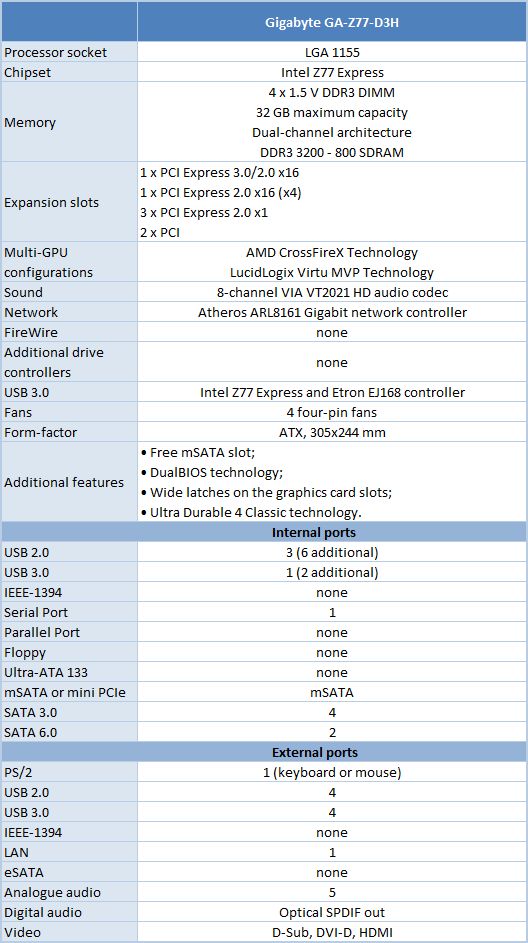
For your convenience we summed up all the technical specifications of the Gigabyte GA-Z77-D3H mainboard in the following table:
BIOS Functionality
In our previous reviews of Gigabyte mainboards we have already discussed multiple times the functionality of Gigabyte 3D BIOS and the default “3D Mode”. In this mode we see a schematic layout of the mainboard, which key knots are highlighted one by one inviting the user to click on them. It works as a visual hint for the inexperienced users prompting them how they could proceed to adjusting the settings for their processor, memory, voltage regulator, etc.
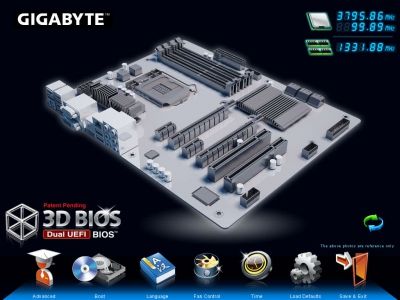
In some cases it is more convenient to work in the visual “3D Mode”, however, the “Advanced Mode” offers more parameters, which we will briefly revise here again.
When you switch to the “Advanced” mode, you get into the “M.I.T.” (MB Intelligent Tweaker) section, which contains all parameters related to overclocking and performance optimizations. The section main screen only lists all sub-sections and reports the basic system data.
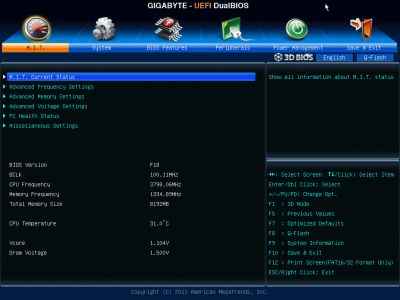
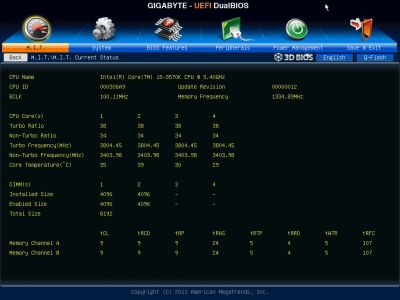
Then we see a purely informational “M.I.T. Current Status” sub-section telling you the current operational parameters of the system.
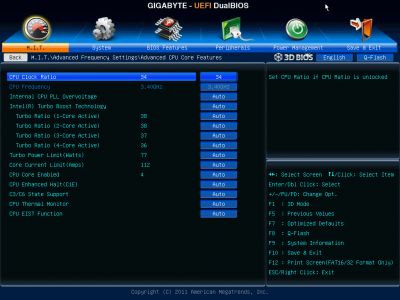
The “Advanced Frequency Settings” sub-section allows you to adjust frequencies and multipliers and there are special informational parameters that will keep you posted about the changes you are making.
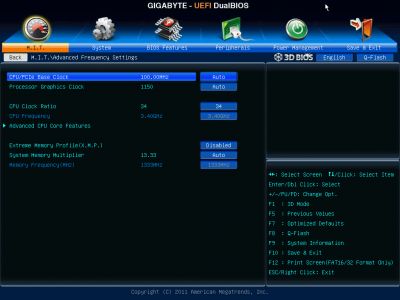
The settings dealing with processor technologies, detailed adjustment of the CPU clock frequency multiplier and power-saving modes are singled out onto a separate page called “Advanced CPU Core Features”.
“Advanced Memory Settings” sub-section allows you to fine-tune the memory sub-system.
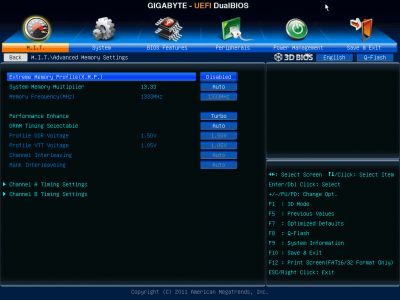
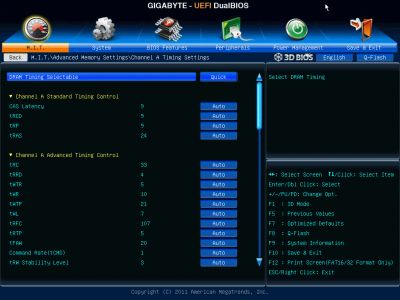
Parameters controlling numerous memory timings are all on separate pages. You can set the timings simultaneously for both memory channels or individually for each one of them.
“Advanced Voltage Settings” sub-section allows you to work with different voltages that are all grouped into four separate pages.
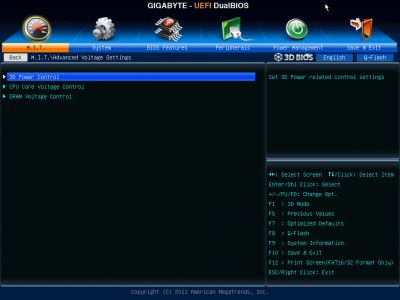
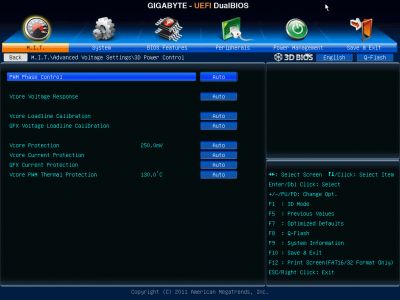
There are a few new parameters in the “3D Power Control” page, which appeared due to the introduction of “3D Power” technology. Now you can set the operational mode for the processor voltage regulator, adjust the level of Vdroop counteraction under heavy load and change a lot of other options right in the BIOS.
The voltages in different parts of the processor can be changed on “CPU Core Voltage Control” page. The CPU Vcore may be locked at a certain value or you may also add a certain value to the nominal setting.
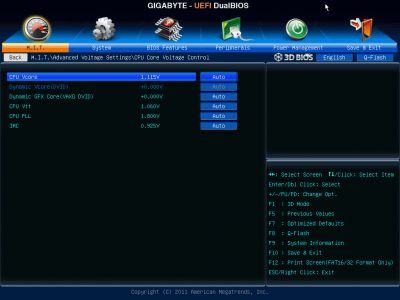
The voltages may be not only increased, but also reduced below the nominal, which may come in very handy sometimes. For example, you may need it if your CPU is functioning at the lower than nominal frequencies or if you are using low-voltage memory modules.

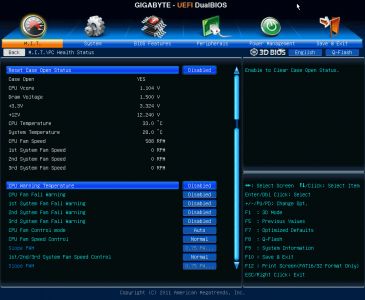
The “PC Health Status” subsection reports current voltages, temperatures and fan speeds. The rotation speed of four fans out of five can be adjusted. You can adjust the rotation speed of the CPU fan and three system fans separately. You can select one of the two preset modes – Normal or Silent – or adjust fan settings manually to your liking. Only the rotation speed of the fourth system fan can be monitored but cannot be adjusted. Unfortunately, if you are using three-pin fans, only the rotation speed of the processor fan and of the first system case fan can be lowered manually, other fan connectors do not support speed adjustment for three-pin fans any more.
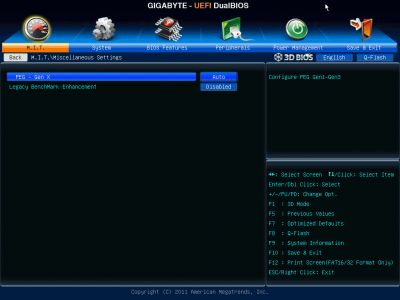
“Miscellaneous Settings” sub-section appeared and remained empty or disappeared completely from Gigabyte mainboard BIOS on several occasions. It turns out this is where you select the operational mode for your PCI Express 3.0/2.0 x16 slots and can therefore improve the performance in certain tests.
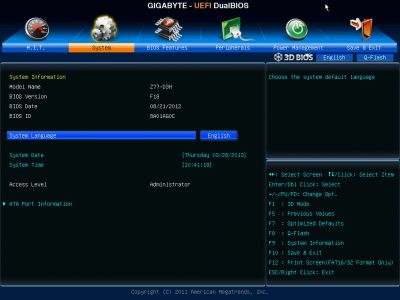
The “System” section is similar to the “Standard CMOS Features” section of the older BIOS. It will tell you basic system information and show the list of connected drives on the “ATA Port Information” page. You can also change the date, time and interface language here.
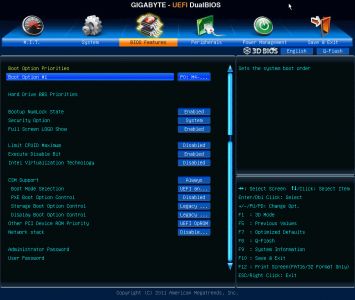
The “BIOS Features” section is where you define your boot devices order, enable the startup picture, control other parameters and technologies, e.g. virtualization, and specify access passwords.
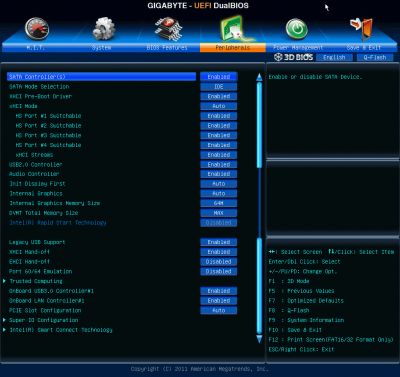
The “Peripherals” section is about external devices and additional onboard controllers. Chipset-specific technologies like Intel Rapid Start and Intel Smart Connect are also configured here.
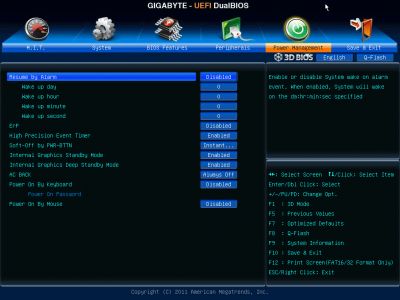
”Power Management” section contains a conventional set of parameters pertaining to the mainboard power supply and start-up.
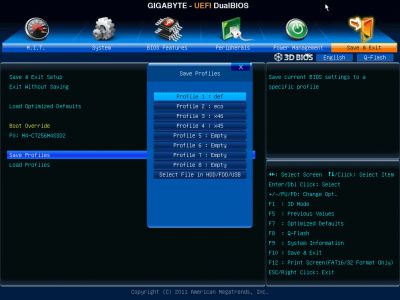
To apply or dismiss your changes you go to the “Save & Exit” section. Here you can also restore default settings. This section also offers you two parameters for BIOS settings profiles management. You can save or load up to eight BIOS profiles, assign each of them a descriptive name. You can again save profiles to external media and load profiles from them. Also, the profiles are saved automatically after each successful system startup.
Some of the functional keys still work the same way. Just as before, F9 will bring up system information.

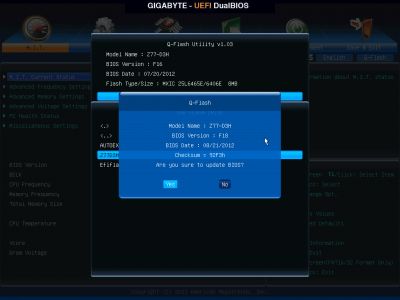
The built-in Q-Flash utility for BIOS updating can be launched by pressing the namesake button or the F8 hot key. It has become more convenient to work with and now shows you both the current BIOS version and the new one you are trying to update to. But it is still unable to work with NTFS disks and the current BIOS version is saved only in the root folder of a disk rather than where you choose to.
The software team, who have been working on Gigabyte 3D BIOS, have truly earned our absolute respect and praise. Within a relatively short period of time they managed to execute the transition from the old Award BIOS to the new AMI UEFI BIOS. Moreover, they managed to implement almost all the previously existing feature in the new BIOS. The profile management functionality that has been seriously limited in the beginning is now back in its most complete form including work with external media and automatic saving of the latest settings profiles after a successful system startup. They can now again control the rotation speed of the processor fans with three-pin connectors, although only one system fan connector allow lowering the rotation speed of three-pin system fans. They came up with a simple and convenient way to select the active BIOS mode. If you were configuring your system in 3D Mode, this will be the mode you see next time you enter the BIOS Setup, and if your last settings save was in Advanced Mode, then you will get right back to it next time. As a result, after a number of improvements and enhancements the new Gigabyte 3D BIOS offers a full set of parameters for performance optimization, overclocking and simply comfortable overall user experience.
Testbed Configuration
We performed all our tests on a testbed built with the following components:
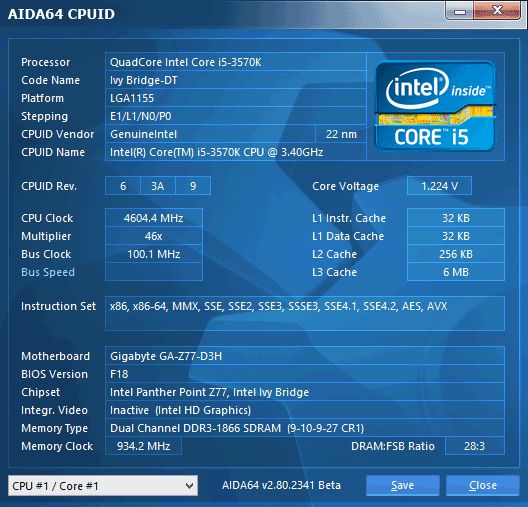
- Gigabyte GA-Z77-D3H rev. 1.1 mainboard (LGA1155, Intel Z77 Express, BIOS version F18);
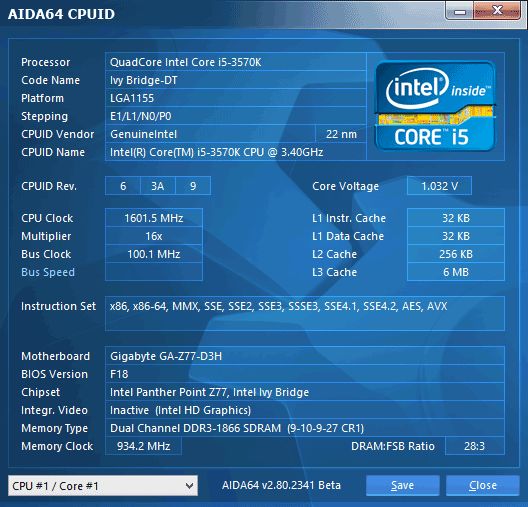
- Intel Core i5-3570K CPU (3.6-3.8 GHz, 4 cores, Ivy Bridge rev.E1, 22nm, 77 W, 1.05 V, LGA 1155);
- 2 x 4 GB DDR3 SDRAM Corsair Vengeance CMZ16GX3M4X1866C9R (1866 MHz, 9-10-9-27 timings, 1.5 V voltage);
- Gigabyte GV-T797OC-3GD (AMD Radeon HD 7970, Tahiti, 28 nm, 1000/5500 MHz, 384-bit GDDR5 3072 MB);
- Crucial m4 SSD (CT256M4SSD2, 256 GB, SATA 6 Gbps);
- Noctua NH-D14 CPU cooler;
- ARCTIC MX-2 thermal interface;
- Enhance EPS-1280GA 800 W PSU;
- Open testbed built using Antec Skeleton system case.
We used Microsoft Windows 8 Enterprise 64 bit (Microsoft Windows, Version 6.2, Build 9200) operating system, Intel Chipset Device Software driver package version 9.3.0.1026, AMD Catalyst 13.1 graphics card driver.
Operational and Overclocking Specifics
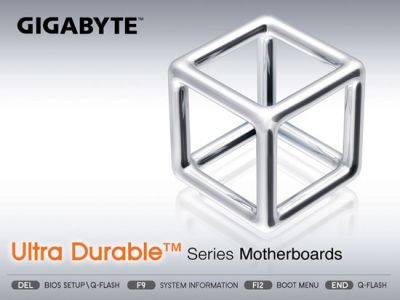
When launched, the Gigabyte GA-Z77-D3H shows a startup picture in the bottom of which you can see a list of active hotkeys. Pressing the Del key will lead you to the mainboard’s BIOS. F9 will show a window with system information (the same key displays the same window if pressed in the BIOS, too). F12 opens up a menu to choose a device to boot from. The End key can be pressed to launch the integrated firmware update tool Q-Flash.
There’s no Tab key listed here which is usually used to remove the startup picture. You can disable the latter in the BIOS, but the fact is, unlike most mainboards from other brands, Gigabyte ones do not output any boot-related information on the screen. The only thing you can see is an AMI logo since the BIOS is based on AMI’s code. We would have called it a downside in the past, but today’s mainboards usually start up so fast that you barely have time to press the key to enter their BIOS, let alone peruse any information they may output. We only mention this because we couldn’t find any real downsides about the GA-Z77-D3H. It doesn’t follow the current trend to increase CPU clock rate by default as many other mainboards do. It also sets the default frequency (1333 MHz) and timings for our system memory according to the SPD information. It is easy then to adjust the clock rate manually or via an XMP profile and change memory timings. Every power-saving technology works by default – you don’t have to change BIOS options from Auto to Enabled as on some other mainboards.
The only odd thing we noticed is that the operation mode for disk drives is selected as IDE instead of AHCI by default. In our recent reviews the ECS Z77H2-A2X (v1.0) was the only mainboard to default to IDE while others enabled AHCI. You can easily switch to the required operation mode, but it’s unclear why the mainboard chooses the outdated one by default. By the way, Gigabyte mainboards come with a special Disk Mode Switch utility which lets you change the operation mode of the disk controller from Microsoft Windows. We’ll tell you more about the exclusive software below.
There are no automatic overclocking features in BIOSes of Gigabyte mainboards. You are supposed to use the Easy Tune6 utility instead. It is hardly a downside since automatic overclocking cannot help you achieve the same results as you can get by overclocking manually. The Gigabyte GA-Z77-D3H did well in our overclocking tests, making our CPU stable at its maximum clock rate of 4.6 GHz. Not all mainboards we’ve tested can do that. We also lifted the memory clock rate up to 1866 MHz and adjusted memory timings.
We want to remind you that we prefer “sustained” overclocking, which means that the overclocked system can be used continuously. We don’t disable any features or controllers. We keep Intel’s power-saving technologies up and running so they lower the CPU’s frequency multiplier and voltage, disable unused CPU subunits and switch the CPU into power-saving modes at low loads.
Gigabyte’s Proprietary Software
We haven’t reviewed Gigabyte’s mainboard-related software for a while, but it hasn’t actually changed. Every utility included into the bundle is familiar to us and was covered in our reviews earlier. So today we’ll just remind you what each of them is supposed to do.
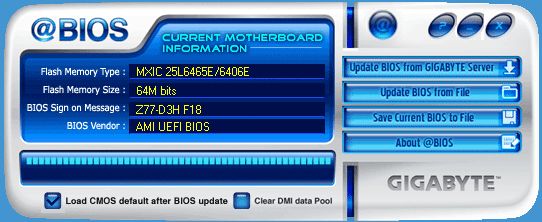
The @BIOS utility is one of the oldest. Its appearance and capabilities haven’t changed much for many years. Its purpose is in updating and saving firmware. With internet access, it can automatically look for and download the latest BIOS version. It can also update a mainboard’s BIOS and save firmware on a local disk.
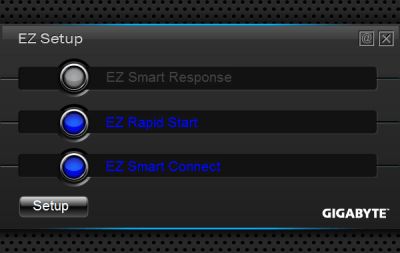
As opposed to @BIOS, the EZ Setup tool is a recent addition to Gigabyte’s software bundle. It helps you enable and set up Intel’s Smart Response, Rapid Start and Smart Connect technologies. Everything, including any necessary BIOS changes, is done by EZ Setup automatically, you only have to mark the required technologies in the list and click the Setup button (Intel Smart Response cannot be selected in the screenshot below because our configuration only included a single SSD).
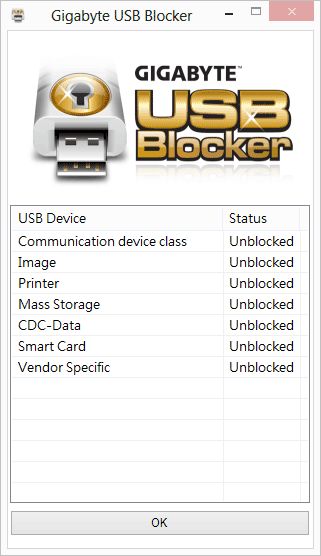
The USB Blocker tool may be helpful not only for system administrators in large corporations but also for parents with not-very-obedient children. It can prohibit the use of USB devices. When you launch USB Blocker for the first time, you are asked to enter a password which will then be used for changing the utility’s settings or disabling it.
We also installed the On/Off Charge tool, which is a special driver for quick recharging of Apple gadgets even if the computer is turned off but remains connected to the mains.
There’s a whole lot of other tools for every purpose. Xpress Recovery 2 can save and restore data backups. The 3D Power utility helps you set up the namesake power system right from Microsoft Windows. TweakLauncher serves for changing frequencies, voltages and memory timings. LAN Optimizer helps optimize network settings. The Disk Mode Switch utility we’ve mentioned above can change the disk controller’s operation mode without entering the BIOS. However, these tools are not yet available for our Microsoft Windows 8 64-bit, so we didn’t install them and can’t show you their screenshots.
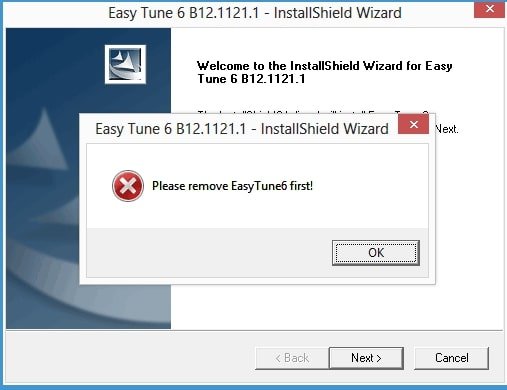
There are some Windows 8 issues even with utilities that are supposed to be compatible with it. We wanted to begin our description of Gigabyte’s excusive software tools from Easy Tune6. It reports CPU, memory and mainboard information, allows you to change clock rates, frequency multipliers and voltages and enable predefined overclock profiles, and can help set up fans and view monitoring data. We know this because we had used the utility earlier. But this time around, after we installed it and rebooted our computer, we couldn’t find the utility’s icon on the desktop or in the Metro interface. When we tried to reinstall it, we got a warning that we needed to remove the currently installed version first.
However, we couldn’t do that because Easy Tune6 was missing on the list of installed software. We couldn’t even find its folder on our SSD to manually launch the uninstall file. The first installation must have gone wrong but some Windows registry entries prevented us from trying again.
By the way, none of the Gigabyte utilities asks for an installation path. All of them get installed automatically onto the system disk in the folder C:\Program Files\Gigabyte or (for 64-bit systems) C:\Program Files (x86)\Gigabyte.
Performance Comparison
As usual, we are going to compare the mainboards speeds in two different modes: in nominal mode and during CPU and memory overclocking. The first mode is interesting because it shows how well the mainboards work with their default settings. It is a known fact that most users do not fine-tune their systems, they simply choose the optimal BIOS settings and do nothing else. That is why we run a round of tests almost without interfering in any way with the default mainboard settings. For comparison purposes we also included the results from our ASRock Z77 Extreme11 and Asus P8Z77-V LK mainboard reviews. The results in the diagrams were sorted out in descending order and the numbers for Gigabyte GA-Z77-D3H are highlighted with a darker color for your convenience.
Nominal Mode
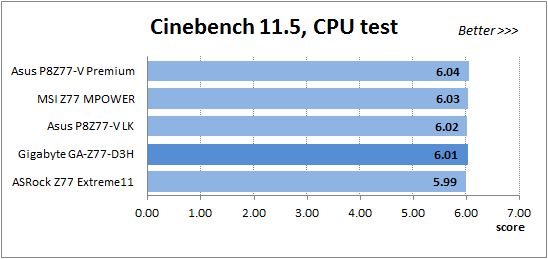
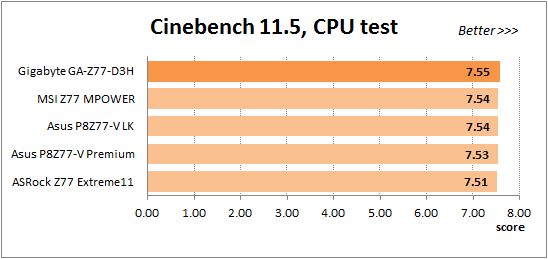
We used Cinebench 11.5. All tests were run five times and the average result of the five runs was taken for the performance charts.
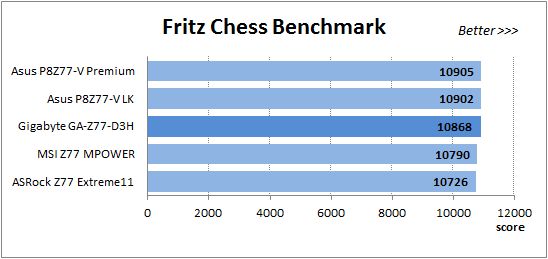
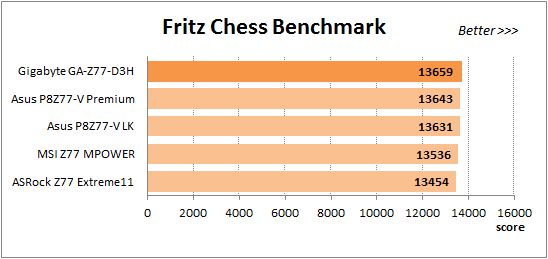
We have been using Fritz Chess Benchmark utility for a long time already and it proved very illustrative. It generated repeated results, the performance in it is scales perfectly depending on the number of involved computational threads.
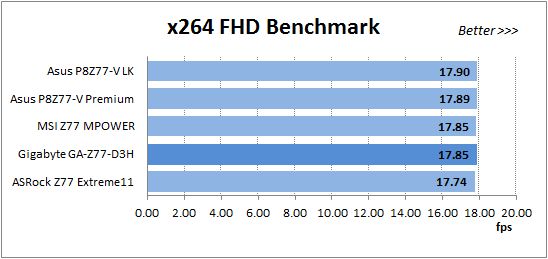
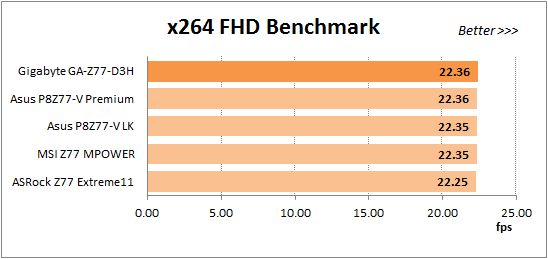
x264 FHD Benchmark v1.0.1 (64 bit) allows us to compare the system performance against the results in the database. The average results of the five test runs are displayed on the following diagram:
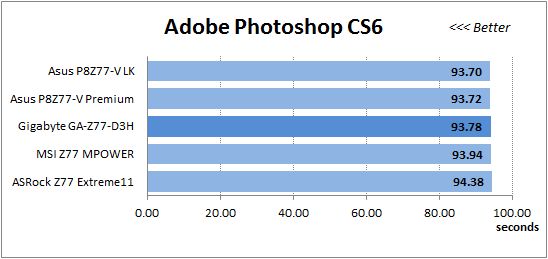
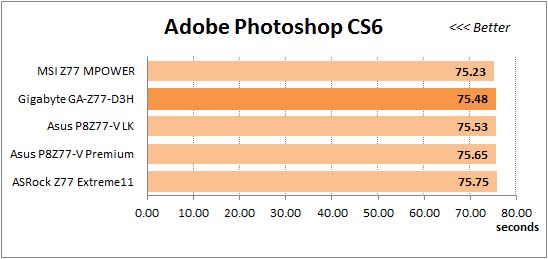
We measured the performance in Adobe Photoshop CS6 using our own benchmark made from Retouch Artists Photoshop Speed Test that has been creatively modified. It includes typical editing of four 24-megapixel images from a digital photo camera.
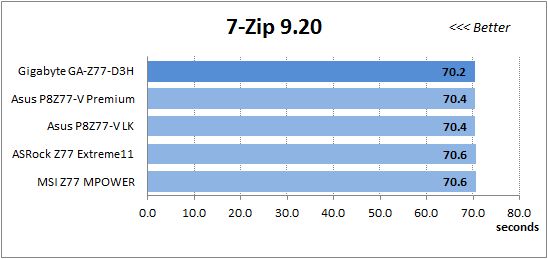
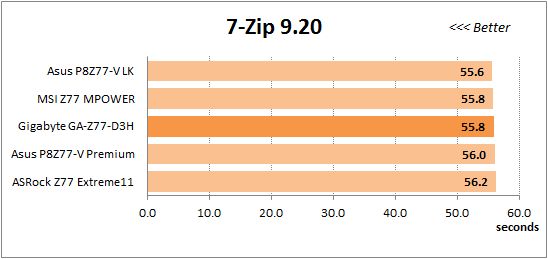
In the archiving test a 1 GB file is compressed using LZMA2 algorithms, while other compression settings remain at defaults.
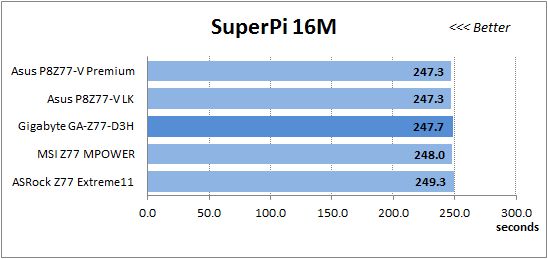
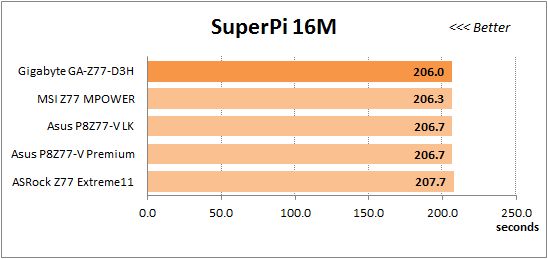
Like in the data compression test, the faster 16 million of Pi digits are calculated, the better. This is the only benchmark where the number of processor cores doesn’t really matter, because it creates single-threaded load.
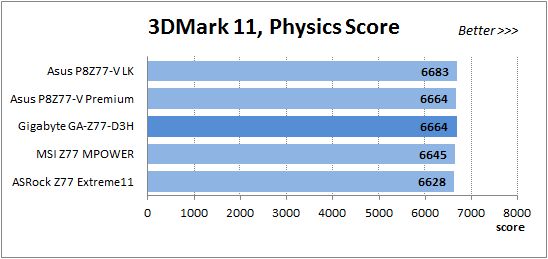
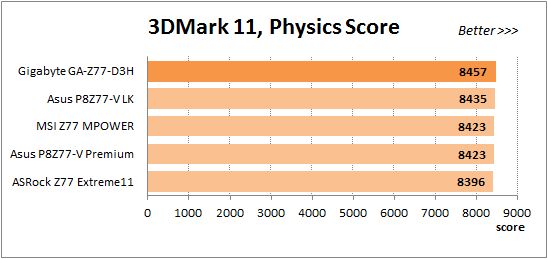
The next diagram shows only CPU tests from the 3DMark11 suite – Physics Score. This score is obtained in a special physics test that emulates the behavior of a complex gaming system working with numerous objects:
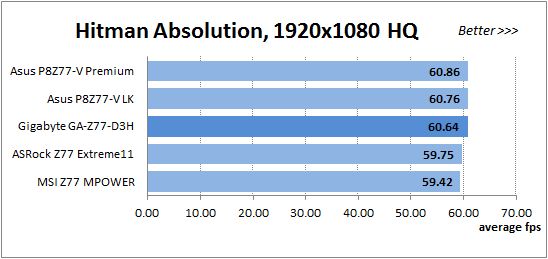
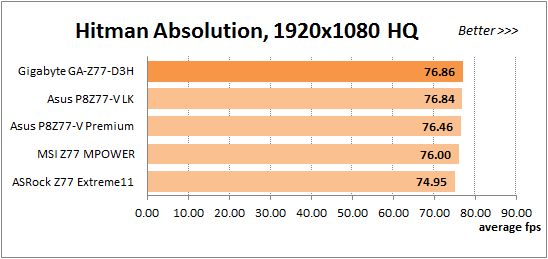
The benchmark integrated into the Hitman Absolution game turned out very convenient. It can be launched directly from the game, from the game launcher utility and even from the command prompt. In order to get the minimal acceptable results, we had to use the lowest image settings and use one of the lower resolutions.
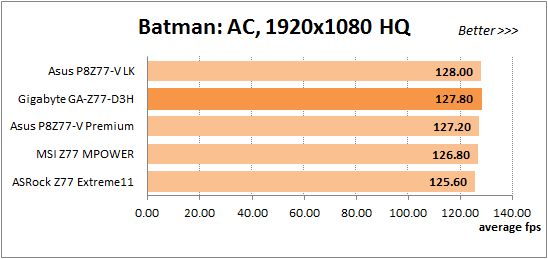
Batman: Arkham City game also reacts eagerly to any changes in the CPU clock frequency, but it uses DirectX 11. We ran game’s integrated benchmark five times with high image quality settings and then take the average of the five runs for the diagrams.
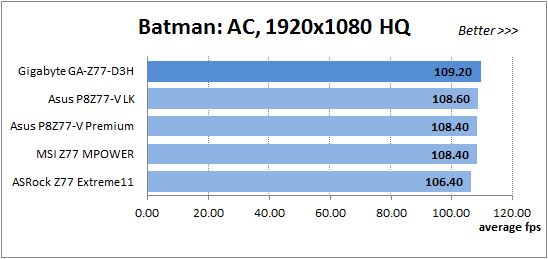
We have pointed out multiple times in our reviews that related mainboards working in identical testing conditions demonstrate about the same performance. The obtained results once again confirm this undeclared rule: in nominal mode the performance of our Gigabyte GA-Z77-D3H is practically identical to that of the others.
Overclocked Mode
It might be different at overclocking because only the ASRock Z77 Extreme11 and Gigabyte GA-Z77-D3H could overclock our CPU to its maximum of 4.6 GHz whereas the others stopped at 4.5 GHz. The two above mentioned models would have an advantage due to that difference but we tested all of them at 4.5 GHz for the sake of a fair comparison.
The overall picture remains the same: the Gigabyte GA-Z77-D3H is comparable to the others when the CPU and memory clock rates are increased. However, this mainboard is now more often in a leading position, so our overclocking seems to be a little more beneficial for it than for the others.
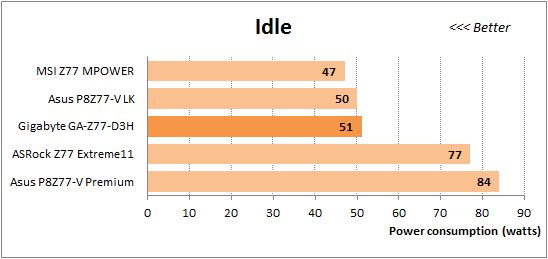
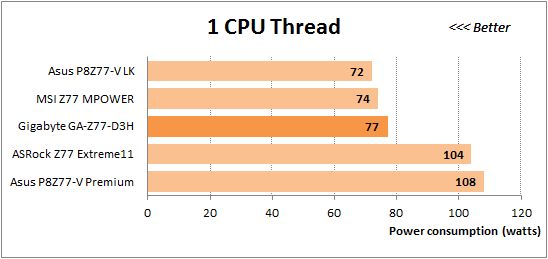
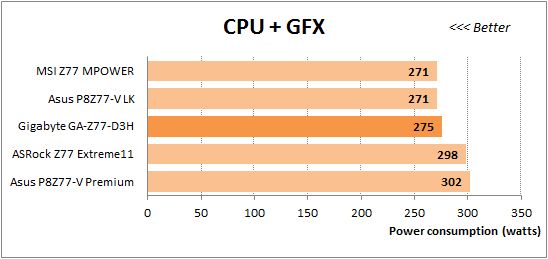
Power Consumption
We performed our power consumption measurements using the same Extech Power Analyzer 380803. This device is connected before the PSU and measures the power draw of the entire system (without the monitor), including the power loss that occurs in the PSU itself. In the idle mode we start the system up and wait until it stops accessing the hard disk. The power consumption in case of single-threaded CPU load is measured while running the Pi-digits performance test, and in case of multi-threaded load – while running the Fritz Chess Benchmark test. We also used Hitman Absolution game to create complex load. The results on the diagrams are sorted out in ascending order and the results of Gigabyte GA-Z77-D3H are highlighted with darker color for your convenience.
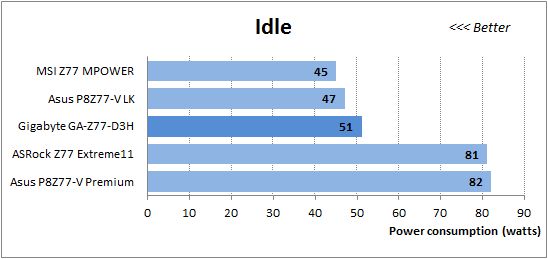
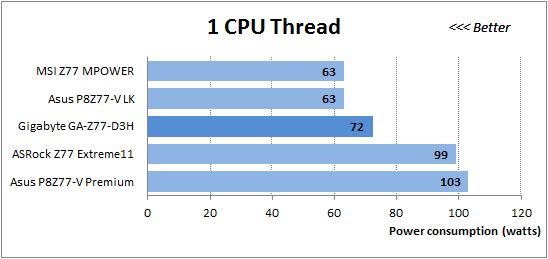
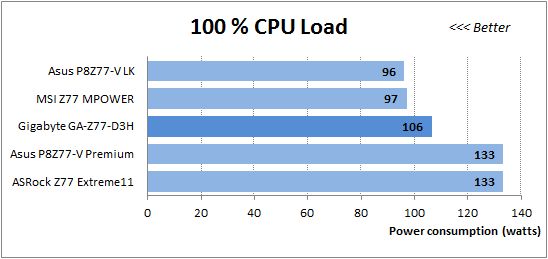
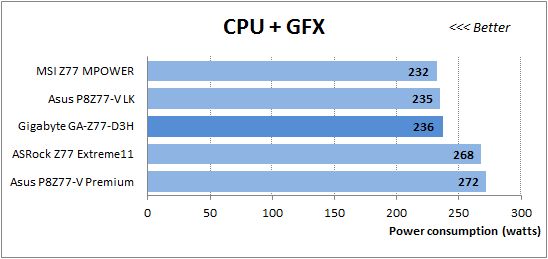
As we wrote above, the Gigabyte GA-Z77-D3H correctly enables all CPU-related power-saving technologies by default. You don’t have to do any manual setting-up for that, which is an advantage. However, the power consumption level of this mainboard is higher than that of the ASUS P8Z77-V LK and MSI Z77 MPOWER which have similar capabilities. The Gigabyte needs much less power than the flagship models from ASRock and ASUS but their power requirements are not typical of ordinary products because they have an additional PCI Express switch.
Now let’s compare how much power the systems need when overclocked.

The standings do not change. The Gigabyte GA-Z77-D3H expectedly needs less power than the two special models but its power draw is higher compared to the two other ordinary mainboards.
Conclusion
Although Gigabyte GA-Z77-D3H is an entry-level product, we had a highly positive experience with it. Its functionality is largely determined by its Intel Z77 Express chipset, and the only chipset feature it doesn’t really use is its ability to share CPU-integrated PCIe lanes between two graphics slots. Instead it has an additional onboard USB 3.0 controller which is responsible for another pair of USB 3.0 ports on the mainboard back panel. The mainboard’s advantages are numerous and include such important features as a user-friendly PCB design, an mSATA connector, ability to adjust the rotation speed of 3-pin CPU fans, efficient layout of the mainboard back panel, all advantages of the DualBIOS and Ultra Durable 4 Classic technologies, excellent overclocking and system fine-tuning options. As for downsides, we have already mentioned some of them. Like other Gigabyte mainboards, GA-Z77-D3H doesn’t display startup information. Besides, only one system fan connector out of three can lower the fan rotation speed. On top of that, its power consumption is noticeably higher than that of the competitors.
Of course, you may encounter some other downsides depending on your particular preferences. Someone may not like the vertically oriented SATA connectors. Others will ask for more than two PCI slots. However, no mainboard can meet requirements of all users, that’s why there are so many different models offered by each manufacturer. You can always find the most suitable model from a lot of similar ones.
However, we do not want to underestimate the value of numerous great features Gigabyte GA-Z77-D3H has to offer, the most significant one being its problem-free behavior. This mainboard just works as expected. You don’t have to do anything to make your CPU work at its true nominal frequency. You don’t have to check out if the power-saving technologies are enabled or not. There are no BIOS update issues. It offers a lot of setup options and reacts adequately to any changes in them. Any configuration changes are quick and easy and the mainboard responds adequately to anything you do. There are mainboards with lots of additional controllers and extensive functionality and there are mainboards which are inexpensive and simple, but among both categories it is not so often that we find such a problem-free product as Gigabyte GA-Z77-D3H.