Intel DZ87KLT-75K Review: LGA1150 Mainboard Leader from Intel

This is a very well-made mainboard model with classic feature set. The functionality includes: additional USB 3.0 and SATA 6 Gbps ports, IEEE 1394 (FireWire) and Thunderbolt ports, two network adapters, wireless technologies, AMD CrossFire and Nvidia SLI, as well as a special connector for mSATA and mini-PCIe cards.
When we get down to studying a new breed of mainboards designed for new CPUs or based on new chipsets, we usually start with flagship models. Why? Because every manufacturer wants to present his products in the most favorable light, so they are all eager to offer us their top-end products in the first place as sporting the most advanced mix of technologies and extra features available at the current moment. It is very exciting to test flagship mainboards and such reviews are popular among our readers, yet when it comes to actual purchasing, most of us would prefer simpler models. Even besides the price factor, which is important too, not all of us can really make use of the entire potential offered by flagship mainboards. Many users will never need anything more than a mainstream or even entry-level product.
So, we started our series of reviews of LGA1150 mainboards based on Intel’s Z87 chipset from the opposite end of the spectrum, i.e. from junior models. They are suitable not only for enthusiasts but also for ordinary users, thus being more interesting from a practical point of view. ASUS’s entry-level Z87-K model was the first to be tested. Then we checked out Gigabyte’s GA-Z87X-D3H and MSI’s Z87-G43. The ASRock Z87 Extreme4 was the only model from the mainstream rather than entry-level class.
Now that we’ve got a general notion of Z87-based mainboards from the four major brands, it’s time to take a look at more advanced products. Intel’s DZ87KLT-75K model we are going to discuss today doesn’t offer us any alternative, though. It can be viewed as both senior and junior just because it is the only model from Intel which is based on the Z87 chipset. Intel produces simpler LGA1150 mainboards but they are based on the H87, Q87 or B85 chipset. It is a striking contrast with ASRock, ASUS and Gigabyte, each of which offers over a dozen models based on the Z87 alone (and a number of LGA1150 mainboards with the other chipsets). MSI has announced about ten Z87-based models as well. It looks like Intel has begun to prepare to the promised discontinuation of its mainboard business. The reduced product range is just one of the first steps in this process.
Anyway, the Intel DZ87KLT-75K is a very advanced LGA1150 product, which is definitely superior to any we’ve tested so far in terms of capabilities. We wrote in a previous review that Intel mainboards are underestimated by enthusiasts, so now we have a chance to check this out in practice. We’ve got the most feature-rich mainboard from the major CPU and chipset developer, so can it set an example for other mainboard makers to follow?
Packaging and Accessories
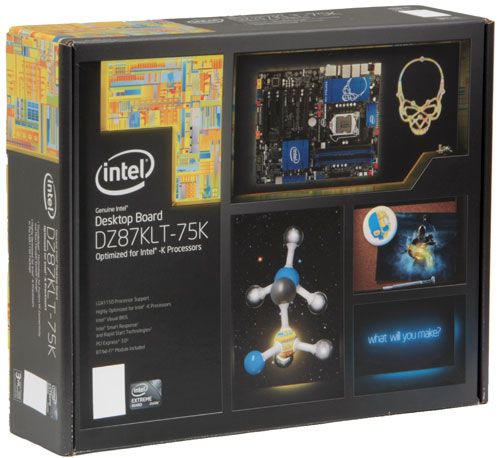
The packaging of the Intel DZ87KLT-75K is designed in the same style as the packaging of Intel’s boxed LGA1150 processors with decorative elements stylized like a CPU die, with the slogan “What Will You Make?”, and with pictures whose meaning is rather vague. Except for the unclear illustrations (which must mean something like “Intel’s products in the center of the Universe”), everything is good. The eye will easily focus on the LGA1150 processor and the mainboard designed for it. Intel’s CPU boxes are traditionally blue whereas the Extreme series mainboards, optimized for overclocker-friendly K series CPUs, come in black boxes with a skull badge. A large picture of the mainboard can be found on the back of the box, with its key features indicated.
We have received from Intel a review sample of the motherboard. It isn’t a retail box, that is why the bundle hadn’t contain some pieces. We have found in the box:
- WiFi/Bluetooth unit with USB connection cable (MS-3871);
- I/O Shield for the back panel;
- A hard bridge for Nvidia SLI graphics configurations;
- Colorful and nice Integration Guide poster.
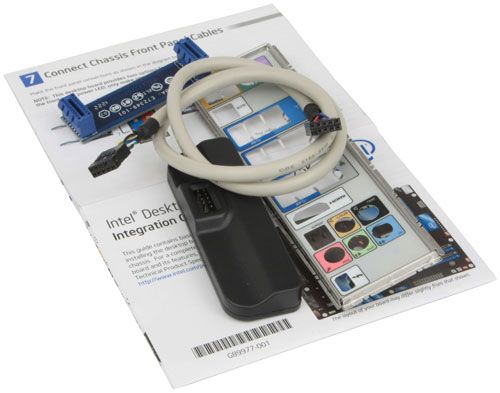
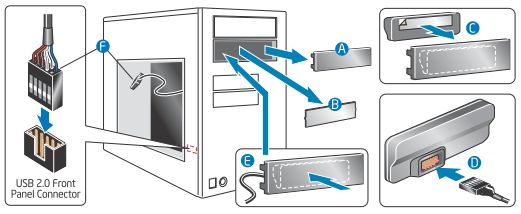
We’ve already seen Intel mainboards ship together with the Wi-Fi/Bluetooth module MS-3871. It supports Bluetooth 2.1 connections at data-transfer rates up to 3 Mbps whereas its 802.11n controller Ralink RT8070 can maintain Wi-Fi connections at speeds up to 150 Mbps over distances of up to 300 meters. Using the sticky stripe on the back of the module, you can secure it inside your computer case by attaching it to the faceplate of an empty 5.25-inch bay. The module’s cable is plugged into an onboard USB 2.0 header.
Besides the accessories shown in the photo, the mainboard is supposed to come with four SATA cables, a Configuration Label (it shows the mainboard’s connectors layout and you can stick it to the inside of your computer case’s side panel), and a DVD with software tools and drivers. Off-the-shelf samples of the mainboard may also be accompanied with the exclusive accessories of the Extreme series such as various stickers, door hangers, and mouse pads with the skull badge.
Design and Features
About a year ago we were very pleased with the enhanced functionality of the DZ77BH-55K product page on Intel’s official website. The mainboard was represented as a large 3D photo you could turn around as you wanted. You could also get additional information about each of the mainboard’s components by moving your mouse pointer over them. It was most convenient for checking out the product before making your purchase. Other mainboard makers don’t offer such preview features and, unfortunately, it was just a one-off promo from Intel as well. The product page for the Intel DZ87KLT-75K model shows a conventional small photo where you can hardly see anything and adds a general description with a list of basic specifications. So we have to make out everything on our own.
Being black like the gloomy mainboards from ASRock and Gigabyte, the Intel DZ87KLT-75K has a merrier appearance thanks to the color coding of its components. As opposed to MSI mainboards, it is the first-to-use pair of memory slots that are marked in blue. The fan connectors are red. The chipset’s six SATA ports are blue and distinct from the two additional SATA ports, which are gray. The onboard USB 3.0 and FireWire headers are blue as well, but you just can’t confuse them. The front-panel audio header is light yellow whereas the dark yellow connector is USB 2.0 High Current. The latter features stronger electric current for recharging mobile gadgets (even when the computer is shut down). The connector for the computer case’s ports and buttons can be found in its conventional location in the bottom corner of the PCB. Its individual pins are color-coded as well. Despite the numerous colors, the mainboard doesn’t look gaudy. The skull badge may seem somewhat incongruous on such a serious product, but that’s a tradition that can’t be avoided.
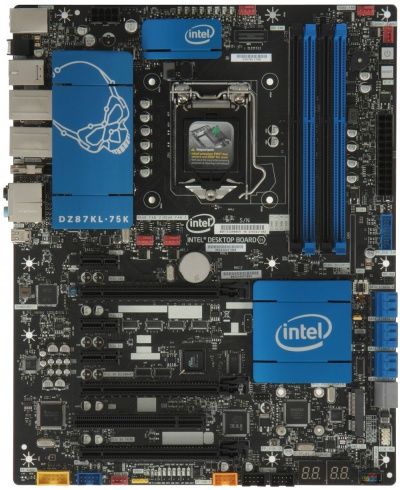
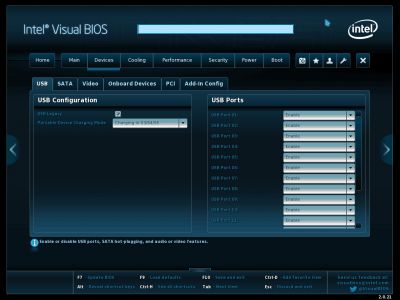
The DZ87KLT-75K makes full use of the PCIe sharing implemented in the Intel Z87 chipset. There are three PCI Express 3.0 x16 slots but the second works in x8 mode and the third, in x4 mode. A single graphics card installed into the first slot will work at full speed. Two cards will share the bandwidth 50/50%. And if you’ve got three graphics cards, the speed formula will be x8/x4/x4. The mainboard lets you build multi-GPU configurations using AMD CrossFireX or Nvidia SLI technology. It also offers three PCI Express 2.0 x1 and one PCI slot for expansion cards. The six blue-colored SATA 6 Gbit/s ports are based on the chipset. The additional pair of SATA 6 Gbit/s ports are provided by an ASMedia ASM1061 controller (the user manual calls it Marvel 88SE9172 for some reason). They are gray. Next to them you can see a connector for mSATA and mini-PCIe cards (both full- and half-size cards are supported).
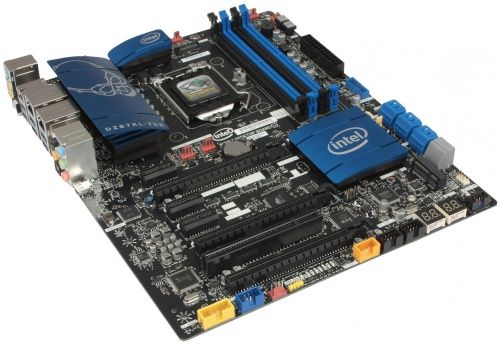
The chipset and the hot components of the power system are equipped with heatsinks, which are secured with screws. When you look at it from another angle, you can see that the decorative piece on the largest heatsink impedes the heat-transfer process. The heatsink is going to be cooled by the air flow only if you have a small cooler, like those that accompany Intel’s boxed CPUs, but enthusiasts are unlikely to install weak coolers on such an advanced mainboard. With a powerful tower-design cooler, the decorative faceplate will deflect the air flow, driving it above rather than through the heatsink. We must confess, though, that the ASUS Z87-K was the only mainboard we’ve tested so far to have really hot heatsinks. The heatsinks of the other LGA1150 mainboards, including the Intel DZ87KLT-75K, are barely warm even at high CPU loads. So, it looks like not only the faceplate but the heatsink itself is a decorative element that serves only to emphasize the high status of the product.
The mainboard back panel has the following ports and connectors:
- Universal PS/2 connector for the keyboard or mouse;
- Two USB 2.0 High Current ports (yellow connectors), which always can be used for charging gadgets (even PC is power off); another six are laid out as three onboard pin-connectors, one connector is also High Current;
- Illuminated Back to BIOS button, which equal for Clear CMOS
- IEEE1394 (Firewire) port built on Texas Instruments TSB43AB22A controller. Another IEEE1394 port you can get from onboard pin-connector;
- Two gigabit local network ports (from Intel WGI217V and Intel WGI210 network adapters);
- Six USB 3.0 ports (blue connectors) implemented in the Intel Z87 chipset and replicated by two Genesys Logic GL3520M dividers. Additional two USB 3.0 ports can be received by internal pin-connector on the mainboard PCB;
- HDMI-Out;
- Optical S/PDIF and five analogue audio-jacks provided by eight-channel Realtek ALC898 codec;
- Thunderbolt connector.
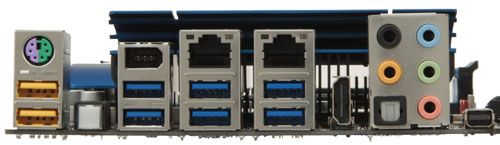
As opposed to entry-level mainboards which are likely to make use of the CPU-integrated graphics core, the Intel DZ87KLT-75K will surely work together with a discrete graphics card (or even several cards). So, it has only one video output (HDMI), leaving space on its back panel for more demanded interfaces.
Here’s a list of the supported interfaces, by the way: two network ports, additional FireWire and SATA controllers, three PCI Express 2.0 x1 slots, and one PCI slot. PCI is not supported by modern Intel chipsets, so this interface is implemented via a PCIe->PCI converter chip. A Thunderbolt connector alone needs as many as four PCIe lanes and no chipset can provide so many free PCIe lanes. That’s why you have to compromise on ordinary mainboards, choosing between additional controllers and expansion slots. The Intel DZ87KLT-75K avoids this limitation by using a PLX PEX 8606 chip for six additional PCIe lanes.
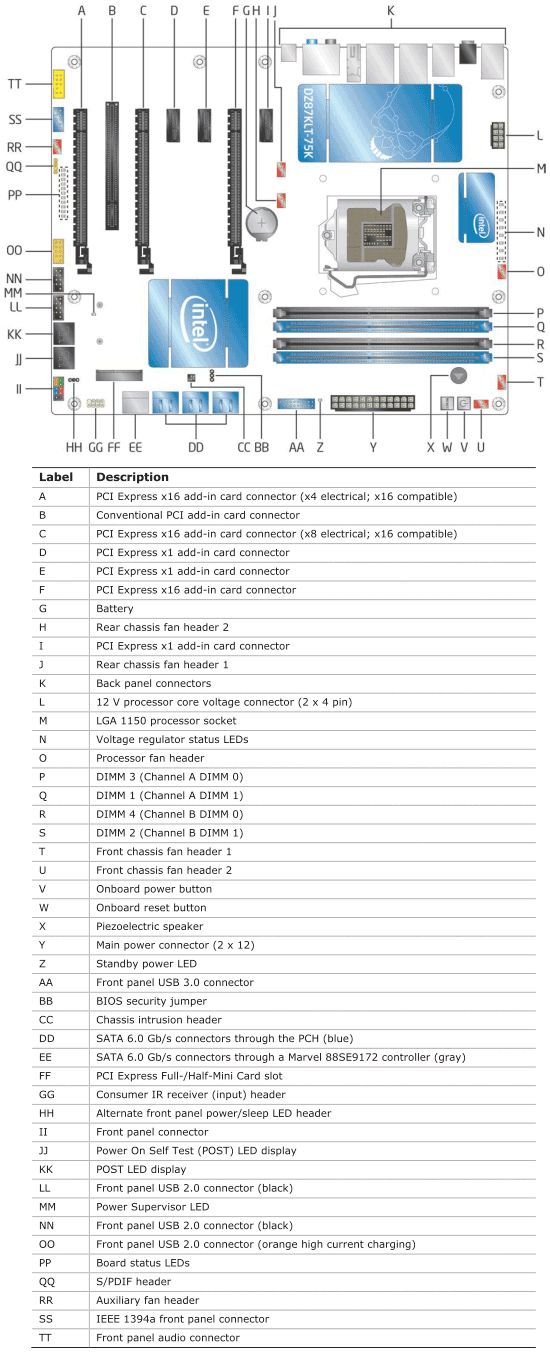
We can spot more features of the Intel DZ87KLT-75K on its flowchart. The letter N denotes a line of Voltage Regulator Status LEDs which indicate the number of active power phases in the CPU voltage regulator. This feature used to be present on various mainboards from many brands but has disappeared recently. Suspiciously, it disappeared at the same time when it seemed to us that the dynamic adjustment of the number of active power phases depending on load ceased to work on some mainboards. Such LEDs are now missing on Gigabyte and MSI mainboards whereas ASRock mainboards don’t allow to check out the number of active phases via the exclusive software. Intel must have nothing to hide because everything works well on its mainboards. You can turn the LEDs off in the BIOS or choose an indication method (constant or pulsating).
The PP letters in the flowchart denote Board Status LEDs. These indicate your drives’ activity, CPU and power system overheat, and POST procedure progress (initialization of the CPU, memory, graphics card, USB, drives, etc). We didn’t find them particularly useful because it’s hard to understand at one glance what the LEDs have to tell (there are but very small and abbreviated labels next to them on the PCB). So you have to look up their meaning in the user manual, which only exists in electronic format. And you just can’t read an electronic manual if your mainboard has halted during the POST procedure! Moreover, the mainboard has two POST code indicators which can be used for diagnostic purposes. At the current moment most of the four-digit codes are reserved for the future, so only one of the two indicators provides the bulk of information.
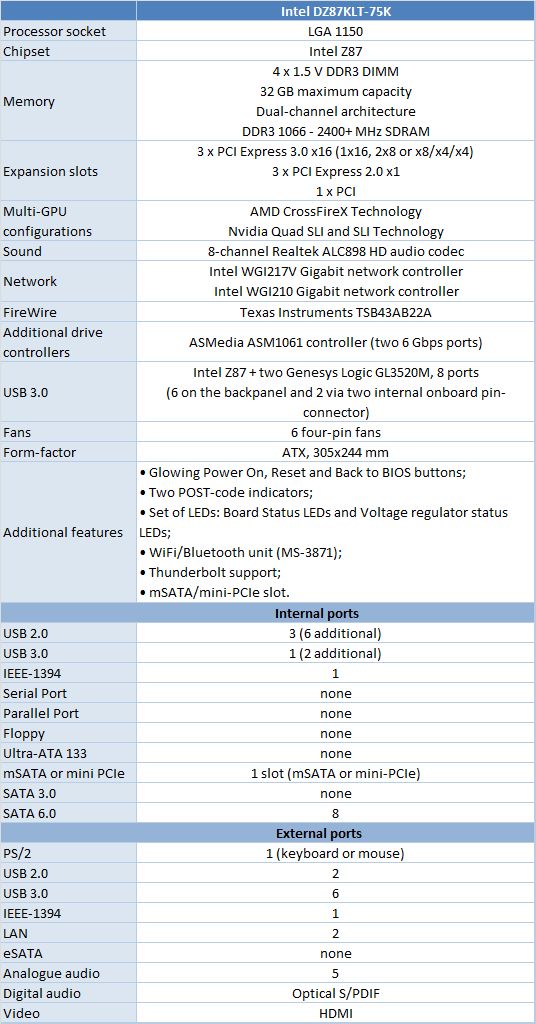
We’ve summed up the basic specs of the Intel DZ87KLT-75K mainboard in the following table. Clicking on it will open a comparative table with specs of all previously tested mainboards, namely ASUS Z87-K, ASRock Z87 Extreme4, Gigabyte GA-Z87X-D3H and MSI Z87-G43.
It’s been a long time since we last saw a mainboard with a nonstandard component layout like an ATX12V power connector in the middle of the PCB or memory modules at the top. The major makers have long ceased such dubious experiments and stick to the classic solutions when developing their ATX products. Intel was in fact the last developer that tried to experiment. Even if Intel mainboards looked normal, they might have some design inconvenience. For example, an internal USB 3.0 connector, which is usually placed at the right edge of the PCB, would be placed at the bottom edge on Intel mainboards, making it harder to connect it to the computer case’s I/O ports. The connector for the computer’s front-panel buttons and indicators is usually found in the bottom right of the PCB but it could be anywhere on Intel mainboards.
Well, it was so in the past while today the Intel DZ87KLT-75K is an example of classic design. And still, we can find one unconventional solution. Power connectors are usually placed at the edge of the PCB in such a way that the connector lock were outside for easier plugging and unplugging. The lock of the ATX12V connector on the Intel DZ87KLT-75K is on the inside. Fortunately, this is not a problem as the nearest heatsinks don’t get in the way.
Overall, the Intel DZ87KLT-75K is a neat and classic mainboard with rich functionality and as many as two POST code indicators. If you remove the model name and logos, you wouldn’t tell it from mainboards of the major brands, which would certainly be proud to market such a product.
BIOS Capabilities
We took our first look at Intel’s new Visual BIOS in our review of Intel’s DZ77RE-75K and DZ77GA-70K mainboards. Then we also used it to review the Intel DZ77BH-55K model. Despite a number of downsides we could put up with, we were generally pleased with the Visual BIOS just because the earlier, classic BIOS interface of Intel mainboards had been too unfriendly and inconvenient. You could get used to the latter but without any positive emotions. The new version of Intel’s Visual BIOS, as implemented on the DZ87KLT-75K mainboard, looks recognizable, yet has a number of changes. One of the most conspicuous ones is that you can’t get back to the classic BIOS interface anymore. Although inconvenient, it was a familiar interface many users had already got used to. Anyway, we don’t want to be sad about it, so let’s instead browse through the capabilities offered by the new Intel Visual BIOS.
As opposed to the start screens of other BIOSes, the Home section of Intel’s BIOS doesn’t look utterly useless. Besides providing some basic setup options, it lets you quickly access the most frequent settings for in-depth optimization in several ways. At the top of the screen there is a search field, which is a unique feature of Intel’s BIOS the other manufacturers have not adopted as yet. The search feature is most helpful and works just like any other search engine, issuing relevant results as long as you enter search requests. So you can just enter the first few characters of your request and see the required option in the search results. Next goes a menu with icons we’ll tell you about shortly. And lower yet, you can read general system information about the mainboard’s model and BIOS version, the CPU’s model name, the amount of system memory, the current date and time. Take note that the Update link next to the BIOS version lets you immediately update the firmware. By the way, mainboards from ASUS and Intel are the only ones to support NTFS disks for BIOS updates. Others work with FAT or FAT32 only. In the same way, the Change link next to the date and time allows you to quickly adjust these parameters.
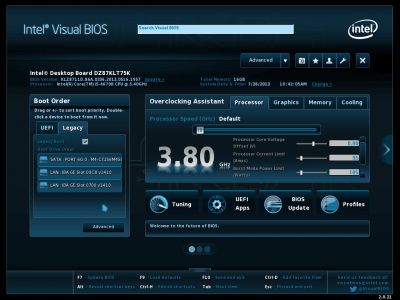
The Boot Order window on the left shows a list of devices you can boot from. You can change their order by moving them with your mouse. If necessary, the Advanced button in this window will open an enhanced mode of the Visual BIOS interface to provide more boot-related options. The Overclocking Assistant window on the right is for increasing the clock rate of your CPU, integrated graphics core and memory by moving a slider. As you do so, the mainboard will automatically adjust such parameters as power limits, voltages, etc. On the Cooling tab, a similar slider lets you configure the correlation between the speed of the fans and the temperature. The Tuning, UEFI Apps and BIOS Update icons below will direct you to the corresponding features whereas the Profiles button is for saving, loading or deleting BIOS profiles. Each profile can be given a descriptive name. When you move your mouse pointer over a parameter, you will see context-sensitive information about its purpose. At the bottom of the window, there are hotkey prompts. The arrow at the right edge of the screen lets you move on to the next screen.
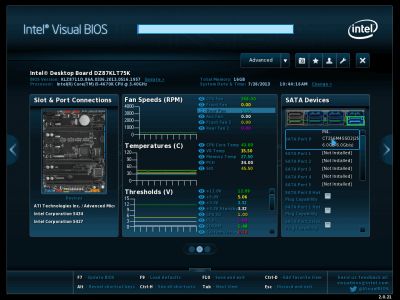
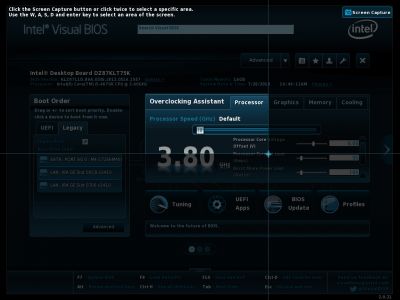
The left window shows you the connected peripheral devices. The central one provides monitoring data in graphical and numerical forms. And the right window outputs a list of drives and the ports they are connected to. The third start screen is purely informative and just tells you about your computer, so now we can get a closer look at the menu with icons in the top right corner of the screen. Clicking on the rightmost icon with a cross will exit the BIOS after saving or discarding your changes. The wrench icon opens a dropdown menu where you can launch a file manager, proceed to update the BIOS, launch EFI apps, make a screenshot or display information about the Visual BIOS and its developers. The icon with a picture of a man will load default BIOS settings or direct you to user-defined profiles. The star icon is Favorites, as in Internet Explorer. It is a list of frequently used BIOS options you can compile yourself by adding and removing options as necessary. The camera icon helps you make screenshots. This feature has long been available in other BIOSes, but the Intel Visual BIOS lets you capture not only the entire screen but also some fragment of it (selectable with a mouse or keyboard, just like in image editors).
The Advanced button is the only one to be textual rather than an icon because it is too important to miss. That’s why we guess it would be appropriate to name it “Advanced Setup” as in the earlier versions of the Visual BIOS. That would make it different from the Advanced button in the start screen’s Boot Order field. Using the arrow on its right, you can see a full list of BIOS sections and go to the necessary one. Clicking on the Advanced button will lead you to the Main section of the enhanced mode or into the section you used last (if you have already done some setting-up before the Home section).
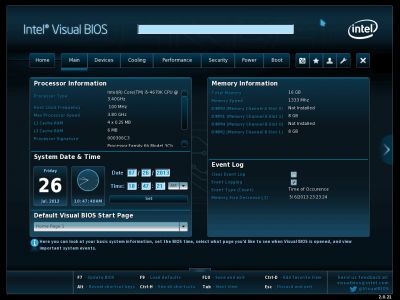
So, the Main section reports various information about your computer. You can set up the current date and time and also choose the first page to show upon your entering the BIOS interface. The menu in the top of the screen leads you back to the Home section or to any other section of the Visual BIOS Advanced mode. You can also use the arrows at the sides of the screen to move sequentially through the BIOS sections. By the way, when you press the Alt key, some letters will be highlighted in the names of the section, so you can quickly go to the necessary one by pressing Alt + the corresponding highlighted letter.
The Devices section is split up into several subsections where you can set up your USB devices, SATA drives, integrated GPU, additional controllers and expansion cards.
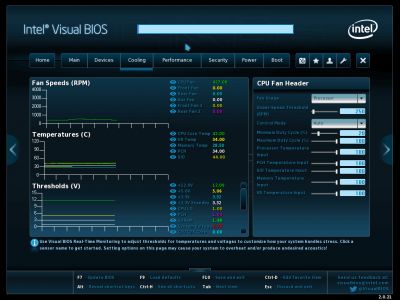
The redesigned Cooling section, on the contrary, lacks any subsections. Instead of numerous tabs with fan, voltage and temperature settings, we see just two windows. The left window outputs monitoring data in graphical and textual form whereas the right window shows details about the parameter you point at with your mouse (by default, it is the CPU fan setting). In the same way, by simply moving your mouse pointer about, you can set up any fan and specify the adjustment range and stepping for the voltages and temperatures.
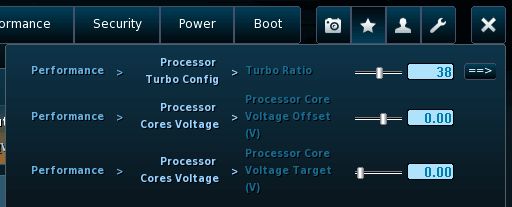
The Performance section has been redesigned following the same principle. It used to be far from convenient, but now it is too unfamiliar. Having got rid of the numerous subsections too, it is split into two parts. The left part contains a kind of flowchart with system parameters and their interrelations whereas the right part reports basic system information.
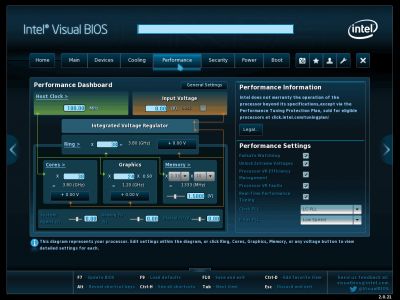
As soon as we begin to change anything in the left part of the screen, the right part outputs a more detailed selection of appropriate settings. For example, if you want to change your CPU frequency multiplier, you can do this in the Cores field by entering numbers from your keyboard or moving the slider. As you do it, the contents of the right window will change, too. The Turbo tab will appear so you can specify the frequency multiplier for all the cores simultaneously or for each of them separately. The Config tab lists the rest of the CPU-related parameters.
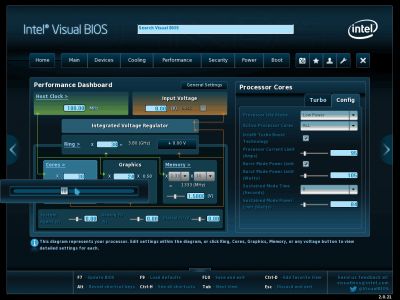
And if you click the voltage button in the same Cores field, you can use the right window to choose a voltage adjustment method and its value. The Intel Visual BIOS allows changing CPU voltage in three ways: in the offset mode, in the adaptive mode, or by fixing it at a constant level.
The same principle is applied to the other parameters. You select something in the left window, and then use the right window’s controls to adjust it.
Although the Cooling and Performance sections have been redesigned in a similar way, the results are different. Everything is clear and intuitive in Cooling. You can easily browse through all the options in the left window by moving your mouse pointer and set everything up as necessary. In the Performance section, you can select an option with a mouse click first. It is important what exactly you click: frequency multipliers, frequencies or voltages. Depending on that, the list of options in the right window will change. The whole mechanism is too sophisticated, that’s why we are not as enthusiastic about the Performance section as about Cooling. It reminds us of the Hardware Monitor section in the new BIOS of MSI mainboards. Everything looks pretty and, if you spend some time getting used to it, works normally. Yet still the section is not handy. Instead of the numerous subsections, tabs or individual pages, we’d prefer a single section with a full list of all parameters. Intel’s Visual BIOS doesn’t offer anything like that but it does let you compile a list of frequently accessed options. The Favorites icon is available always, so you can use your own list of options for overclocking instead of what is offered in the Performance section.
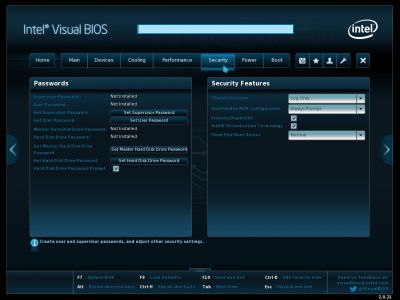
The Security section lets you set up access passwords and other security-related parameters.
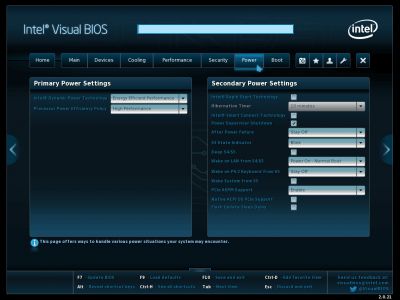
Power-related options and power-saving technologies can be set up in the Power section.
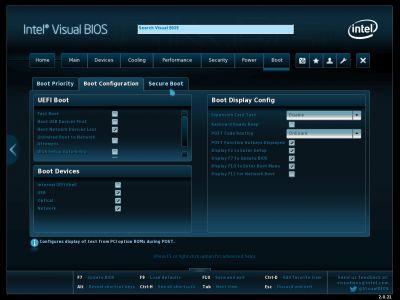
The Boot section is about how your computer starts up.
Summing everything up, we’ve got a favorable impression about the Intel Visual BIOS and how it has evolved. It doesn’t have huge sections with long lists of numerous parameters as in the BIOS of ASUS mainboards. And it doesn’t have small sections with multiple subsections and lower-level individual pages as in Gigabyte’s BIOS. Its key idea is to let the user do everything in the same screen – without having to switch to subsections or even scroll down. After that you can move on to the next screen, which refers to another aspect of your computer, and optimize in the same way. The specific implementations vary from perfect to mediocre, yet the general idea is good.
We also like the Home section, which allows to do some basic setting up or go to more detailed settings. It is the start BIOS screen by default, but you can use any other section as the start one. Following the latest trends in BIOS making, the user is given the opportunity to compile a list of frequently accessed options. The search function is unique to the Intel Visual BIOS. Besides capturing a full screenshot, you can capture a fragment of the BIOS screen, but that’s not a very useful feature. Help information is always visible at the bottom of the screen. When you move your mouse pointer to a specific BIOS option, you get context-sensitive information about it. Intel’s Visual BIOS offers all the settings you need to fine-tune and overclock your computer. They are just not always easy to use. Anyway, we’ll have to use them now to test our Intel DZ87KLT-75K mainboard.
Testbed Configuration
We performed all our tests on a testbed built with the following components:
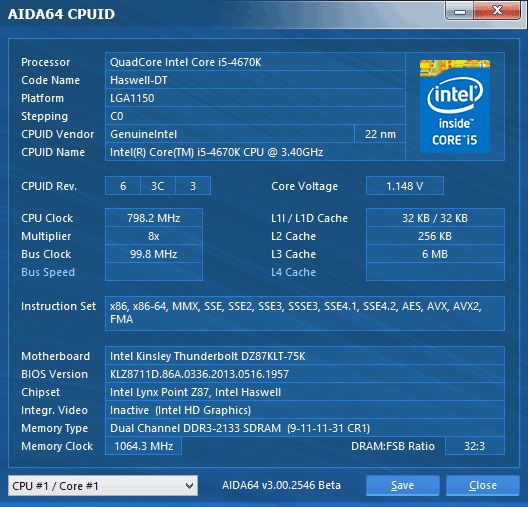
- Intel DZ87KLT-75K mainboard (LGA1150, Intel Z87, BIOS version 0336);
- Intel Core i5-4670K CPU (3.6-3.8 GHz, 4 cores, Haswell, 22nm, 84 W, LGA 1150);
- 2 x 8 GB DDR3 SDRAM G.Skill TridentX F3-2133C9Q-32GTX (2133 MHz, 9-11-11-31-2N timings, 1.6 V voltage);
- Gigabyte GV-T797OC-3GD (AMD Radeon HD 7970, Tahiti, 28 nm, 1000/5500 MHz, 384-bit GDDR5 3072 MB);
- Crucial m4 SSD (CT256M4SSD2, 256 GB, SATA 6 Gbps);
- Scythe Mugen 3 Revision B (SCMG-3100) CPU cooler;
- ARCTIC MX-2 thermal interface;
- Enhance EPS-1280GA 800 W PSU;
- Open testbed built using Antec Skeleton system case.
We used Microsoft Windows 8 Enterprise 64 bit (Microsoft Windows, Version 6.2, Build 9200) operating system, Intel Chipset Device Software driver package version 9.4.0.1017, AMD Catalyst 13.4 graphics card driver.
Working at Default Settings
When the mainboard starts up and shows you its boot picture, your speakers will emit the first notes of the corporate jingle. You can easily switch this annoying sound off, though. In the bottom left of the screen you are reminded of the active hotkeys. As a unique feature of Intel mainboards, you can edit that list. Mainboards from some other makers allow replacing the standard boot picture with a user-defined one, so you can take any image and write anything on it, including hotkey prompts. It is not easy, though, whereas the Boot section of the Intel Visual BIOS lets you select which prompts to show.
You can enter the BIOS interface by pressing F2. The F10 key will open a menu to choose an out-of-order boot device. F12 can be used for booting over the network. The Tab key is not listed. You cannot disable the boot picture, so you don’t get any information about the startup procedure except for POST codes shown in the corner of the screen. The first thing we did was press the F7 button to update the firmware to the latest version.
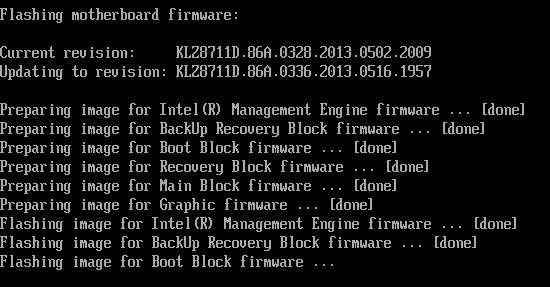
Intel mainboards offer several ways to update their firmware. Windows users will probably prefer to run a self-extracting archive which reboots the computer and updates the BIOS automatically. The Iflash utility can be used to update from the DOS environment. There is a method for WinPE. There is also an integrated utility which is evoked by pressing F7 (you can also launch it from the BIOS interface). The current firmware is not saved by default (at least, we couldn’t find this feature in the documentation).
It would be odd for an Intel mainboard to set an Intel processor up in a nonstandard way. So, our CPU works just as expected, lowering the frequency multiplier and voltage at low loads. Like with the other LGA1150 mainboards we have tested so far, it is possible to save more power in idle mode by manually turning on every power-saving option in the BIOS. There is only one problem we found out later during our power consumption tests. While running AVX-using LinX, mainboards normally consume 125 to 131 watts whereas the Intel DZ87KLT-75K needed only 116 watts. Like MSI mainboards, Intel’s are rather economical, yet this difference made us suspicious. It turned out that the frequency multiplier of our Intel Core i5-4670K processor would drop to x34 at high loads while it was supposed to be x36, hence the difference in power consumption. We wouldn’t mind it if the lower power draw didn’t come at the expense of performance.
It must be noted that LinX, a graphics shell for the Intel Linpack test, is too high a load – much higher than what we have in ordinary applications. On the other hand, our x264 FHD Benchmark v1.0.1 (64-bit), which can use the AVX2 instructions implemented in the Haswell series CPUs, would also occasionally make the frequency multiplier go down to x34, even though it is not as heavy as LinX. Fortunately, you can easily get rid of this effect by simply increasing the CPU’s power limits in the BIOS. We did this before our power consumption and performance tests.
CPU Overclocking Details
As on many other mainboards, you can overclock your computer safely and rather economically by turning on the Single Max Turbo Ratio option in the BIOS. In this case, the CPU frequency multiplier is always set at its maximum, which is normally used by the Intel Turbo Boost technology for low loads only. With our CPU, it means that the clock rate is always at 3.8 GHz instead of changing dynamically in a range of 3.6 to 3.8 GHz. You can overclock the CPU more by moving the appropriate slider in the BIOS Home section. One and the same CPU clock rate can be achieved by changing the frequency multiplier alone or by changing it together with the base clock rate. The mainboard automatically does the rest (adjusts the power limits and voltages, etc), so you only have to choose one of the variants offered.
Although the Intel Visual BIOS provides three ways of adjusting CPU voltage (offset mode, adaptive mode, a fixed value), it is increased in the offset mode during automatic overclocking. That is, a certain value is added to the default voltage level. We used to promote this volt-modding method as it allowed to keep all CPU-related power-saving technologies enabled. It is indeed a good and easy method for any CPUs, but not for LGA1150 ones. The voltage regulator integrated into the Haswell CPUs increases voltage too much at high loads in this case. If you change the CPU voltage in the offset mode, you can overclock but a little and with a huge increase in power consumption. Maximum CPU clock rates are not achievable at all due to extremely high voltage and temperature.
So can the Intel DZ87KLT-75K be overclocked in an energy-efficient way, without any voltage increase? Yes it can. But besides setting a required CPU frequency multiplier, you need to manually increase the power limits. Otherwise, the multiplier will be dropped at high loads. In fact, you had to do so on every mainboard in the past, but then all of them learned to automatically set up the power limits depending on the user-defined parameters. The Intel DZ87KLT-75K can correct the power limits, too, but only during automatic overclocking (as you’re moving the slider in the Home section). If you overclock manually, you have to correct them manually as well. That’s not hard, but somewhat inconvenient.
Energy efficient overclocking is only possible if you don’t increase voltage. It will ensure higher performance and, despite the increased power consumption, you can expect long-term savings due to the reduced amount of energy spent for each computation. Energy efficient overclocking is going to be environment-friendly as we showed in our Power Consumption of Overclocked CPUs review. However, when we test mainboards, we want to check them out under different conditions and loads, so we choose what overclocking method ensures the highest results. Higher clock rates and voltages mean harsher test conditions and it is under such conditions that we can better see any flaws or problems in mainboard design. That’s why we overclock our CPU to 4.5 GHz in our mainboard reviews, fixing the voltage at 1.150 volts and using the XMP settings for our memory modules.

When we overclock by fixing the CPU voltage at a certain level, some of the power-saving technologies get disabled. The CPU’s frequency multiplier is lowered at low loads but its voltage always remains high. Anyway, we stick to this overclocking for the duration of our tests, especially as it doesn’t affect the computer’s idle power draw much.
The results are almost the same as we had with other mainboards except for one difference. When loading the XMP profile, the mainboard set the memory timings at 9-11-11-31-1N whereas the others set them as 9-11-11-31-2N. We made sure our memory could work at such settings without any problems. The difference is insignificant and can hardly affect performance but it reminds us of the long-time downside of Intel’s BIOS. Intel mainboards do not allow to correct individual memory timings. All of the timings are set by the mainboard automatically and cannot be changed, even if you load an XMP profile. And if you want to change something, you can easily set any memory frequency or any of the numerous timings. But in this case, you have to manually set up every parameter. You cannot change but one parameter, leaving the others at their defaults. Modern mainboards are generally free from this downside, but not Intel’s.
Performance Tests
We usually benchmark mainboards in two test modes: at the default settings and with the CPU and memory overclocked. The first mode is interesting because it shows how well the mainboards work with their default settings. It is a known fact that most users do not fine-tune their systems, they simply choose the optimal BIOS settings and do nothing else. But this time we was needed to correct some settings for all motherboards, excluding Gigabyte GA-Z87-D3H, which works as specified by Intel. For Asus Z87-K we had manually set CPU turbo multipliers to prevent drops frequencies at high load, for ASRock Z87 Extreme4 we had disable Power Saving Mode, for MSI Z87-G43 we had disable Enhanced Turbo, and for Intel DZ87KLT-75K we had manually increase processor power limits.
The results are sorted in the descending performance order.
Nominal Mode
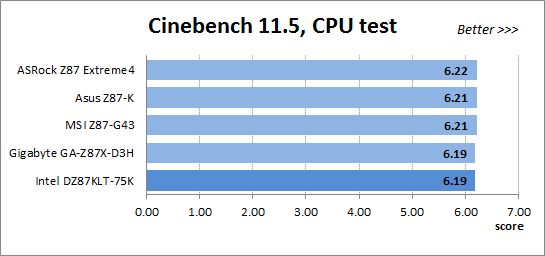
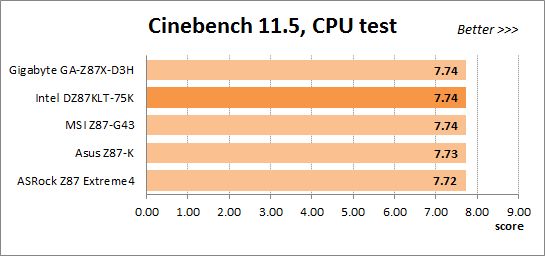
We used Cinebench 11.5. All tests were run five times and the average result of the five runs was taken for the performance charts.
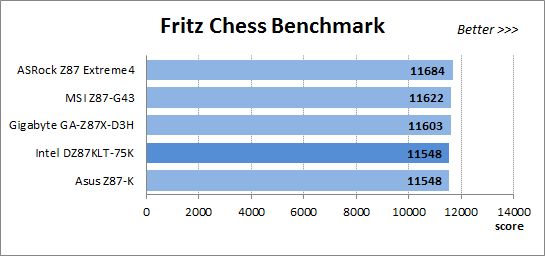
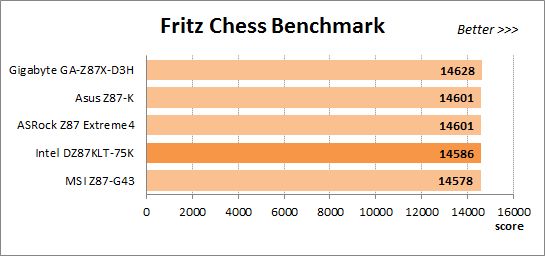
We have been using Fritz Chess Benchmark utility for a long time already and it proved very illustrative. It generated repeated results, the performance in it is scales perfectly depending on the number of involved computational threads.
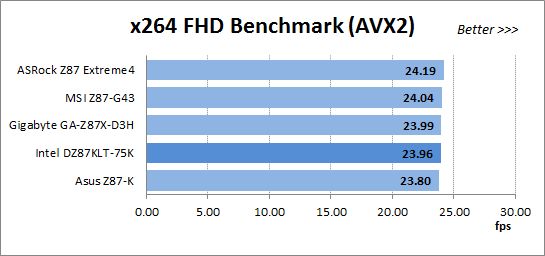
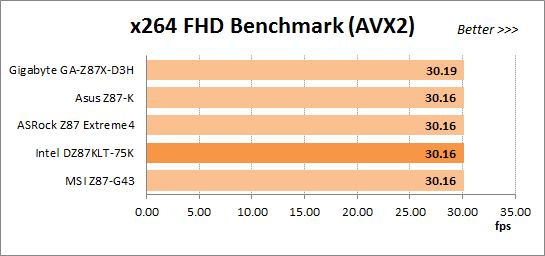
x264 FHD Benchmark v1.0.1 (64 bit) allows us to compare the system performance during video transcoding against the results in the database. So far this is the only utility in our testing suite that supports AVX2 instructions implemented in Haswell processors. The average results of the five test runs are displayed on the following diagram:
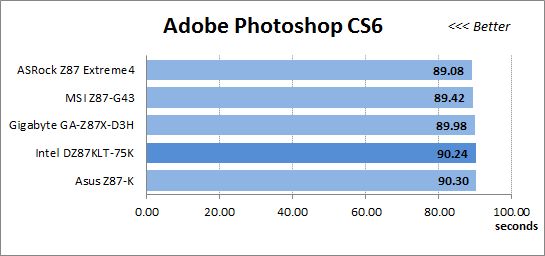
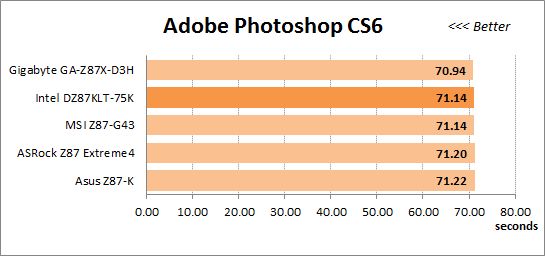
We measured the performance in Adobe Photoshop CS6 using our own benchmark made from Retouch Artists Photoshop Speed Test that has been creatively modified. It includes typical editing of four 24-megapixel images from a digital photo camera.
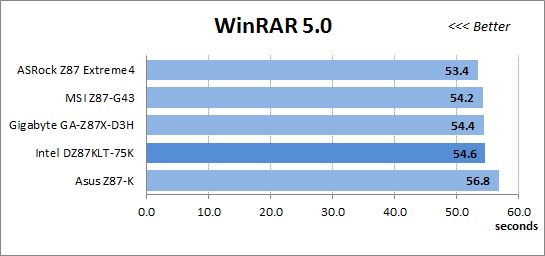
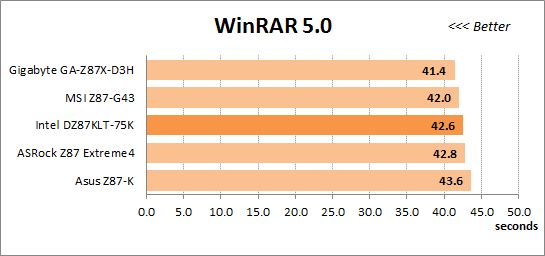
In the archiving test a 1 GB file is compressed using WinRAR archiving tool with maximum compression level.
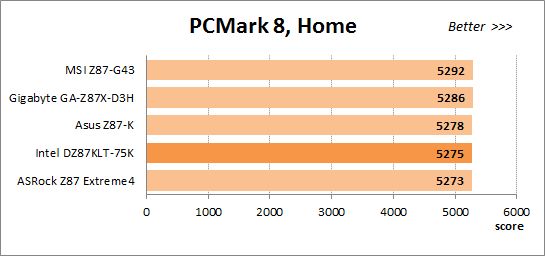
The recently released PCMark 8 suite allows us to assess the overall system performance, the efficiency of its storage sub-system, measure the battery life of a mobile device. We use the “Home” test package that includes typical home use applications: web browsing, creating and editing documents, simple games, photo editing, video chatting.

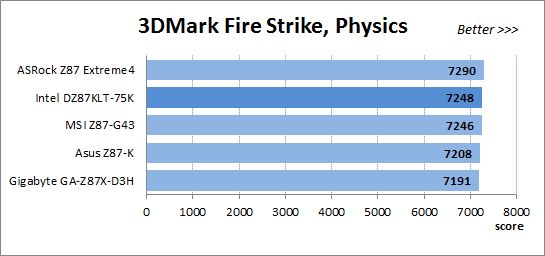
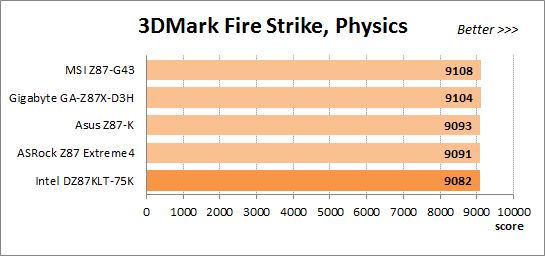
The next diagram shows only CPU tests from the 3DMark Fire Strike. This score is obtained in a special physics test that emulates the behavior of a complex gaming system working with numerous objects:
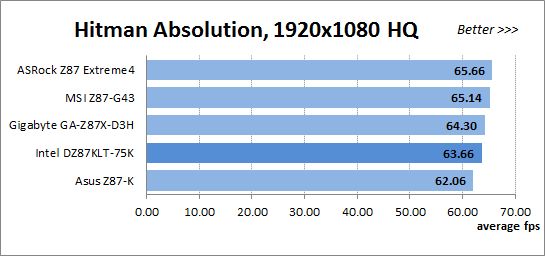
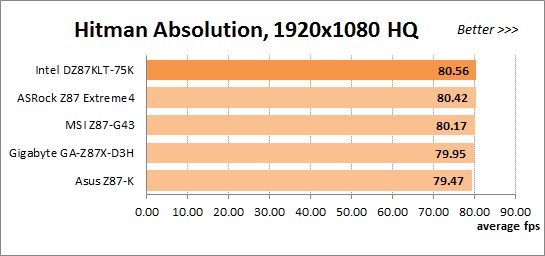
The benchmark integrated into the Hitman Absolution game turned out very convenient. It can be launched directly from the game, from the game launcher utility and even from the command prompt. We use maximum quality settings from the “Ultra” profile and a pretty high screen resolution.
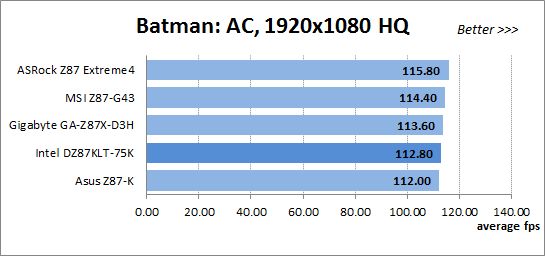
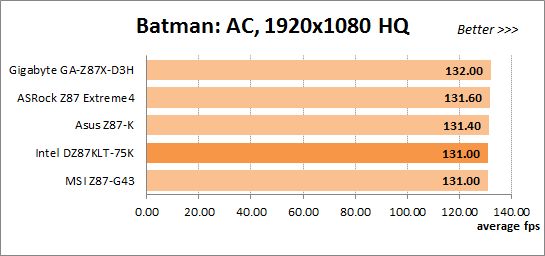
Batman: Arkham City game also reacts eagerly to any changes in the CPU clock frequency, and it uses DirectX 11. We ran game’s integrated benchmark five times with “Very High” image quality settings and then take the average of the five runs for the diagrams.
Similar mainboards are prone to deliver the same performance under identical test conditions, but this time around the difference is quite large. The ASRock Z87 Extreme4 doesn’t seem to use any overclocking at its default settings, yet it takes a leading position in every benchmark. In some tests its advantage is quite substantial.
Overclocked mode
Now let’s see what performance can be expected from our configurations with their CPU and memory overclocked. We reached the same overclocking results with all these mainboards: a CPU clock rate of 4.5 GHz and a memory clock rate of 2133 MHz with timings of 9-11-11-31-2N. The only exception was the Intel DZ87KLT-75K as it set the timings at 9-11-11-31-1N.
Like MSI mainboards, Intel ones were often a little bit slower in comparison with similar products from other brands. This difference has been shrinking over time, so the Intel DZ87KLT-75K is now first in some tests and last in others. The gap from the other mainboards is really small, both at the default and overclocked settings. The different timings do not affect its performance much.
Power Consumption
We performed our power consumption measurements in nominal and overclocked modes using Extech Power Analyzer 380803. This device is connected before the PSU and measures the power draw of the entire system (without the monitor), including the power loss that occurs in the PSU itself. In the idle mode we start the system up and wait until it stops accessing the hard disk. The results on the diagrams are sorted out in ascending order.
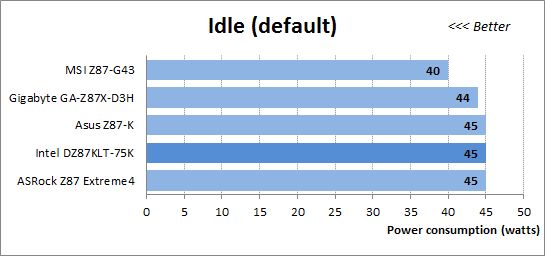
Except for the traditionally economical MSI, the mainboards are comparable in the idle mode at their default settings. For all their downsides, Haswell-based CPUs should be given credit for requiring less power in idle mode in comparison with their LGA1155 counterparts. Unfortunately, we can’t see that when the mainboards work at their default settings, so we have an additional test mode called Eco. It means the same default settings but we manually switch all options referring to Intel’s power-saving technologies from Auto to Enabled in the mainboards’ BIOSes. This helps improve the results, lowering the power consumption of our configurations considerably. The mainboards from ASRock and Intel benefit less than the others from this, though.
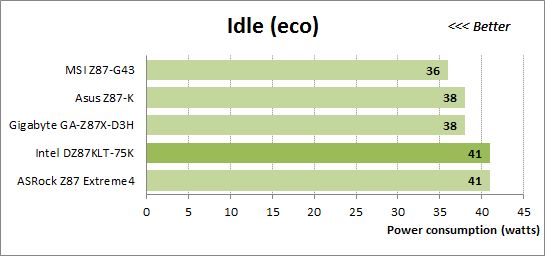
We want to remind you that we install an AMD Radeon HD 7970 graphics card into our test configurations. If we instead used the CPU-integrated graphics core, the overall power draw would be lower than 30 watts. Haswell-based CPUs are indeed very economical when idle, so it is a shame that the mainboards do not ensure this advantage by default. You have to correct some BIOS options for that.
The high load on our Haswell is created by the LinX utility with support for AVX instructions. It is heavier on the CPU than ordinary applications, yet it is just an application nonetheless. It is quite possible that there are some other programs that can be just as heavy. That’s why we stick to using LinX for the purpose of checking the computer out for stability and when measuring its power consumption.

The numbers are high, but they are close to the highest power consumption possible at all. To measure the power draw of our configurations in typical applications, we used the Fritz benchmark. It doesn’t really matter which exactly application you use for that purpose. Any ordinary program that can run on all four CPU cores will produce the same or comparable results. So it turns out that we shouldn’t worry about the high power draw under the AVX-using LinX. The typical power consumption is about 100 watts whereas the most economical mainboards need even less.
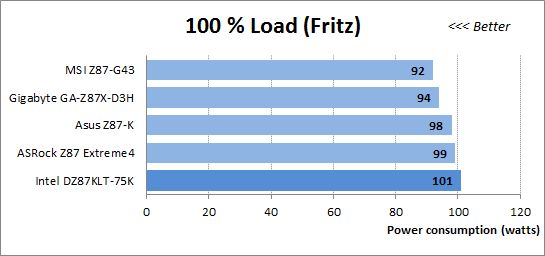
By the way, you have to count in the graphics card’s power draw to calculate the overall system consumption. We use CPU loads in our power consumption tests, but if we load the AMD Radeon HD 7970, the total power draw will be close to 250 watts at default settings and even higher at overclocking.
The mainboards are comparable in idle mode when overclocked, but the ASRock and Intel are again somewhat different, consuming over 40 watts.

We don’t have a special Eco mode here because we always use as many power-saving technologies as possible while overclocking. Instead, we show you a summary diagram with the power consumption of each mainboard at different settings. The results are paradoxical. The overclocked systems (working at increased CPU voltage) need as much power as in the Eco mode and less than at the default settings. It just proves once again how important it is to enable all power-saving technologies if you want your computer to be energy efficient.
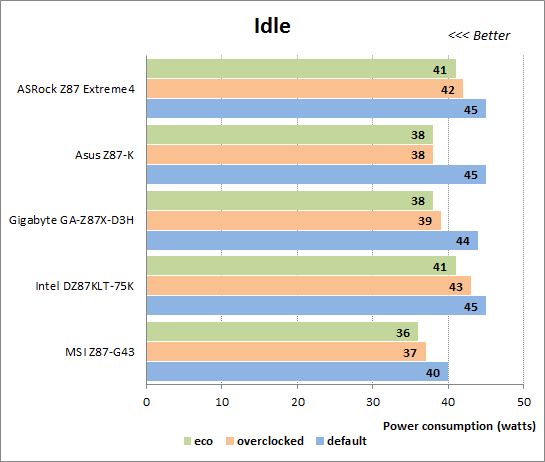
The overclocked systems need much more power at high loads compared to themselves at the default settings. The high frequencies and increased voltages show up then.

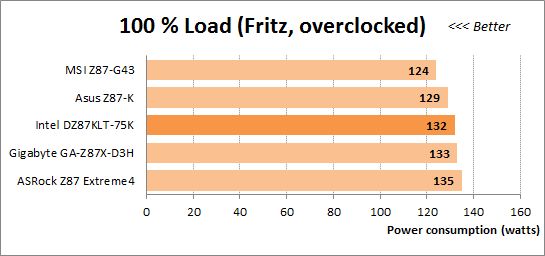
As we mentioned above, mainboards from Intel and MSI used to be more economical than others. The MSI Z87-G43 proves it in our tests but the Intel DZ87KLT-75K doesn’t. Moreover, it needs even more power than its competitors in some operation modes. However, most of the tested mainboards are entry-level products. They are small and have but few additional controllers. The ASRock Z87 Extreme4 is the only one we’d call a mainstream model, yet the Intel DZ87KLT-75K is of a much higher class. That’s why the fact that Intel’s flagship mainboard is comparable to the others in power consumption is its advantage. When overclocked, it needs a little more power than its opponents in idle mode but less power at high loads. So, we guess we should wait for tests of other flagship mainboards to make our final verdict. It may turn out that the Intel DZ87KLT-75K will be much more economical than them.
Conclusion
Answering the question we asked at the beginning of this review, the Intel DZ87KLT-75K is indeed an example for other mainboard makers. The flagship of Intel’s LGA1150 mainboard series, it not only makes full use of the Z87 chipset’s capabilities but adds to them with extra controllers. It has additional USB 3.0 and SATA 6 Gbit/s ports, two network controllers, FireWire and Thunderbolt, and an mSATA/miniPCIe adapter for full-size and half-size cards. You often have to choose between the additional controllers and expansion slots since the number of the chipset’s PCIe lanes is limited, but the Intel DZ87KLT-75K avoids this limitation by using a PLX PEX 8606 chip for six additional PCIe lanes.
The mainboard can share the CPU-integrated PCIe lanes between three graphics slots, supporting multi-GPU CrossFireX and SLI configurations, but allows to use the CPU-integrated graphics core as well. Its PCB design is user-friendly. The color coding of the connectors facilitates system integration. It has highlighted Power, Reset and Back to BIOS buttons, two POST code indicators, Board Status LEDs, and Voltage Regulator Status LEDs. Moreover, it comes with an MS-3871 Wi-Fi/Bluetooth module. It is not very economical but we haven’t yet compared it with other flagship products. Its performance is comparable to that of other similar products, both at the default settings and in the overclocked mode.
Intel’s Visual BIOS has been evolving, so now it is quite distinct from BIOSes of other mainboards. Its key idea is to allow you to set up everything related to one aspect of your computer in a single screen, without going to multiple subsections and pages or scrolling up and down. Then you just go to the next screen, which refers to another aspect, and continue in the same way. The implementation of this concept isn’t always perfect, yet the BIOS provides all the setup options necessary for fine-tuning and overclocking. It offers a unique search system and allows to make screenshots of a fragment of the screen.
We noted some minor downsides in our review, but there were no serious ones. The decorative faceplate on the heatsink impedes cooling, but the heatsink isn’t hot anyway. The ATX12V connector is turned around, but it doesn’t make it difficult to plug the cable in. There is no eSATA port on the back panel, but you get high-speed USB 3.0 and Thunderbolt interfaces. The new design of the BIOS’s Performance section is unfamiliar and inconvenient, but the mainboard allows to build your own list of frequently accessed features and evoke it from any BIOS page.
Except for the two POST code indicators, we haven’t found anything extraordinary, but a flagship mainboard doesn’t have to surprise. The Intel DZ87KLT-75K is just a well-made product with classic design and rich functionality. If the latter suits you, purchasing that model will be a wise decision.