Iomega StorCenter px6-300d Network Storage Review

Today we are going to talk about a high performance business class desktop device from Iomega, which promises to be ideal for small-to medium sized businesses and distributed enterprise locations like branch and remote offices, for content sharing and data protection. Powered by EMC storage technology and with up to 18TB of storage capacity, including a diskless option, is should be easy to setup and manage, and affordable to own.
The range of Iomega’s network attached storage products available on the international market numbers eight models. The two low-end ones are targeted at home users; they are based on the ARM platform and offer two disk bays. There is also a 4-disk NAS for the SOHO market, with an ARM processor, too. The tower-design StorCenter px4-300d and px6-300d are the two mainstream models. Based on Intel’s Atom processors, they offer four and six disk bays, respectively, for SMBs and large corporations. The three top-end models are rack-mounted NASes for 4 and 12 disks. They feature Intel Celeron and Core 2 Duo processors.
In this review I will be talking about the StorCenter px6-300d. With six disk bays and a rather high price, it is not a typical home NAS, although homes differ. It can be shipped diskless or with preinstalled HDDs in the following configurations: 3×2 TB, 6×2 TB or 6×3 TB. You may want to prefer one of the latter to have no worries about compatibility and to be able to quickly install your NAS on your network.
It is important for such NASes for support server OSes. The StorCenter px6-300d is certified for Citrix, Microsoft and VMware software. The NAS’s firmware is based on LifeLine from EMC, a well-known maker of corporate storage systems Iomega is part of. Users are offered 24/7 tech support and extended warranty servicing.
A large part of the description of the NAS’s functionality can be applied to the px4-300d model which has the same firmware.
Package and Accessories
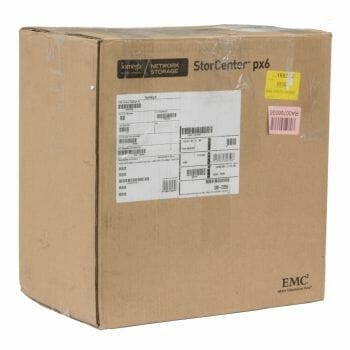
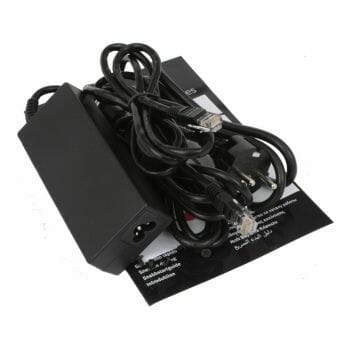
We’ve got a business product here, so its packaging is robust cardboard with a minimum of decorations. Besides the NAS, the box contains an external power adapter with cord, a LAN cable, some screws, a CD with software, a brief installation guide, and an Iomega product catalogue.
It’s somewhat odd for a six-disk NAS to be equipped with an external power adapter (19V/6.32A) because its dimensions are large enough to accommodate one inside. The potential benefits of this solution (better cooling, lower noise, easy replacement) can hardly outweigh the downsides (you have to find some place for the external adapter; external connections are less reliable).
The CD contains a document with links to the manufacturer’s websites where you can download electronic versions of user manuals and the Iomega Storage Manager tool for Windows, Mac OS 10 and Linux. In the website’s Support section you can find a lot of useful information, particularly various NAS usage scenarios and answers to frequently asked questions. The manufacturer offers technical support by phone and email. You can find the list of phone numbers and email addresses at the website.
Exterior Design
The StorCenter px6-300d is designed line a miniature tower measuring 17.7 x 25 x 27 centimeters. The disk bays can be accessed through the door in the face panel. The door is a plastic mesh that doesn’t hinder ventilation. Its color is gray to match the metallic case. On the right, there is a black glossy insert with a USB 3.0 port and a Power button with built-in indicator. There is a window in the top part of the door for a dot-matrix display. You can also see two LED indicators and a couple of buttons nearby.

The display can report the status of the NAS, including system errors. You can use it to learn such information as system name, IP address, RAID status, date and time. It can’t be used to adjust any settings, though.

The rear panel is largely occupied by the grids of two 90mm cooling fans. Above them there is a standard expansion slot bracket. On the right, there are two USB 2.0 ports, two Gigabit Ethernet connectors with built-in indicators, a Reset button, and a power connector.
Hardware Configuration
The StorCenter px6-300d is based on the Intel Atom platform. Its 17x17cm PCB carries the following components: a D525 processor (2 cores, 4 threads, 1.8 GHz), an ICH9R South Bridge, two SO-DIMM DDR3 slots (one is occupied by a 2GB PC-10600 module), Realtek RTL8111E LAN controllers, and a single-port USB 3.0 controller FL1000G. Part of the firmware is stored in the 1GB flash memory chip made by Samsung which is connected via USB.
There is also a VGA mini-connector (a normal monitor connector would be even better, though), a serial port, a Clear CMOS button, a BIOS restore connector, a debugging port, and a PCIe x4 slot on the PCB. The manufacturer doesn’t specify any uses for the PCIe slot. The NAS is assembled using a lot of rivets, so you may find it difficult to take it apart to reach the fans for cleaning or replacing.
The hardware looks good except for the lack of eSATA and the single USB 3.0 port. The former is explained by the exclusive use of the chipset’s controllers whereas the latter is mere cost-saving. You can potentially expand the NAS’s functionality by installing an add-on card into the PCIe slot but you must make sure beforehand that it’s supported by the integrated OS.
The NAS is cooled by two 92x25mm fans from Delta Electronic. Their speed is PWM-regulated automatically. There is also an additional high-speed fan on the processor. The overall noise level is average, allowing to use this model at an office, which is good enough for a six-disk NAS.
I tested it with firmware version 3.1.14.995.
Getting Started
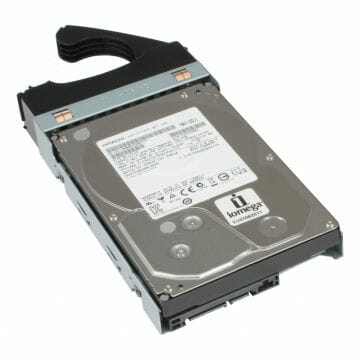
If you’ve got a StorCenter px6-300d without preinstalled HDDs, you need to add at least one disk first. It’s simple. Just put your HDDs onto the frames and insert the frames into the bays. The NAS supports both 3.5 and 2.5-inch disks. When being initialized, the NAS formats its disks and writes some system files to a dedicated partition (it is as large as 20 gigabytes).
You set up your StorCenter px6-300d via its web-interface. It is available in several languages, supports HTTPS, offers an integrated search engine, help system (identical to the full electronic user manual) and a link to the tech support page at the manufacturer’s website. Novice users may find the Setup page with links to key settings helpful. Besides the web-interface, you can use the Iomega Storage Manager utility for accessing the NAS over your LAN, connecting network disks and entering certain settings.
The web-interface is quite simple and intuitive. There are icons of pages with settings on the left, grouped by topic. You can also view all the pages at once. This can be handy since there are not so many of them here.
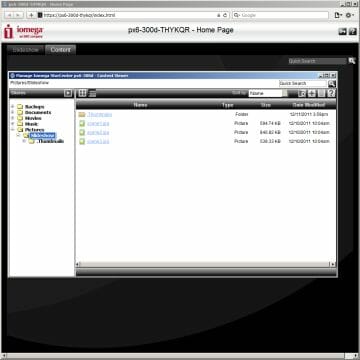
If you enable the Home Page feature, ordinary users will be able to access the NAS via their web-browser. They can be offered a predefined photo slideshow or a simple file manager for uploading, downloading and deleting files and folders (copying or renaming are not supported).
Basic Functionality
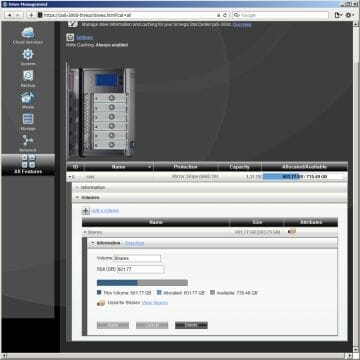
As is indicated by the number in its name, the StorCenter px6-300d supports up to six disks. The installed disks can be joined into RAID arrays of the following types: 0, 1, 10, 5, 6 and JBOD. The process of creating shared resources is somewhat unusual with this NAS. First you build a RAID array out of your disks, then specify a disk volume of certain capacity and only then you can create shared folders. Take note of the second step: by default a disk volume is about half the whole capacity of the RAID. XFS is used for the file system.
You can change the capacity and type of your RAIDs without losing your data. Particularly, you can turn a mirror array into a RAID5 or a RAID5 into a RAID6. The last two types allow adding new disks, for example to increase the overall capacity of the array. The current version of the firmware does not allow to increase the capacity by sequentially replacing disks with higher-capacity ones in fault-tolerant arrays, though. This may be due to the complex disk structure described above. But you can assign replacement disks for fault-tolerant arrays. You can also choose the write cache mode: enabled, disabled or enabled with UPS.
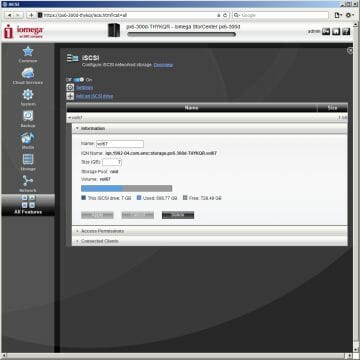
You can create iSCSI volumes on your RAIDs. The NAS can use an integrated or external iSNS server and supports Mutual CHAP for all iSCSI volumes. For each volume individually you can specify access rights (the minimum password length is 12 characters). This service can be disabled if you don’t plan to use iSCSI.
I didn’t find a special page where I could check out the health of each HDD. Hopefully, the NAS uses S.M.A.R.T. technology and monitors the status of its HDDs.
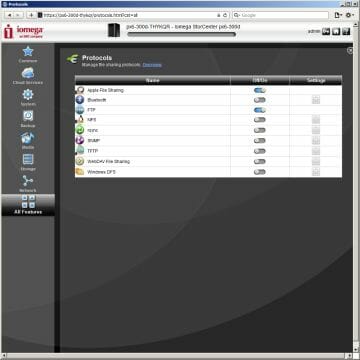
Data access is provided by the following protocols: CIFS/SMB, AFP, NFS, FTP and WebDAV. The first of them is always on and can’t be disabled. You can specify the NAS’s network name and description, workgroup and domain. The AFP and FTP protocols have no settings at all. While it’s okay with AFP, I wish I could change port numbers, limit connections and speeds with FTP. The FTP server supports Unicode for non-Latin filenames. The NFS protocol has only one setting: root_squash/all_squash. By using WebDAV over HTTP/HTTPS you can access your documents via your web-browser. Windows DFS technology can be used to combine multiple external network resources in a single shared folder of the StorCenter px6-300d.
Files can be uploaded to the NAS via TFTP, too. Besides the mentioned AFP, Mac OS users may be interested in the NAS’s support for the backup tool Time Machine. The NAS’s factory settings provide access for every user. You can ensure more security by making the user enter his name/password. On this page you can also enable HTTPS-based access to the web-interface.
If the NAS is not on a domain, you have to enter user groups and accounts directly on it. There are no unusual options here except for choosing UID/GID for new accounts. Disk quotas can be assigned to users. If necessary, ordinary users can be permitted to administer the NAS. Access rights can be assigned for specific files and folders.

As I wrote above, shared folders are created on disk volumes which are located on RAID arrays. They can be accessed by anybody without any restrictions by default, but you can specify read-only access as well. For the NFS protocol you enter hosts and networks that can connect to the particular resource (in read-only or full-access mode). You can specify in a shared folder’s properties whether its files must be indexed by the media server.
Besides these conventional setup options, there are a couple of unusual ones. The View Content option has been mentioned above. It provides browser-based access to files. The second is Active Folders and helps to automatically process documents that are written to such a resource over LAN: the folder’s files or links to them can be sent by email, photos can be published on Facebook/Flickr and videos on YouTube, images can be resized or watermarked, files can be downloaded by BitTorrent.
The StorCenter px6-300d connects to a LAN via its two Gigabit Ethernet ports which support Jumbo Frames and can be combined for higher reliability or performance using the 802.3ad protocol. VLAN support can be handy for large networks (up to four networks for each network adapter).
External Devices
The StorCenter px6-300d has three USB ports. The front-panel one is version 3.0 while the other two are 2.0. You can connect the following types of peripherals to them: external disks, digital cameras, printers, UPSes, Bluetooth controllers. USB hubs can be used to connect more peripherals concurrently.
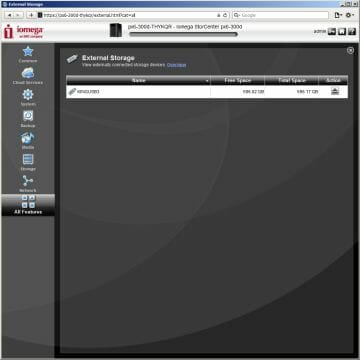
Multiple partitions can be accessed on external disks. They can be formatted as FAT, EXT2/3/4, NTFS or HFS+. Each partition becomes automatically accessible as a shared folder. You can change its name and access rights (this information is retained even after the disk has been re-plugged). FTP-based connection only works with the original name of the external disk. You can turn off external disks safely from the web-interface (make sure there are no open documents).
The Picture Transfer Protocol is supported for copying images from digital cameras automatically into a predefined folder. The NAS creates subfolders with names corresponding to dates from EXIF. Copied files can be removed from the camera or left intact.
USB-printers connected to the NAS can be accessed from Windows, Mac OS and other OSes if they support SMB or IPP. As usual, it is impossible to check out the level of ink or toner.
The manufacturer’s website doesn’t offer compatibility lists of printers and UPSes. According to the documentation, when you connect a UPS, the NAS will be able to monitor power supply and shut down safely if necessary. This feature has no LAN-based options.
By connecting a Bluetooth adapter you can enable the NAS to receive any files wirelessly. You can specify a device name, PIN code, and a folder for storing files.
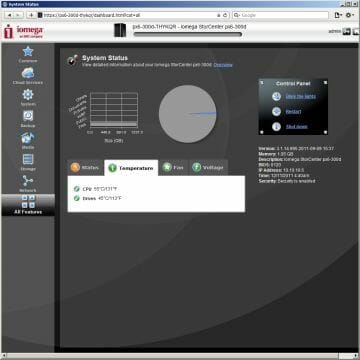
System SettingsThe system status page offers you information about firmware version, system memory amount, network address, disk status (including the size of shared folders) and hardware (voltage, fan speed, temperature). It also provides links to rebooting or shutting the NAS down. It is on this page that you can check out the status of RAIDs as they are being rebuilt (you can use the dot-matrix display for that purpose, too).
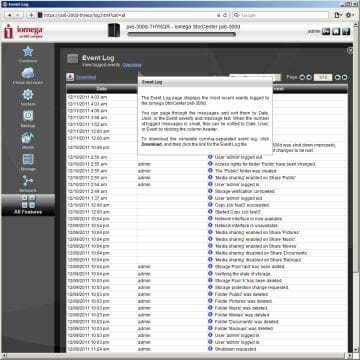
The event log is quite detailed. Besides downloading the whole document in CSV format, you can make the NAS send email notifications. You can use the NAS’s built-in SMTP server for that and only specify a recipient’s address. The email language can be changed in the settings. The NAS supports SNMP for corporate applications.
The power management options are limited to turning HDDs off after a period of inactivity (from 5 minutes to 1 hour). A firmware update option is available. You can check out for new versions right from the web-interface if you’ve got Internet connection. Saving and restoring the current NAS configuration is not possible. Resetting it to the factory defaults can be accompanied with a quick or full removal of user data.
The integrated clock can be set up manually or automatically.
Additional Features
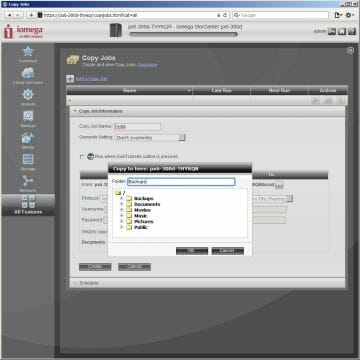
Backing up data is surely one of the most important applications for a NAS. The StorCenter px6-300 features an integrated backup module for that. On the Copy Jobs page you can create several data backup jobs using local NAS folders, external disks, shared folders on other LAN devices (user PCs, for example) and rsync servers as the source or destination of data. The NAS can act as an rsync server itself. You only have to enable this option and specify an access password.
You can choose a synchronization mode for each job: do not rewrite, rewrite and remove missing files, rewrite and leave missing files. Backup jobs are easily scheduled by specifying the time and day of the week. The Quick Transfer button can be bound to specific jobs. Unfortunately, this feature doesn’t support multiple copies of data.
When an external disk is connected, the StorCenter px6-300d automatically creates jobs for copying each partition into a folder specified by the admin (in a subfolder named after the device and partition number). To launch these jobs, you press the Quick Transfer button on the NAS’s case or the appropriate icon in its web-interface.
The NAS can be set up for a backup server with EMC Avamar software. This can help you save disk space because that software supports deduplication.
Trendy cloud technologies are not forgotten: the StorCenter px6-300d supports online storage services Amazon S3 and Mozy.
You can even build your personal cloud by making the NAS accessible via the internet. It is not easy to set this feature up, though. First, you need your router’s external IP address. Then you have to set your router up to translate a port for this feature (you can choose the port number yourself). After that you need to register your cloud on Iomega’s servers, providing a unique name for it. Then you add users, i.e. clients of Iomega’s service, by sending them email invitations with instructions for using it. The client will have to install Iomega Storage Manager to his PC and enter his credentials to access your personal cloud.
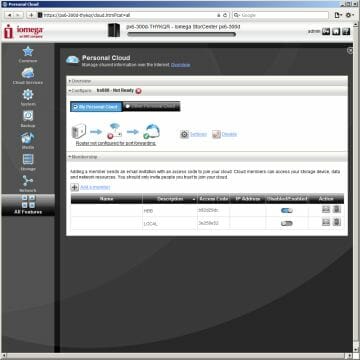
The remote user will be able to use the resources of your cloud and share his own resources with other users. The connected clients can communicate directly using TCP/IP as if they were on a single LAN with “gray” IP addresses. It is up to the admins of the clients to ensure access control after they connect. For example, inviting a remote user to your personal cloud is not enough to transfer a file. You also need to provide a network resource for storing the document and a user account with appropriate access rights. This feature is quite powerful, allowing to automatically access all of the NAS’s services (to back up data, access the media server or FTP server, for example), but its implementation is not easy and intuitive.
This feature incorporates browser-based access to files and a media server. The former is implemented by the standard web-interface with enabled Home Pages whereas the latter is based on TwonkyMedia. You only have to set up your router to translate appropriate ports. Iomega has recently released the Iomega Link utility for iOS gadgets. This free tool helps you transfer files to and from the NAS (for uploading and downloading of photos, accessing documents, browsing multimedia files).
The Remote Access feature is much simpler. A special wizard will guide you through three steps of checking out your internet connection, setting up port translation on a compatible UPnP router and creating a DDNS domain name. There can be some problems, though. Translation can only be performed for the standard HTTPS port (443), which is not always handy. So, perhaps setting the router up manually will be a better option for you.
Home users may need the integrated DLNA server, based on TwonkyMedia 6, for streaming multimedia content to compatible players. Each shared folder can be indexed by this server. You can access its own setup interface and force the indexing of files. Despite the lack of special settings, the NAS can serve as an iTunes library.
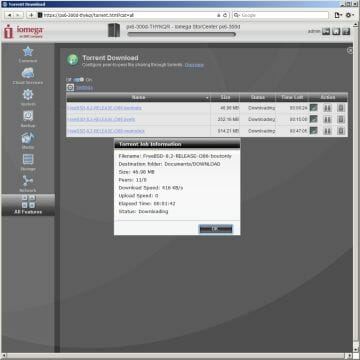
Of course, the StorCenter px6-300d can download files via BitTorrent autonomously. There are very few settings, though: speed limits for downloading and seeding, and port number. Before using this feature you must enable monitoring of new download jobs for a shared folder. A download job will be launched as soon as its torrent file is saved into that folder. You can pause, restart, delete and view downloads. The number of download jobs is not limited but only eight can be active simultaneously. When complete, a downloaded file acquires the Uploading status and frees one download job slot. I couldn’t check out if the NAS was really seeding files, though. The file will remain Uploading until its download job is removed. You cannot define priorities for download jobs.
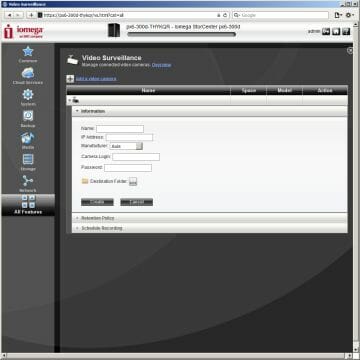
The integrated video recording system may be interesting for corporate users. The StorCenter px6-300d supports up to 10 devices. The compatibility list includes models from Axis, Panasonic and D-Link. This module has a minimum of settings: you can choose a shared folder to store recordings, set a time or size limit for keeping recordings from each camera, and specify a recording schedule. You can view recordings as video files. There are no integrated monitoring or motion sensor features.
Functionality Enhancements
Like many other NAS makers, Iomega provides the option of installing additional software developed with its SDK. However, at the time of my writing this there were no ready-to-use packages at http://lifelineapps.com. Hopefully, some will came about soon.
There is a hidden face in the interface where you can enable SSH and SFTP access, collect a report file for tech support and carry out an offline file system check.
These actions can void your warranty, though. The use of a 64-bit OS in the firmware makes it somewhat more difficult to install software add-ons.
Performance
I couldn’t find six identical HDDs for this test, so I had to add a WD Caviar Blue WD5000AAKS to five Caviar Black WD5001AALS disks. Multi-disk RAIDs worked without any problems. I benchmarked the NAS with Intel NASPT 1.7.1 using one disk or six disks as RAID0, 10, 5 and 6. Jumbo Frames were enabled.
The StorCenter px6-300d is quite fast for its class, delivering a read speed of up to 100 MB/s and a write speed up to 80-90 MB/s. The parity arrays were generally faster than the striped ones, contrary to what one might expect. It means you don’t lose in performance by building RAID5 or 6 arrays on this NAS. This may be due to the file system, which is but seldom employed in serial NASes, or to some problems with the RAID0 implementation.
To check out how fast the NAS is with peripheral storage devices, I took an external HDD from Kingmax (the 640-gigabyte KE-71 model with USB 3.0 interface). After formatting its partition as NTFS, EXT4 or HFS+, I connected it to the USB 3.0 and USB 2.0 ports of the NAS.
The top speeds are 20-40 MB/s with USB 2.0 irrespective of the test pattern and file system. You may want to prefer NTFS and HFS+ for reading whereas EXT4 is faster at writing. NTFS and HFS+ are quite close to each other in terms of speed. EXT4 turns out to be more efficient when processing small files.
The data-transfer speeds grow up with large files when the disk is connected via USB 3.0. The top numbers are 30-85 MB/s. This time around EXT4 seems to be more efficient than the other file systems. It is faster when writing and processing small files and comparable to the others at multithreaded reading.
Conclusion
The StorCenter px6-300d is a classic NAS based on the Intel Atom platform. It features one USB 3.0 port and two Gigabit Ethernet controllers which may come in handy for corporate networks. Unfortunately, the manufacturer didn’t implement eSATA whereas the USB 3.0 interface is represented by only one connector. Well, eSATA would require additional controllers because the chipset’s ones are all utilized for internal HDDs. On the other hand, the px4-300d model lacks eSATA, too.
Among other hardware features I can note a large amount of system memory and a free memory slot for upgrading it. The documentation doesn’t mention any usage for the PCI x4 slot, so I can only propose installing network adapters or peripheral controllers (eSATA or USB 3.0, for example).
The NAS itself is sturdy and high quality. It has an external power adapter, but I guess an internal one would be more appropriate for its class. The large display is handy for monitoring and diagnosing any problems.
The firmware is based on EMC’s software and I couldn’t find any flaws in it. There are some peculiarities as to the disk volume management and no opportunity of increasing the size of a RAID by replacing its disks with larger-capacity ones.
The StorCenter px6-300d supports a large number of network protocols, which is important for heterogeneous networks but I wish the FTP server settings were more detailed. FTP is more important for a NAS of this class than the support for digital cameras and Bluetooth.
The NAS offers handy backup options with support for cloud-based storage systems. The Personal Cloud feature allows working with remote devices and PCs combined into a single resource pool. This technology doesn’t look polished off to me, though. It is too complex to set up and use. Like home-oriented NASes, the StorCenter px6-300d has a media server and a file download system. Its IP camera recording system is going to be relevant for corporate users.
The firmware can be expanded by installing add-ons although none was available at the time of my writing this. So if anything is missing, you have to use the console access to the OS.
The performance of the StorCenter px6-300d is average for this platform. It can deliver data-transfer speeds up to 80-100 MB/s. It is fast with fault-tolerant RAIDs. The same speed can be achieved with USB 3.0 external disks.
The high price of x86-based NASes seems to be the main factor that limits their popularity. The StorCenter px6-300d is no exception as it costs (in the diskless version) as much as $900. A larger part of this price covers not the hardware but the software, certifications and tech support which are so important for corporate users.