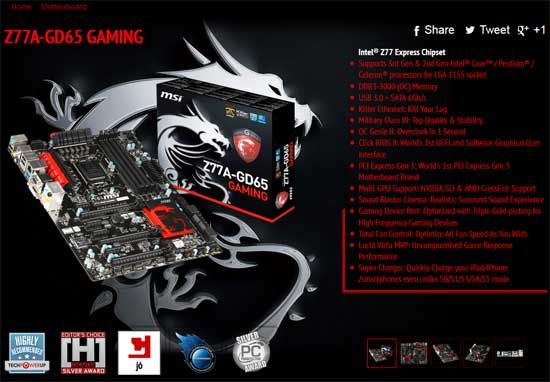
MSI Z77A-GD65 GAMING Mainboard Review: LGA 1155 Mainboard from New MSI Gaming Series

The major but not the only distinguishing features of new Micro-Star gaming mainboards compared with the regular models is the replacement of the generic network controllers with Qualcomm Atheros Killer E2200, which allows assigning priorities with focus on gaming traffic, thus reducing the delays during online gaming.
The annual expo CeBIT 2013 took place in Hannover, Germany, in early March. It is there and then that MSI announced its gaming product series which currently includes notebooks, all-in-one PCs, graphics cards and mainboards. These products share an aggressive black-and-red color scheme and use a cute dragon as the series logo.
Talking about gaming mainboards, we recall the Republic of Gamers series from ASUS in the first place. Then, there is the G1-Killer series from Gigabyte, which was introduced a couple of years ago. These two product lines are completely different, offering specific advantages, and MSI’s gaming mainboards also have one special feature of their own. It becomes clear when you take a look at the list of available models (by the time this review is published, Intel’s new platform will have already been announced, so this list is going to be complemented with LGA1150 products).
Gaming mainboards from ASUS and Gigabyte are special solutions that have little in common with ordinary mainboards from these brands. Sporting a large number of additional controllers and technologies, they are expensive whereas MSI’s gaming products have the familiar names of the company’s mainstream and even entry-level mainboards with the addition of the “Gaming” designation. While it’s good that enhanced capabilities can be had for little money, we wonder what the difference is.
It’s been a while since we tested the MSI Z77A-GD65 mainboard. We found it to be an ordinary enough product, without any special advantages, yet also without serious flaws. So, we are curious to check out the MSI Z77A-GD65 GAMING model now to see how it differs from its non-gaming cousin.
Packaging and Accessories
It is no wonder that MSI uses a different style of packaging for its new gaming series, but the overall design principles have remained the same. We see the product’s model name and logos on the front of the box. On the back, there is a list of specifications and descriptions of certain features and capabilities illustrated with photographs and diagrams.
The mainboard is additionally protected with an antistatic pack. Separated with a sheet of cardboard, the following accessories can be found below it:
- Four Serial ATA cables with metal connector locks, half with L-shaped locks and another half – with straight ones;
- A flexible bridge for 2-way Nvidia SLI graphics configurations;
- I/O Shield for the back panel;
- “M-Connector” block including modules for easy connection of the system case front panel buttons, indicators and audio;
- “V-Check Cable” adapter set for manual voltage monitoring with a voltmeter;
- User manual;
- A booklet on proprietary software;
- A booklet with brief assembly instructions;
- System case sticker with Micro-Star gaming mainboard series logo;
- “I’m not here” and “I’m sorry busy gaming” door tags;
- DVD disk with software and drivers.
Compared to its non-gaming cousin, the new mainboard has the same accessories plus a self-adhesive gaming series badge and a dual-sided door tag.
PCB Design and Functionality
The MSI Z77A-GD65 and MSI Z77A-GD65 GAMING look completely different, but this is only a superficial impression. Upon closer inspection the mainboards turn out to have the same design with minor variations. So the Gaming model is actually based on its non-gaming cousin.

Both mainboards feature premium Military Class III components (DrMOS II transistors, Solid CAP and Hi-c CAP capacitors, Super Ferrite Chokes). The hot parts of the CPU voltage regulator are covered with two additional heatsinks connected with a heat pipe. All the heatsinks, including the third one on the chipset, are attached to the PCB with screws. There is a row of CPU Phase LEDs in the top right corner of the PCB, which indicate the current number of active phases in the CPU voltage regulator. There are also three highlighted buttons there: Power, Reset and OC Genie (the latter allows to overclock the computer automatically). The nearby V-Check Points and the bundled V-Check cables let you easily monitor key system voltages with a voltmeter.
The Intel Z77 Express chipset supports four SATA 3 Gbit/s and two SATA 6 Gbit/s ports. Two more SATA 6 Gbit/s ports are added with an ASMedia ASM1061 controller. The two PCIe 3.0/2.0 x16 slots can share 16 CPU-based PCIe lanes as x8/x8, allowing to build multi-GPU configurations in CrossFireX or SLI mode. If you’ve got an Ivy Bridge CPU, the third PCIe 3.0 x16 slot becomes available as well, so the speed formula becomes x8/x4/x4. The three PCIe 3.0/2.0 x16 slots are all equipped with handy broad latches. Besides them, the mainboard offers four PCIe 2.0 x1 slots for expansion cards.
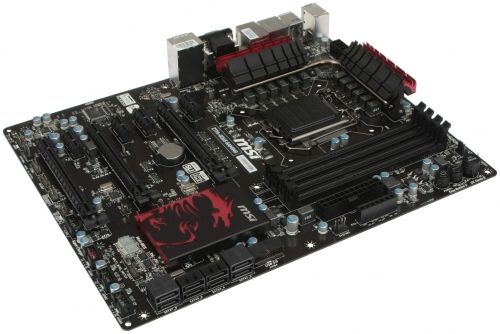
The combination of red and black is always a winning visual solution but there is just too much black here at the expense of practicality, we guess. We had the same problem with the Z77A-GD65 model which used more colors: even knowing that DDR3 modules should be installed into the black pair of slots (the farthest slots from the CPU), you could involuntarily plug them into the attractive-looking blue ones. The memory slots of the Z77A-GD65 GAMING are all black but you can find instructions about their usage written next to them right on the PCB. The same goes for the other connectors – they all look like each other and are all black. You can only differentiate USB 2.0 and IEEE 1394 headers by their labels whereas the SATA 6 Gbit/s ports based on the additional controller are no different in color from the chipset’s SATA ports, both 6 and 3 Gbit/s. The two chipset-based SATA 6 Gbit/s ports you should use in the first place are only indicated with a sticker (it’s not shown in the photo).
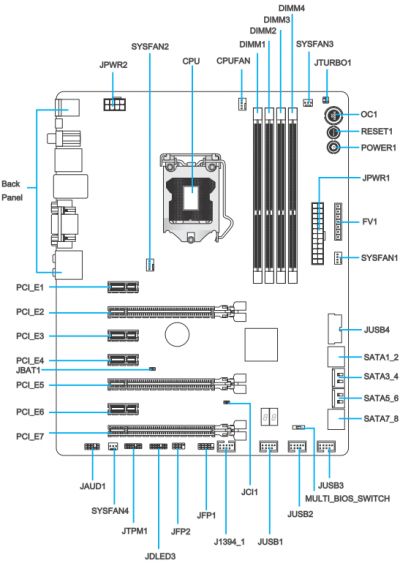
The mainboard’s layout drawing reveals a few more components. There is a POST indicator, two independent BIOS chips (you can select the chip to use with a switch), and five fan connectors, three of which are of the 4-pin variety (including the CPU fan connector).
Except for the color scheme, we have failed to find any difference between the Z77A-GD65 and Z77A-GD65 GAMING so far. Their back panels look identical as well, although it is there that the mainboards actually differ.
Here’s what we have there:
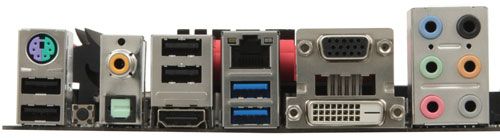
- PS/2 connector for keyboard or mouse;
- Four USB 2.0 ports, six more USB ports are available as three onboard pin-connectors;
- Clear CMOS button;
- Optical and coaxial S/PDIF, and six analogue audio-jacks provided by eight-channel Realtek ALC898 codec.
- D-Sub, DVI-D and HDMI Video outs;
- Two USB 3.0 ports (blue connectors) implemented via Intel Z77 Express chipset, another two ports are available as an onboard pin-connector;
- A local network port (network adapter is built on Gigabit Qualcomm Atheros Killer E2205 controller).
The key difference is that Intel’s Gigabit Ethernet controller is replaced with Qualcomm’s Atheros Killer E2205, so you can use the Killer Network Manager utility to define bandwidth priorities in favor of online gaming applications and thus ensure lower latencies. This feature is limited to Microsoft Windows 7 and 8 as yet. Besides the different network controller, the gaming mainboard has a Gaming Device Port which supports computer mice with a high poll rate (500 to 1000 Hz) whereas the PS/2 and USB connectors are gold-plated using thrice more gold than usual. The Realtek ALC898 controller has remained the same but the Sound Blaster Cinema technology provides additional sound effects.
Besides that, the additional controller VIA VT6315N supports FireWire but there’s no free space on the back panel, so you only get an onboard FireWire header. The eSATA interface is missing as well, and there are no back-panel brackets with eSATA or FireWire ports in the mainboard’s box.
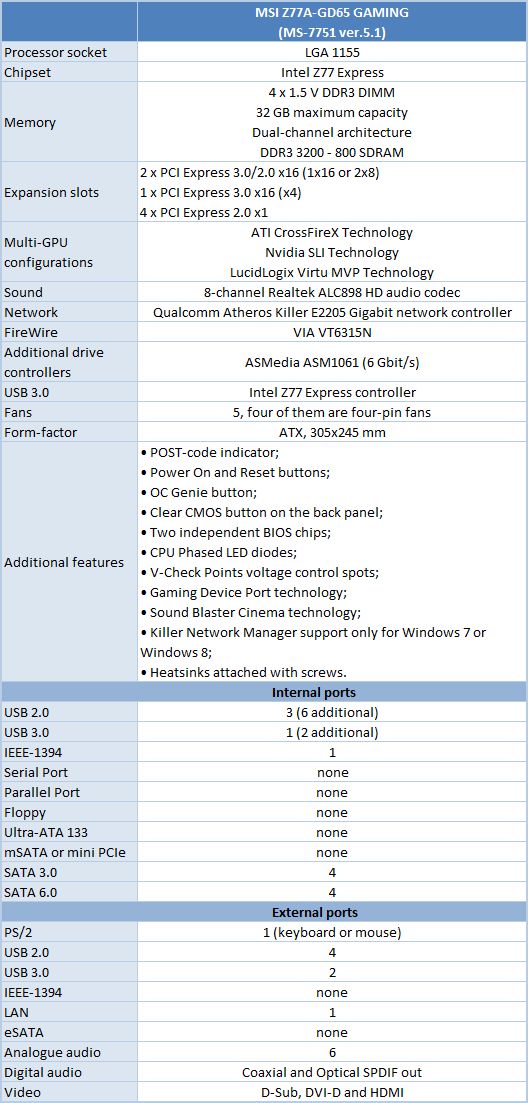
All technical characteristics of this mainboards are summed up in the following table for your convenience:
BIOS Functionality
In our previous MSI mainboard reviews we have already discussed MSI Click BIOS II, which represents a pretty successful implementation of the UEFI (Unified Extensible Firmware Interface) standard. The top of the screen performs not only informational functions but also allows choosing interface language, changing the order of boot-up devices by simply dragging and dropping them with a mouse pointer. The currently active devices will be highlighted.
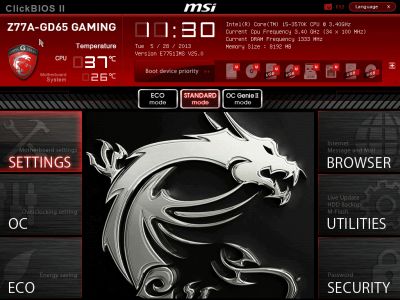
The center of the screen is allocated for displaying the BIOS settings, with main section icons on the -left and right-hand sides. Let’s get to the first section called “Settings”, which also contains a few sub-sections.
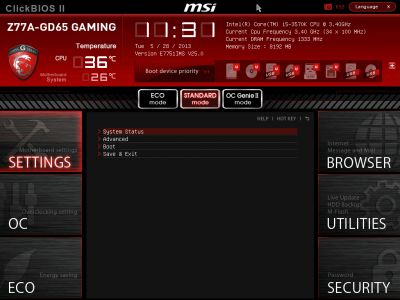
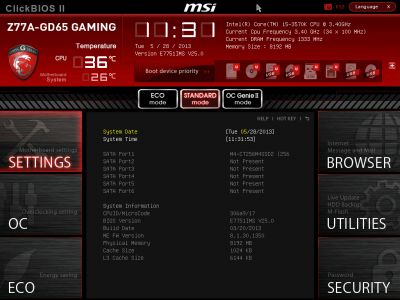
“System Status” sub-section is, in fact, the same startup screen, which we saw when we entered the regular traditional BIOS. It reports the major system info.
The variety of settings in the “Advanced” section is of no surprise to us, as they have migrated from the regular BIOS almost without any modifications. Here you can also enable and configure the unique technologies of the Intel chipset, such as “Intel Rapid Start” and “Intel Smart Connect”.
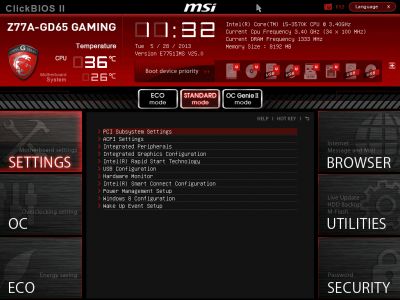
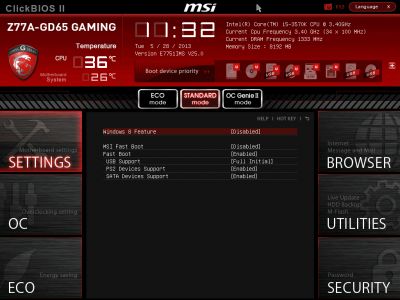
There is a new sub-section called “Windows 8 Configuration”, where you can enable the specific boot-up system typical of this particular OS and speed up the overall start-up time.
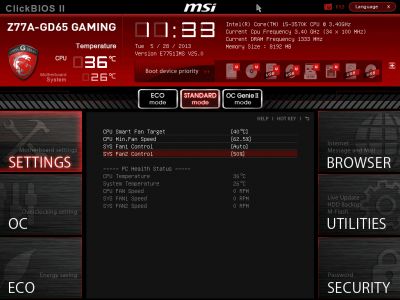
Now let’s check out the “Hardware Monitor” section where you can enable automatic adjustment of the CPU fan rotation speed depending on the current processor temperature. The adjustment works only for four-pin fans. All three-pin fans will rotate at their full speed. However, if you connect a three-pin fan to one of the two four-pin system fan connectors, its rotation speed will be lowered as needed. The rotation speed adjustment for these two fan connectors may be left at Auto or set at a specific level. The rotation speed of the fans in the remaining two three-pin fan connectors cannot be adjusted or even monitored.
“Boot” sub-section will allow you to set the boot-up devices order and a number of other things used during system startup.
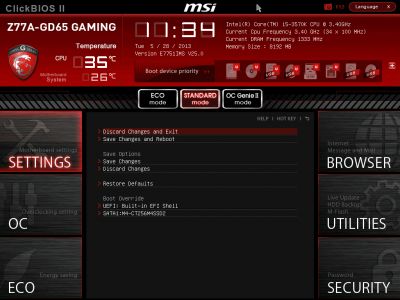
The functionality of the “Save & Exit” sub-section is obvious and doesn’t need an explanation.
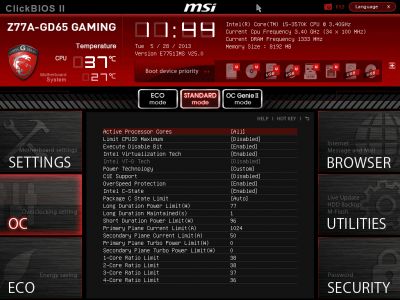
“OC” section is one of the largest in terms of available settings. It contains almost all options necessary for successful configuring and overclocking. It also has a number of informational parameters that report the current system status.
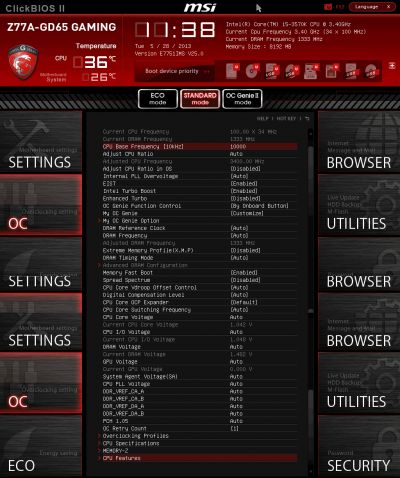
You can use “Enhanced Turbo” BIOS parameter if you want to slightly overclock the processor and at the same time keep all processor power-saving technologies up and running. When this function is on, under any type of load the processor clock frequency multiplier will rise to the maximum for this specific processor model as allowed by Intel Turbo Boost. If you want to achieve even higher results, you should use OC Genie II function that allows overclocking the system by selecting a proper option in the mainboard BIOS or by pressing the OC Genie button. Any automatic overclocking technology has a number of shortcomings, which could be partially smoothed out during user fine-tuning. “My OC Genie” parameter allows setting some of the parameters to desired values, which will be used during overclocking with the “OC Genie II” function.
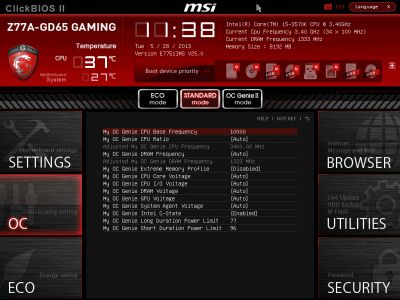
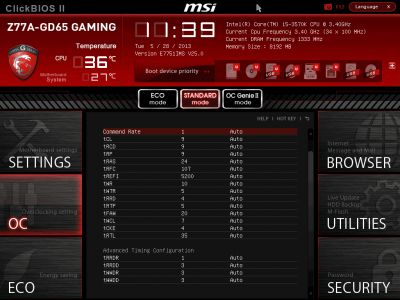
In order to make it easier to work in this feature-rich section, some parameters have been moved to individual pages. Namely, the memory timings have all been isolated in an individual sub-section. They may be identical for all memory channels, or set individually for each of them.
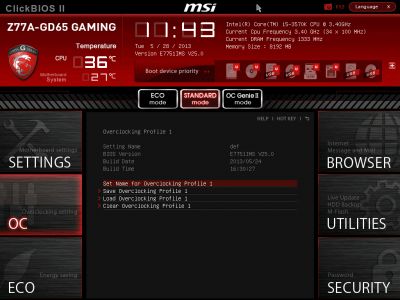
The mainboard can save six full BIOS settings profiles in the “Overclocking Profiles” sub-section. It allows saving and loading settings profiles from external media. One minor inconvenience is that you can’t tell which profiles have been used by looking at the list.
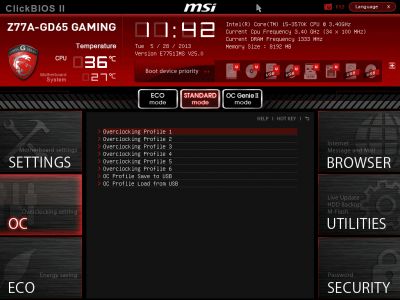
However, the actual work with the profiles is absolutely problem-free. The date and time of the profile creation as well as the BIOS version it belongs to are saved automatically for each profile. You can assign each profile a memorable descriptive name, or erase a profile from memory if necessary.
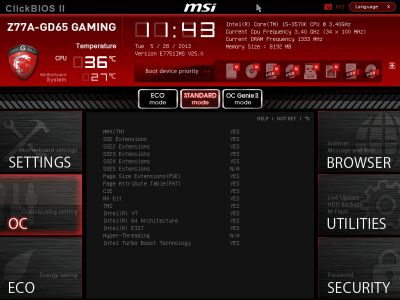
The next two sub-sections called “CPU Specifications” and “Memory-Z” perform purely informational functions. The first one tells us all the basic info about our CPU:
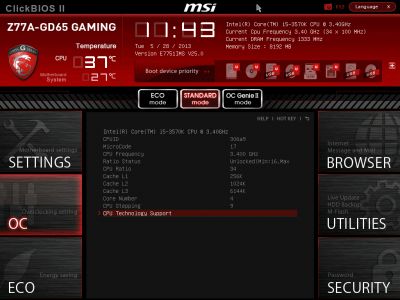
You can dig deeper, if you like, and check out the list of supported processor technologies.
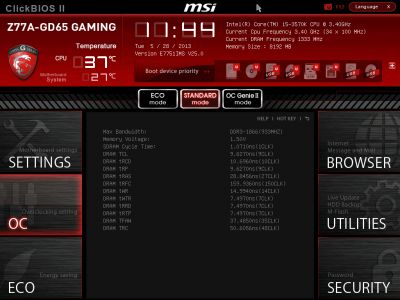
The “Memory-Z” sub-section is organized in a similar manner. The first thing you see is the information recorded in the memory modules SPD. The mainboard will use these particular settings by default.
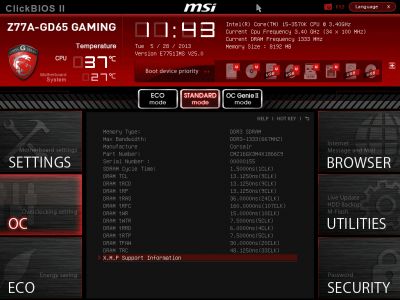
However, the actual potential of the memory modules can only be found in the “X.M.P.” profile, which you can also access through here.
In the “CPU Features” sub-section we can configure processor clock frequency multipliers, acceptable power consumption range and various processor technologies. This very important sub-section for some reason was the last in the list, but it is still very easy to access it, because all parameters in the “OC” section are looped. You don’t have to keep pressing the “down” key endless number of times to get the last sub-sections or settings. Just press the “up” key once and you will get there immediately.
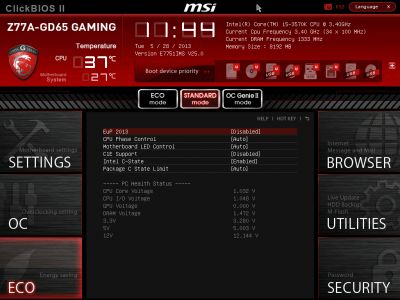
“ECO” section is what used to be “Green Power” before. Here we can work with some power-saving parameters, disable the onboard LEDs and control the current values of the most important voltages in the system.
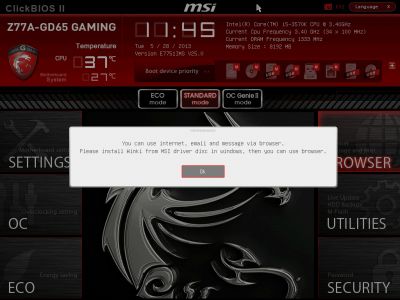
“Browser” icon on the right-hand side will let you browse the Internet, check your e-mail, use some office or IM apps, but only if you have previously installed Winki 3 Linux-based operating system from the included DVD disk.
The same is true for HDD Backup and Live Update utilities, which are hidden behind the “Utilities” icon.
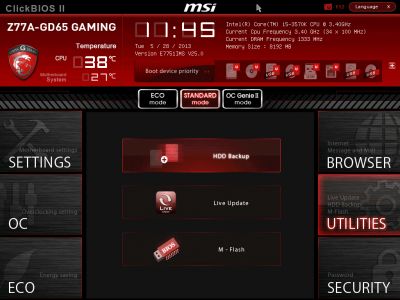
In the “M-Flash” sub-section we can try and boot using a BIOS image on a flash-drive, can save the current BIOS version or update it. It is somewhat inconvenient that the images are not only saved in the drive root folder, they should also be there for a successful update. There is no file manager of any sort, the NTFS file system is not supported, and the flash drive must be formatted as FAT or FAT32.
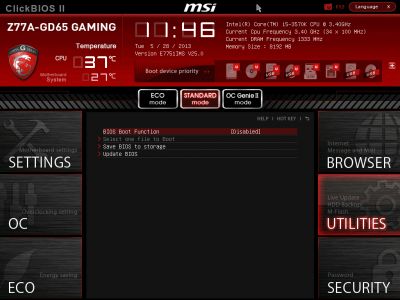
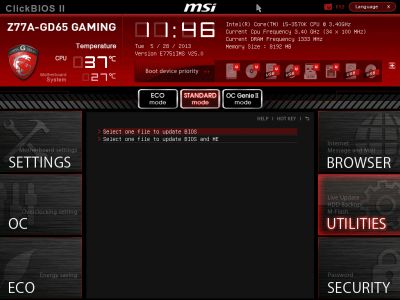
The more complex BIOS reflashing process that we uncovered in our MSI Z77 MPOWER mainboard review remained unchanged. There used to be a single parameter that offered us to select a file with the BIOS version to be reflashed. Now there is a second one, which allows to simultaneously update BIOS and ME – Intel Management Engine. Now it is somewhat tricky for the user to decide which parameter to select in which situation, because there is no help on that in MSI Click BIOS II.
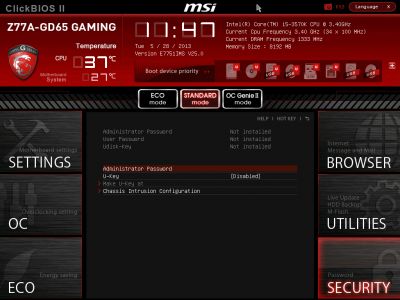
In the “Security” section you will be able to set passwords for system access, which is what other boards also allow. There is an interesting MSI’s own proprietary feature that will let you turn a common flash drive into an access key.
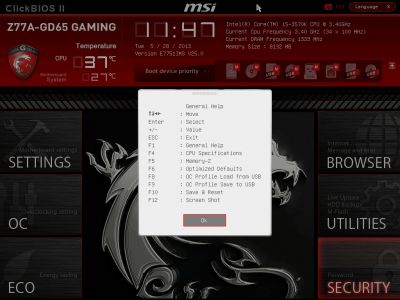
You can press F1 key at any time and while in any section of the BIOS to display the help topics. They also introduced new hot keys – F8 and F9, which allow you to load the settings profiles onto external storage media and load the profiles from them. I wish they have also made a key that could let you clear all the changes and go back to the previous settings in just one key stroke.
Overall, MSI Click BIOS II looks very easy to work with and illustrative, and the company improves it continuously. They introduce more new parameters that make working with this board even easier than it already is, although sometimes things go the other way and certain functionality becomes more convoluted, like in case with the BIOS updating. They still haven’t gotten rid of the typical shortcoming all MSI mainboards possess: MSI mainboards are still unable to increase the processor core voltage in the “Offset” mode by simply adding the necessary value to the nominal. Moreover, strange and sometimes even unexplainable connection between the BIOS parameters may also become an issue in itself. Every time you adjust an option, you have to go back in and check if the previously set parameters are still the same and haven’t gotten affected. Another shortcoming is the lack of Help info, which we do see in the BIOS of other mainboard makers all the time.
MSI Proprietary Software
We’ve covered MSI’s exclusive software for mainboards in our earlier articles. The last time it was the MSI FM2-A85XA-G65 review. The versions of software utilities bundled with MSI’s gaming products only differ in their special red-and-black color scheme, so we’ll just give you a brief description of each here.
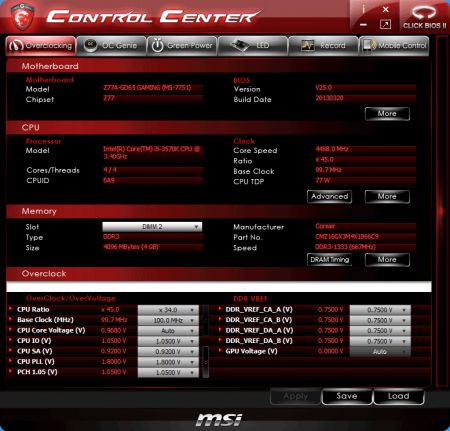
The start screen of the MSI Control Center utility reports information about the mainboard, CPU and memory. When you click More, you get more details about those components. In the bottom part of the window you can adjust multipliers, frequencies and voltages, i.e. overclock. The OC Genie tab reminds you that you can automatically overclock your system using the OC Genie technology. The Green Power section helps regulate one CPU and two system fans. The LED tab is for turning off the mainboard’s highlighting while the Record tab allows to select parameters you’re interested in and watch them change over time. You can specify thresholds so that the utility warned you each time a parameter goes out of the specified range. The Mobile Control section can be used to control your computer from a smartphone. To enable this feature, you should first install an appropriate app on your mobile gadget and add Wi-Fi to your computer.
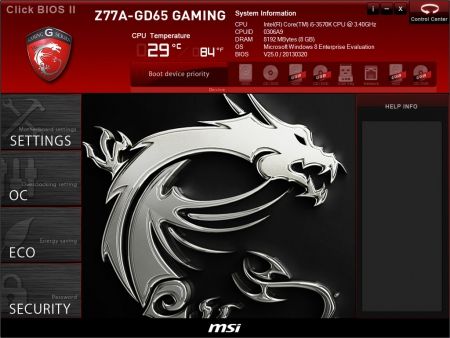
MSI Click BIOS II is not only the name of MSI’s BIOS Setup but also the utility which duplicates the BIOS interface and allows changing BIOS settings right from Microsoft Windows. We had MSI Control Center and MSI Click BIOS II installed concurrently. It was handy to switch between them by clicking the icon in the top right corner of each utility.
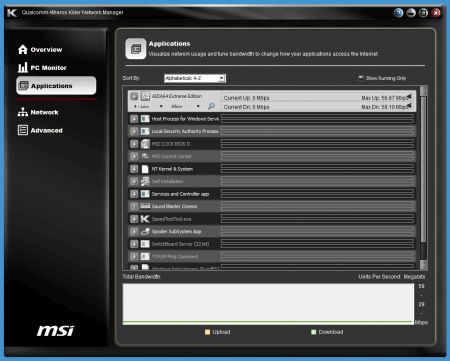
The Killer Network Manager utility provides system information and allows the user to keep track of various parameters such as CPU load. Its main purpose is network traffic prioritization.
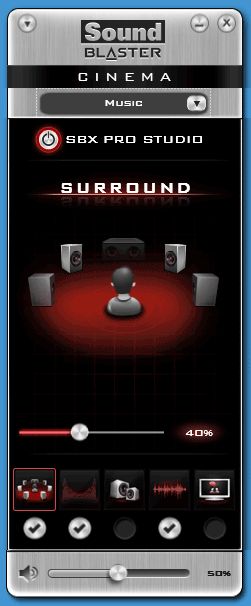
Based on SBX Pro Studio technologies, the Sound Blaster Cinema utility lets you choose additional sound effects for games and music.
Besides the mainboards, the red-and-black color scheme of the gaming series covers the packaging, BIOS interface and bundled utilities. The pages of the MSI website about the new mainboards are also designed in this style, although it’s rather hard to read the red or white letters against the black background.
Testbed Configuration
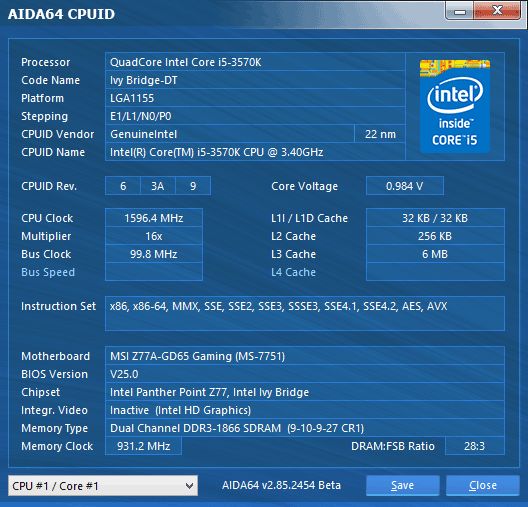
We performed all our tests on a testbed built with the following components:
- Mainboard: MSI Z77A-GD65 GAMING, MS-7751 ver.5.1 (LGA 1155, Intel Z77 Express, BIOS version 25.0);
- Intel Core i5-3570K CPU (3.6-3.8 GHz, 4 cores, Ivy Bridge rev.E1, 22nm, 77 W, 1.05 V, LGA 1155);
- 2 x 4 GB DDR3 SDRAM Corsair Vengeance CMZ16GX3M4X1866C9R (1866 MHz, 9-10-9-27 timings, 1.5 V voltage);
- Gigabyte GV-T797OC-3GD (AMD Radeon HD 7970, Tahiti, 28 nm, 1000/5500 MHz, 384-bit GDDR5 3072 MB);
- Crucial m4 SSD (CT256M4SSD2, 256 GB, SATA 6 Gbps);
- Noctua NH-D14 CPU cooler;
- ARCTIC MX-2 thermal interface;
- Enhance EPS-1280GA 800 W PSU;
- Open testbed built using Antec Skeleton system case.
We used Microsoft Windows 8 Enterprise 64 bit (Microsoft Windows, Version 6.2, Build 9200) operating system, Intel Chipset Device Software drivers version 9.3.0.1026, AMD Catalyst graphics card driver version 13.1.
Operational and Overclocking Specifics
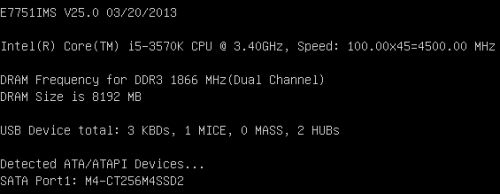
Assembling a computer around the MSI Z77A-GD65 GAMING is unlikely to provoke any problems but it may be difficult to differentiate between connectors, which are all black and look identical. When starting up, the mainboard shows a new picture with a list of available hotkeys at the bottom of the screen.
You can disable the startup picture in the BIOS or with the Tab key to view system information instead. The information is absolutely correct, by the way. We mean that some other mainboards may report a wrong CPU clock rate (like ASUS’s) or a wrong memory frequency (like ASRock’s) or even don’t report anything at all (Gigabyte’s and Intel’s mainboards). It is also good that the hotkey prompt remains visible even when the startup picture is turned off.
At its default settings the mainboard selects the specified parameters for our CPU and memory but the BIOS screenshots show that not all of power-saving technologies are enabled. You also have to manually enable the automatic regulation of the CPU fan. That’s not hard, though, so the mainboard works without any problems. It is always the case with MSI products, by the way. They work very well until you get down to tweaking or overclocking them.
Well, it is actually very easy to increase performance a little. Just enable the Enhanced Turbo option in the mainboard’s BIOS. If it is turned on, the CPU frequency multiplier will always be at its maximum, which is normally permitted by the Intel Turbo Boost technology for single-threaded loads only. To reach higher results, you can use the OC Genie II feature, which is evoked by a corresponding BIOS option or a namesake button. No automatic overclocking feature is perfect but OC Genie II is better than others as it permits some user-defined fine-tuning on the My OC Genie page. Of course, manual overclocking is the best way to go, but it often involves difficulties on MSI mainboards.
First of all, we don’t like having to check out whether some other BIOS options, besides the one we’ve changed, have changed automatically as well. This intellectual behavior of the BIOS interface isn’t always bad. Sometimes it really helps make your life easier by automating certain actions. For example, when Intel’s Turbo Boost technology was introduced, the CPU’s power limit had to be adjusted manually for overclocking. Otherwise, the CPU would just drop its frequency upon reaching the default limit. Today, you don’t have to do that because every mainboard changes the power limit automatically depending on the CPU clock rate you’ve selected. But we really don’t understand why MSI mainboards disable Intel C-State, enable Intel PLL Overvoltage and turn off CPU Phase Control when we change the CPU frequency multiplier.
Next we faced a problem we hadn’t seen before with MSI mainboards but had experienced with the ASRock FM2A85X Extreme6. XMPs or eXtreme Memory Profiles are used to simplify memory subsystem configuring, so memory modules carry information not only about their default operation mode but also about maximum settings. Every modern mainboard can read these profiles and automatically set such memory parameters as frequency, voltage and timings, saving the user the trouble of manual configuring. When we selected the XMP profile on the MSI Z77A-GD65 GAMING, the voltage remained the same (because it didn’t have to be increased for our modules), the frequency was higher, but the timings didn’t change. It turned out that the mainboard read the timings information correctly but only applied it after a reboot. We usually adjust memory timings by changing Command Rate from 2T into 1T, but we couldn’t do that right away since the rest of the timings wouldn’t have been appropriate for the selected frequency and the mainboard wouldn’t have started up. So, we had to reboot, enter the BIOS once again, see the correct timings in the Advanced DRAM Configuration section, and only then specify our own settings. That’s all rather inconvenient.
As opposed to mainboards from most other brands, MSI ones don’t allow to change CPU voltage by adding or subtracting an offset value, so you have to fix that voltage at a certain level, thus disabling power-saving technologies. We don’t recommend such overclocking and don’t use it ourselves.
It is possible, however, to overclock MSI mainboards in an energy-efficient way. You just don’t increase CPU voltage at all. Instead, you can use the CPU Core Vdroop Offset Control option which counteracts CPU voltage drop at high loads. Instead of increasing voltage, we just prevent it from going down, so the result is going to be almost the same. Although we couldn’t make the CPU stable at its maximum clock rate of 4.6 GHz, we did reach 4.5 GHz. We also increased memory frequency and adjusted memory timings.

We want to remind you that we prefer “sustained” overclocking, which means that the overclocked system can be used continuously. We don’t disable any features or controllers. We keep Intel’s power-saving technologies up and running so they lower the CPU’s frequency multiplier and voltage, disable unused CPU subunits and switch the CPU into power-saving modes at low loads.
Performance Comparison
As usual, we are going to compare the mainboards speeds in two different modes: in nominal mode and during CPU and memory overclocking. The first mode is interesting because it shows how well the mainboards work with their default settings. It is a known fact that most users do not fine-tune their systems, they simply choose the optimal BIOS settings and do nothing else. That is why we run a round of tests almost without interfering in any way with the default mainboard settings. For comparison purposes we also included the results from our review of the following mainboards: ASRock Z77 Extreme11, Asus P8Z77-V, Asus P8Z77-V LE PLUS, Asus P8Z77-V LK and Gigabyte GA-Z77-D3H. The results in the diagrams were sorted out in descending order and the numbers for MSI Z77A-GD65 GAMING are highlighted with a darker color for your convenience.
Nominal Mode
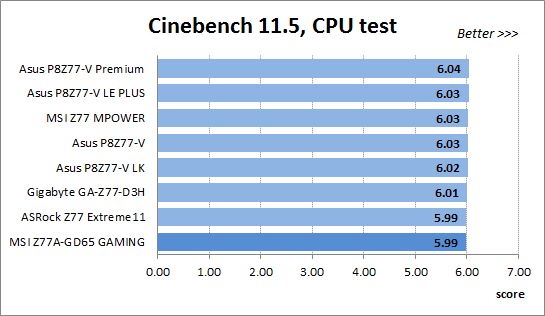
We used Cinebench 11.5. All tests were run five times and the average result of the five runs was taken for the performance charts.
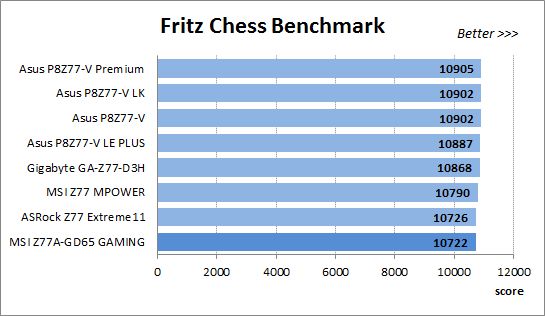
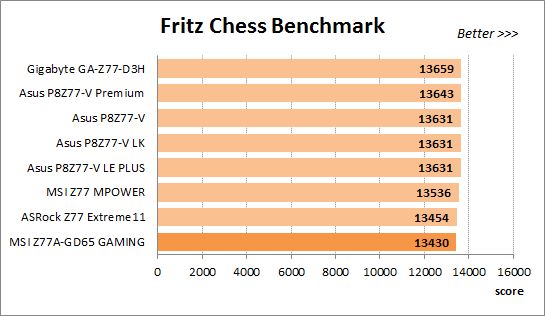
We have been using Fritz Chess Benchmark utility for a long time already and it proved very illustrative. It generated repeated results, the performance in it is scales perfectly depending on the number of involved computational threads.
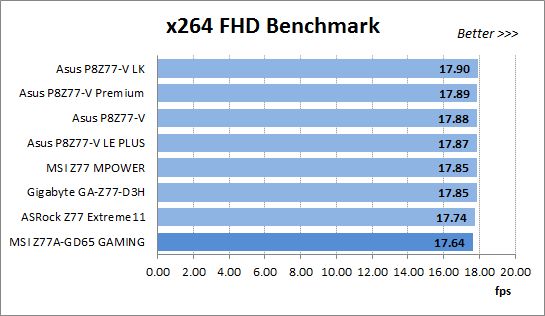
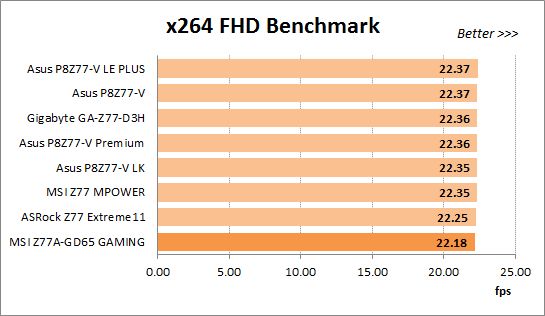
x264 FHD Benchmark v1.0.1 (64 bit) allows us to compare the system performance against the results in the database. The average results of the five test runs are displayed on the following diagram:
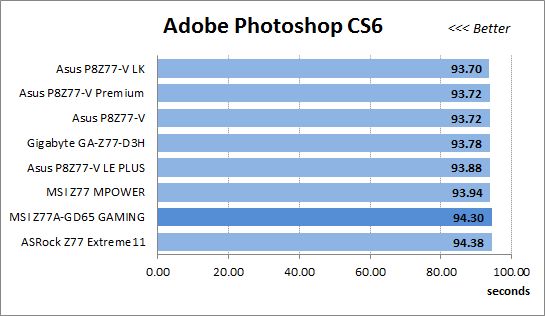
We measured the performance in Adobe Photoshop CS6 using our own benchmark made from Retouch Artists Photoshop Speed Test that has been creatively modified. It includes typical editing of four 24-megapixel images from a digital photo camera.
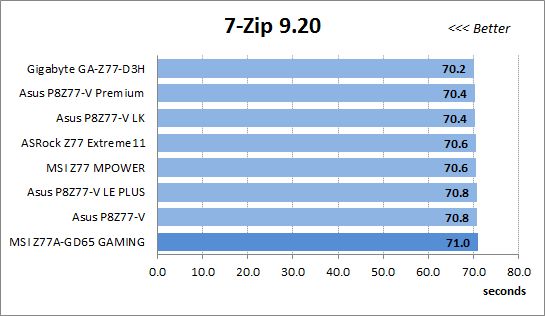
In the archiving test a 1 GB file is compressed using LZMA2 algorithms, while other compression settings remain at defaults.
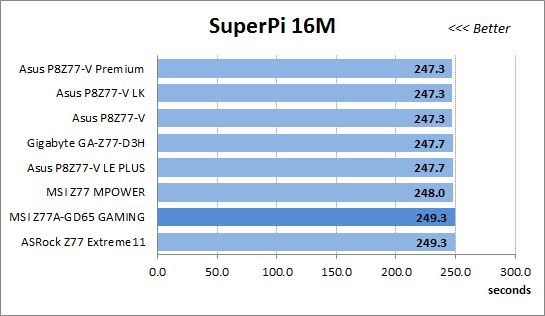
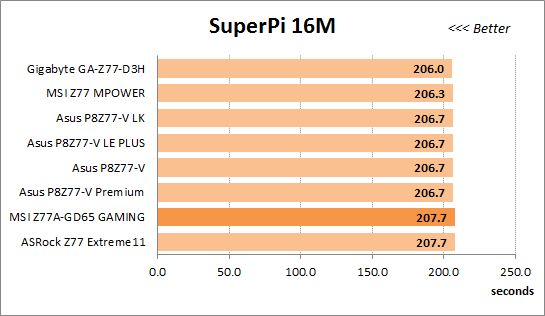
Like in the data compression test, the faster 16 million of Pi digits are calculated, the better. This is the only benchmark where the number of processor cores doesn’t really matter, because it creates single-threaded load.
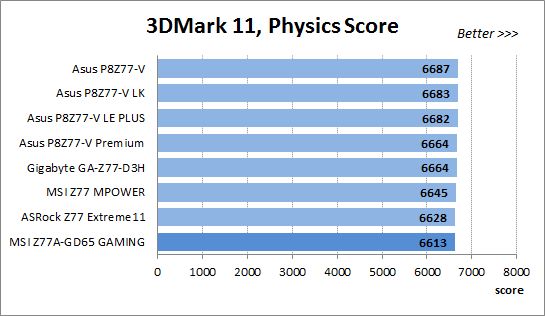
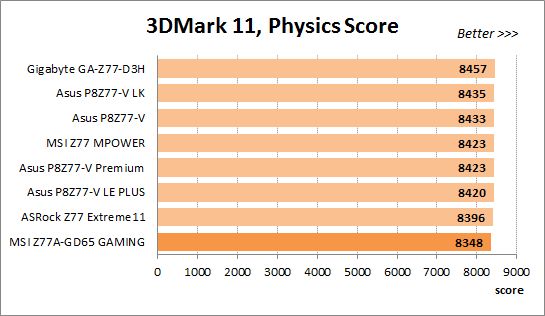
The next diagram shows only CPU tests from the 3DMark11 suite – Physics Score. This score is obtained in a special physics test that emulates the behavior of a complex gaming system working with numerous objects:
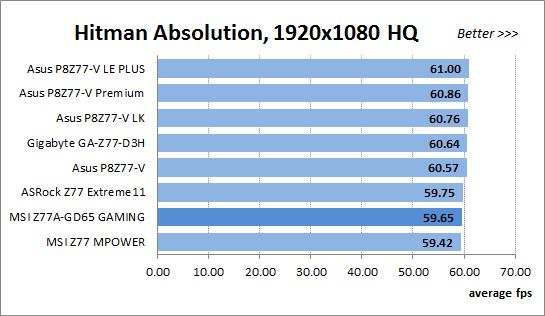
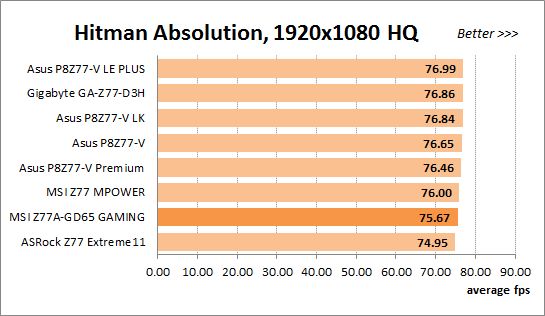
The benchmark integrated into the Hitman Absolution game turned out very convenient. It can be launched directly from the game, from the game launcher utility and even from the command prompt. In order to get the minimal acceptable results, we had to use the lowest image settings and use one of the lower resolutions.
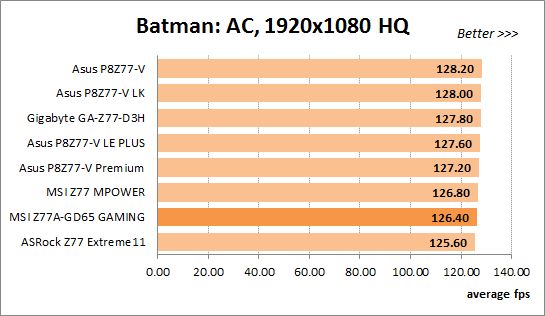
Batman: Arkham City game also reacts eagerly to any changes in the CPU clock frequency, but it uses DirectX 11. We ran game’s integrated benchmark five times with high image quality settings and then take the average of the five runs for the diagrams.
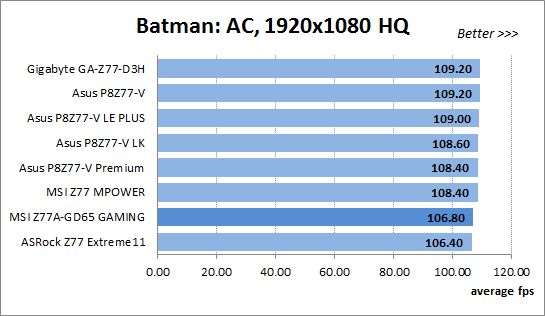
As we’ve noted repeatedly in our reviews, similar mainboards are prone to deliver the same performance under identical conditions. The MSI Z77A-GD65 GAMING isn’t much different from the other mainboards at default settings, yet we can note that it is not a leader in our performance benchmarks.
Overclocked Mode
It might be different at overclocking because the ASRock Z77 Extreme11, ASUS P8Z77-V and Gigabyte GA-Z77-D3H could overclock our CPU to its maximum of 4.6 GHz whereas the others stopped at 4.5 GHz. The mentioned models would have had an advantage due to that difference but we tested all of them at 4.5 GHz for the comparison’s sake.

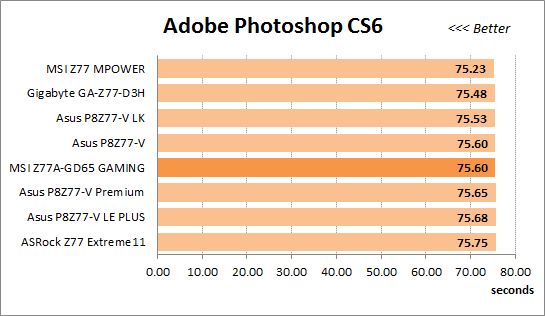

The overall picture remains the same. The MSI Z77A-GD65 GAMING is still one of the slowest mainboards except for the Adobe Photoshop CS6 and 7-Zip tests.
Power Consumption
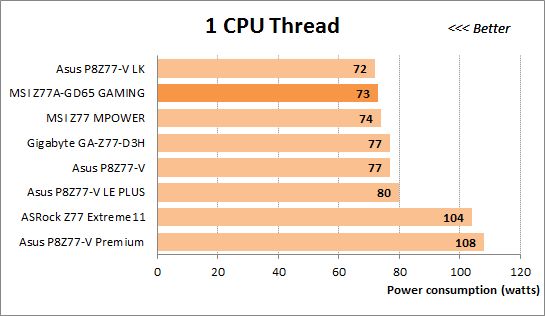
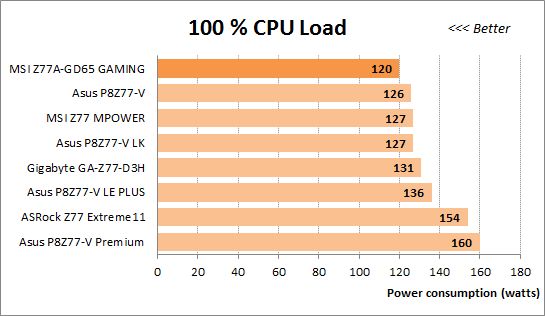
We performed our power consumption measurements using an Extech Power Analyzer 380803. This device is connected before the PSU and measures the power draw of the entire system (without the monitor), including the power loss that occurs in the PSU itself. In the idle mode we start the system up and wait until it stops accessing the hard disk. Then we use LinX to load the CPU. For a more illustrative picture there are graphs that show how the computer power consumption grows depending on the number of active execution threads in LinX (both at the default and overclocked system settings). The results of MSI Z77A-GD65 GAMING are marked with a darker color for your convenience.
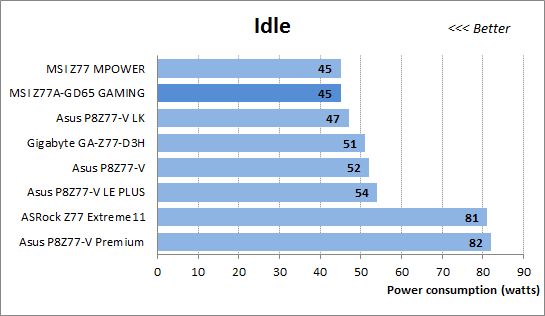

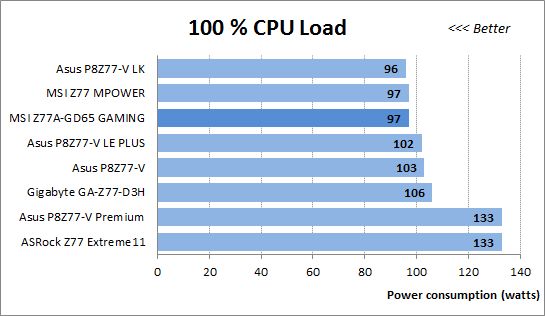
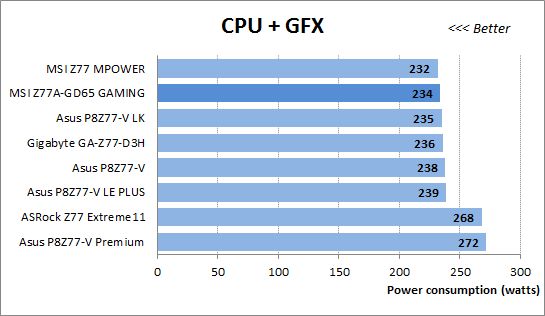
MSI mainboards are generally very economical, and the Z77A-GD65 GAMING doesn’t need much power at any loads, either. By the way, the high power draw of the flagship products from ASRock and ASUS is due to their additional PCIe switch.
Now let’s compare the mainboards with the CPU and memory overclocked.
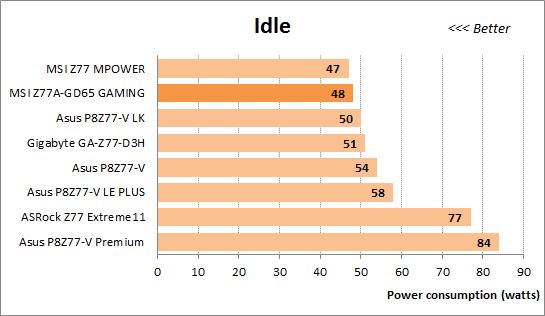
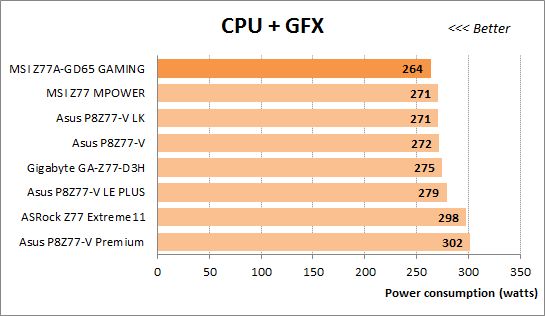

The Z77A-GD65 GAMING was good in terms of power consumption at its default settings and is even better here. Energy-efficient overclocking is only possible on MSI mainboards when you don’t increase CPU voltage, which is why the Z77A-GD65 GAMING is one of the most economical in this test.
Conclusion
The key difference of MSI’s gaming series mainboards from ordinary models is their use of the Qualcomm Atheros Killer E2200 series network controller, which allows setting bandwidth utilization priorities in order to reduce latencies in online games. Besides that, the Gaming Device Port technology supports computer mice with high poll rate while the PS/2 and USB connectors are plated with thrice more gold than usual to prevent corrosion and increase their service life. The Sound Blaster Cinema technology enhances the capabilities of integrated audio codecs by means of additional sound effects. Otherwise, apart from the new visual style, the MSI Z77A-GD65 GAMING mainboard is very much alike to the Z77A-GD65 model. And we can see both good and bad points about that.
The dragon badge of MSI’s gaming series looks nice and the unified black-and-red color scheme is effective everywhere, except the official website, yet there’s too much black on the mainboard, making it hard to differentiate its connectors. We had no problems saving BIOS profiles or updating the BIOS, although the update process has become somewhat more complicated than before. There is another problem we found, though. The mainboard only updates memory timings after you restart your computer.
When it comes to overclocking, we face the old-time peculiarity of MSI mainboards: they cannot add an offset value to CPU voltage, so you can’t reach maximum results while overclocking them in an energy-efficient way. The mainboard’s BIOS options are interrelated in odd ways, so every time you change one of them, you have to make sure that the rest have not changed as well. Like most other MSI products, this one is very economical but also slow in terms of performance, just like its non-gaming cousin.
There is nothing special about the MSI Z77A-GD65 GAMING that we didn’t see on other makers’ products. We mean the Qualcomm Atheros Killer E2200 controller, USB ports with high poll rate, gold-plated connectors, badges and even door hangers. However, we’ve seen all this only with expensive top-end products from other brands. The new gaming series from MSI suggests that such extras can be had with midrange or even entry-level mainboards. We have no doubt that buyers will appreciate this.
We hadn’t expected much from the MSI Z77A-GD65 GAMING, so we have no reasons to be disappointed with its downsides. As for its advantages, they are hardly impressive. However, it is the newest MSI mainboards that we’re looking forward to. Every mainboard maker has prepared something special for the announcement of the LGA1150 platform, and MSI is no exception. We used to criticize MSI’s BIOS for its numerous problems but now MSI Click BIOS II is going to be replaced with MSI Click BIOS 4 in the company’s LGA1150 products (skipping over the third version for some reason). Hopefully, this will help MSI mainboards get rid of their old-time problems without acquiring new ones.