How to Force Your GPU in a P0 State

Clock fluctuation for your CPU and GPU is generally considered to be bad for your inputs since it introduces variations to what otherwise would be a linear and predictable input. In both cases, you can get rid of this problem by overclocking your CPU/GPU and disabling C-states for your CPU and P-states for your GPU.
This generally introduces more power consumption during idle loads for your GPU but instead offers you a steady clock that (mostly – GPU clocks are determined by thermals) does not fluctuate. This way you can tune your GPU for the best performance and inputs during competitive gaming.
What Is the P0 State?
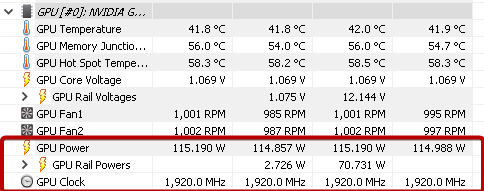
Your GPU comes with different performance states that are tagged as P0, P1, etc. The P0 state is the highest performance state of your GPU meaning your clock will be at its possible highest point at all times producing the most FPS and most accurate inputs.
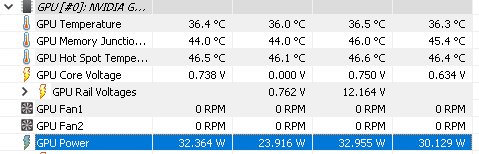
This state is usually engaged by the GPU during loads and is desirable during gaming since your graphics card is working full-throttle. The only downside of the P0 state is that your GPU will consume a lot of watts and go up in temperature.
How to Enable the P0 State?
There are 2 ways you can enable the P0 state permanently for your GPU to make your clocks as stable as possible with as few fluctuations as possible.
The first one is to lock your voltage and frequency on the MSI Afterburner curve after you have tuned your GPU overclock by selecting your voltage/frequency point and pressing L.
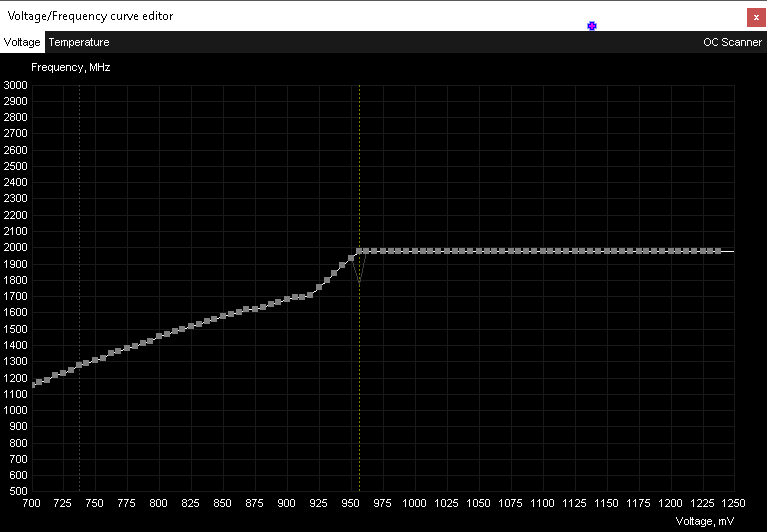
This will show up as a yellow line that will indicate you have successfully engaged the P0 state for your GPU. The advantage of this approach is that you engage the P0 state only when you apply your GPU OC during gaming, meaning that you do not have extra power consumption during idle loads.
The second way of applying the P0 state to your GPU is through the registry. In most cases, if you open regedit.exe and paste the following address (HKEY_LOCAL_MACHINE\SYSTEM\CurrentControlSet\Control\Class\{4d36e968-e325-11ce-bfc1-08002be10318}\0000) in the address bar you will find your GPU driver directory, where you will need to edit the value for “DisableDynamicPstate” to 1. The address might change during different driver installs to 0001 or 0002 but in essence, the directory will look the same so the same instructions apply.

If you open that directory and cannot find the DisableDynamicPstate key simply create it yourself and set the value to 1. To revert to different dynamic states change the value to 0 from 1. This process can be automated by using this bat file which does all of that in a click.
Watch Out for Your Temps
When forcing P0 you need to be certain that your GPU is well-ventilated (on idle my GPU went from 35c to 40c because of P0) since it will use more power. If you have bad airflow forcing P0 will not help you much since your GPU will thermally throttle quickly down to lower frequencies anyways.
In general, I would say using the MSI Afterburner method where you force your GPU into P0 along with applying your OC makes more sense since then you can keep your GPU idle when not gaming. The registry method is quite good if you just want to set it once and forget about it though, so use what fits your scenario better.