How to Install a New Windows ISO

Nobody likes setting up a new Windows install from scratch because it might take a while to get everything back in working order, but when the situation is dire and your computer is freezing randomly making it unusable, the current Windows install needs to go.
This might be caused by installing a bunch of random components that are in conflict, or maybe in your search for optimizations you messed with some registry file you should not have touched resulting in 100% CPU usage. In any case, you have to steel yourself and get ready for a new Windows.
Preparations That Need to Be Completed
To properly get rid of the current OS and wipe it clean from your drive you will need to install a completely new ISO on your drive and you will need a couple of things to do that.
First of all, make sure you have a flash drive that has 8GB or more of free disk space. You need the flash drive since you will use it as a boot drive. There are ways around this by making a different partition on your current drives and installing the new ISO from there but this process is a bit more complicated and takes a bit more preparation therefore just get a flash drive.
The second step is getting a new Windows ISO. You can get the Windows media creation tool from Microsoft easily and that will give you the files you need. If you are an advanced user you can also download custom Windows ISOs for better performance and less clutter.
Third, you need a tool to burn the ISO onto your boot drive (a.k.a the flash drive you definitely have). We recommend using Rufus since it is a simple and effective tool. With this, you are ready for the next step.
Getting Your Boot Drive Ready
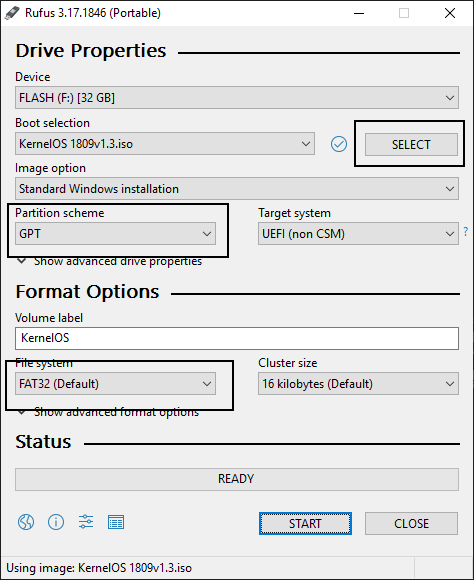
Now that you have all the necessary files plug in your flash drive and open up Rufus. In most cases, you can simply select your ISO and press Ready but just in case you should also check some settings.
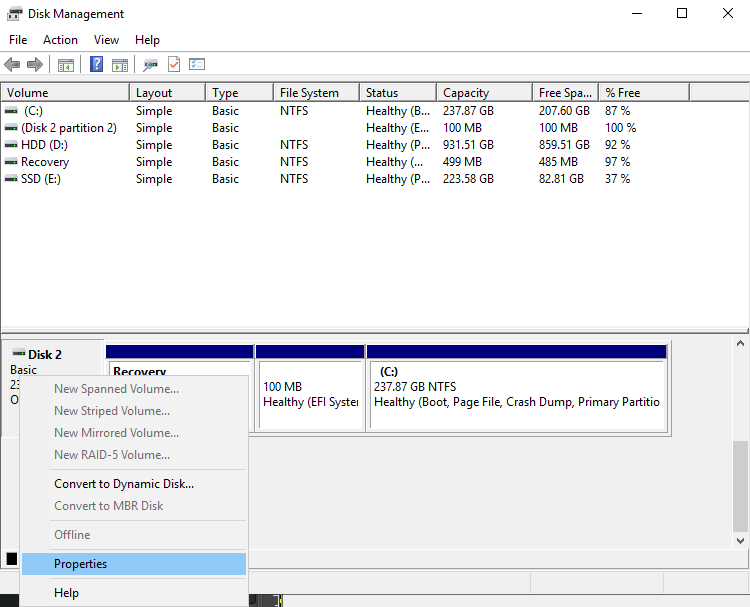
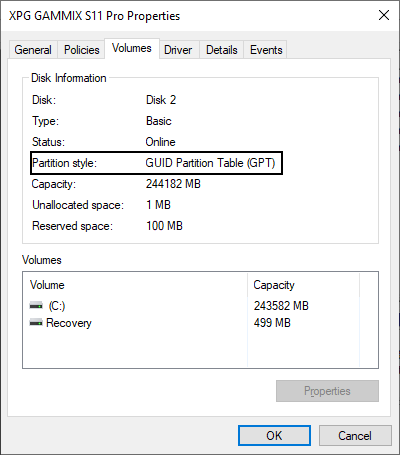
Go to your disk management (Win+R and type diskmgmt.msc) and select your disk where you will install the new Windows Image. Right-click that drive, go to properties, and open the Volumes tab. There check what kind of partition style you have on that drive and adjust it in Rufus.
Just in case, also make sure that you have selected FAT32 in the file system tab since this will usually be a safer option for installing the ISO. Your Rufus should end looking something like this.
With this, you can press start and burn the ISO onto the flash drive.
Windows Installation
All that is left for you is to restart your PC and boot into your BIOS. From there change the boot order of your devices and make sure your flash drive with the new ISO starts before the SSD/HDD you have your old Windows install on.
BIOS menus are all different therefore if you are having issues on this step just Google your motherboard brand and find out how to change the boot order for devices.
F10 to save your changes and restart again. With this, you should boot into the new Windows installation. Delete the old disk partitions on which Windows was installed and select the unallocated space as the new drive you want to install your ISO on. Make sure to not delete any other partitions from other drives since you will lose all data on them.
With this, the Windows installation should start and you will have to go through the usual steps of accepting Microsoft’s spying telemetry, and finally, you will be greeted with your new desktop.
Once there remember what you did last time to break your old Windows install and do not do it again. If you are bent on breaking Windows in pursuit of better FPS and input lag once again then you better have that bootable flash drive close by and a lot of backups on your other drives.