Noctua NH-D14 CPU Cooler: One Step Ahead

Since its first public showcase, the enthusiast community has been waiting impatiently for it to finally become available. Everyone hopes that it would be the best. Please meet Noctua NH-D14!
The Austrian Noctua Company doesn’t often roll out new solutions for overclocking fans. After launching two extremely efficient tower coolers back in 2005, NH-U9 and NH-U12, they haven’t really done anything that dramatically new over the past four years except modifying the retention kits for their coolers and fans. Looks like Noctua engineers believed that NH-U9 and NH-U12 solutions were sufficient for successful competition in this market that is why they haven’t designed anything new over such a long period of time.
However, there appeared a lot of air coolers for processors in the market since then. Some of them were more efficient than Noctua and cost less. Moreover, we have to admit that Noctua solutions have never really been on top of the food chain. At last the company decided to fix that and demonstrated their new Noctua NH-D14 solution at one of the trade shows that took place in early summer. This product was immediately named “the killer of Thermalright IFX-14”, which until today has been a performance etalon in the cooling solutions segment. So, did NH-D14 actually become one? Our today’s review will answer this question.
Package and Accessories
I can’t say anything about efficiency at this point, but in terms of package size, Noctua NH-D14 is definitely a winner:
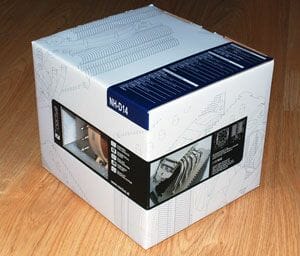
According to the most conservative estimates, this box should easily fit eight (!) Thermalright IFX-14 heatsinks or four boxed Radeon HD 5770 graphics cards. Even the package of a gigantic Cooler Master V10 doesn’t come close to that of Noctua NH-D14.
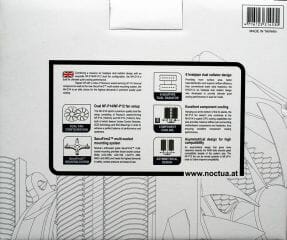
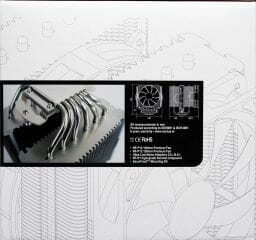
There is a clear window on the front of the box revealing part of the heatsink and fan. All other sides bear the NH-D14 cooler specifications and description of its key features:
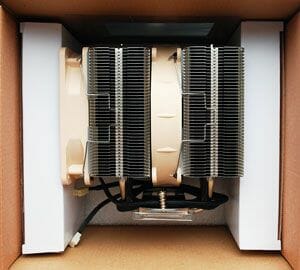
Inside everything is extremely secure and reliable: there are cardboard boxes on the sides and polyurethane foam on top and at the bottom, which hold the cooler securely in place:
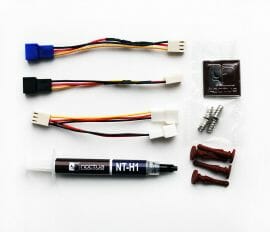
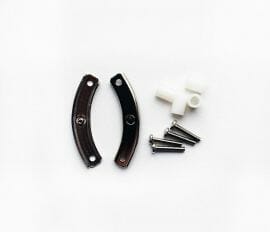
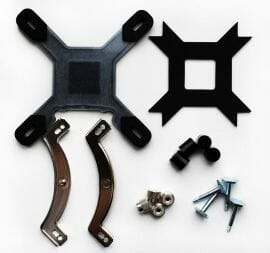
These cardboard boxes not just hold the cooler, but are also used for included accessories, which are in fact quite numerous:
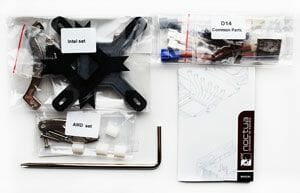
I have to say that I am truly impressed with Noctua’s extreme attention and neatness when it comes to packaging and accessorizing their cooling solutions. The retention kit for each processor socket type is sealed in an individual plastic bag and the installation instructions are designed as a notepad with two pockets containing two step-by-step descriptions of the cooler installation procedure.
I was a little surprised to see that there are four silicon mounts for the fans and four self-tapping screws included with the accessories: none of these are required for cooler installation on any of the supported platforms.
Noctua NH-D14 is made in Taiwan. The recommended price of the new cooler is set at $85. It comes with a 6-year warranty.
Design and Functionality
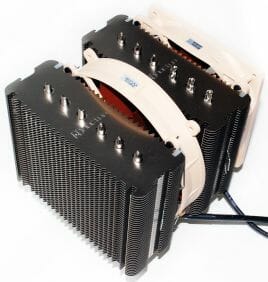
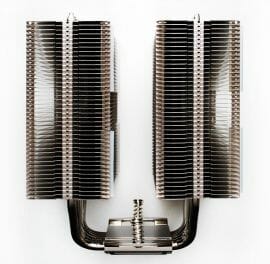
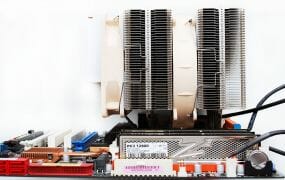
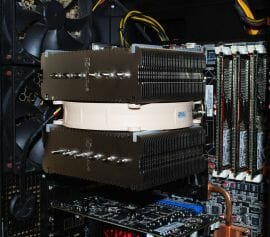
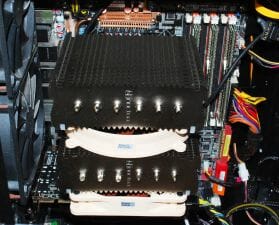
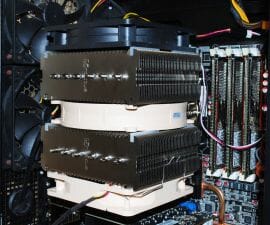
The first impression from Noctua NH-D14 is definitely made by the size and weight of this product. The cooler measures 160x140x158 mm and weighs 1240 g with two fans, 1070 g with one fan and 900 without any fans. At the same time, the cooler doesn’t look bulky or clumsy. On the contrary, the solution made of two tower heatsinks has a pretty strict and finished look:
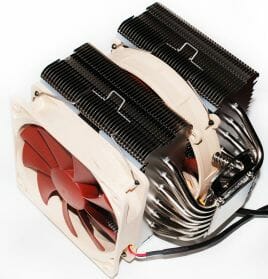
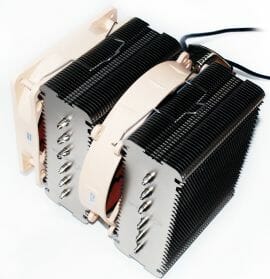
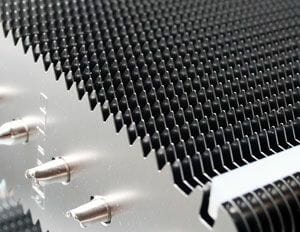
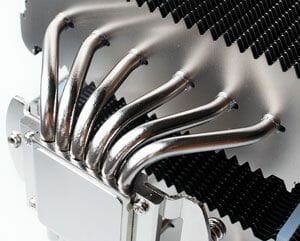
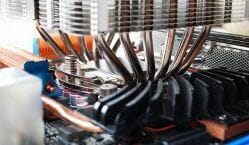
Noctua NH-D14 is built on six copper nickel-plated heatpipes 6 mm in diameter. The heatpipes go through copper nickel-plated base and pierce two heatsink arrays, each consisting of 42 aluminum plates with 0.45-0.50 mm thickness.
The gaps between the plates are 2.5 mm and the space between the heatsink arrays measures 28 mm. Therefore, you won’t be able to install thick fans with high static pressure between the heatsink arrays.
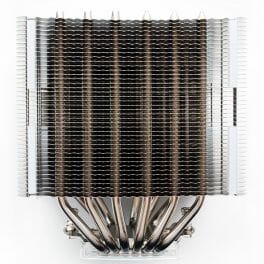
Note that the heatsink arrays aren’t symmetrical in respect to the cooler base: the second array along the airflow path is slightly shifted forward. It must have been done in order to make the heatsink with installed fans smaller, because the air intake fan should be installed onto that part of the heatsink that is closer to the vertical base axis. Although in this case it is not all that simple, we are going to get back to this matter later when we discuss the benchmark results.
Heatsink arrays are absolutely identical in shape as well as plates size. Each plate measures 140×51 mm. The heatpipes within each heatsink array are placed into a single line without any special “optimizations”:
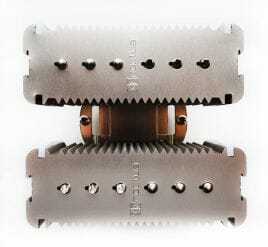
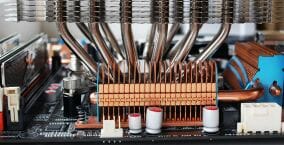
The plates are soldered to the heatpipes. The calculated effective heatsink surface of Noctua NH-D14 is about 12,020 cm2 and it is the best number among air super-coolers (Cooler Master V10 and Scythe Mugen 2 have about 10,660 cm2 and Thermaltake IFX-14 – 10,320 cm2.
The sides of the heatsink plates are notched to lower the airflow resistance:
As you may remember, the heatsinks of Noctua NH-U9, NH-U12 and their modifications also boasted similar plates optimization, however, it has become significantly more distinct and most likely more efficient in Noctua NH-D14. At least, I suggested that it would be a good idea for Thermalright engineers to apply the same notching to the sides of their cooler heatsink plates about a year ago, but unfortunately, they didn’t seem to pay any attention to that suggestion.
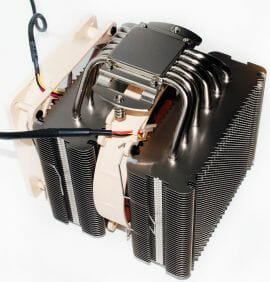
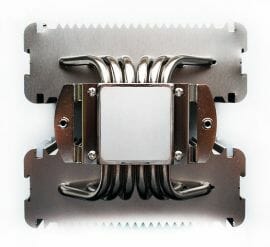
The heatpipes are also soldered to the cooler base, but it is done so neatly that you can only notice traces of soldering once you take a real close look at the cooler:
Noctua have never pursued mirror-shining base surfaces. And today is also no exception, as we see no polishing of any kind on the NH-D14 base:
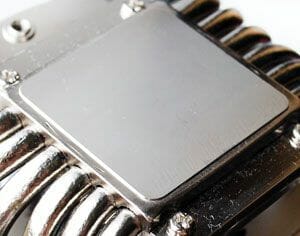
I don’t think we should consider it a drawback. However, the issues with the base surface evenness definitely cannot be overlooked:

The contact surface of the base obviously has a small bump shifted towards one of the sides. Hopefully, it is typical only of our specific sample and not the entire lineup, unlike the solutions from one of the popular cooler makers. If all Noctua NH-D14 cooler will suffer from this issue, the users will have to take matters into their own hands and even out and polish the base on their own.
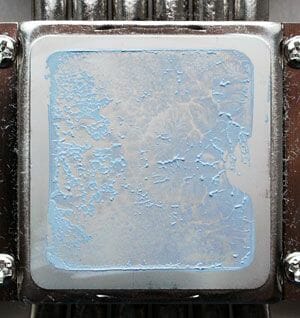
Despite the not so idea surface of our Noctua NH-D14 cooler sample, the thermal compound imprint off the processor heat-spreader turned out quite OK:
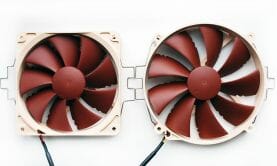
Noctua NH-D14 is equipped with two fans: 120 mm NF-P12 and a new 140 mm NF-P14 fan that fits in-between the heatsink arrays:
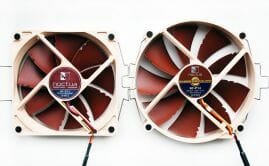
Our regular readers should be well familiar with the first fan, however the 140 mm one is a new kid on the block. It is new not only because it is larger and can be installed into the same retention holes as the 120 mm model, but also because it uses a rotor of modified design with metal reinforcements that should increase the rotor and fan MTBF. The remarkable thing is that there is a metal cap on the rotor instead of the common paper or film sticker:
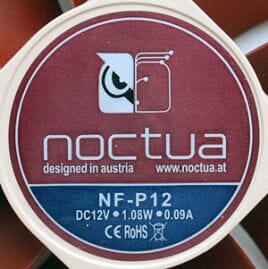
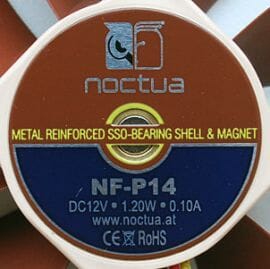
We are going to take a closer look at this new fan alongside with a bunch of others in the upcoming fan roundup. At this point I would only like to add that the maximum rotation speed of the Noctua NH-D14 fans are 1300 RPM for the 120 mm NF-P12 model and 1200 RPM for the 140 mm NF-P14 model. You can use the enclosed rotation speed adapters to lower the speed of both fans to 900 RPM and the bundled Y-splitter to power them from the same mainboard fan connector. All other fan specs will be listed in the table below.
I have to point out that the fans do not touch the heatsink but sit on eight silicon bricks inserted into heatsink grooves. Thanks to these bricks the cooler generates less noise and the fans are raised 3-4 mm above the heatsink arrays. Together with notched sides of the heatsink plates this reduces the dependence of the cooler efficiency on the fan rotation speed. There is one thing, however, that could be improved: if the silicon bricks were only one third of their actual size, they wouldn’t cover so much of the heatsink plates. Any user can easily do it with a pair of scissors.
Compatibility and Installation Tips
There is no need to compromise if you decide to go for Noctua NH-D14, because it comes with everything necessary for installing this cooler onto any contemporary platform. In all cases the cooler needs to be installed through the mainboard PCB, but for AMD Socket AM2(+)/AM3 you will use the default backplate, so there will be no need to remove the mainboard from the system case. However, if you want to install Noctua NH-D14 onto an LGA 775/1156/1366 platform, the mainboard must be taken out, because you need to attach a universal backplate for these processor sockets first:
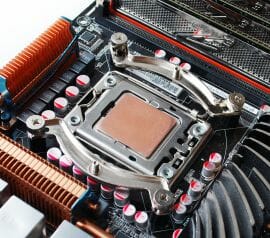
I would like to draw your attention to the fact that the hexagonal top of the closest spindle has been installed incorrectly on purpose in order to demonstrate the way you shouldn’t fasten the backplate. The top must be locked between the backplate edges, because only in this case it will latch during cooler installation and will ensure secure hold. The photo on the right shows plastic spindles with attached steel retention plates tightened with large cross screw-nuts. The cooler is installed the same way onto mainboards for AMD CPUs, you only use different retention plates.
Once you have attached the retention to the mainboard, degreased the processor heat-spreader and cooler base surfaces and applied a minimal layer of thermal paste, you can proceed to heatsink installation. You should start with a heatsink alone, the fans need to be removed:
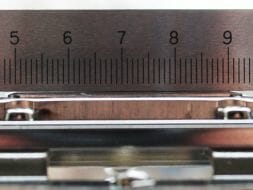
To avoid skewing, you should tighten the screws gradually, one-two turns per screw. Once the heatsink has been installed, the distance from the mainboard PCB to the lowest heatsink plate was 50 mm:
Therefore, it is quite possible that Noctua NH-D14 will be compatible with some memory modules featuring tall heat-spreaders. Here I would also like to add that the 140 mm fan installed between the heatsink arrays should be pushed all the way to the bottom. In this case its airflow will also cool down the voltage regulator components around the processor socket:
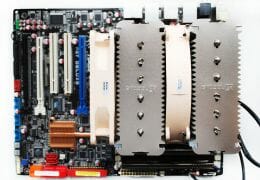
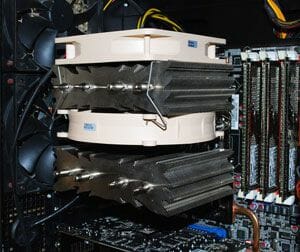
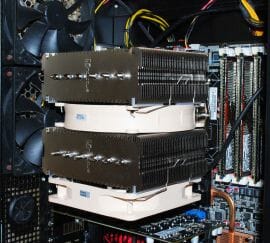
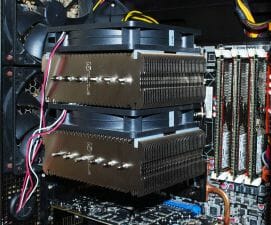
In conclusion I would like to show you what Noctua NH-D14 looks like inside the system case:


There is no mention about the preferable positioning of the cooler neither in the installation instructions booklet, nor in the FAQ on the official company web-site. Looks like Noctua trusts the user to make the choice depending on his or her specific platform and system case.
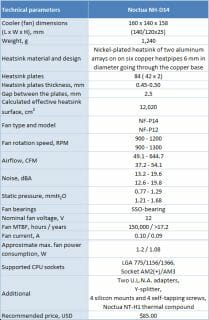
Technical Specifications and Recommended Retail Price
Testbed and Methods
All tests of the new Noctua cooler and its only competitor were performed in a testbed with the following configuration:
- Mainboard: ASUS P6T Deluxe (Intel X58 Express), LGA 1366, BIOS 1702;
- Processor: Intel Core i7-920, 2.67 GHz, 1.25V, 4 x 256 KB L2, 8MB L3 (Bloomfield, C0);
- Thermal interface: Tuniq TX-2;
- Graphics card: XFX Radeon HD 5750 1 GB GDDR5, 700/4600 MHz;
- Memory: DDR3 PC3-12800 3 x 2 GB OCZ Platinum Low-Voltage Triple Channel (Spec: 1600MHz / 7-7-7-24 / 1.65 V);
- System HDD: Western Digital VelociRaptor (SATA-II, 300 GB storage capacity, 10,000 RPM, 16 MB cache, NCQ) inside Scythe Quiet Drive 3.5” silencer and cooler chassis;
- System case: Antec Twelve Hundred (front panel: two Noiseblocker NB-Multiframe S-Series MF12-S1 fans at 900 RPM and Scythe Gentle Typhoon fan at 900 RPM; back panel: two Scythe SlipStream 120 fans at 900 RPM; top panel: standard 200 mm fan at 400 RPM; side panel removed);
- Control and monitoring panel: Zalman ZM-MFC2;
- Power supply: Zalman ZM1000-HP 1000 W (with a default 140 mm fan).
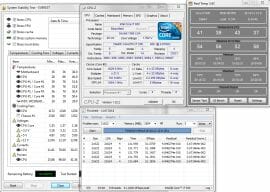
During this test session we managed to overclock our 45nm quad-core processor (with polished heat-spreader) with the multiplier set at 21x and “Load-Line Calibration” enabled to 4.01 GHz. The nominal processor Vcore was increased to 1.36875 V in the mainboard BIOS.
The memory voltage was at 1.64 V and its frequency was around 1.55 GHz (7-7-7-14_1T timings). All other parameters available in the mainboard BIOS and connected with CPU or memory overclocking remained unchanged (set to Auto).
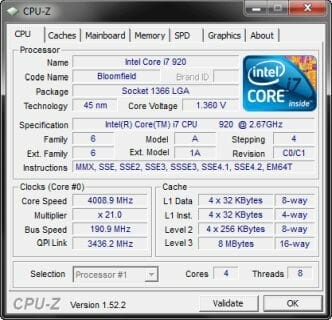
All tests were performed under Windows 7 RTM x64 operating system. We used the following software during our test session:
- Linpack 64-bit with LinX shell version 0.6.4 – to create maximum CPU load (two test cycles, 5 Linpack runs in each cycle with 3584 MB RAM capacity involved);
- CPU-Z 1.52.2 – to monitor processor core voltage and frequency;
- Real Temp 3.42 – to monitor the processor core temperature;
- Everest 5.02.1925b – to monitor fans rotation speeds.
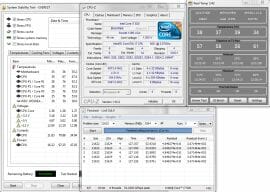
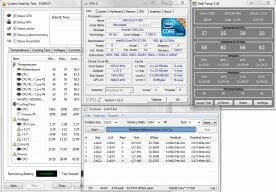
So, the complete screenshot during the test session looks as follows:

The CPU was loaded with two consecutive Linpack test runs with the settings as indicated above. The stabilization period for the CPU temperature between the two test cycles was about 8-10 minutes. We took the maximum temperature of the hottest processor core of the four for the results charts. The ambient temperature was checked next to the system case with an electronic thermometer with 0.1 °C precision that allows monitoring the temperature changes over the past 6 hours. During our test session room temperature was at 23.6-24.0 °C.
Our cooler, Noctua NH-D14, will be competing against Thermalright IFX-14. Both solutions were tested with Noctua’s default fans:
Besides, we also added the third fan – Thermalright TR-FDB-2000. We also tested both coolers with two Thermalright fans in quiet mode at 810 RPM, moderate mode at 1220 RPM and at maximum rotation speed of 2040 RPM. We are going to talk more about fan installation in the next part of our article devoted to cooling efficiency tests.
Cooling Efficiency Tests
Dependence of Cooler Efficiency on Fans Number and Rotation Speed
The first thing that made me a little uneasy was the fact that with Noctua NH-D14 default fans installed in a standard manner the 120 mm fan turned out extremely close to the back of the graphics card. There is barely 15 mm of space between them, which will hardly allow any fresh airflow to get to the fan and the heatsink. That is why we ran the tests in the following two configurations:


As you see, when we moved the 120 mm fan onto the second heatsink array and installed it for air exhaust, the cooling efficiency didn’t change. Note that we use a “cool” Radeon HD 5750 graphics card. Of course, the standard fan configuration on Noctua NH-D14 will be considerably less efficient if the 120 mm fan will be fed the airflow from the scorching hot Radeon HD 4870 X2, for instance. Therefore, we are going to complete our today’s test session with the second fans configuration. For all potential owners of the new Noctua NH-D14 we would strongly recommend to experiment with fans configurations and airflow directions.
The next round of tests was intended to check out the dependence of Noctua NH-D14 heatsink efficiency on the rotation speeds of the fans, their number and type. To accomplish this we tested the cooler in two rotation speed modes with one 140 mm Noctua fan, two default Noctua fans, three fans (Noctua + Thermalright TR-FDB) and two Thermalright TR-FDB fans:
In the latter case the fans rotation speed varied between 600 and 2000 RPM with 200 RPM increments (±20 RPM). The results are summed up on the graph below:

Here we should dwell on several interesting things. Firstly, Noctua NH-D14 is currently the only solution that can cool a CPU overclocked to 4 GHz running Linpack 64-bit with two fans at 600 RPM. Believe me, it is an unprecedented achievement! Secondly, despite relatively large inter-plate space and heatsink optimization for quiet low-speed fans, the cooler efficiency with two Thermalright TR-FDB fans increases almost linearly up to 1800 RPM (by 8°C in the 600-1000 RPM interval, 6°C in the 1000-1800 RPM interval). Thirdly, with two default Noctua fans, NF-P12 and NF-P14, the cooler efficiency is exactly the same as with a pair of Thermalright TR-FDB fans, which means that replacing the default fans with alternative ones doesn’t make any practical sense. If we only leave one 140 mm fan, then even in quiet mode at 870 RPM the cooler can work a small wonder, and by adding the third fan to the two default ones you can lower the peak temperature by 2°C more.
Cooling Efficiency vs. Thermalright IFX-14
Well, now we have to see how the new Noctua NH-D14 cooler performs against still the best air cooler out there:
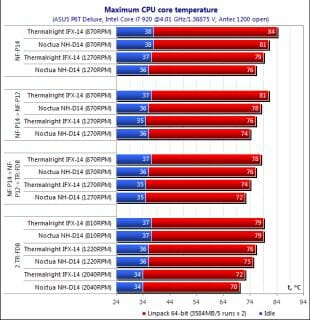
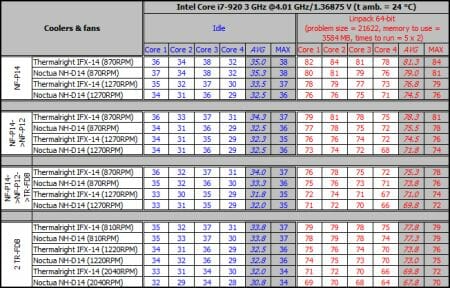
As you see, the new Noctua flagship solution is one step ahead of Thermalright IFX-14 in all test modes. In quiet mode with one 140 mm fan NH-D14 is 3°C more efficient than the competitor, and in almost all other cases – 2°C more efficient. With two Thermalright TR-FDB fans that suit IFX-14 the best, the difference lowers to 1-2°C, but the victory still stays with Noctua NH-D14. The table below shows the detailed results for your reference:
During the maximum overclocking tests the Austrian newcomer was ahead again:
I will be brief about the acoustic performance of Noctua NH-D14: up to 1000 RPM the cooler was extremely quiet and at maximum rotation speed the noise was moderate. Most interestingly, at up to 1000 RPM we couldn’t detect any acoustic differences between NF-P12 and NF-P14. At higher speeds 140 mm fan is a little noisier, but mostly because of larger air volume going through. We are going to take a closer look at the fans performance in the upcoming fan roundup and now it is time to draw some conclusions.
Conclusion
You may think that the difference in peak temperature between Noctua NH-D14 and Thermalright IFX-14 is quite insignificant, since the newcomer won only 1-3°C. However, even this seemingly small difference becomes quite significant considering that Thermalright solution remained totally undefeated for over two years easily beating off the other super-coolers’ attacks. But everything eventually comes to an end. And although Thermalright IFX-14 costs $80 compared to $85 they ask for Noctua NH-D14, the former comes without any fans, while the latter is fully armed and ready for use on any contemporary platform.
No doubt, Noctua NH-D14 is an excellent cooler starting with secure packaging and highly informative official web-site and ending with superb manufacture quality, highest performance and low noise levels. Obviously Noctua engineers paid attention to every single detail, every little trifle, which paid back big: their true work of art became the indisputably best cooling solution out there. That is why we are proud to award it with our Editor’s Choice title as the best CPU air-cooler in the today’s market.
Are there any drawbacks we could point out? Fans without LEDs? – Well, this is an individual preference; besides, you can replace the fans any time. Heavy weight and large size? – Trust me, they wouldn’t win otherwise, not with the current components base anyway. Not quite even base of the particular cooler sample is no reason to criticize the entire lineup, but we will wait for the user statistics and feedback before making any conclusions about this issue. I think the biggest “issue” is probably the absence of the additional wire clip kit for the third fan. 🙂
Well, what should we expect next? Probably some triple-array tower heatsinks with two 140×38 mm fans between the arrays and maybe even something dramatically new. Anyway, I prefer to believe that other cooler makers will soon release their new solutions that will offer low noise and high cooling efficiency. Especially, since they have a great example in front of them. So, let’s wait and see.