The Best Competitive Overwatch 2 Settings

The goal of these recommendations when it comes to OW2 settings is all based on the premise of gaining the lowest possible latency and the most stable/highest FPS. These settings were tested on 2 PCs and only 4 Windows installs therefore our sample size is not nearly enough to account for all the possible variables between software and hardware.
Although most settings described should act as indicated below, if you do encounter issues then you need to troubleshoot them for yourself since most likely your Windows install, tweaks and hardware need a different config.
Video
Display Mode – Fullscreen – Make sure it is Fullscreen Exclusive (FSE) – Normal fullscreen renders the game on top of the desktop introducing latency because there are extra steps in the render pipeline. You can achieve FSE by using a custom Windows or manually tweaking your install. To check if you are running FSE, use the volume keybinds on your keyboard – if you see the Windows volume overlay while you are in the game you are not on FSE.
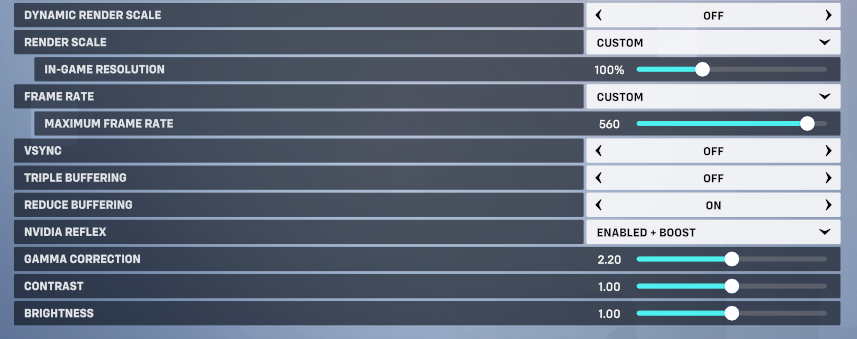
Dynamic Render Scale – Off – This setting is confirmed to add input lag.
Render Scale – Custom – 100-75% depending on your PC and FPS target.
Framerate – Custom – Use 2 x monitor Hz FPS cap for the smoothest experience (example) or uncapped FPS for the lowest latency – Try to still keep GPU usage under 95% even with Reflex on.
Reduce Buffering – On to disable the 1 frame buffer in OW – Off if you are CPU bottlenecked (example). To determine CPU/GPU bottlenecks look at your GPU usage or look at the in-game FPS counter: 1 dot = CPU bound, 3 dots = GPU bound.
Nvidia Reflex – Enabled + Boost on a CPU-bound PC, Enabled on a GPU-bound PC.
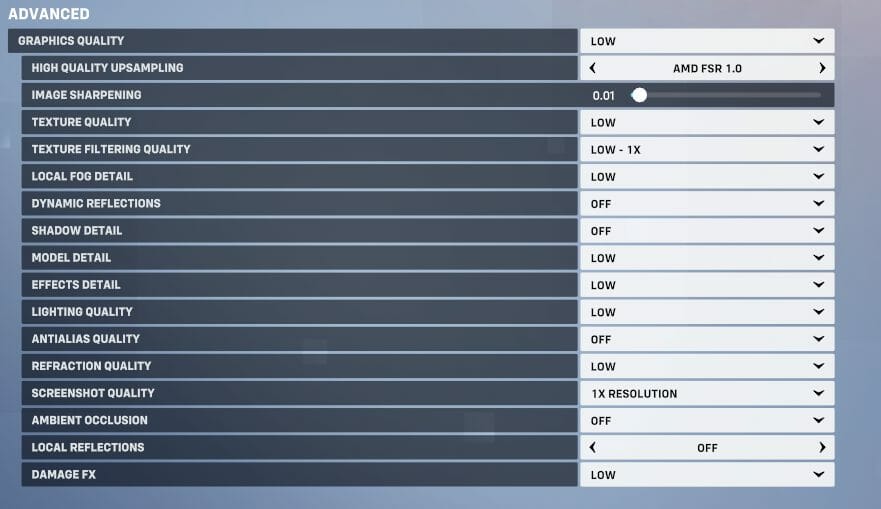
Graphics Quality
Turn every setting to low/off to maximize FPS. Use the high-quality upsampling setting – AMD FSR 1.0. To use FSR properly, use 0.01 for the image sharpening value, which is the lowest possible value while using the FSR algorithm.
Although logic dictates that the default render option should be better in terms of input lag, since FSR upscales a lower resolution to improve performance, in OW2 having FSR enabled on the lowest value results in better inputs too. This setting might produce different results for different builds so do a little bit of testing yourself.
Details
In the Display Performance Stats menu enable the Show Framerate option so you can monitor your performance and also so you can see the dots included with the FPS counter to identify whether you are GPU or CPU bound (needed for optimal Reflex setting).
Sounds
Audio Mix: Studio Reference – It seems like using this option turns off the in-game EQ allowing clearer sounds. The default Headphone preset sounds muddy and bassy making it hard to hear steps or other audio queues. This is a setting that falls under the preferences, but if you are aiming for the most competitive experience not missing audio queues is important.

Controls
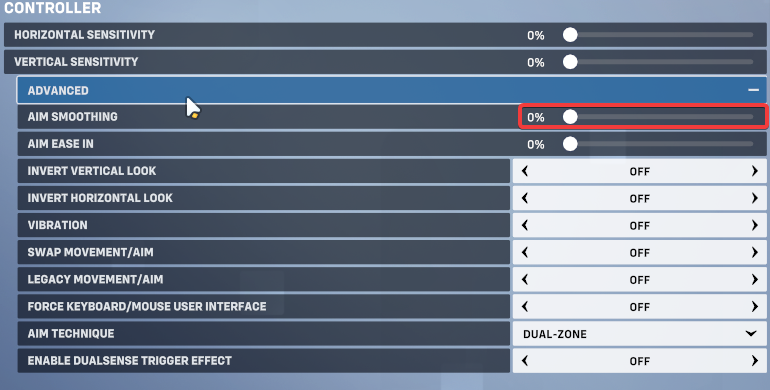
Controller – Aim Smoothing – 0% – There have been multiple reports that this setting bleeds into M&K inputs therefore you should turn it off just in case.
Turn off recoil Recovery Aim Compensation for Ashe/Cassidy/Widow/Ana/Baptiste – For most people, this should feel a lot more natural since your crosshair does not get kicked up automatically to compensate for recoil. This will give you much more control over your micro-adjustments while aiming with the characters mentioned above.

Gameplay
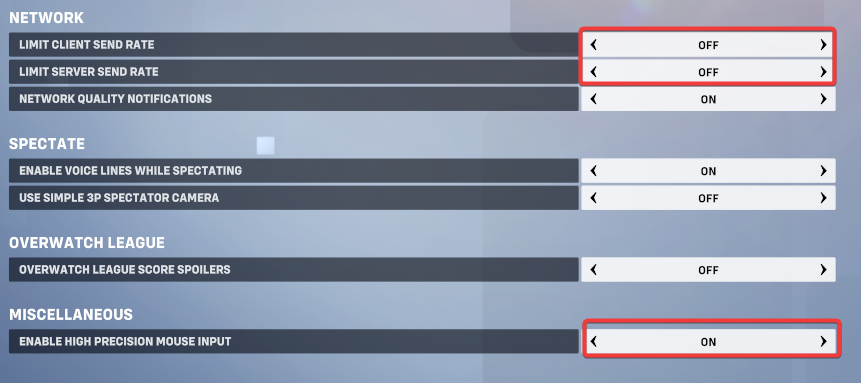
Network – Limit Client Send Rate – Off – Limit Server Send Rate – Off – This simply allows your game to send and receive as much information as needed.
Enable High Precision Mouse Input – On – The simple explanation here is that with this setting on you can now functionally shoot between rendered frames (or at high fps, on rendered frames that are in between ticks) allowing for the most precise inputs. There is a whole post about how this setting works if you want a full explanation, but essentially you will always want this setting on.
Accessibility
Camera Shake – Reduced – HUD Shake – Off – Reduce Menu Movement – On. All of these settings will simply clean up the UI and get rid of visual clutter.

Extra Findings
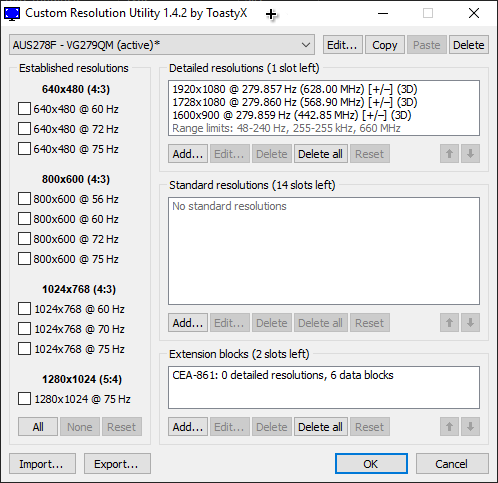
I have found that instead of reducing the in-game render scale the image quality looks better if you simply make a new CRU scaled 16:9/16:10 lower resolution (1600×900/1728×1080) to gain FPS.
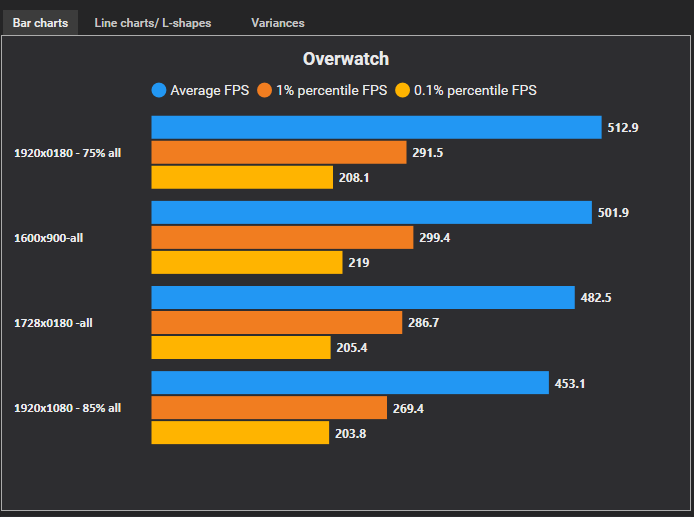
I tested this using CapFrameX, a benchmark scenario in OW custom games, and some tweaks to the said benchmark (used only Doomfist, and turned the legacy camera on so it does the same movement across the map) to make the results as consistent as possible between runs. I ran each resolution 3x times and aggregated the results. Since OW2 does not have an official benchmarking method I worked with what I had but the methodology I used could potentially have flaws.
The simple conclusion is that lower resolutions = better FPS & better latency since you are CPU bound (as expected).
I also wanted to test what is the difference between FSR values in terms of performance so I followed the same procedures.
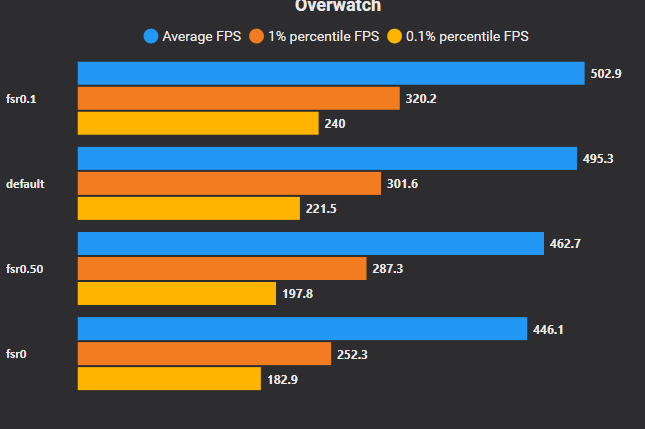
It seems that if the value on the FSR slider is 0 something in the game gets bugged and it performs worse than with the setting off. Otherwise, everything else is as expected – FSR gives you better FPS at the lowest sharpening value while cranking the sharpening slider results in lower FPS.
Tweaking
These are not settings that necessarily relate to OW2 but having a good tweaked-out Windows ISO will directly impact the performance of the game. I won’t bother going into detail on each tweak because then this will become a tweaking guide, not OW2 recommendations. If you do not want to fiddle with Windows settings then you can hop on OW2 since the settings for the game itself are already optimized.
Use a Custom Windows 10 ISO
FoxOS 1809 – For advanced users only – Will require a lot of troubleshooting or previous PC tweaking knowledge. Least background clutter, and the best latency.
ggOS – The default recommendation that most gamers should use – Most services work just fine, and no real troubleshooting is needed in most cases (Their Discord is locked up for now so I have included the official download link).
Ghost Spectre – This is the choice for people completely new to PC optimizing or tweaking – Close to a default base Windows 10 installation, but with some annoying things removed. The least optimized choice.
I own none of these custom Windows ISOs and all rights go to their respective owners. I am simply offering some recommendations based on my testing.
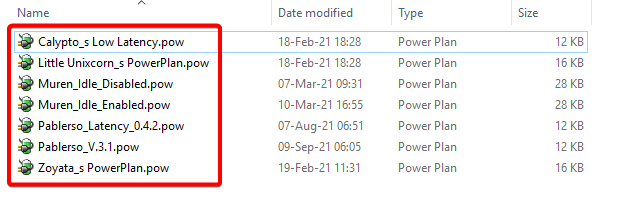
Import a No-Idle Power Plan
Having a good power plan is important because you will achieve much better inputs that will be a lot more stable.
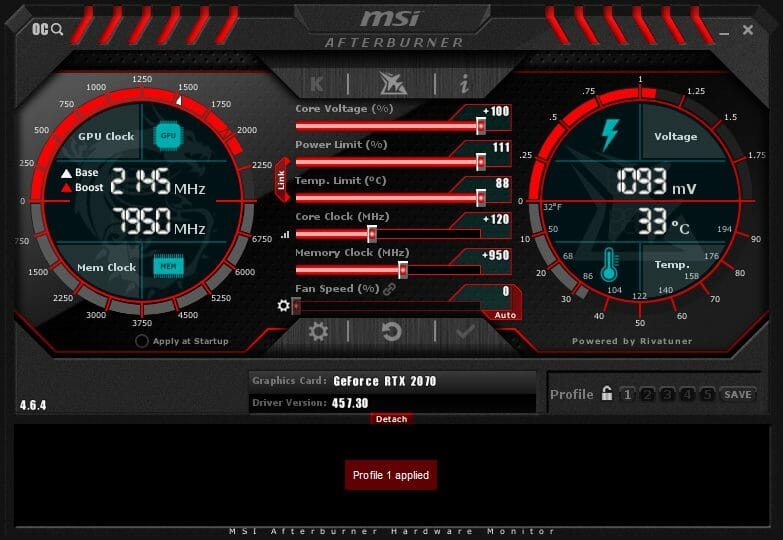
Overclock Your CPU and GPU
The most significant gains you will see in performance uplift will always come from overclocking your CPU and GPU. There is no reason not to squeeze out all of the possible performance if you are seeking a competitive advantage.
Disable Power Savings in Your BIOS
Getting rid of power savings will allow you to achieve much better consistency in inputs and FPS. You should also consider disabling E-cores if you are on Intel 12/13th gen for better P-core overclocking and better overall FPS in gaming. Your productivity tasks will suffer without the E-cores but since we care only about gaming this is a small price to pay.
Disable SMT Hyperthreading in BIOS
Gaming does not suffer from the virtual cores being disabled and you will have much better latency with virtualization off. Productivity will suffer with fewer cores available. On AMD try to keep everything working on one CCX (if you own a CPU with multiple CCXs) otherwise you will incur a latency penalty.
Proper GPU Driver Installation
DDU your old GPU driver and use a stripped Nvidia driver for better performance and less telemetry. Installing a new driver on a clean system is important because it reduces the chances of weird bugs occurring during gameplay.
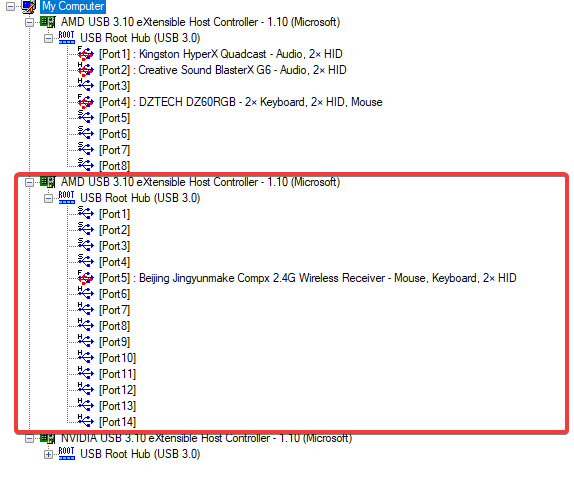
Prioritize Your Mouse Inputs
Make sure your mouse is alone on the USB controller so it does not share resources with other devices. You can check which USB controllers are being used by what devices using the USB Tree tool. A good scenario should look like this.
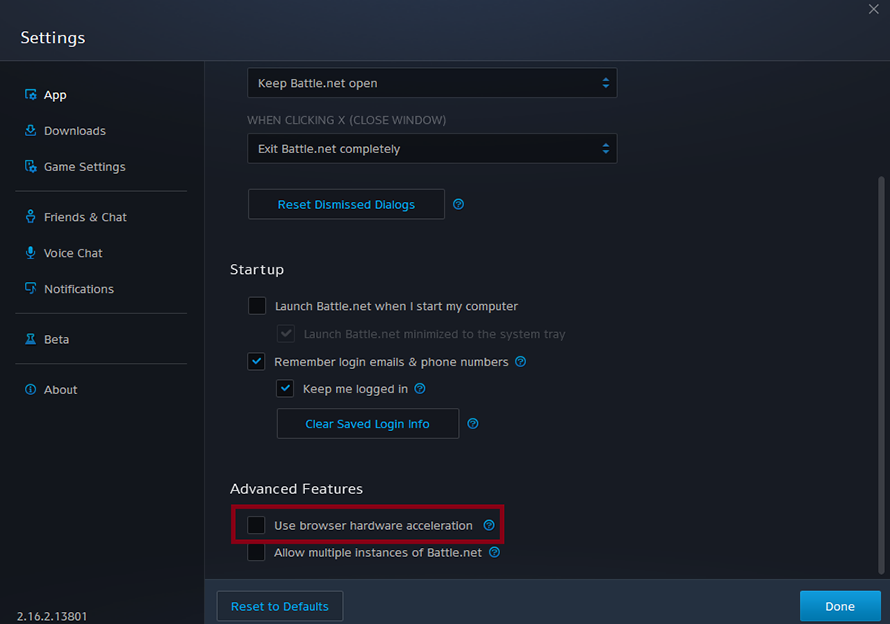
Disable Hardware Acceleration
Disable hardware acceleration in your browser, Discord, Spotify, Battlenet, Steam, etc. This will allow all your resources to be focused on your game and result in better performance.
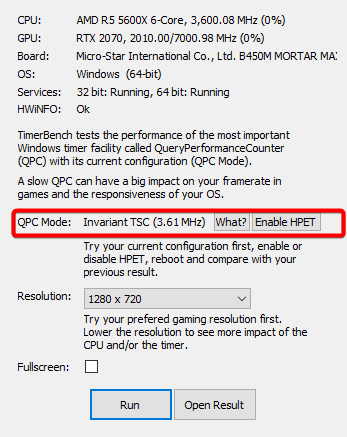
High Precision Event Timers
As described here, for better inputs you should make sure you are using the TSC timer which is an on-die timer that has lower latencies than HPET, which is located on the chipset. Use the commands in the linked article to disable HPET and related services for better performance.
To confirm the changes, use Timer Bench and look at the QPC mode.
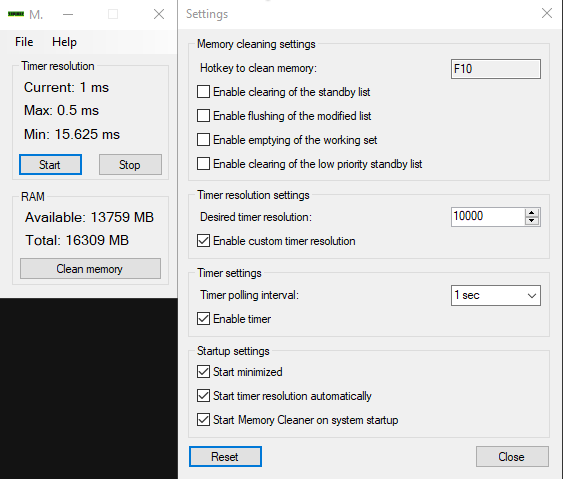
Once everything is configured you should also use a 1 ms timer resolution for better performance. You can use any utility that you prefer but I use this one because it’s lightweight.
Only enable the timer, not the memory cleaning settings since the cleaning service might cause stutters while you are playing your games.
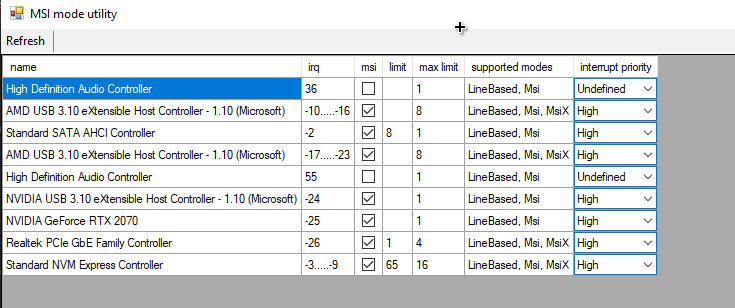
Enable MSI Mode
Enable MSI mode on high priority for your GPU, USB controller, network adapter, etc. Be careful not to enable MSI/high priority on your audio controllers since it is known to cause issues and crashes. After you have applied the settings, restart your PC.
Credits
I have worked on this guide with my friend @Killuminati_exe which helped me with testing (to widen my sample size) and also helped with suggestions. GGWP.
just wanted to chime in and thank you for this guide 🙂 take care