Why Does Twitch Keep Buffering?
Have you been noticing that your experience on Twitch gets ruined by constant buffering? You start watching a stream only to see it keep freezing over and over. If that’s not bad enough, the video resolution almost looks unbearable to watch. If that’s something you keep experiencing, then you have a Twitch buffering issue on your hands. But don’t worry. There’s no need to delete your Twitch account right away. You can easily fix this.
Most of the time, the main issue when Twitch streams keep buffering is related to either browser issues or network connection problems. Even though we can pin it down mainly to these two factors, there are still a lot of different problems that can occur. That’s why you will sometimes find that Twitch suddenly starts buffering and never fixes itself until you step in.
So, if you’re still asking yourself why is Twitch buffering, let’s explain it here and find a few possible solutions to this problem. These are the main techniques to fix Twitch’s buffering problem that have worked for most users. Simply follow the steps shown below and your problem should be fixed. But first, let’s first understand why this happens.
Why Your Twitch Stream Is Buffering
As we mentioned, it all comes down to browser or network connection issues most of the time. Another possibility is that Twitch is currently making updates or is fixing a minor issue on their platform, making it unstable. However, if this is the case it usually gets fixed within the same day. But, what do you do if Twitch keeps buffering day after day and no one is fixing it?
Most of the time, the buffering problem with Twitch is due to a poor internet connection. In addition to that, the device you’re watching Twitch streams on can also cause problems if it’s too old. For smartphones, models older than 3 years usually start experiencing buffering problems with Twitch and other platforms.
In the end, it all comes down to a few reasons that are almost always the case for most Twitch users. But, without knowing for sure you won’t be able to fix your problem. You must check what the problem exactly is by following the solutions below. The three main areas to check are the following:
- Browser Problems
- Network Connection Issues
- Device Hardware Malfunctions
How Do I Stop Twitch From Buffering?
Now comes the fun part. What methods can you implement with your Twitch constantly buffering issue? Try the following examples:
1. Clear Your Browser’s Cache
Most of the time, clearing the cache on any app does wonders for fixing buffering and loading issues. This enables the app to function faster and smoother by having more storage to work with. Here is how to do this with Chrome.
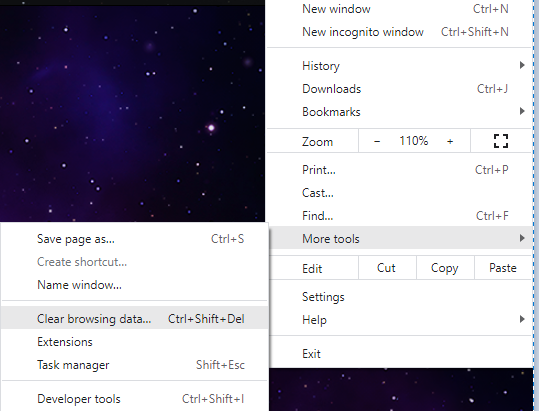
Step 1: Open Google Chrome and click on the 3 dots in the top right corner of the screen
Step 2: Click on “More Tools” and select “Clear browsing data”
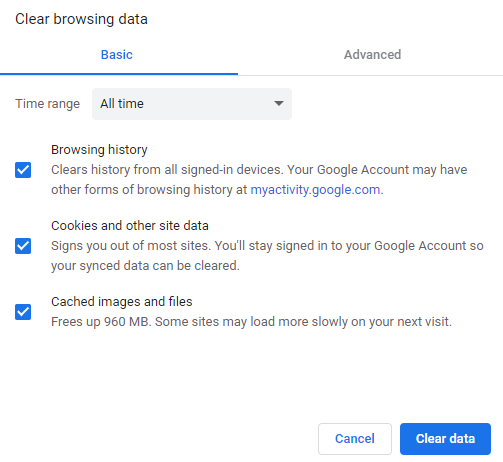
Step 3: Click on “Clear Browsing Data”, select All Time, and click on “CLEAR DATA”
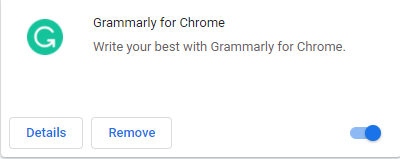
2. Disable Browser Extensions
Certain Chrome extensions can also be responsible for causing Twitch to buffer. We can’t know which ones cause this for sure, but you can test and find out if any of your installed extensions are the root of this problem.
Simply disable them all and check if the Twitch problem is resolved. If it is, enable them one by one again and check which one starts causing Twitch to buffer once again. Then, uninstall that extension for good.
Step 1: Open Google Chrome and click on the three dots in the top right corner
Step 2: Click on “More Tools” and select “Extensions”

Step 3: Toggle the button in the bottom right corner to turn each extension on and off. There’s no need to remove them all. Simply turn them off on the blue button.
3. Change Your DNS
The simple process of changing your current DNS (Domain Name System) to Google’s DNS has a great chance of fixing the Twitch buffering problem. Here is how to get this done in a few simple steps:
Step 1: Click on the “Windows” button from your keyboard and type in “control panel”

Step 2: Find and click on “Network and Sharing Center”

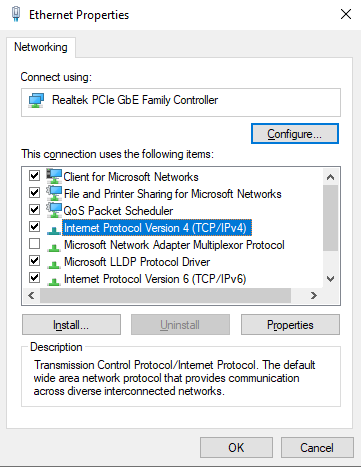
Step 3: From the sidebar on the left, click on “Change adapter settings”
Step 4: Right-click on the box with your Network name and select “Properties”
Step 5: Click on “Internet Protocol Version 4 (TCP/IPv4)” and click on Properties on the left side beneath it
Step 6: Check the button that says “Use the following DNS server address” and type in the following codes:
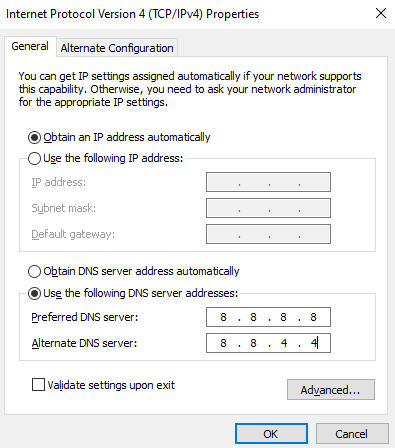
- Under “Preferred DNS Server” – 8888
- Under “Alternate DNS Server” – 8844
Step 7: Click “OK” and exit the Control Panel
4. Disable Hardware Acceleration
This is another method to try if Twitch keeps buffering. This one also has to be performed through the Chrome browser. By disabling hardware acceleration, you prevent processing all data through the GPU. This should allow everything to work more smoothly and prevent Twitch from constantly buffering. Here’s how to do it:
Step 1: Open Chrome and go to Settings by clicking on the 3 dots in the top right corner of the screen
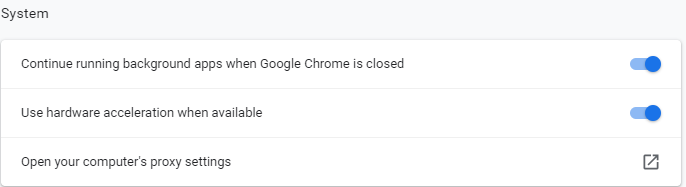
Step 2: Click on “Advanced” from the left-side navigation panel and go to “System”
Step 3: From there, toggle the button next to “Use hardware acceleration when available” to turn it off and on
Step 4: Restart the browser after this so the changes can take effect
5. Disable Your VPN
If all else fails, there’s one more thing you can try in order to stop Twitch from buffering. Although, we believe that one of the solutions above will almost always work to fix the problem. If not, you can always disable your VPN if you have one running. Many VPNs can significantly slow down your internet and cause buffering on more platforms than just Twitch.
Any VPN can be disabled the same way you activated it. Simply turn it off while you’re enjoying your Stream and then turn it back on again. If you don’t want to disable your VPN because you want to block Twitch ads, you can also upgrade to premium versions of most VPNs that offer higher internet speeds and no interference on broadcasting platforms like Twitch.