Zalman CNPS9900 LED Cooler Review

Today we are going to review the newest cooler from the world famous Korean manufacturer. The brand fans have been waiting for two long years for Zalman to roll out a new solution. Has it proven up to their expectations? We are going to answer this and many other questions in our today’s article.
Long time ago Korean Zalman Company was a trend setter in the market of air coolers for computer components. There was barely any competition in this segment, so no one could really disturb Zalman from resting on the winner’s laurels. Some manufacturers tried to copycat the Koreans and released outrageously similar cooling solutions (remember Ice Hammer or Pentagram coolers). However, time kept going and not only the CPU market but also all accompanying segments developed rapidly, including the cooling solutions. As a result, competition in this area got tense, even aggressive and the overwhelming use of heatpipes technology stimulated this process even more.
And what about Zalman? Unfortunately, there wasn’t much going on with them. In 2005 they released a very successful (at that time) CNPS9500 LED cooler and then in 2006 – CNPS9700 LED. After that the air cooling division of the company kept quiet for two years. They tried to refresh the memories of good old times by launching a pretty mediocre Zalman CNPS8700 LED and slight modifications of the existing CNPS9700 model. In the meanwhile, the flagship solutions from such competitors as Thermalright, Scythe, Cooler Master, Thermaltake and ZEROtherm outperformed the best Zalman cooler in efficiency, and sometimes this advantages was pretty significant (8~10°C under peak load). No doubt, it was the time for Zalman to respond to all their rivals with the launch of a new highly efficient cooling solution. The recent announcement of the new Core i7 platform was another stimulus for this.
So, today we are proud to present the new Zalman CNPS9900 LED!
Package and Accessories
The new solution comes in a not very big box made of thick cardboard with dark-blue color design. There are cut-out windows in the front and back of the box, revealing a little of the new Zalman CNPS9900 LED cooler:
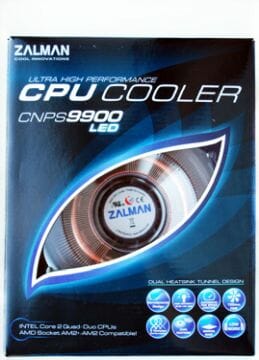

The information you ca n find on the box is quite typical for the systems of this class: the key features of the cooler, the list of supported processor sockets, technical specifications and a bunch of other less essential info.
There is a clear plastic casing inside the box that is shaped exactly as the cooler. It protects the unit securely against any transportation damages that may occur on the way to you. The bundled accessories are placed right above the cooler. The bundle includes the following items (I will list them from left to right and from top to bottom):
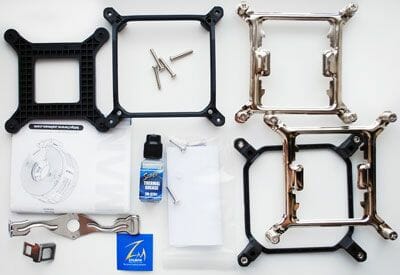
- Plastic backplate for LGA 775 mainboards;
- Retention frame and screws for LGA 775 mainboards;
- Steel retention plate for LGA 775 mainboards;
- Multi-lingual installation guide;
- Zalman ZM-STG1 thermal compound;
- Socket 939/AM2(+) retention clip and a thumb hook for it;
- Zalman logo sticker;
- A set of screws and a sheet with instructions for LGA 1366 platforms;
- A plastic retention frame and steel bracket for LGA 1366 platforms.
At first I was a little surprised that there was no rotation speed controller among the bundled accessories, however, as we studied the cooler more carefully, I figured out the reason for that. Zalman CNPS9900 LED is made in Korea and its recommended retail price is set at $89.90.
Design and Functionality
One quick look at the new Zalman CNPS9900 LED is enough for any overclocker’s heart to start beating faster. See for yourselves:
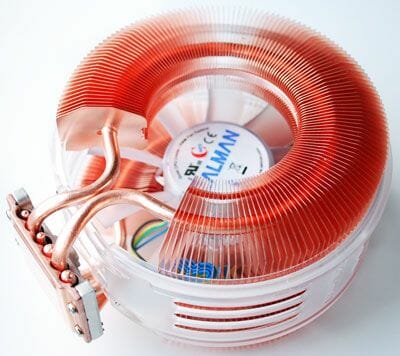
Beautifully twisted heatpipes piercing fine heatsink fins will hardly leave anyone indifferent, even if they have nothing to do with computers. The cooler measures 94 x 140 x 158.5 mm, which makes it 16 mm wider and 16.5 mm taller than Zalman CNPS9700. As for the weight, the newcomer didn’t actually become much heavier: now it weighs 782 g (compare with 764 g of Zalman CNPS 9700). And the heatsink surface area even got 82 sq.cm smaller and now makes 5402 sq.cm.
The cooler is built on three copper heatpipes 6mm in diameter that come out of the copper base plate. The heatpipes pierce two copper toroidal-shaped heatsink arrays. There is a fan installed between them and covered with a plastic housing with slits in it.
To remove this housing you need to undo two screws at the bottom of it. This will let you take a closer look at the heatsink.
As you can see, the heatsink arrays have different width. The heatsink facing the incoming airflow is narrower and there is only one heatpipe going through it. And the heatsink array installed behind the fan is wider and there are two heatpipes holding its body together.
The copper fins are 0.2 mm thin and the gap between them measures 1 mm in the inner circle and 2-2.2 mm on the outer circle.
As we have already said, there are three heatpipes. However, they are looped in such a way that there are six heatpipes fragments in the cooler base. Two central heatpipe fragments that bear the maximum workload enter the larger heatsink and run closer the fan.
Two next heatpipe fragments go in a different direction and enter the smaller heatsink. And two heatpipe fragments on the sides pierce the larger heatsink along its outer side. So, the heatpipes are arranged in a very smart and effective way.
The heatpipes are soldered to the base of the cooler and to the heatsink fins. This is another indication of manufacturer’s serious intentions in terms of implementing the ideas first brought up in Zalman CNPS9700 LED.
The finish quality of cooler copper base is ideal. Besides, the base is impeccably even. We couldn’t find even the tiniest flaw in the remarkable thermal compound imprints on the glass surface as well as on the processor heat-spreader.
There is a 110 x 25 mm fan installed between the heatsink arrays. It features nine semi-transparent blades.
Its rotation speed is controlled with pulse-width modulation method (PWM) between 1000 and 2000 RPM. In fact, since the fan supports automatic rotation speed adjustment there was no need to include a rotation speed controller with the cooler. The claimed acoustic specification is 19.5 ~ 38.0 dBA. Unfortunately, there is no info on the created airflow intensity among the revealed official specifications.
The fan uses ball bearings with 50,000 hours (over 5.7 years) of non-stop operation. Maximum fan power consumption shouldn’t exceed 9.6 W.
The fan is fastened to the plastic insert with three screws, and the insert has special hooks that catch securely to a special groove in the wider part of the heatsink. In fact, you can replace this fan with an alternative one if the bearing fails, however, you will need to cut it off the standard 120-mm fan frame first. You can even install a standard framed fan between the heatsink arrays attaching it with ties. However, we are not going to talk about possible modifications of the new Zalman CNPS9900 LED cooler in our today’s article, so let’s continue to our next chapter.
Installation Tips
Zalman CNPS9900 LED cooler is the first air cooler I have had a chance to test so far that can be installed onto a new LGA 1366 platform. We do not have this platform in our Cooling lab yet, but we are getting one very soon. We are going to test all coolers including the previously reviewed ones on Core i7 platform using special retention kits for them. Today, however, we are going to check out the new Zalman CNPS9900 LED on an LGA 775 platform, so let’s take a closer look at how the cooler actually installs onto it.
Unlike Zalman CNPS9700/9500, the new cooler uses a plastic retention frame that is screwed to a backplate through the mainboard PCB first.
The frame meets Intel’s standards, so it fits easily into the free space around the CPU Socket. Moreover, it will not block the processor socket lock-latch, so you can replace the CPU easily, without taking the cooler retention frame off. Socket 939/940/AM2(+) mainboards can also accommodate Zalman CNPS9900 LED cooler. In this case you will have to use the retention clip that hooks on to the standard plastic socket frame of these mainboards.
Once the frame is in place, we apply the thermal compound and press the cooler against the CPU with a metal frame with spring-screws. The only inconvenience is that you have to lean the screwdriver when tightening the screws, because of the heatsink and it keeps sliding off. However, a few installations made me really good at it and tightening the retention screws was no longer a problem.
The cooler is very compact at the base and even on a heavily loaded mainboard like DFI LANPARTY DK X48-T2RS we used we had no problems in any of the four possible cooler positions.
The cooler is pressed very firmly against the CPU heat-spreader. It doesn’t shift or rotate thanks to the frame that holds its base in place. The new solution installed into a system case looks like this.
And blue fan LEDs will look really festive and add a Christmas spirit to your system. However, to need to have a clear side panel to enjoy this beauty, or to use no system case at all.
Testbed and Methods
We tested Zalman CNPS9900 LED and its competitors in two modes: in an open testbed when the mainboard sits horizontally on the desk and the coolers are installed vertically, and in a closed system case with the mainboard in vertical position.
Our testbed was identical for all coolers and featured the following configuration:
- Mainboard: DFI LANPARTY DK X48-T2RS (Intel X48), LGA 775, BIOS 10/03/2008
- Processor: Intel Core 2 Extreme QX9650 (3.0GHz, 1.25V, 2x6MB L2 cache, 4x333MHz FSB, Yorkfield, C0)
- Thermal interface: Gelid GC1
- Graphics card: ZOTAC GeForce GTX 260 AMP2! Edition GDDR3 896 MB / 448 bit, 648/1404/2106 MHz
- Memory:
- 2 x 1024MB DDR2 Corsair Dominator TWIN2X2048-9136C5D (1142MHz / 5-5-5-18 / 2.1V);
- 2 x 1024MB DDR2 CSXO-XAC-1200-2GB-KIT DIABLO (1200MHz / 5-5-5-16 / 2.4V).
- Disk subsystem: Western Digital VelociRaptor (SATA-II, 300GB storage capacity, 10,000RPM, 16MB cache, NCQ)
- HDD silencer and cooler: Scythe Quiet Drive 3.5”
- Optical drive: Samsung SH-S183L SATA-II DVD RAM & DVD±R/RW & CD±RW
- System case: ASUS ASCOT 6AR2-B Black&Silver (ATX) with 120mm ~960RPM Scythe Slip Stream 120 fans for air intake and exhaust (the fans are installed on silicon spindles), and Enermax Magma fan at ~960RPM fan on the side panel. We applied noise insulation.
- Control and monitoring panel: Zalman ZM-MFC2
- Power supply: Thermaltake Toughpower 1500W W0218 (with a default 140 mm fan)
- Monitor: 24″ BenQ FP241W (Wide LCD, 1920 x 1200 / 60 Hz)
All tests were performed under Windows Vista Ultimate Edition x86 SP1. SpeedFan 4.37 was used to monitor the temperature of the CPU and mainboard chipset, reading it directly from the CPU core sensor and to monitor the rotation speed of the cooler fans.
The mainboard’s automatic fan speed management feature as well as CPU power-saving technologies were disabled for the time of the tests in the mainboard BIOS. The CPU thermal throttling was controlled with the RightMark CPU Clock Utility version 2.35.0.
The CPU was heated up using Linpack 32-bit with LinX shell version 0.5.3. The RAM capacity was set at 1536MB and the test cycle included 15 runs.
Since we ran the test twice with 20/10-minute idle period between the runs for the system to cool down and temperatures to set in, the relatively short actual testing period was quite enough for the maximum processor temperature to become stable.
For the second type of load we used OCCT (OverClock Checking Tool) v2.0.1. We ran a 23-minute test with maximum CPU utilization, during which the system remained idle in the first 1 and last 4 minutes of the test.
To conveniently control the temperatures in real time we used RivaTuner 2.21 with SpeedFan plugin. Full screenshots of our test session are given below.
I performed at least two cycles of tests in both test modes and waited for approximately 15 minutes for the temperature to stabilize during each test cycle. Despite the stabilization period, the result of the second test cycle was usually 0.5-1°C higher. We took the maximum temperature of the hottest processor core after two test cycles for the results charts.
The ambient temperature was checked next to the system case with an electronic thermometer that allows monitoring the temperature changes over the past 6 hours. During our test session room temperature stayed at 23.5°C. It is used as a starting point on the temperature diagrams. Note that the fan rotation speeds as shown in the diagrams are the average readings reported by SpeedFan, and not the official claimed fan specifications.
The noise level of each cooler was measured after 1:00AM in a closed room about 20sq.m big using CENTER-321 electronic noise meter. The measurements were taken at 3cm, 1m and 3m distance from the noise source. During the acoustics tests all three 120-mm case fans were slowed down to ~700 RPM. In this mode the background noise from the system case measured at 1m distance didn’t exceed ~32.7 dBA, and the loudest fan was the 140-mm fan of the system power supply. When the system was completely powered off, our noise meter detected 30.8 dBA (the lowest on the charts is 30 dBA. The subjectively comfortable noise level is around 34~34.5 dBA.
We are going to compare Zalman CNPS9900 LED against two more cooling solutions: the previous Zalman CNPS9700 NT model (I didn’t have the non-nickel-plated LED modification available at the time of the tests), and our performance etalon – Thermalright SI-128 SE cooler ($40).
Zalman CNPS9700 NT was equipped with a PWM controlled fan that is why its fan rotation speed was adjusted automatically in the interval from 1270 to 2780 RPM. Thermalright SI-128 SE was equipped with 120 x 120 x 25 mm Enermax Magma fan ($15) that worked in two modes: at 1020 RPM and at 1580 RPM.
Cooling Efficiency
During Linpack tests inside a closed system case using the “weakest” cooling system of the today’s testing participants we managed to overclock our 45 nm quad-core processor to 3.68 GHz (+22.7%). The nominal processor Vcore was increased to ~1.46275 V in the mainboard BIOS (+27.2%).
During the OCCT tests in the same conditions the CPU remained stable up to 3.9 GHz (+30%) at 1.55V (+34.8%) Vcore.
Before we continue to our benchmark results, we would like to dwell on one very important thing. When the cooler was tested inside the system case installed the way you have just seen on the photo above (the airflow is directed towards the back of the case), Zalman CNPS9900 LED cooled our overclocked processor 2°C worse than CNPS9700! I was extremely frustrated with the obtained result and started looking for an explanation. As a result, I discovered that the cooler should be installed inside the ATX system case so that the wider part of its heatsink and two heatpipes entering it from the base were at the top.
After the events had taken this turn (in direct and indirect meaning of this word), Zalman CNPS9900 LED started to outperform its predecessor. It is in fact a very interesting observation, especially since the manual doesn’t say a word about it and in an open testbed when the cooler stands vertically we saw no difference in the efficiency depending on the cooler positioning. The thermal compound imprint on the processor heat-spreader was ideal in both cases and Zalman CNPS9700 demonstrated the same results in all positions. Looks like the direction of the main cooler heatpipes does affect the cooling efficiency in the end. However, I am going to get back to checking it out on Core i7 platform later on. So, let’s take a look at the obtained results.
First of all I would like to say that the newcomer is definitely more efficient than its predecessor – Zalman CNPS9700 NT: the advantage is about 4~7°C depending on the testing conditions and type of CPU workload. Not bad, but it is still not enough to outperform Thermalright SI-128 SE. Zalman CNPS9900 LED proves as efficient as the latter only when Thermalright cooler fan works in its quiet mode. At higher fan rotation speed SI-128 SE is beyond any competition. Moreover, it turned out that Enermax Magma fan rotating at the same speed as Scythe Ultra Kaze fan keeps the CPU 2°C cooler. Moreover, further increase in the fan rotation speed (over 1600 RPM) doesn’t improve the CPU temperature any more. But, enough of Thermalright SI-128 SE discussion, let’s get back to our today’s hero – Zalman CNPS9900 LED.
What could we add here? There is one thing! You may have already noticed that the plastic housing covering the fan all around has cut-out slits in it. These slits release partially the airflow and I decided to get it to work for my benefit. I used regular clear scotch tape that appeared of the same width as the plastic housing. This simple modification improved the cooling efficiency in Linpack under maximum workload by 2°C! You may think it is a trifle, but this improvement can be achieved with the most primitive fix that will take you 30 seconds to put in place and will not change the looks of the cooler. Therefore, I would obviously like to ask the manufacturer in the first place: why did they make these slits at all, if they lower the cooler efficiency? Are they intended to improve the cooling of the around-the-socket area or to lower the noise? I doubt it. So, the question still stands.
Two best coolers in our today’s test session were also tested during maximum CPU overclocking. The test was performed in an open testbed with the workload created by Linpack. Here are the results.
As you see, SI-128 SE not only gets the CPU frequency about 50MHz higher than CNPS9900 LED, but also ensures lower operational temperature (84°C vs 92°C on the hottest CPU core).
Acoustic Performance
Unfortunately, Zalman CNPS9900 LED is not a quiet cooling solution even at its minimal fan rotation speed. Despite the low dBA levels on the diagram (33.2 at 1m and 1000 RPM), the cooler generates low-frequency rumbling sound. The constantly changing fan rotation depending on the CPU utilization speed also adds certain discomfort. Even when doing common things in Photoshop or during archiving, Zalman CNPS9900 LED fan speeds up and slows down all the time. Believe me, it is much more annoying than a monotonous humming of the fan at high rotation speed. However, in absolute numbers Zalman CNPS9900 LED turned out quieter than Zalman CNPS9700 NT.
Conclusion
Summing up the results of our today’s test session I would like to say that the new Zalman cooler outperformed its predecessor, Zalman CNPS9700 NT, having proven quieter and more efficient. Yes, it is $25 more expensive and yields in combined key characteristics, such as cooling efficiency and acoustic performance, to the etalon solution from Thermalright. However, Zalman CNPS9900 LED boasts ideally even base finished with remarkable quality, offers an LGA 1366 retention kit with it and directs the airflow along the mainboard PCB (to be exhausted out of the system case).
On our part, we would like to make a few recommendations to Zalman for their next (still hypothetical) cooler revision: to make the plastic fan housing solid, use a 38-mm fan and replace automatic PWM rotation speed adjustment with a manual one, like the one used in Zalman CNPS9700 LED. All this added to impressive looks and bright LED glow will make the new solution extremely attractive, especially with such great holidays as Christmas and New Year just around the corner. Happy holidays!