Zalman GS1000 and Z-Machine GT1000 System Cases Review

Today we are going to introduce to you two system cases from Zalman. Will this company manage to show us something unique, something different from the competition? Let’s find out.
The name of Zalman is widely known on the market of computer components. The company is mostly recognized as a maker of CPU and GPU coolers, including liquid cooling solutions. It is quiet and efficient coolers that made the company’s name a few years ago. We don’t have to look far for examples because our test configuration for system case reviews includes Zalman’s CPU cooler CNPS9500 AT. However, today’s Zalman is not only about coolers. The company offers a broad range of innovative and original products such as the stereo-monitor Trimon ZM-M220W, multi-channel headphones ZM-RS6F, and power supplies (e.g. the quiet and high-wattage ZM850-HP).
In this review we will be talking about Zalman’s system cases. Some time ago we tested Zalman’s HD160XT, a system case for HTPCs, and today we will take a look at a couple of traditional desktop “towers”.
Zalman GS1000
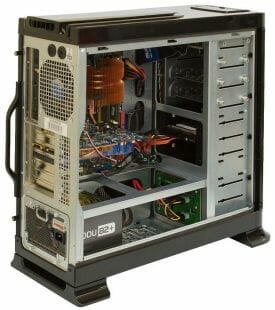
We will start out with the Zalman GS1000, a big – perhaps even huge – system case of the full-tower form-factor. It comes in two variants: all black (like our sample) or black-and-gray (“titan”).
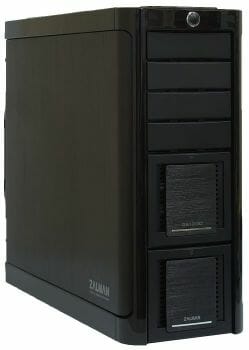
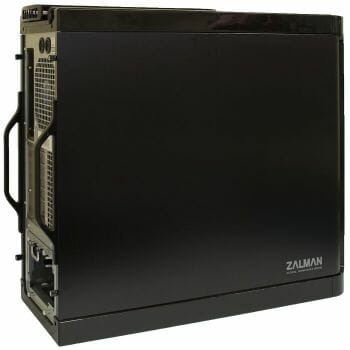
The system case has a restrained exterior design but is not a classic rectangular box. Far from being angular, it has rounded-off edges.

As a result, the GS1000 has some elegance of shape as far as this term can be applied to system cases of such a huge size. Take note that the side panels seem to go into the front one, which looks original and beautiful.
This design is made possible by the organic use of steel, plastic and aluminum. The main chassis is steel. The external details (such as the top panel and the exterior of the front panel) are plastic. The sides are anodized aluminum with characteristic finish. The only thing we don’t like is the combination of glossy plastic and textured aluminum. The developer should have made all the case either glossy or matte.
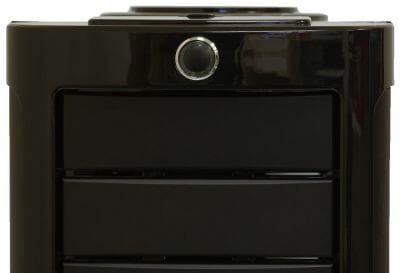
The GS1000 is supposed to stand on the floor as is indicated by the lack of a side window and the position of the Power button at the very top of the front panel. The rim of the button is a Power indicator. A Reset button is missing.
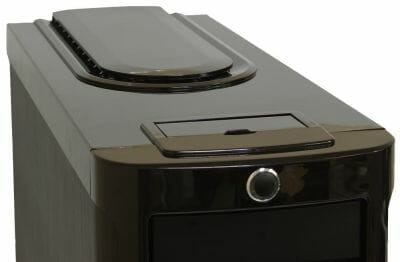
I/O connectors can be found under a movable cover on the top panel. You will not have to bend down to reach them.
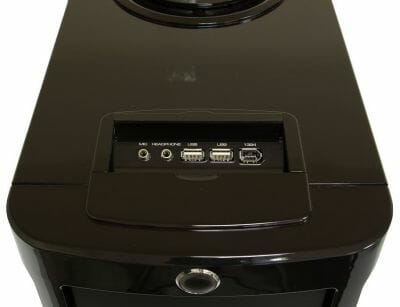
These are two audio connectors, two USB ports and one IEEE1394 connector. It’s a shame the developer offers FireWire instead of eSATA which is getting more and more popular. The USB ports are too close to each other. You won’t be above to plug two wide devices in simultaneously.
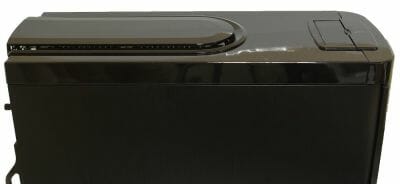
The top panel is an interesting thing, too. There is a protruding covering at its back with vent holes below. Judging by the size of the covering, there must be two 120mm fans below it.
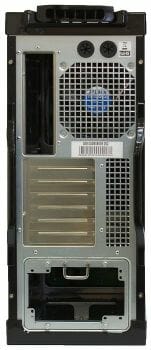
The back panel is far from standard, too. Following the current trends, the power supply compartment is at the bottom of the case, so the mainboard’s I/O connectors and expansion slots are somewhat higher than usual. Then, the vent holes of the above-mentioned covering open to the back panel, too. And finally, there is a 120mm Zalman fan here (running a little ahead, we can tell you that both system cases employ Zalman’s own fans: 120mm ZM-F3 and 92mm ZM-F2 models). A vent grid occupies the rest of the back panel. There are also two rubberized openings for the pipes of a liquid cooling system if you want to install one.
The side panels of the case have handles and are fastened with spring-loaded thumbscrews. You don’t need a screwdriver to take the side panels off and you won’t lose the screws.
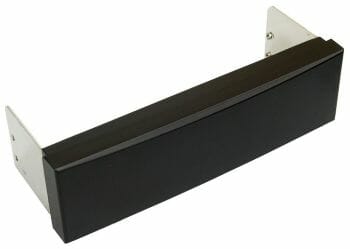
The GS1000 comes with two plastic stands.
Of course, you can do without the stands, but they make the case steadier and facilitate the intake of air through the vent holes that populate most of the bottom panel.
It is not easy to attach the stands irrespective of whether the case is upright or lies on its side. You have to lift it up with one hand and attach the stands with the other hand. The good news is that the stands have grooves for lifting the GS1000 up afterwards. We’d recommend you to place the case upright for assembly or put the stands on after you’ve assembled your computer system because the GS1000 will not lie comfortably on its side with the stands attached.
Inside, the chassis is robust. It is made from rather thick steel and every sharp edge is neatly rolled in. You can note that 5-inch devices are fastened with spring-loaded thumbscrews – you won’t need a screwdriver here, either. The mainboard is installed in the old way – on hex cap poles – and fastened with screws. By the way, take note how much space it is allotted. The GS1000 is meant for not only ATX but also for longer E-ATX mainboards. The latter variety is often installed in server platforms. Thus, the Zalman GS1000 can easily accommodate a top-performance workstation with two CPUs.
At the bottom of the mainboard’s mounting plate there are holes to lay the cables neatly behind the mainboard. The edges of the holes are covered with plastic so that they did not cut the cables. There is quite enough of space for the cables in there, which is much handier than making bunches of cables within the main interior of the system case.
But let’s get back to the interior. There are indeed two seats for 120mm fans at the top of the case, below the top covering, but only one fan is installed by default.
Both fans have 3-pin power connectors for the mainboard. This is not expedient because there is usually only one such connector at the top of the mainboard, so you will have to stretch the second fan’s cable through the entire case. And this cable is not long enough to be hidden behind the mainboard’s mounting plate.
The bottom part of the case (with the PSU compartment) is separated from the top part with a small partition. There is no such partitioning of the case into two separate compartments as we have seen in Antec’s products.
The vent holes in the bottom of the case are meant for 120mm fans as is indicated by the characteristic bulges with threading in the appropriate locations. While the central fan would be helpful because it will cool the graphics card, installing a fan under the PSU is hardly reasonable. It just won’t have enough of free space to create a strong airflow.
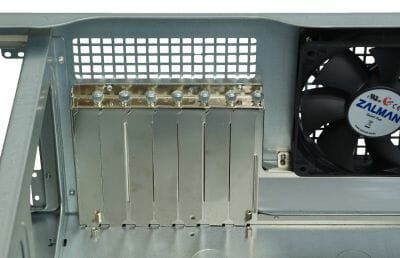
Thumbscrews seem to be the characteristic feature of the GS1000. You will find them even on the expansion-slot brackets. This is a handy solution but only for people with slim fingers. We were surprised to find the screws to be so tightly fastened that we had to undo them with a screwdriver. This had been done to prevent the screws from unfastening during transportation.
To install a power supply, you need to attach a special frame to it. This frame allows to place the PSU upside down, which is good for models with 120mm or 140mm cooling fans.
Then you can simply roll the PSU into the case along the rails with plastic wheels. The PSU is fixed in place by fastening the frame to the chassis – with thumbscrews again.
The rack for hard and optical drives consists of three sections. The top section is for 5-inch bays. The middle and bottom sections are for 3.5-inch hard drives, the bottom section being an individual cage.
The 5-inch bays are covered with rather nonstandard faceplates that are secured on the chassis with the same screws as you use to fasten a 5-inch device. That’s handy: you don’t have to tear anything off.
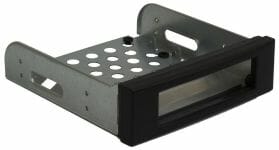
Two guides for external 3.5-inch devices are included with the GS1000. A device can be fastened to the side or bottom panels of the guide.
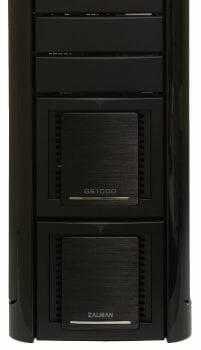
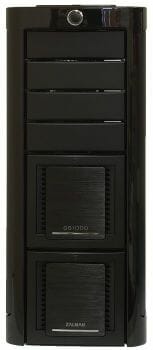
HDDs are accessed through the two flip-down covers on the front panel of the case. Behind them, there are two individual compartments each of which accommodates three HDD guides. Unfortunately, there is no place for cooling fans here.
The guide is attached to an HDD with its four smooth poles that fit tightly into the HDD’s threaded holes. These poles are secured on the guide by means of rubber pads that reduce vibration. The whole contraption can be taken apart: you can move one side panel by using the flat levers on the bottom of the guide. This complex thing is designed for the HDD to be placed into the guide and fixed firmly by shifting the sides of the guide back without any screws. This may sound too sophisticated but is actually quite handy. If you worry about the fastening of your HDDs, there is a hole in the guide to additionally secure the HDD with a screw.
To take the guide out of the case, you have to squeeze the protrusions in its front part and pull at the handle. This is not an easy operation, but fortunately, you don’t have to press the guide too hard.
The bottom compartment is a cage for three SATA drives.
You can see vent openings in the bottom panel just below the cage. The mounting holes suggest that you can install a 120mm fan here. Unfortunately, the fan won’t fit in even if the bottom HDD is missing: the side plastic grooves for the guides get in the way. The chassis seems to have not been intended for this cage. Perhaps that’s just a developer’s mistake.
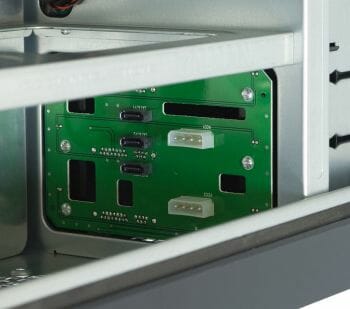
The owners of old but high-quality PSUs will like the fact that the SATA cage is powered via PATA power connectors: two connectors for three SATA HDDs.
Finally, we can show you a funny accessory supplied with this system case. It is an adapter from one 8-pin to a 4-pin CPU power connector. It is useful. For example, we used it to extend the PSU’s native power cable to reach to the mainboard’s connector behind the mainboard’s mounting plate. But why does this adapter have two 4-pin connectors that can be joined back into an 8-pin one?
It is a real pleasure to assemble a computer in this system case because it is roomy. Take note that the numerous cables can be done with in a handy and even aesthetic manner: they can be hidden behind the mainboard’s mounting plate. The big length of the case guarantees that any graphics card, even the longest one, will fit in. We guess the GS1000 will make it comfortable to assemble a graphics-processing station because you won’t have any problems installing a dual-processor mainboard or huge professional graphics cards. There is enough of room for HDDs, too. The only question is how effective this system case is in terms of ventilation. Its two exhaust fans have to create a strong airflow through the entire interior. Will they cope? You will learn shortly.
Zalman Z-Machine GT1000
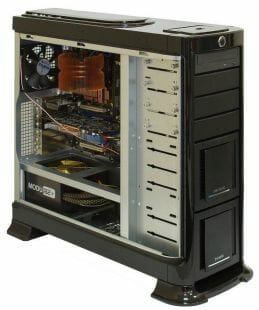
Like the previous model, the Zalman Z-Machine GT1000 comes in two versions: black and titan. It is smaller, being a standard tower made from aluminum. We got some suspicions about the materials when we were taking our sample out of the box because it proved to be as heavy as 12.5 kilos. The explanation is simple: each aluminum detail is 4 to 5 millimeters thick, which makes the case sufficiently rigid because aluminum is itself softer than steel. On the other hand, this negates the key advantage of aluminum system cases which is their low mass. So, the high price of the GT1000 can only be justified by its original appearance. In fact, the Z-Machine GT1000 is from the category of products that focus on externals rather than on a reasonable price/quality ratio.
The GT1000 has an impressive exterior indeed. It is compact, wide (it seems to be a mistake that the word slim is applied to this system case in the description at the official website), squatty and with a very queer profile. Well, at least it does attract the eye. Its appearance is eye-catching and memorable. You can hardly confuse it with some other model, so Zalman’s designers can be proud of their job.
The side doors are especially impressive. The side panel is indeed made up of two halves of unequal size. The left half has a transparent window that provides a view on the components whereas the small right half gives you access to the rack with drives. When closed, the doors are held with magnetic locks and four thumbscrews (two screws for each door). It is a shame that the screws scratch the surface of such a wonderful case. The screws themselves hide the scratches, but anyway.
You can see nothing unusual at the back: the GT1000 obviously has a standard layout with an almost obligatory (save for the cheapest models) 120mm exhaust fan. The other side panel is quite unusual, though. It consists of two doors, too. And the doors are held with hex cap screws you don’t often see in computers. The appropriate spanner is included with the system case, though.
Take note that the case has a minimum of perforation in comparison with its opponents. It only has a vent grid in the front panel and a fan grid in the back panel. That’s all. Perhaps the power supply may also serve as a connection between the interior and the outside world. There are no other vent holes here.
Now let’s get back to the front panel. In the center of it, between the massive vent grid below and the external drive bays above, there are I/O ports and controls: Power and Reset buttons, three indicators, two audio connectors, two USB ports and one FireWire port. The USB ports are too close to each other, and you won’t be able to plug two wide devices in simultaneously.
The designer has managed to fit these elements organically into the front panel. The buttons are shiny and these elements form a line that is emphasized by a neat ledge from below. The Reset button is small. You won’t be able to press it accidentally, yet the surrounding ledge makes it easier to use the button than in many other cases where you can only press it with a pen or something, and not with your finger.
The feet of this case add to its overall appearance. They are styled like that feet of home audio/video appliances and have a big diameter and a polished metal finish. This is largely mere decoration, though. In fact, the GT1000 stands on rather small square rubber pads you can see inside the feet.
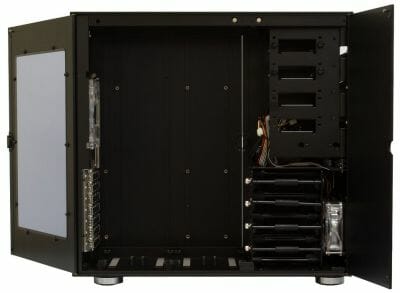
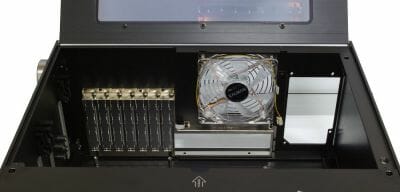
Now, let’s open the doors wide. You can see two compartments for drives. The bottom compartment is designed for crosswise installation of HDDs and has two highlighted 92mm fans at the front. This compartment with dual fans seems to be the reason for the GT1000 to be wider than its opponents. The mainboard is installed on traditional poles and secured with screws. The manufacturing quality is high: everything is finished ideally. Every detail is very rigid due to the thickness of aluminum.
The left door opens very wide and will not get in the way when you will be assembling your computer.
The brackets opposite the expansion slots don’t match the overall style, being just too trivial. But they are fastened with thumbscrews, which seems to be Zalman’s style.
In the top two 5-inch bays devices are fastened with spring-loaded thumbscrews already fixed in both sides of the rack. You can fasten these screws without opening the second pair of doors by bending your hand inside the case, but most likely you will have to take the special spanner and open all the doors to install your 5-inch devices.
In the other bays devices are fastened with ordinary screws. They are not quite ordinary, though. These screws are longer than usual because of the thickness of the aluminum panels.
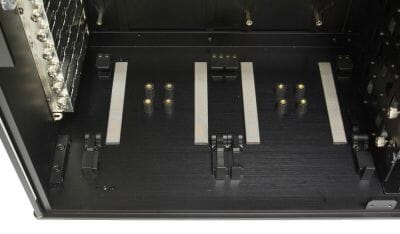
Now let’s move on to HDDs. There are two seats for them on the bottom of the case. First, you take off the four poles out of the bottom panel.
Next you insert these poles into the HDD’s standard mounting holes. Each pole has a metallic core wrapped into a thick layer of soft rubber.
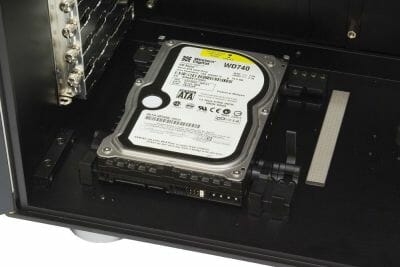
Then you lay the HDD down to the damping pads and insert it into the case, fitting the poles into the respective grooves. And finally, you close the locks on the front grooves to fix the HDD firmly in place.
HDDs are installed into the bottom cage of the front rack in an original, yet simple way, too. The cage consists of four tiers of freely rotating rollers that HDDs roll in on. Similar rollers press the HDD from above and smaller rollers do the same from the sides. The rollers are wrapped into a soft material. As a result, the HDD finds itself squeezed firmly between two bottom, two top and two side rollers.
It is the additional front roller that finally secures the HDD in place. Lifting it up, you open the way for the HDD to get inside. When you lower it, the HDD is fixed in its place. The roller bends noticeably at that.
If you need to fix the HDDs as hard as possible, there are discs with cutouts at the ends of the rollers. You can align the cutout with the opening in the rack and insert the thumbscrew you can see nearby. As a result, the front roller is fixed and the HDD, too.
Finally, we want to say a few words about the included ZM-MC1 system. It is the power adapter you can see in the left of the photo above. You can use this adapter to connect the front-panel fans to 12V or 5V by simply choosing the necessary pair of connectors in the adapter. You can hardly connect those fans directly to the mainboard because their cables are too short to get around the HDD cage.
We had no problems installing our components into the GT1000. As often with compact system cases, laying the cables out neatly, especially at the bottom, may be difficult. You should connect the front-panel I/O interfaces before installing your HDDs into the bottom seats because the latter will block the access to the mainboard’s bottom part. This is an expected tradeoff for the opportunity to fit so many HDDs into such a small system case. In an assembled GT1000 it is also going to be difficult to access the SATA ports that are usually located in the bottom right corner of a mainboard.
The Z-Machine has fans with red highlighting and the look of the system case working in a dimly lit room once again reassured us that the exterior design is its key feature
Test Methods
The assembled system case is tested at a constant ambient temperature of 23°C maintained by an air conditioner. As we assume that most users prefer low-noise system cases, we set the speed of the CPU and system fans (those connected to the mainboard’s 3-pin connector) into Silent mode (the quietest mode on ASUS mainboards). We do not change the default configuration of airflows determined by system case design.
The following components are installed into the system case:
- ASUS P5E mainboard
- Core 2 Duo E6850 processor
- Zalman CNPS9500 AT cooler
- Four hard disk drives Western Digital Raptor WD740GD
- HIS IceQ3 Radeon HD 3870 graphics card
- 2GB DDR2-800 SDRAM Patriot PDC24G6400LLK
- Microsoft Windows XP Professional SP2
The CPU temperature is read with ASUS PC Probe included with the mainboard. The temperature of the HDDs is measured with HDD Thermometer. The graphics card’s temperature is reported by its control panel. There are the following test modes:
- Idle
- IOMeter (IOMeter’s Access Time test running on all the HDDs to load them fully)
- Prime95 (Prime95 running in In-Place Large FFTs mode to load both CPU cores fully)
- 3DMark06 (3DMark06 running at 1280×1024 with maximum graphics quality settings)
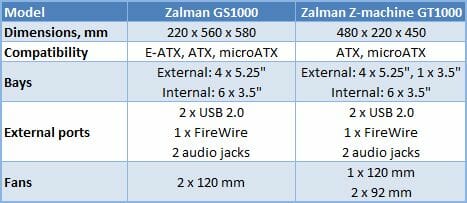
Every temperature is read after the system has worked for half an hour in the current test mode. The noise level is evaluated subjectively. The next table shows the brief specs of the tested system cases:
Test Results
First let’s take a look at the results of each system case individually and see how the cooling of HDDs depends on their position.
Zalman GS1000
The HDDs are numbered from top to bottom: HDD1 is in the top bay while the other three occupy the bottom compartment.
The temperatures of the CPU, graphics card and mainboard are normal in every mode, but we cannot say the same about the HDDs. There is nothing terrible about them, yet the temperature of 45-47°C is too high for a modern system case and too close to the dangerous limit of 50°C which should not be exceeded. The service life of a HDD is shortened greatly under high temperature. The two fans in quiet mode must be unable to create a strong airflow to cool the HDDs effectively. This is also indicated by the big difference between the HDD in the top bay and the three densely packed HDDs in the bottom compartment. The top HDD has better ventilation, which explains the difference in the results. This is all quite disappointing considering that the GS1000 does not provide for installation of fans in front of the HDD cages. In order for your HDDs to feel comfortable in this system case, you will have to select cool HDD models, install a second exhaust fan at the top, and adjust the fan speed as necessary.
When it comes to noise and vibration, the GT1000 is like every other modern high-quality product. With our configuration we could only hear the noise from the HDDs’ heads whereas the system fans and the air flow through the vent holes were almost imperceptible.
Zalman Z-Machine GT1000, 80 mm @ 5 V
The first two HDDs were located in the front cage (numbered from top to bottom) while the other two, at the bottom of the case (numbered from front to back). The fans were powered by 5V.
The GT1000 is much better at cooling HDDs. Neither of them is hotter than 40°C even under load. The outermost HDDs in the cage and the second HDD at the bottom are somewhat worse in terms of cooling. The other components are cooled less successfully than in the GS1000. The graphics card is especially uncomfortable as it lacks vent holes to take cool air from.
But what if we increase the speed of the intake fans by switching them to 12V?
Zalman Z-Machine GT1000, 80 mm @ 12 V. As expected, all components are 2-4°C cooler now.
The downside is the increased acoustic noise. The fans are quite audible even at 5V and become comparable to the actively working heads of the four HDDs at 12V. This noise does not come from the fans’ bearings, which are all right. It is the hiss of the airflow passing through the front grid and getting lost in the labyrinth of the HDDs and numerous rollers that hold them. The impellers of the fans are not ideally shaped and add to the noise, too. However, it is the complex route the air has to take that is the main cause for that. Therefore we recommend using this system case with low-speed fans, balancing the cooling of the HDDs and the overall noise. Perhaps the fans’ speed should be reduced further, but the system case does not allow that. You have to either replace the fans or use a fan speed controller capable of reducing voltage below 5V.
It is all right with vibrations: the rigid chassis and the employed HDD fastening system suppress them easily.
And finally, let’s compare the two system cases. The temperatures of the coldest and hottest HDDs are shown below.
Easy to see, the GT1000 is somewhat cooler than its big cousin when idle. The difference is especially conspicuous with the HDDs: the difference of 10 degrees in the temperature of the best HDD is quite a lot.
There is the same gap when the HDDs are under load: their temperatures are comfortable in the GT1000 and rather alarming in the GS1000.

The GS1000 is also inferior when the CPU is under load. The graphics card is the only component that is colder in the GS1000 than in the GT1000.
This is the highest load typical of home computers. The GS1000 cools the graphics card well enough – better than the GT1000 with the fans set at maximum speed. The GS1000 is also good at cooling the CPU, but the HDDs spoil the picture: the worst HDD is as hot as 43°C, which is too much. So, you should not pack too many HDDs into this system case. We guess it should better be used for top-performance workstations that don’t need an advanced disk subsystem.
Comparing the performance of the GT1000 at different fan speeds, you can lower the temperature by 3 degrees at the expense of your acoustic comfort. We don’t guess this is a fair exchange. The system case is good enough even when its fans are powered by 5V.
Conclusion
Zalman maintains its reputation of the developer of products that are different from others. The Zalman GS1000 is a perfect system case for building a top-end computer. It supports E-ATX mainboards, allows to hide the cables and provides easy access to the components. There is a lot of good about this system case but there is one application it is inferior to its opponents at. You should not use it for a multi-disk storage system because of the poor cooling of HDDs in it.
The Zalman Z-Machine GT1000 has an eye-catching exterior design. If you want a system case that will impress, here it is. Besides, it has a good layout and offers the opportunity to install up to 6 hard disk drives. This system case is not absolutely quiet, yet acceptable in terms of noisiness whereas its cooling properties are very good. In fact, there is only one downside to this product – its high price. Beauty is costly and only few people will afford the beauty of the Z-Machine GT1000.