Socket FM2+ Mainboards Comparison: Asus A88XM-Plus versus Gigabyte GA-F2A88XM-D3H

Asus A88XM-Plus and Gigabyte GA-F2A88XM-D3H are similar to each other. They are similar by specs and price, made by first-tier manufacturers, based on AMD A88X chipset and have a micro-ATX form-factor appropriated to low-cost systems. But let’s take a look to their differences.
If you’re interested in the Socket FM2+ platform, you may want to read our AMD A10-7850K (Kaveri) review first as it covers the new processors in detail and compares them with their predecessors and competitors. Unfortunately, the latest desktop processors from both AMD and Intel leave us disappointed to some degree. Yes, it’s good that the Kaveri processors are manufactured on a more advanced 28nm tech process and their Steamroller microarchitecture is more energy efficient than the Piledriver. The bad news is that these innovations translate into small performance benefits but the processor die has got more complex and can’t even be clocked at the same frequency as its predecessor. It is no wonder then that the new FM2+ processors are still inferior to their Intel opponents. More disappointingly, they are occasionally slower than their Socket FM2 predecessors. The heterogeneous computing architecture HSA with hUMA and hQ technologies can theoretically make the Kaveri faster, but we’ll probably have other processors by the time it gets widely implemented in practice.
It is the integrated graphics core that is the single indisputable advantage of the new processors. It used to be good enough already but now has become even faster and better overall. Although it can’t compare with top-end or midrange discrete graphics cards, it is indeed unrivalled in its own class. So if your requirements are not high and your budget is rather limited, you may want to prefer the new processors for their allowing to build an entry-level gaming desktop without an external graphics card. This opportunity may be interesting for some of our readers, so we are going to test a few Socket FM2+ mainboards in our labs. Top-end products of this class will not be widely demanded whereas low-end ones are likely to disappoint. That’s why we’ve picked up midrange offers for this review: ASUS’s A88XM-Plus and Gigabyte’s GA-F2A88XM-D3H. With comparable prices and specs, they are both based on the AMD A88X chipset and designed in the micro-ATX form-factor which is perfect for entry-level desktop PCs. Now let’s see how comparable they are in terms of real-life performance and functionality.
ASUS A88XM-Plus: Overview
Some mainboard makers have different packaging for AMD and Intel-based mainboards. Sometimes even specific platforms are differentiated. ASUS, on the contrary, prefers uniformity in its product packaging. There’s the model name and logotypes of processors, chipset and technologies on the front of the box. On the back, you can see a picture of the mainboard together with a list of its specs and a description of some features. Apart from the logos and model name, the packaging looks the same as the Z87M-Plus’s, for example.
The 5X Protection badge on the front of the box indicates that the mainboard supports the corresponding technology. 5X Protection covers a number of engineering solutions that make the mainboard more reliable and long-lasting such as protection against overloads, short circuits and electrostatic discharges. The digital voltage regulator DIGI+ delivers stable power while the solid-state capacitors and the steel I/O Shield coated with a thin layer of chromium oxide (to prevent corrosion) increase the service life of the mainboard.
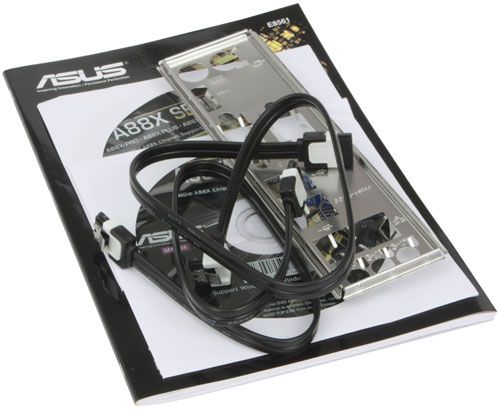
The box with the ASUS mainboard is slimmer than usual thanks to the special way of contents packing. The sheet of cardboard that separates the mainboard and its accessories is long and bends at the end, forming a compartment for the rather thick SATA cables. The other accessories and documentation are at the bottom of the box, below the mainboard. As a result, the box is smaller than standard packaging, which must have some positive environmental impact.
The mainboard comes with just the necessary minimum of accessories:
- Two SATA 6 Gbit/s cables with metallic locks (one with two straight connectors and another with one straight and one L-shaped connector)
- I/O Shield
- User manual
- Installation guide
- Safety warning
- DVD with software and drivers
- “Powered by ASUS” sticker for your computer case
The exterior design of the A88XM-Plus looks familiar as well because all regular mainboards from ASUS currently use the same color scheme. The yellow elements bring about associations with gold. And, being a noble metal, gold is supposed to emphasize the high quality, reliability, performance and advanced technologies of ASUS mainboards. The coloring has some practical function, too. For example, if you’ve got only two memory modules, you should install them into the two yellow-colored slots. The main graphics slot is color-coded as well.
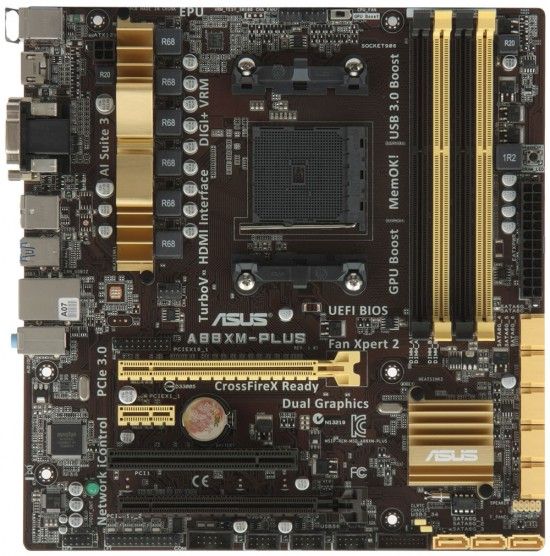
The 4+2-phase digital power system DIGI+ supports both new Socket FM2+ and old Socket FM2 processors. The processor is going to be powered via a single 4-pin ATX12V connector, yet the hot components of the power system are cooled by an additional heatsink secured with spring-loaded locks. The main graphics slot PCIe 3.0/2.0 x16 will only use the third version of the protocol with the new processors. The second graphics slot (PCI Express 2.0 x16) is based on the chipset’s PCIe lanes and works at x4 speed, allowing to build CrossFireX configurations out of two graphics cards. There are also one PCIe 2.0 x1 and one PCI slot on the mainboard. With eight SATA 6 Gbit/s ports on board, you can easily connect all of your storage devices.
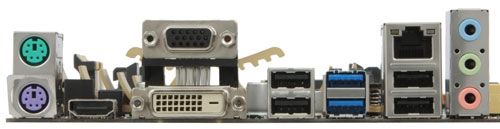
The back panel is underpopulated as is typical of entry-level mainboards. We can see the following connectors here:
- Two PS/2 connectors for keyboard and mouse
- HDMI, D-Sub and DVI-D video outputs
- Four USB 2.0 ports (with six more via three onboard headers)
- Two USB 3.0 ports (blue connectors, based on the AMD A88X chipset, with two more available via a single onboard header)
- Gigabit Ethernet connector (based on a Realtek RTL8111G controller)
- Three analog audio outputs (based on an 8-channel Realtek ALC887 codec)
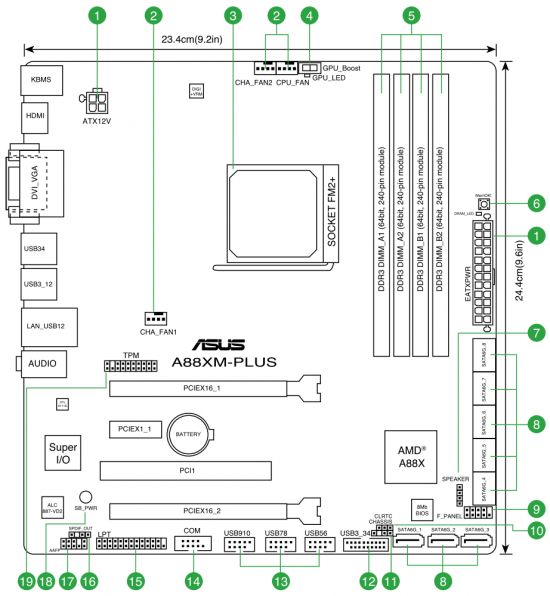
The mainboard’s schematic also shows LPT and COM ports, three 4-pin fan connectors, a MemOK! button (for starting up safely in case of some memory-related problems), and a GPU Boost switch (to overclock the processor-integrated graphics core automatically). The A88XM-Plus has only one of the Q-Design features which facilitate system assembly and use: it’s got large and handy latches on the graphics slots (Q-Slot).
We’ll wait with our final opinion about the ASUS A88XM-Plus until we compare its functionality with that of its Gigabyte opponent.
Gigabyte GA-F2A88XM-D3H: Overview
Gigabyte’s product packaging is uniform, too. On the front side of the box we can see the mainboard’s name and logotypes of supported processors and technologies.

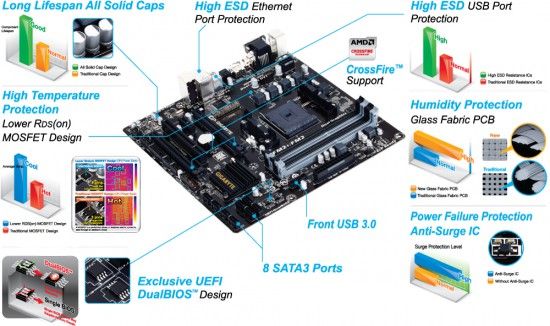
On the back of the box there is a short list of specifications and a picture of the mainboard where each key feature is described as in the picture below:
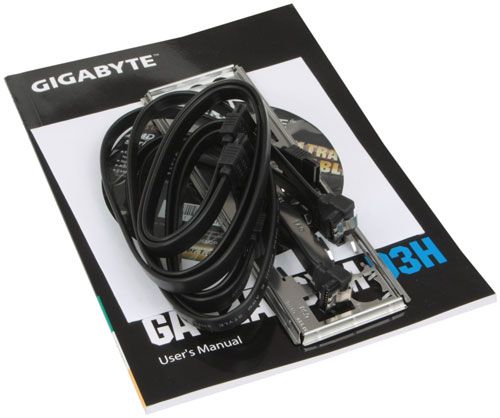
The accessories are not numerous but sufficient to start with:
- Four SATA 6 Gbit/s cables with metallic locks (one pair with two straight connectors and another pair with one straight and one L-shaped connector)
- I/O Shield
- User manual
- Installation guide
- DVD with software and drivers
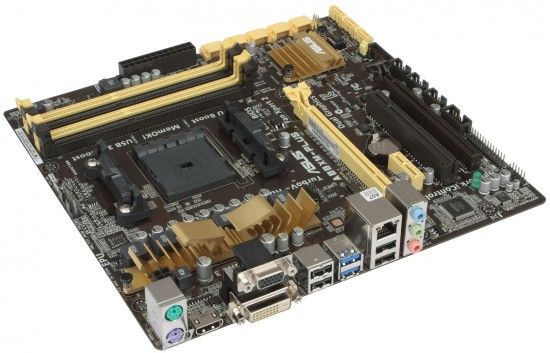
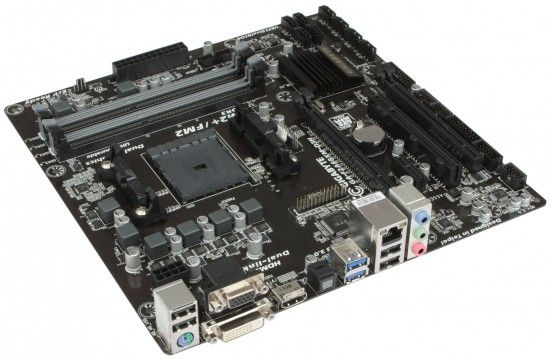
As opposed to ASUS’s gold color scheme and Gigabyte’s gaming and overclocker-friendly series, the GA-F2A88XM-D3H model has a rather dull appearance. This black-and-gray design has been used by Gigabyte for the majority of its mainboards over the last few years, so the company seems to think it appropriate.
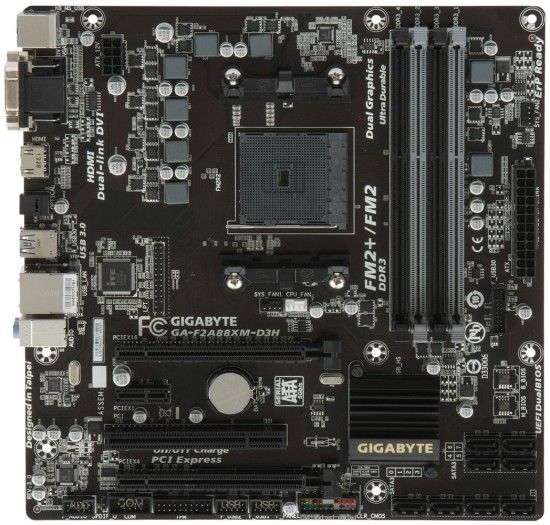
Similar to ASUS’s 5X Protection, Gigabyte mainboards feature the Ultra Durable 4 Plus set of technologies. “Ultra Performance” refers to the use of long-lasting solid-state capacitors and low RDS(on) MOSFETs. “Ultra Safe” means the exclusive DualBIOS technology. Besides them, Ultra Durable 4 Plus includes a lot of other features such as short circuit and electrostatic discharge protection, and resistance to high humidity thanks to premium PCB materials.
The mainboard lacks an additional heatsink on power system components but has an 8-pin ATX12V connector. The rest of its specs coincide with the ASUS model’s. Its four DDR3 SDRAM slots can take in up to 64 gigabytes of system memory clocked at 1333 to 2400 MHz. AMD Memory Profile and Extreme Memory Profile are both supported.
The mainboard offers one PCIe 3.0/2.0 x16 and one PCIe 2.0 x16 (at x4 speed) for two graphics cards which can be united in a CrossFireX tandem. Besides them, there is one PCIe 2.0 x1 and one PCI slot for expansion cards. The mainboard has no additional onboard controllers. Its eight SATA 6 Gbit/s ports are implemented via the AMD A88X chipset. All of the SATA connectors are positioned upright.
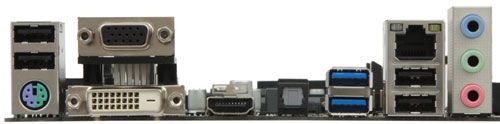
The back panel is not fully populated, just like on the ASUS, yet the selection of connectors is different:
- Four USB 2.0 ports (with four more via two onboard headers)
- One PS/2 connector for keyboard or mouse
- D-Sub, DVI-D and HDMI video outputs
- Two USB 3.0 ports (blue connectors, based on the AMD A88X chipset, with two more available via a single onboard header)
- Gigabit Ethernet connector (based on a Realtek RTL8111F controller)
- One optical S/PDIF and three analog audio outputs (based on an 8-channel Realtek ALC887 codec)
We’ve always liked Gigabyte’s mainboard schematics. They are neat, clean and easily understandable. You can see which controller is where at a glance. It’s a real pleasure to read a schematic like this one.
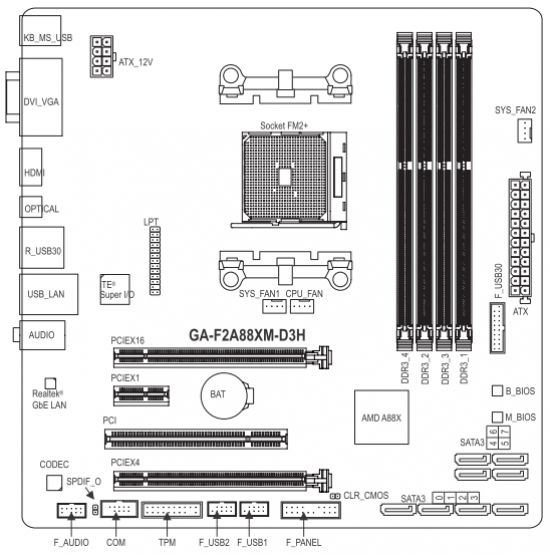
What we can find here are COM and LPT connectors (the latter is placed in an unconventional location) and three 4-pin fan connectors. The position of the CPU and first system fan connectors wouldn‘t be appropriate on any other platform because the installed CPU cooler and graphics card are going to hinder your access to them. However, Socket FM2+ mainboards will mostly be used with a processor-integrated graphics core rather than a discrete graphics card, so this downside isn’t critical for them. Specifications Comparison
We’ve put together the specifications of the two mainboards in the following table for the sake of comparison.
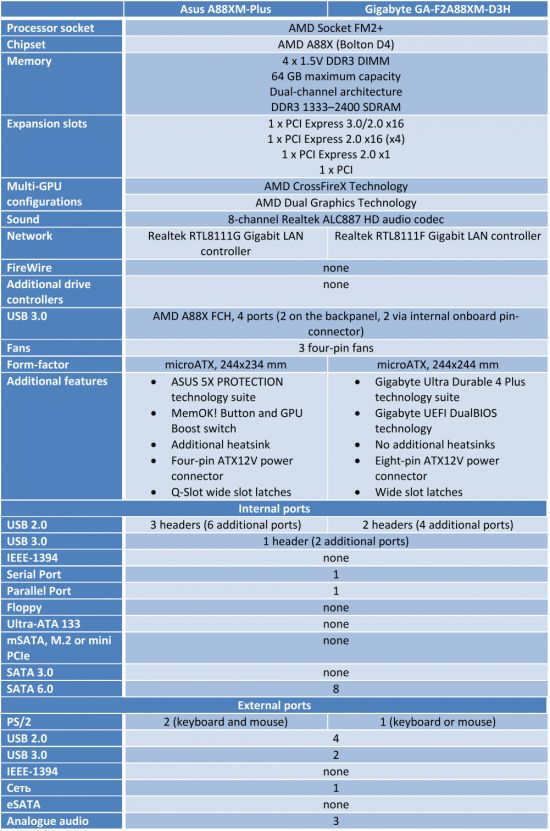
Each mainboard has something special about it. The ASUS is somewhat smaller in width and has an additional heatsink on the hot power system components but powers the processor via a 4-pin ATX12V connector. It has three onboard headers for six USB 2.0 ports, as opposed to four such ports you have with the Gigabyte. The ASUS’s extra features include the MemOK! button and the GPU Boost switch. The Gigabyte, in its turn, sports two BIOS chips and a back-panel optical S/PDIF output. Otherwise, the specs are almost identical since we deliberately selected two models with comparable prices and capabilities.
ASUS A88XM-Plus: BIOS Interface
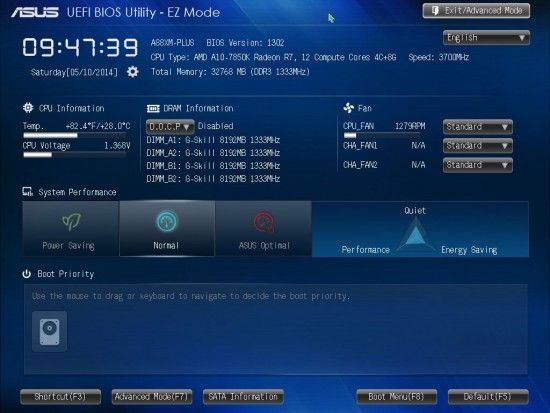
We tested Socket FM2 mainboards over a year ago and ASUS’s BIOS has changed considerably since then. The product unification goes beyond packaging and mainboard design. It covers BIOS capabilities, too. So the BIOS interface is almost the same as with LGA1150 products except for a few differences due to unique features of the Socket FM2+ platform. As before, the BIOS interface opens in the simplified EZ Mode by default. It provides basic system information and allows to do some initial setting-up. Pressing the F5 key loads standard settings. After setting up your fans and system date and time, you can apply XMP profiles to your memory modules and check out information about the connected storage devices. You can also specify the order of boot devices by simply moving them with your mouse. The F7 key is used to switch from EZ Mode to Advanced Mode whereas the F3 key lets you quickly go to any of the most frequently used BIOS sections.
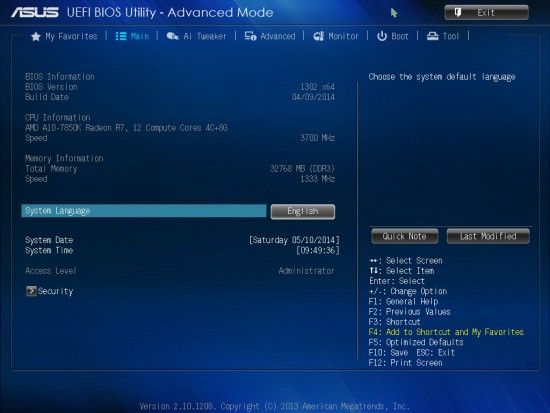
You can switch from EZ to Advanced Mode or press F3 every time you enter the BIOS (by the way, this hot button works in the other BIOS sections as well), yet it may be easier to make the BIOS open in Advanced Mode by default. In this case, you will see the familiar Main section where you can read some basic system information, change the interface language and set up date and time. User and admin passwords can be specified in its Security subsection.
The Main section is not the first on the list, though. It is preceded by the new My Favorites section which helps collect frequently used BIOS options in one place. Empty by default, it only contains instructions on adding and removing options with your mouse and keyboard.
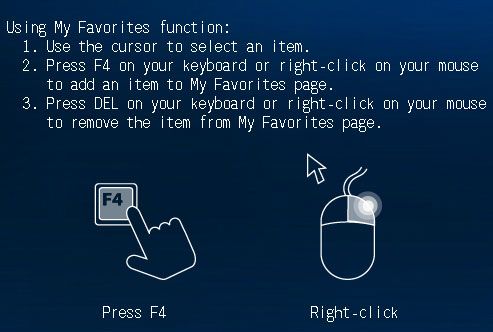
There are some limitations. You can’t add certain sections and subsections. The user manual says that even individual options which contain submenus can’t be added, but this limitation has already been removed. The list of options displayed upon your pressing the F3 key has no such limitations and you can edit it in the same way by removing and adding entries. So, you have to use both the My Favorites section and the quick access menu, which is not very convenient. Moreover, like other sections, My Favorites cannot be set as the start BIOS screen.
Most of the overclocking-related options are collected in the Ai Tweaker section. It contains an enormous number of adjustable parameters and you don’t even see all of them by default because they are set up by the mainboard automatically. You will find a lot of previously hidden options as soon as you get down to manual setting-up. You can set the Ai Overclock Tuner option at D.O.C.P. to automatically set up your memory subsystem parameters or at Manual. The EPU Power Saving Mode lets you choose from three levels of power savings. To reduce power consumption at the expense of the processor’s performance, you can set the Target TDP at 45 to 65 watts. The GPU Boost option allows you to set the clock rate of the integrated graphics core manually or use one of the two predefined overclock modes (Turbo and Extreme). The OC Tuner option is necessary for automatic system overclocking.
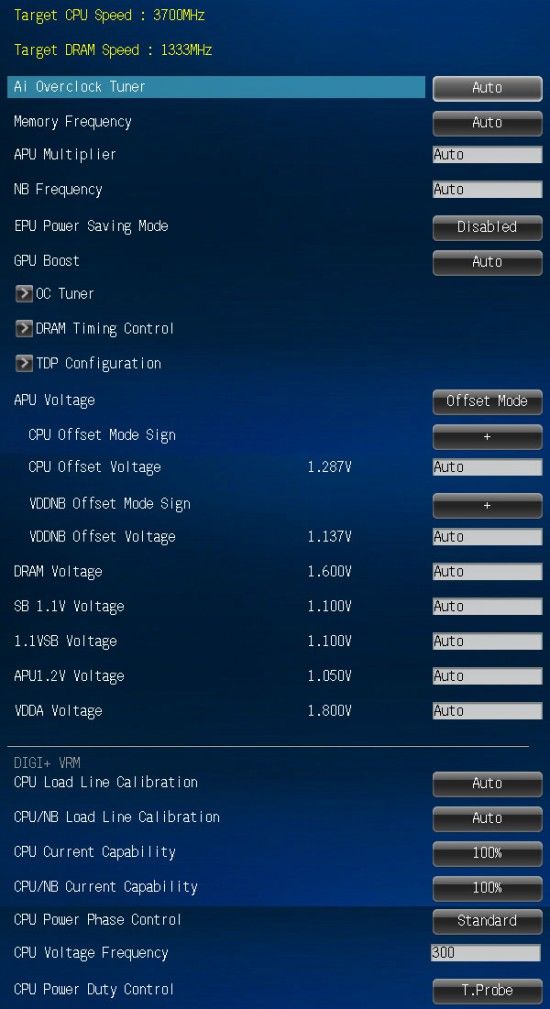
You don’t have to move into the monitoring section to keep track of system voltages because they are shown right next to each BIOS option that lets you change a particular voltage. Voltages can be set higher or lower than the default level. There are quite a lot of options related to power supply and the digital power system called DIGI+. You can control ASUS’s exclusive power-saving technologies right here, in the BIOS. One of them allows changing the number of active phases in the CPU voltage regulator depending on load. Load Line Calibration for the CPU and the CPU-integrated North Bridge can now be not only enabled or disabled but also set to a certain level (it helps counteract the voltage drop occurring at high loads).
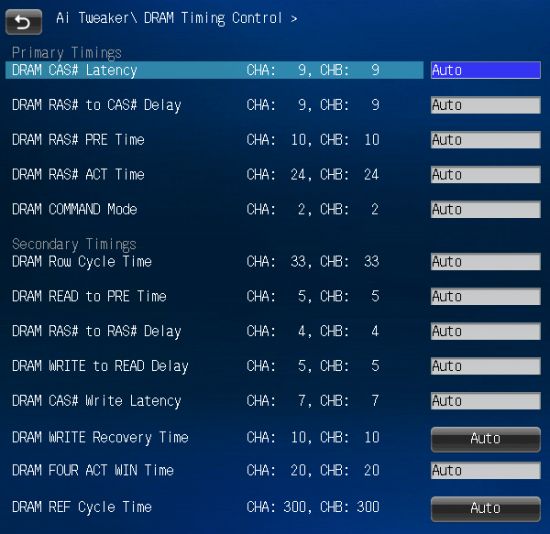
Some of the setup options are available in individual subsections in order not to clutter the main section. There is a separate page for memory timings with lots of options. Using the scrollbar, you can see all the timings set up by the mainboard for the two memory channels. You can adjust just some of them, leaving the others at their defaults.
The Ai Tweaker section ends here but we still haven’t found a group of very important settings that control CPU-related technologies. That’s a typical downside of many mainboards from many brands because all of them use AMI BIOS for their UEFI BIOS implementations. And AMI BIOS has a few questionable layout solutions.
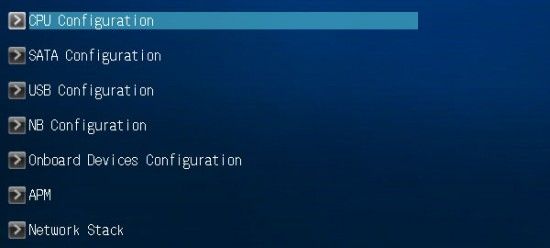
The options of the Advanced section should be familiar to you and their names are self-descriptive. They let you set up the chipset and additional I/O controllers.
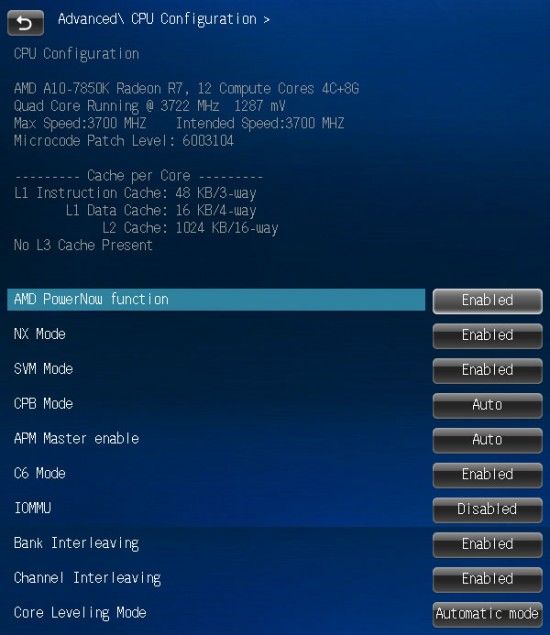
The CPU Configuration subsection reports you basic information about the CPU and allows to control important CPU-related technologies pertaining to power saving, performance, virtualization and security.
The Monitor section is where you can check out the current temperatures, voltages and fan speeds. You can select a speed regulation mode for any of the fans supported by the mainboard: Standard, Silent, Turbo or max speed. Or you can set them up manually, too. The two system fan connectors can regulate the speed of 3-pin fans but the CPU fan connector doesn’t support that.

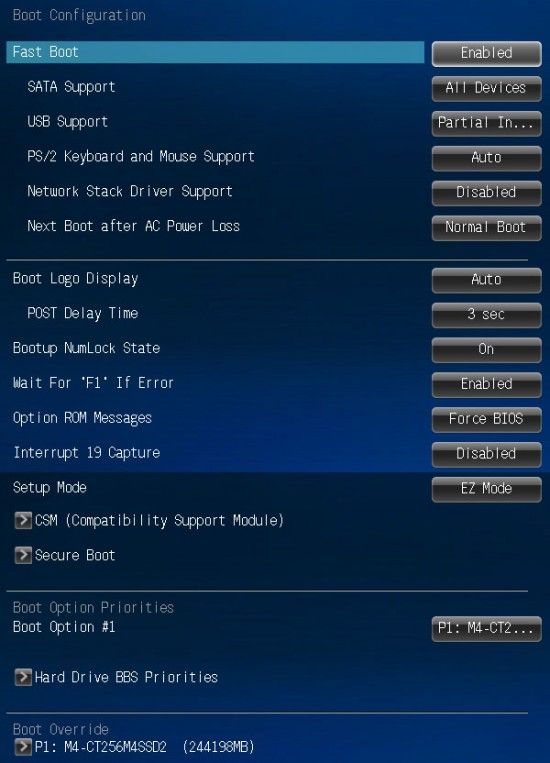
System startup options can be found in the Boot section. It’s here that you can change the start mode from EZ to Advanced. While setting the mainboard up for the first time, you may want to disable the Fast Boot parameter to make it easier to enter the BIOS interface.
Next goes the Tools section with a couple of most important subsections plus a nearly useless one.

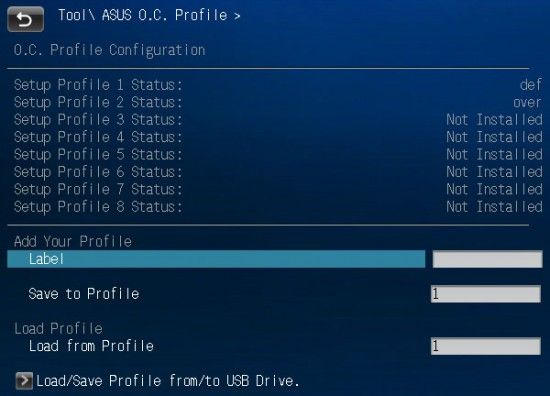
The integrated BIOS update tool called EZ Flash 2 is perhaps the handiest and most functional among the utilities of its kind. The support for NTFS partitions is only implemented in the BIOS update tools from ASUS and Intel as yet. Unfortunately, the option of saving the current BIOS prior to updating it has been removed altogether. ASUS mainboards allow you to store and load up to eight profiles with full BIOS settings. Each profile can be given a descriptive name. BIOS profiles can be shared by saving and loading them from external disks. The profiles do not save the option of turning the startup picture off.
Like on mainboards from many other brands, we can now see the information written into the memory modules’ SPD unit, including XMP profiles. It is not handy that we find it in the Tools section because memory timings are adjusted in a different part of the BIOS interface.
In the center right of the screen, above the list of active hotkeys, there are two buttons: Quick Note and Last Modified.
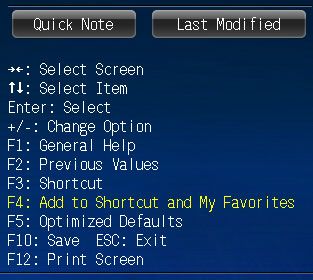
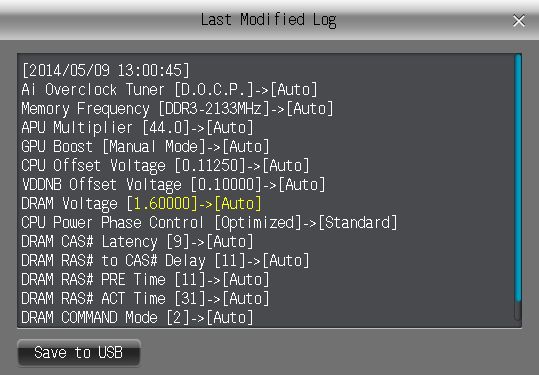
The former lets you write down some notes for yourself and the latter shows a list of your last changes which is retained even after you reboot your computer. So you can always check out which BIOS changes you made the last time. You don’t even have to enter the BIOS interface for that as the Save to USB option lets you save that list on an external drive.
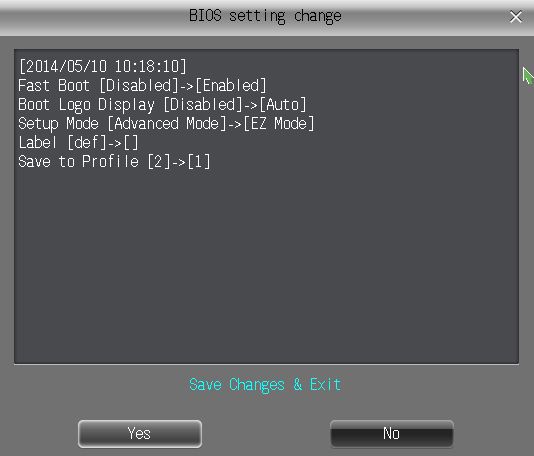
Similar to the Last Modified feature, the BIOS Setting Change popup window is also very handy, showing the list of changes to be applied. It provides an easy way to control your changes before actually applying them. This window also makes it easy to compare the current settings with what is written in the BIOS profiles. By loading a profile you will see its key differences from the current settings in the BIOS Setting Change window that opens up.
Summing it up, ASUS’s EFI BIOS only called for a correction of certain errors and the new version is indeed better than before. Some changes are not significant like the slightly enhanced functionality of the previously useless EZ Mode. Others are more important, like the new My Favorites section, the opportunity to write down notes and edit the list of frequently accessed BIOS options you can open up by pressing F3. The Last Modified feature will come in handy, too. The popup window BIOS Setting Change is also useful, showing a list of BIOS changes to be applied.
Some errors persist, though. For example, ASUS mainboards do not save your turning off the startup picture in BIOS profiles. Important power-related options would be more appropriate in the Ai Tweaker section – they are too hard to access currently. The My Favorite page has limitations about what options you can add to it and cannot be used as the start page. It is also sad that Socket FM2+ mainboards still cannot regulate 3-pin CPU fans.
Gigabyte GA-F2A88XM-D3H: BIOS Interface
You may be disappointed when you enter the BIOS of the Gigabyte GA-F2A88XM-D3H for the first time because it lacks the new Dashboard mode with unprecedented visual customization flexibility. This mainboard sports Gigabyte’s classic UEFI DualBIOS (even without the 3D mode which used to be available with the company’s Socket FM2 products but wasn’t much popular).
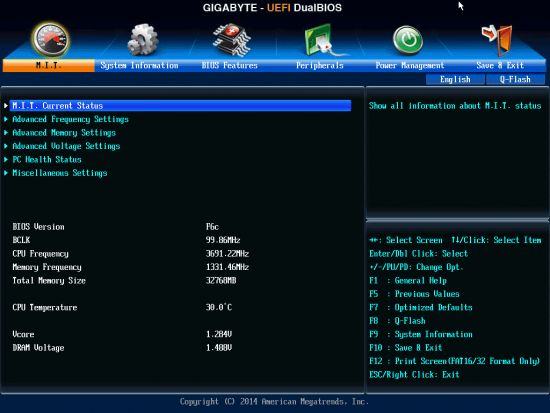
As opposed to other BIOS implementations where fine-tuning and overclocking options are mostly collected all together in a single large BIOS section, Gigabyte puts them into several BIOS pages. There are separate subsections related to the CPU, memory subsystem and voltages, each subsection being split up further into multiple pages. This interface design lets you easily see all the options in a single screen. You don’t have to look up the necessary parameter in a long scrollable list. The downside is that moving between the numerous subsections and pages may be troublesome and you can easily skip over some group of settings.
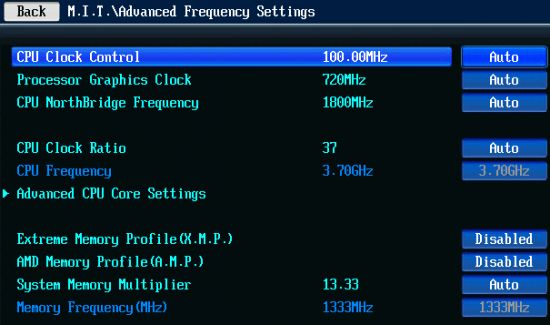
The Advanced Frequency Settings subsection is about clock rates and frequency multipliers. A number of informational parameters will let you know the outcome of your changes.
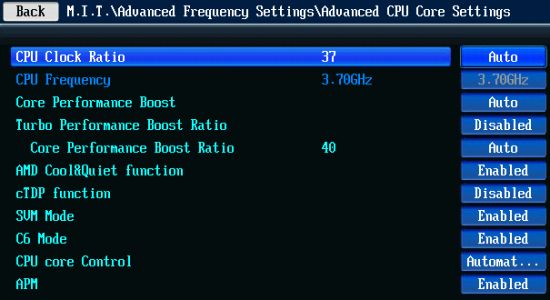
CPU-related technologies, power-saving modes and frequency multiplier settings belong to the Advanced CPU Core Settings.
The memory subsystem is set up in a similar way. The clock rate is specified in one screen, and the latencies, in another. You can set the same or different timings for the two memory channels.
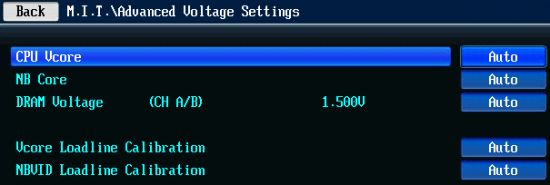
The voltages subsection contains but a few options in a single page. You can only increase but not decrease voltages, yet low-voltage DDR3 SDRAM can be used since the bottom value is 1.2 volts. As on the ASUS mainboard, you can choose the level of counteraction to the voltage drop on the processor and integrated North Bridge at high loads.
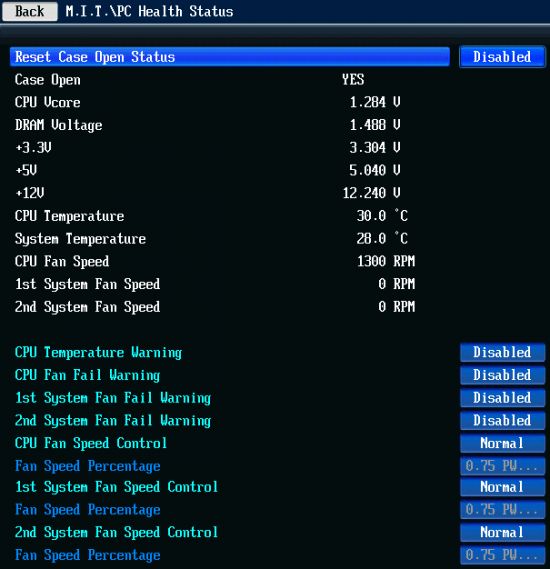
The PC Health Status subsection reports current voltages, temperatures and fan speeds. The two system fan connectors can lower the speed of 3-pin fans whereas the CPU one lacks this capability.
Similar to the old Standard CMOS Features, the System Information section contains basic information about your computer. You can change your date, time and BIOS interface language here. In the BIOS Features section you can set up your boot device order, disable the startup picture, accelerate the startup procedure, enable a special Windows 8 boot mode, and define access passwords. The Peripherals section allows you to control the mainboard’s peripheral devices and onboard controllers. The Power Management section contains a standard set of power-related options.
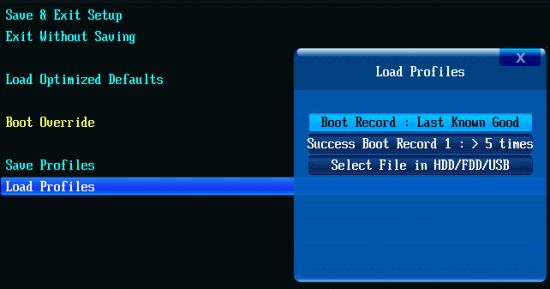
The Save & Exit section is where you can apply your changes, exit without saving or load default BIOS settings. You can also manage BIOS profiles from here. The mainboard stores up to eight BIOS profiles which can be given descriptive names. The profiles can be saved to external disks or loaded from them. A unique feature of Gigabyte mainboards, the current BIOS settings are saved automatically after the mainboard starts up successfully – even the total number of successful starts is recorded. Thus, you can get back to a working BIOS profile even though you have not explicitly saved it.
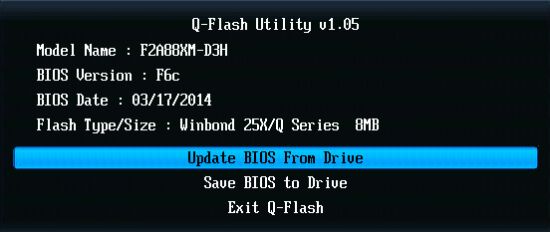
We should remind you of the integrated firmware update tool called Q-Flash. It is evoked by pressing F8 in the BIOS interface or the End key while starting up. As opposed to such tools on ASRock and ASUS mainboards, Q-Flash allows to save the current firmware version prior to updating.
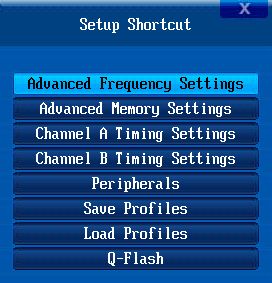
We have a vast experience dealing with Gigabyte mainboards, so we thought we knew everything about their BIOS. However, we still come across new features from time to time. This time around, we found out that the classic BIOS interface offered a list of frequently used BIOS pages, too. You can see it by pressing the undocumented F11 key. As opposed to the similar list in the Dashboard mode, it is not editable.
Summing everything up, the Gigabyte GA-F2A88XM-D3H doesn’t offer the customizable Dashboard mode, yet the classic BIOS interface provides the same options. However, there are no automatic processor overclocking feature and no predefined memory overclock profiles as we have with Gigabyte’s LGA1150 products. It offers fewer voltage tweaking options than the ASUS mainboard and doesn’t allow to lower voltages. It can’t even regulate 3-pin CPU fans as most other Gigabyte mainboards do. Overall, we feel a little disappointed with the BIOS capabilities of the GA-F2A88XM-D3H.
Testbed and Methods
We performed all our tests on a testbed built out of the following components:
- Mainboards:
- ASUS A88XM-Plus rev. 1.02 (Socket FM2+, AMD A88X, BIOS 1302)
- Gigabyte GA-F2A88XM-D3H rev. 3.0 (Socket FM2+, AMD A88X, BIOS F6c)
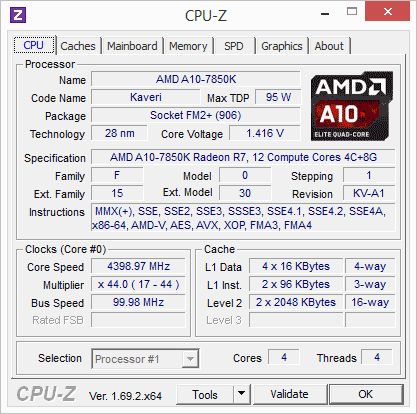
- CPU: AMD A10-7850K (3.7-4.0 GHz, 4 cores (2 modules), Kaveri, 28 nm, 95 W, Socket FM2+)
- DDR3 SDRAM: 4x8GB G.SKILL TridentX F3-2133C9Q-32GTX (2133 MHz, 9-11-11-31-2N, 1.6 volts)
- Graphics card: integrated graphics core AMD Radeon R7 (GCN 1.1, Spectre, 28nm, 720 MHz, 8 clusters, 512 shaders)
- Disk subsystem: Crucial m4 SSD (CT256M4SSD2, 256 GB, SATA 6 Gbit/s)
- Cooling system: Noctua NH-D14
- Thermal interface: ARCTIC MX-2
- PSU: Enhance EPS-1280GA 800 W
- Computer case: Antec Skeleton
We used Microsoft Windows 8.1 Enterprise 64-bit (Microsoft Windows version 6.3 build 9600) and the AMD Catalyst 14.4 drivers.
We refreshed our test configuration by installing all of the latest updates for our Microsoft Windows 8.1 Enterprise 64-bit, but its build and version numbers remained the same. We did not want to use a discrete graphics card because the new Kaveri processors feature an advanced integrated graphics core. We only had some doubts about the cooling system. Few users will buy a CPU cooler that would be more expensive than the mainboard, but the Noctua NH-D14 is far from new, yet still highly efficient. We didn’t purchase it especially for our tests, so we guess that users who upgrade to the Socket FM2+ platform might use an old and high-performance cooler on it, too. We also preferred that cooling system because we didn’t want to limit the frequency potential of the new processors (which is not particularly high to start with) by installing a low-performance cooler.
ASUS A88XM-Plus: Working in Default and Overclocked Mode
We had no difficulty assembling our test configuration with the ASUS A88XM-Plus. We launched the mainboard successfully and updated its firmware using the BIOS-integrated ASUS EZ Flash 2 utility. The mainboard worked without serious problems yet there were quite a few minor downsides.
As is typical of ASUS mainboards, the startup picture only mentions that you can press Del or F2 to enter the BIOS interface. ASUS persists in not telling us anything about the other active hotkeys. For example, you can press F8 to open a menu for choosing an out-of-order boot device but you can only learn about that from the user manual.
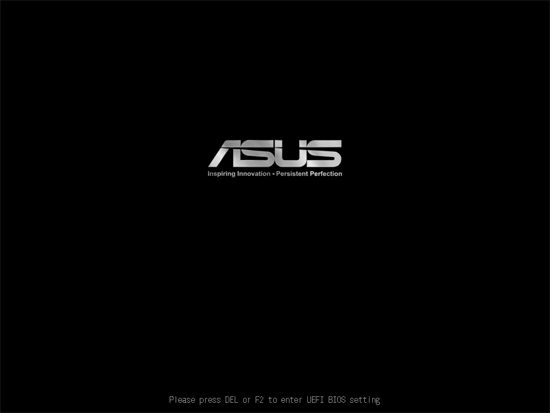
You can disable the startup picture with the Tab key (temporarily) or in the BIOS (permanently), but you won’t see any prompts, either. What you will see is information about the mainboard’s model name, BIOS version, CPU model, the amount and frequency of system memory, the number and type of USB devices, and about the connected storage devices. The real processor clock rate is not reported, though. Our AMD A10-7850K processor has a base clock rate of 3700 MHz but it is going to go up to 4 GHz without any overclocking due to the Turbo Core technology.

Modern mainboards start up very fast and this may even present a problem for users of ASUS mainboards. It is only during the first launch that the mainboard lets you enter its BIOS easily. After that, the startup procedure gets so fast that you can hardly have any time to hit the required key. With some ASUS mainboards you can use a dedicated DirectKey for that purpose, but it’s not convenient. Instead of rebooting and entering the BIOS, it shuts the computer down first. Then you have to power it up again and find yourself in the BIOS. The problem is the A88XM-Plus has no such DirectKey. You can use the ASUS Boot Setting utility instead. Its functionality is okay, but you have to install it first. Moreover, it only runs under Microsoft Windows. So when you’re setting up your mainboard after purchasing it, you may want to disable the Fast Boot option in the Boot section, which is turned on by default.
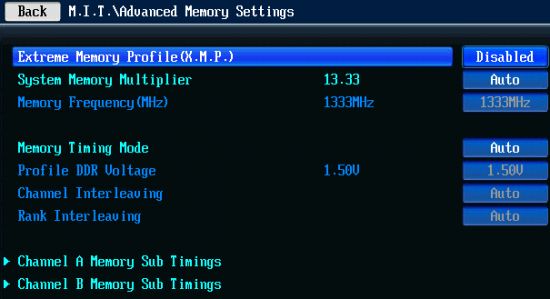
We had no other problems with the A88XM-Plus at its default settings. It is only when we tried to overclock it that we had some troubles. First of all, our configuration turned out to be unstable when we applied the XMP profiles to our memory modules. The memory clock rate and timings were changed according to the profile data but the computer couldn’t pass our tests. We easily corrected this by slightly increasing the North Bridge voltage, yet we hadn’t seen such a problem with any other mainboard. By the way, the BIOS screenshots show that the mainboard sets its memory voltage at 1.6 volts by default although the standard level for DDR3 SDRAM is 1.5 volts. We wonder if this is done on purpose, meaning that the mainboard is indeed unstable with memory and needs to use an increased voltage even at default settings. It may be just an accidental error in the settings, though.
Being unstable at increased memory and processor clock rates, the mainboard would issue BSODs or hang up, and we found it hard to quickly correct its parameters. The mainboard would just refuse to reboot because it couldn’t recognize our boot drive. The Crucial m4 SSD would get identified again after a few minutes of being idle, but sometimes we had to wait for hours. Fortunately, we found the 070H firmware update at the Crucial website which resolved the mentioned issue. The update had been actually released over a year ago. We just didn’t know about it because we had never had such problems with that SSD.
Well, we did have one problem with it. And that was during our last-year tests of the AMD Socket FM2 platform: the Crucial m4 would disconnect then in the same manner, too. It must be the drive’s fault which is cured by the firmware update, yet it’s odd that it worked normally for years with various LGA2011 and LGA1155 mainboards and only malfunctioned with AMD’s Socket FM2 and FM2+ ones. It makes us suspicious about AMD’s chipsets, really.
The memory and SSD related issues successfully solved, we quickly moved on with our overclocking experiments. The OC Tuner option in the mainboard’s BIOS lets you overclock automatically to 4.1 GHz for the processor and 900 MHz for the integrated graphics core. These are not the best results possible and the memory clock rate isn’t increased at all although it should ensure a strong effect on performance without a significant increase in power consumption.
When we overclocked manually, our AMD A10-7850K processor could work at 4.2 GHz (boosted to 4.4 GHz) without our increasing its voltage. The GPU Boost option lets you overclock the integrated graphics core automatically. If you set it at Turbo Mode, the resulting clock rate will be 900 MHz (and the North Bridge voltage will be stepped up by 0.1 volts). And if you choose Extreme Mode, the graphics core will be clocked at 960 MHz and the North Bridge voltage will be increased by 0.15 volts. Instead of using GPU Boost, we manually set the clock rate at 960 MHz and the voltage at 0.1 volts. That was also enough to clock system memory at 2133 MHz.
Two points should be noted about the animated picture above. First of all, it is the North Bridge frequency. At the default settings it is lowered to 1400 MHz at low loads and goes up to 1800 MHz at high loads. It should be the same in the overclocked mode, yet we mostly saw it working at 1400 MHz, both at low and high loads. The North Bridge only worked at 1800 MHz occasionally when transitioning from high to low loads or vice versa. Although this parameter doesn’t have a strong effect on overall computer performance, such small factors may sum up to a high total, so the developers should do something about that.
And the second problem is about the integrated graphics core’s clock rate. By default, it is 720 MHz at high loads and 350 MHz in idle mode. This power-saving trick ceases to work at overclocking, so the clock rate remains constant at 960 MHz. The graphics core’s voltage is constant in this case, too. We’ll see the negative effect of this issue in our power consumption tests, but now let’s move on to the Gigabyte.
Gigabyte GA-F2A88XM-D3H: Working in Default and Overclocked Mode
We assembled our configuration with the Gigabyte GA-F2A88XM-D3H easily. We only needed to install our CPU with its cooler, add memory modules and connect power. The mainboard didn’t start up, though. Our sample had an early BIOS version which didn’t support Socket FM2+ processors, so we needed a Socket FM one to update its firmware.
You may be aware of this problem if you’re an old-time AMD user. AMD’s new chipsets often appear a few months earlier, so mainboards turn out to be incompatible with new processors without a firmware update. It is especially for such situations that AMD developed its USB BIOS Flashback feature which lets you update firmware without assembling your computer. You don’t even need a CPU or memory modules for that. Just connect power to the mainboard. By the way, the ASUS A88XM-Plus doesn’t support USB BIOS Flashback, so we were lucky it came to us with a new BIOS version that already supported Socket FM2+ processors.
It’s not a problem for a system assembler or a hardware reviewer to get a required processor for a while to update a mainboard’s firmware, but what about ordinary users? Are they supposed to contact the manufacturer’s tech support or return the mainboard to the store?
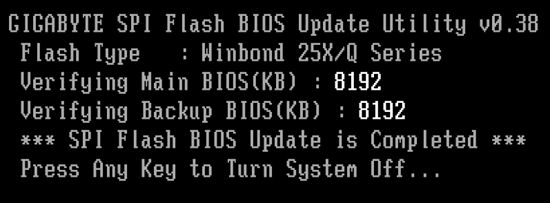
It must also be noted that Gigabyte’s BIOS-based Q-Flash utility doesn’t work in this case. It will just issue a warning message that it is outdated. So, in order to update your firmware, you have to manually create a bootable USB flash drive and unpack the archive with the new BIOS version to it. Then, you start up your mainboard, press F12, choose the flash drive in the menu that opens, and wait for the update process to complete. The firmware will be written to both the main and backup BIOS chips, making your mainboard ready for AMD’s newest processors.
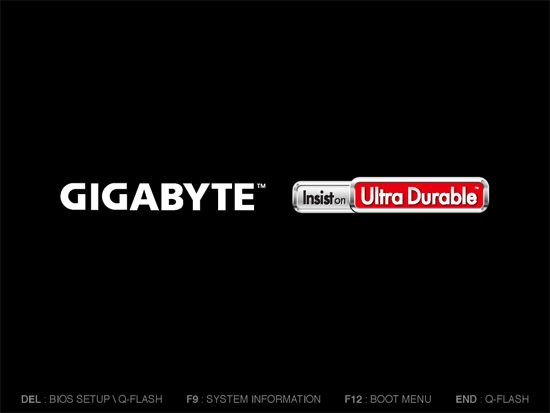
When booting up, the Gigabyte GA-F2A88XM-D3H shows us a familiar picture with information about active hotkeys. You can enter the BIOS interface by pressing the Del key. The F9 key will open up a system info window, the same as you get when you press the same key in the BIOS. F12 shows a list of devices you can boot from. The End key launches the integrated BIOS update tool Q-Flash.
The Tab key, which usually removes the boot picture, is not listed here. Although you can turn the picture off in the BIOS, there is no point in doing so. The mainboard won’t tell anything about the startup procedure anyway. It is hardly a downside because today’s mainboards start up very fast and you can’t read anything from the screen. To make the process even faster, you can enable Fast Boot in the BIOS.

The latest official firmware (version F5) was more like a beta version. The North Bridge clock rate wouldn’t be lowered with it whereas monitoring tools couldn’t even identify memory timings. After we upgraded to the beta version F6c, these problems disappeared and there were new BIOS parameters available. So we did most of our tests with firmware F6c and it is this version’s screenshots that you can see in the BIOS capabilities section of our review.
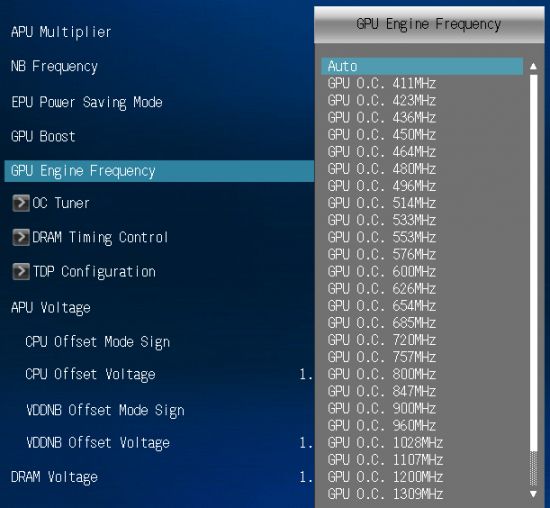
As opposed to the ASUS mainboard, the BIOS offers no automatic overclocking features for the processor, its graphics core or system memory. There are no extras like ASUS’s GPU Boost switch, so you have to do everything manually. You only need to select an XMP profile to apply it to your memory modules. That’s how it should work, so you don’t have to increase memory voltage or anything. It is extremely inconvenient, however, to adjust the clock rate of the integrated graphics core although, unlike on the ASUS A88XM-Plus, the power-saving technology lowers that clock rate in idle mode even when the graphics core is overclocked. The frequency adjustment is done in the same way as on Gigabyte’s Socket FM2 mainboards over a year ago. The BIOS has an option called Processor Graphics Clock you can set at 300 to 2000 MHz stepping 1 MHz. The problem is that the resulting frequency is likely to be different from what you’ve specified, sometimes very different, because it can only take certain values. It is hard to guess those values, so we looked them up in the ASUS’s BIOS.
Well, the real problem occurred when we tried to overclock the processor because its clock rate would drop to the default 3700 MHz or even lower, to 3500 MHz, at high loads even at the default settings. That’s a well-known problem, actually. AMD APUs aren’t very fast, so the manufacturer sets too high default clock rates for them to make up for the poor performance. The processor can’t work at that clock rate if the load is high. In other words, AMD’s processors are heavily overclocked even in their specified operating mode.
There’s no point in overclocking if the processor can’t keep its clock rate stable. Whatever clock rate you set, it is just going to be dropped at high loads. Earlier, you had to disable Core Performance Boost to overclock Socket FM2 processors. In that case, their clock rate was constant. It didn’t go up above the default level but didn’t drop below it, either. This method doesn’t work with our Socket FM2+ processor: the clock rate doesn’t reach 4 GHz (as it would in Turbo mode) but drops to 3.5 GHz easily instead of remaining constant at the standard 3.7 GHz.
To notice this frequency drop, it is easier to keep track of the processor voltage because these parameters are interrelated. In idle mode, when the power-saving technologies lower the processor’s clock rate to 1700 MHz, the voltage is below 1 volt. At high loads, when the Core Performance Boost feature increases the clock rate above the standard 3700 MHz, the voltage rises above 1.3 volts. So if the voltage drops below 1.3 volts at high loads, you can be sure that the clock rate has dropped to the default level or even lower, too. Monitoring tools will spot this frequency drop with some delay, so voltage monitoring is a faster way.
After some experimenting, we found out that we could avoid the frequency drop by disabling Application Power Management in the mainboard’s BIOS. However, when we got down to testing the overclocked mainboard’s stability with the Prime95 utility, the GA-F2A88XM-D3H would abort the test with an error or even restart automatically 15 to 30 minutes into the test.
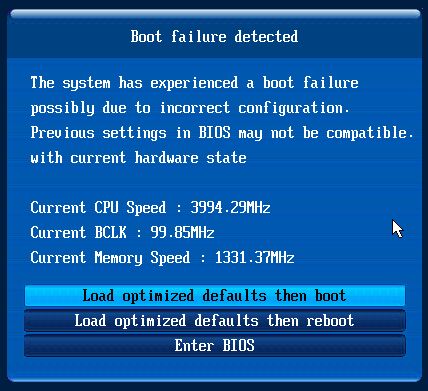
The mainboard could only pass the stability check at the default processor frequency of 3700 MHz. We couldn’t overclock it even to 3800 MHz. We tried to use the firmware version F5, but it was even worse. We couldn’t avoid the frequency drop with that BIOS version and had to get back to version F6c. Then we tried to overclock the same computer configuration with another Gigabyte mainboard (its review is going to be posted on our site later on) and easily reached a frequency of 4.4 GHz. So, our verdict goes like this: the Gigabyte GA-F2A88XM-D3H cannot overclock processors.
Performance
Nominal Mode
We usually benchmark mainboards in two test modes: at the default settings and with the CPU and memory overclocked. The first mode is interesting because it shows how well the mainboards work with their default settings. It is a known fact that most users do not fine-tune their systems, they simply choose standard BIOS settings and do nothing else. So here is the performance you can expect from the mainboards if you don’t tweak their settings:
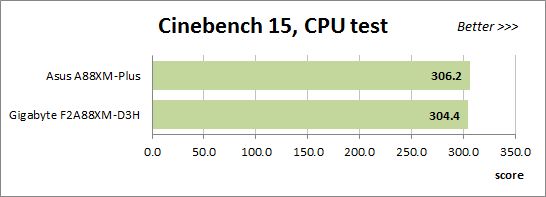
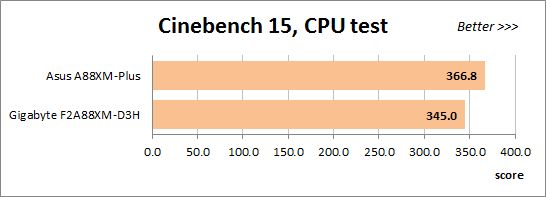
We run the CPU test of the 3D rendering suite Cinebench 15 five times and calculate the average result.
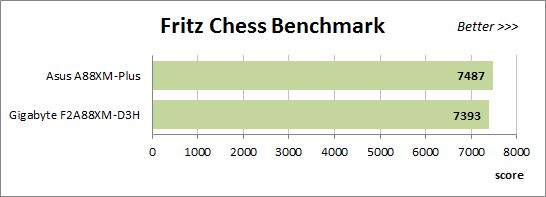
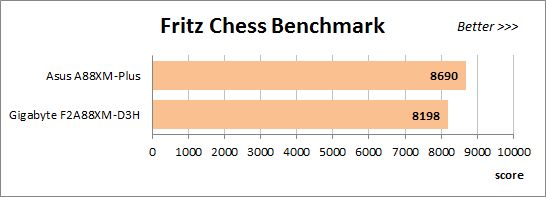
We have been using Fritz Chess Benchmark for a long time already and it proves very illustrative. It generates repeatable results and its performance scales perfectly depending on the number of computing threads.
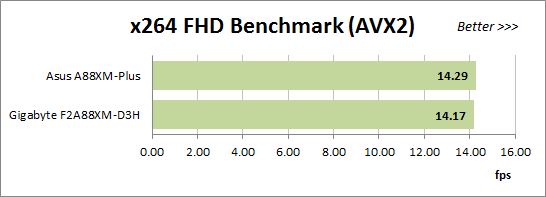
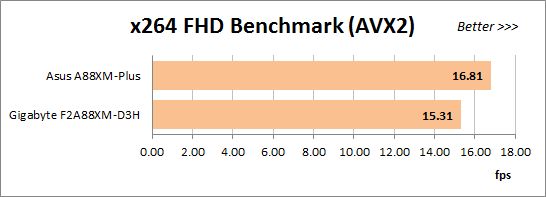
x264 FHD Benchmark v1.0.1 (64-bit) helps us test video transcoding performance. The original version of the benchmark uses a version r2106 coder but we have updated it to version r2334. The results are the average of five runs of the benchmark.
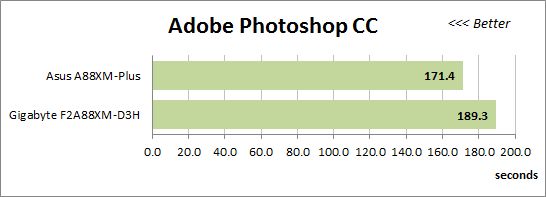
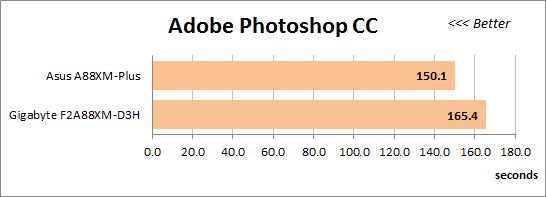
We benchmark performance in Adobe Photoshop CC using our custom test that is based on the Retouch Artists Photoshop Speed Test and consists of typical processing of four 24-megapixel images captured with a digital camera.
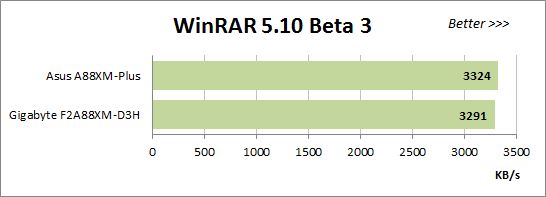
We use the integrated performance test of WinRAR 5.10 Beta 3 to benchmark the speed of file archiving.
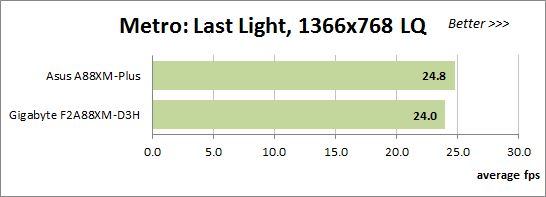
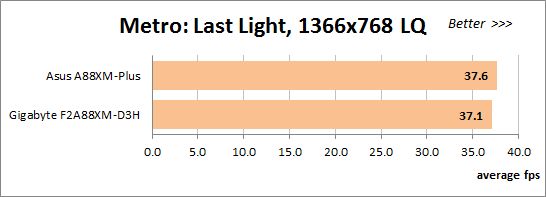
Metro: Last Light is a very beautiful video game but its frame rate depends heavily on the graphics subsystem. So we had to use the Low Quality settings to maintain playability at a screen resolution of 1366×768 pixels. The diagram shows the averaged results of five runs of the integrated benchmark.
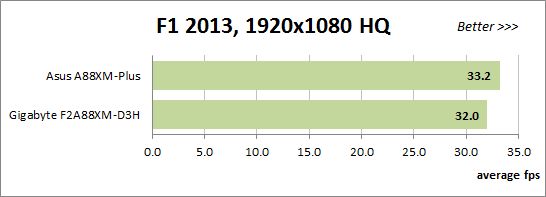
F1 2013 is less demanding on the graphics subsystem than the previous game. At a resolution of 1920×1080 pixels we choose near-maximum settings by enabling High Quality but have to disable additional image-enhancing options. The diagram shows the averaged results of five runs of the integrated benchmark.
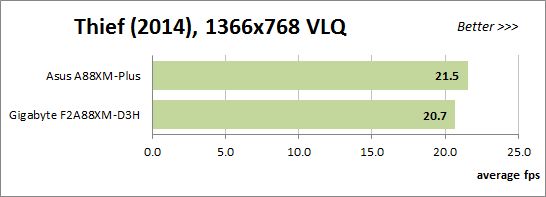
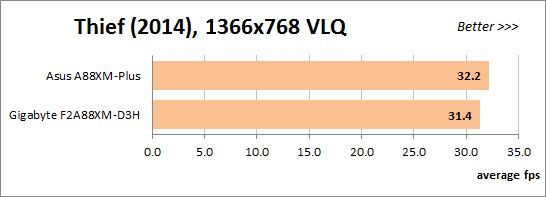
The new version of Thief is not acclaimed by critics, yet its visuals are top-notch. It’s got an integrated performance benchmark and lets you enable AMD’s Mantle technology. Besides lowering the display resolution, we had to choose Very Low Quality settings, yet the frame rate is still far from good.
The ASUS A88XM-Plus is always ahead of its opponent, the gap varying from small to considerable. This difference must be due to the Gigabyte GA-F2A88XM-D3H not increasing its clock rate much. To ensure that the CPU clock rate is increased from 3.7 to 4.0 GHz more often using the Core Performance Boost technology, you must enable the Turbo Performance Boost Ratio option which is off by default.
Overclocked Mode
Now let’s see what we have with the processor, graphics core and memory overclocked. With the ASUS A88XM-Plus we overclocked the processor to 4.4 GHz, the graphics core to 960 MHz and the memory to 2133 MHz with timings of 9-11-11-31-2N (using the XMP profile).
The Gigabyte GA-F2A88XM-D3H could overclock the graphics core and memory to the same level. As for the processor, we set the same clock rate of 4.4 GHz as with the ASUS but it would drop to the default level of 3.7 GHz or even lower at high loads.
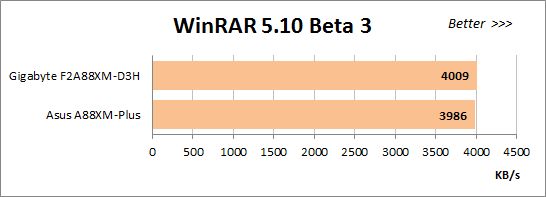

We’ve got just what we expected. The ASUS is ahead of its opponent because the later drops its processor clock rate. The only exception is WinRAR 5.10 Beta 3 where the Gigabyte is slightly faster. The WinRAR test must be inaccurate as it tries to deny the obvious. We’ll probably have to replace it with something else.
Power Consumption
We perform our power consumption measurements with an Extech Power Analyzer 380803. This device is connected before the PSU and measures the power draw of the entire system (without the monitor), including the power loss that occurs on the PSU itself. In the idle mode we start the computer up and wait until it stops accessing the system drive. The mainboards are sorted in the order of ascending power consumption.
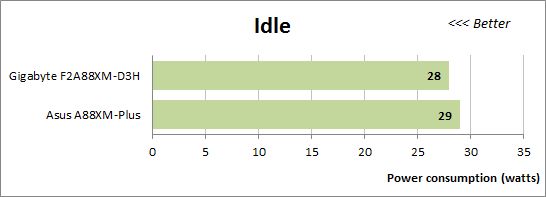
The mainboards are comparable in their power requirements in idle mode, yet the Gigabyte is a little more economical.
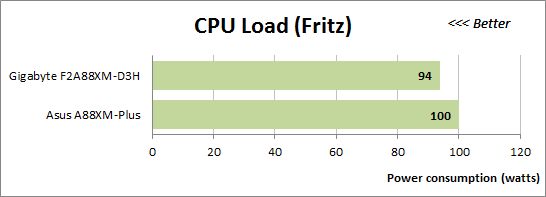
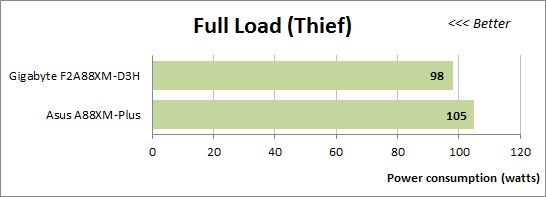
When we run a processor-intensive application or have a complex x86/graphics load (as in a 3D game), the gap grows larger, yet this is no feat of Gigabyte. The fact is the Gigabyte doesn’t increase its processor clock rate much via the Core Performance Boost technology but often drops that clock rate. The ASUS was always faster in our performance tests at default settings, so the lower power consumption comes at the expense of performance. And the Socket FM2+ platform doesn’t have too much performance to start with.
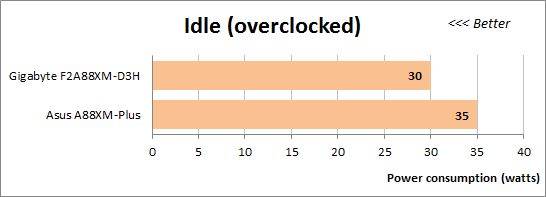
Now let’s see how much power our configurations need with their CPU, integrated graphics core and memory overclocked. The diagram shows the negative effect of the ASUS mainboard’s inability to drop the clock rate and voltage of the graphics core in idle mode. The Gigabyte’s power consumption is but slightly higher compared to its results at the default settings. The difference is larger with the ASUS. As a consequence, the gap between the two mainboards is larger, too.
The Gigabyte remains more economical when running applications but it’s hard to tell why. The Gigabyte may be slightly more economical to start with and the ASUS wastes a few watts due to disabling graphics-related power-saving features at overclocking. But we guess the difference is mainly due to the fact that the Gigabyte drops its processor clock rate to the default level and even lower, reducing the voltage, too. It is slower than the ASUS as the consequence, so the Gigabyte’s lower power draw comes at a cost.
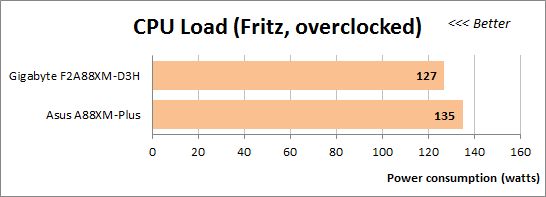
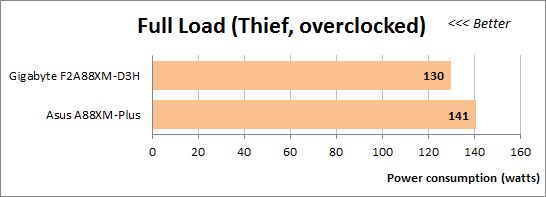
The Socket FM2+ configurations don’t have good power consumption results when overclocked. Thief is a recently released game so we didn’t use it in our tests earlier but you can use the Fritz Chess Benchmark results to compare their power draw with that of LGA1150 platforms. Despite the discrete graphics card, their power consumption is comparable but the Intel Core i5-4670K overclocked to 4.5 GHz is almost twice as fast as its opponent!
Conclusion
It is not the first time in our tests that two seemingly identical mainboards with similar specs and prices turn out to be incomparable in practice. Although not perfect itself, the ASUS A88XM-Plus is head above its today’s opponent. Besides the typical downsides of ASUS products such as wrong processor information in the startup screen (which still has no full list of active hotkeys), a clumsy BIOS structure, etc., the A88XM-Plus is unstable with XMP memory profiles, doesn’t enable power-saving technologies for the integrated graphics core at overclocking and doesn’t change the North Bridge clock rate correctly at overclocking too. But apart from these minor downsides, the mainboard is good overall. It offers sufficient functionality and a modern BIOS with lots of setup options.
Notwithstanding similar specifications, the Gigabyte GA-F2A88XM-D3H has much fewer BIOS options. It doesn’t support visual customization and can’t regulate 3-pin CPU fans as other Gigabyte mainboards do. It is inconvenient to change the graphics core clock rate with it but the main problem is that it cannot overclock processors. That would be a fatal blow for any product but we’re talking about a Socket FM2+ one, so it is not as bad as it seems. We don’t really think that Socket FM2+ processors and their integrated graphics cores should be overclocked. We overclock them only to put the mainboard under stress conditions in our tests and thus reveal any features in its behavior which are not evident at default settings. Overclocking for practical purposes doesn’t make sense because you won’t get the same performance as with Intel’s competing solutions whereas the integrated graphics core, however overclocked, cannot replace even a midrange discrete graphics card. The performance benefits from overclocking Socket FM2+ processors are small but the power consumption grows up significantly. Overclocking system memory is a better solution because it ensures a considerable performance boost without affecting the power draw much. And the Gigabyte GA-F2A88XM-D3H is quite good at overclocking memory.
The Socket FM2+ platform at large has remained a niche solution just like its predecessor. It is meant for people who want to play some games but don’t have enough money to buy a discrete graphics card. Serious gamers who play the most advanced titles can’t do without discrete graphics. And if you are not interested in games at all, Intel’s platform is going to be faster and more economical than AMD’s. The Socket FM2+ platform will help you save some money yet you are going to be limited in your choice of games and visual quality settings. If you suspect you will want more speed or visual quality, you may want to prefer an Intel platform with a discrete graphics card right away rather than buy a Socket FM2+ mainboard and add such a card to it later on.
We also don’t like the Socket FM2+ platform because we don’t see many innovations about it. We explained our opinion about AMD’s APUs in our FM2 platform review a year and a half ago and there’s no cause for us to change it now. The new chipsets have the same specs as the old ones. The new mainboards are still incompatible with the new APUs until you update their firmware. We have some old stability issues, too. The performance is still rather low while the power consumption is high. The Kaveri APU series features an enhanced graphics core, but has lower clock rates, so the overall performance level hasn’t changed. The new APUs are faster than their predecessors in certain applications but may be slower in others. They are still inferior to Intel’s products and come at a higher price.
AMD calls its new APUs revolutionary and some reviewers view them as an ongoing evolution of the APU series, but we think that they are generally the same as before. When you change nothing but your product’s name, it is neither revolution nor evolution. It is stagnation.