Asus P8Z77-V Deluxe Review: New Look of the LGA 1155 Platform

This system board boasts good accessories bundle, features smart design and supports all contemporary interfaces including wireless ones. Its BIOS is pretty easy to work with; it contains a lot of settings that can be adjusted within extensive ranges. An additional advantage is “Asus AI Suite II” software suite including numerous functional utilities.
In early April Intel unveiled its new LGA1155 chipsets and by the end of the same month the new Ivy Bridge CPU family was introduced as well. We dedicated our special Core i7-3770K review to those events. It goes without saying that, being the major developer and manufacturer of CPUs and chipsets, Intel knows virtually everything about them and has got a lot of in-depth documentation on its websites. Unfortunately, notwithstanding the regular visitor surveys and the recent redesign which helped give the sites a more modern appearance, it is still extremely hard to find anything specific there. For example, when you want to learn the differences between the new Z77 Express, Z75 Express and H77 Express chipsets, the comparison system will inform you that they are in fact identical except for their price! We’d be excited about that if we were mainboard manufacturers, yet we are still curious where this price differentiation comes from. And, as a personal remark, people who build such unfriendly websites even have the cheek to tell you what browser to use. They don’t like Opera, for example. But we’re digressing from the topic of this review.
The point is that the chipsets are indeed very similar even if you compare the new 7 series (the Panther Point family) with their Cougar Point predecessors.
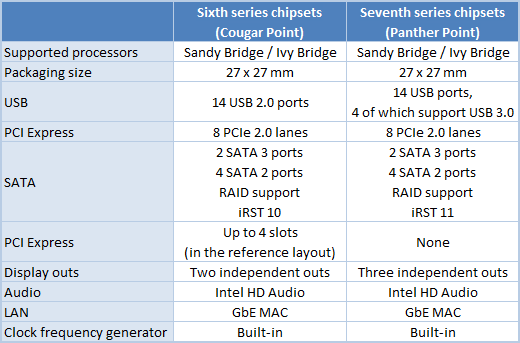
The top-of-the-line Intel Z77 Express offers the full selection of capabilities. It provides the most flexible way of splitting up the CPU-integrated PCI Express lanes: 1×16, 2×8 or 1×8 + 2×4. The Intel Z75 Express doesn’t support Intel Smart Response and can only use 16 PCIe lanes as 1×16 or 2×8. The Intel H77 Express cannot split the PCI Express lanes up at all and lacks any CPU overclocking capabilities.
Although older mainboards based on the 6 series chipsets are perfectly compatible with the new Ivy Bridge CPUs, we are going to write a series of reviews of the most functional products based on the Intel Z77 Express. We’ll start out with ASUS P8Z77-V Deluxe.
Packaging and Accessories
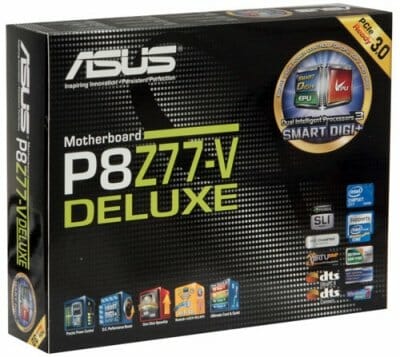
As is typical of ASUS’s top-end products, the packaging of the P8Z77-V Deluxe has a flip-back cover, so you can take a look at the mainboard through a large window. The design of the box is conventional for ASUS, too. The product name and a few logotypes are on the front of the box. On the back of the box and under the flip-back cover we can see a picture of the mainboard, a list of its specs and a brief description of its key features.
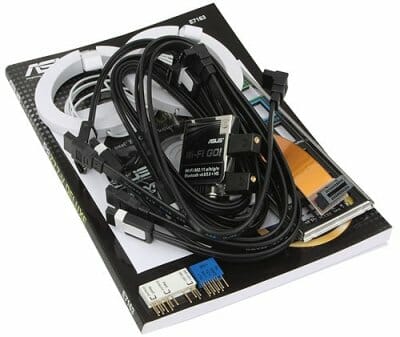
Inside, the mainboard is wrapped in an antistatic pack. The following accessories can be found underneath it:
- Six SATA cables with metal L-shaped connector locks. Two pairs are specifically designed for SATA 6 Gbps devices (with white inserts in the connectors);
- A flexible bridge for two-way Nvidia SLI graphics configurations;
- Wi-Fi GO! module;
- Two Wi-Fi ring antennas;
- I/O Shield for the back panel;
- “Asus Q-Connector Kit” including adapters for easy connection of the system case front panel buttons and indicators and a USB 2.0 port;
- User manual;
- Brochure with brief assembly instructions in multiple languages;
- Wi-Fi GO! module manual;
- “Powered by Asus” sticker;
- DVD disk with software and drivers.
PCB Design and Functionality
The ASUS P8Z77-V Deluxe has a classic component layout. Besides being easy to use, this mainboard just looks good.
Its digital power system SMART DIGI+, combined with Dual Intelligent Processors 3 (TPU or TurboV Processing Unit and EPU or Energy Processing Unit), provides stable power to every mainboard component and offers very flexible setup opportunities. The CPU voltage regulator has 20 phases, four of which are allotted for the integrated graphics core. There are two heatsinks on the hottest components, a heat pipe connecting one of them to the auxiliary central heatsink. The latter is rather an indication of the product’s high status than a real necessity. The heatsinks are not very hot even at high loads and at overclocked settings but all of them, including the chipset one, are securely fastened with screws. The mainboard’s four DIMM slots can take in up to 32 gigabytes of DDR3 SDRAM. The Intel Z77 Express is declared to support memory frequencies up to 1600 MHz. ASUS specifies a max memory frequency of 2800 MHz for this mainboard but the frequency range available in the BIOS goes all the way from 800 up to 3200 MHz.
The mainboard’s slots and connectors are conveniently color-coded. There are two PCI Express 3.0/2.0 x16 slots (blue and white) for expansion cards. Their speed formula is 1×16 or 2×8. There is also one PCI Express 2.0 x16 slot (black) at x4 speed and four PCI Express 2.0 x1 slots. The Intel Z77 Express chipset is responsible for the four blue-colored Serial ATA 3 Gbit/s ports as well as for the two white-colored SATA 6 Gbit/s ports. An additional controller Marvell 88SE9128 adds two more SATA 6 Gbit/s ports (the dark-blue connectors). Now let’s take a look at the mainboard’s back panel.
The back panel of Asus P8Z77-V Deluxe mainboard has the following ports and connectors:
- Four USB 2.0 ports, another four ports are laid out as two onboard pin-connectors;
- WiFi/Bluetooth 4.0 module;
- Six USB 3.0 ports (blue connectors), four of which are implemented via two ASMedia ASM1042 controllers. Another two ports and one more internal pin-connector for two additional USB 3.0 ports are provided by Intel Z77 Express chipset;
- Two eSATA 6 Gbps ports implemented via ASMedia ASM1061 controller;
- Optical S/PDIF and six analogue audio-jacks provided by eight-channel Realtek ALC898 codec;
- HDMI and DisplayPort video outs;
- “USB BIOS Flash back” button;
- Two local network ports (network adapters are built on Gigabit Intel 82579V and Realtek RTL8111F network controllers).
The Wi-Fi GO! module is now based on a Broadcom chipset that supports IEEE 802.11 a/b/g/n and both frequency bands (2.4 and 5 GHz). The USB BIOS Flashback button is part of the namesake technology for updating the mainboard’s BIOS in an easiest way possible: you don’t even have to assemble your computer besides connecting the mainboard to a PSU, so you won’t have any incompatibility issues with newest CPUs. There are only two and compact video connectors at the back: HDMI and DisplayPort. That’s good because top-end mainboards are generally used with discrete graphics cards and numerous video connectors just take up useful space on their back panel.
Like other ASUS mainboards, the P8Z77-V Deluxe uses conveniently wide Q-Slot latches on the graphics card slots and one-sided Q-DIMM latches on the memory slots. Besides the abovementioned USB BIOS Flashback and the highlighted Power and Reset, there are two more buttons on the back panel: MemOK! that allows the mainboard to successfully boot up in case of memory-related problems and Clear CMOS for resetting BIOS parameters.
The Q-LED indicators will help you quickly determine at what stage the boot-up process has stalled. The TPU switch can be used to overclock the CPU automatically while the EPU switch enables power-saving operation modes. The P8Z77-V Deluxe offers two 4-pin connectors for CPU coolers and four connectors for system fans.
BIOS Functionality
We’ve already seen ASUS EFI BIOS, a very successful implementation of the UEFI standard (Unified Extensible Firmware Interface), in our previous reviews of ASUS mainboards. The P8Z77-V Deluxe differs but in some minor details in its BIOS capabilities.
By default the BIOS opens up in EZ Mode which gives you a lot of information but offers almost no user-defined options. You can only learn some basic system specs and monitor a few parameters, choose between high-performance and energy-saving operation modes, and define the boot device order by dragging the icons with your mouse.
There are a couple of hot buttons available. You can press F3 and select the BIOS section you need from the list. And you can press F7 to quickly switch from EZ into Advanced Mode.
You can press F3 every time you enter the BIOS (by the way, this hot button works in the other BIOS sections as well), yet it may be easier to make the BIOS open in Advanced Mode by default. In this case you will see the familiar Main section where you can read some basic system information, change the interface language and set up date and time.
Most of the overclocking-related options are collected in the Ai Tweaker section. In the main screen you can change frequencies, multipliers and voltages. You don’t have to move to the monitoring section to check out the current levels of voltages as they are shown right next to each voltage-affecting parameter.
Earlier it was easy to overlook the ASUS Ratio Boost feature which could be evoked by pressing F6 to fix the CPU frequency multiplier at its maximum permitted by the Intel Turbo Boost technology irrespective of load. Now we’ve got the conspicuous option ASUS MultiCore Enhancement which does the same. It’s in the list next to the rest of settings.
Some of the setup options are available in individual subsections in order not to clutter the main section. The OCTuner parameter looks like a subsection but is actually used to overclock the computer automatically. There is a separate page for memory timings. There are a lot of options here, yet they are quite easy to use. You can see all the timings set up by the mainboard for each of the two memory channels. You can adjust just some of them, leaving the others at their defaults.
The CPU Performance Settings section has been renamed as CPU Power Management, which is more appropriate. It helps you fine-tune Intel Turbo Boost parameters but you can hardly need to do that since the mainboard sets them correctly by default, depending on CPU parameters you have selected.
There are quite a lot of options related to power supply and the new digital power system called DIGI+. You can control ASUS’s exclusive power-saving technologies right here, in the BIOS. One of them allows changing the number of active phases in the CPU voltage regulator depending on load. CPU Load Line Calibration can now be not only enabled or disabled but also set to a certain level (it helps counteract the voltage drop occurring on the CPU under load).
The options of the Advanced section should be familiar to you and their names are self-descriptive. Let’s take a look at each of its subsections, though.
The CPU Configuration subsection reports you basic information about the CPU and allows to control some CPU-related technologies. Power-saving technologies can be managed on the CPU Power Management Configuration page.
The PCH Configuration subsection is for enabling/disabling Intel Rapid Start and Intel Smart Connect technologies. The SATA Configuration subsection lists SATA drives connected to the mainboard.
The System Agent Configuration subsection gives you access to Graphics Configuration and NB PCIe Configuration pages. The CPU-integrated graphics core is turned off by default. If you enable it, the Ai Tweaker section will provide options for changing its voltage and frequency. The NB PCIe Configuration page helps you choose the operation mode of the two PCI Express 3.0/2.0 x16 slots for expansion cards.
USB-related options can be found in the USB Configuration subsection. The Onboard Devices Configuration subsection allows you to set up each of the mainboard’s numerous onboard controllers.
Startup and power-related options are available in the APM subsection. The last subsection, called Network Stack, allows you to use the mainboard’s two network controllers in teaming mode.
The Monitor section is where you can check out the current temperatures, voltages and fan speeds. You can select a speed regulation mode for any of the fans supported by the mainboard: Standard, Silent or Turbo. Or you can set them up manually, too. System fans used to be regulated all together with the Chassis Q-Fan Control parameter, but now you can individually set up the behavior of each of them. The two CPU fans can only be regulated if they have 4-pin connectors.
System startup options can be found in the Boot section. It’s here that you can change the start mode from EZ to Advanced. Next goes the Tools section with four subsections.
The integrated BIOS update tool called EZ Flash 2 is perhaps the handiest and most functional among the utilities of its kind. We only notice one downside about it after it had transitioned to EFI BIOS: the current firmware version was saved into the root directory of the connected drive by default (it could be saved into any folder previously). This deficiency was eliminated in a very smart way: the option of saving the current BIOS prior to updating it has been removed altogether. Although that’s not a frequently used feature, we don’t quite like the way the problem has been solved.
ASUS mainboards allow you to store and load up to eight profiles with full BIOS settings. Each profile can be given a descriptive name. Sharing BIOS profiles by saving and loading them from external disks is not available after the transition to EFI BIOS. The profiles do not save the option of turning the startup picture off.
Like on mainboards from many other brands, we can now see the information written into the memory modules’ SPD unit. The Drive Xpert section can help you quickly and easily build a RAID array out of two disks connected to the onboard controller Marvell 88SE9128. The Exit section goes last. It allows you to save your changes, load default BIOS settings, or switch back to EZ Mode.
Testbed Configuration
We carried out our tests on a testbed that included the following components:
- Asus P8Z77-V Deluxe rev.1.02 mainboard (LGA 1155, Intel Z77 Express, BIOS version 0802);
- Intel Core i5-3570K CPU (3.6-3.8 GHz, 4 cores, Ivy Bridge rev.E1, 22nm, 77 W, 1.05 V, LGA 1155);
- 2 x 4 GB DDR3 SDRAM Corsair Vengeance CMZ16GX3M4X1866C9R (1866 MHz, 9-10-9-27 timings, 1.5 V voltage);
- Gigabyte GV-T797OC-3GD )AMD Radeon HD 7970, Tahiti, 28 nm, 1000/5500 MHz, 384-bit GDDR5 3072 MB);
- Crucial m4 SSD (CT256M4SSD2, 256 GB, SATA 6 Gbps);
- Scythe Mugen 3 Revision B (SCMG-3100) CPU cooler;
- ARCTIC MX-2 thermal interface;
- CoolerMaster RealPower M850 PSU (RS-850-ESBA);
- Open testbed built using Antec Skeleton system case.
We used Microsoft Windows 7 Ultimate SP1 64 bit (Microsoft Windows, Version 6.1, Build 7601: Service Pack 1) operating system, Intel Chipset Software Installation Utility version 9.3.0.1020, AMD Catalyst graphics card driver version 12.4.
As usual, we’ve made some tweaks to our testbed before embarking on the new series of reviews. We’ve picked up a serial Intel Core i5-3570K, which is a quad-core CPU with a default voltage of 1.05 volts and a clock rate of 3.4 GHz. The actual frequency is usually higher: the CPU is dynamically overclocked to 3.6 GHz even at high load thanks to the Intel Turbo Boost technology.
When only one CPU core is active, the clock rate is even raised up to 3.8 GHz.
When idle, the power-saving technologies lower the frequency multiplier and voltage of the CPU.
You may already be aware of the problems the new Ivy Bridge CPUs have with cooling because of the reduced size of the CPU die and the different thermal interface between the die and the heat-spreading cap. Such CPUs are often hotter than their Sandy Bridge predecessors under the same conditions. As we found out, it made no difference what cooler we used if it was a high-performance model. So, we chose a Scythe Mugen 3 Revision B.
You can read our review of the Scythe Mugen 3 for more details. Its B revision is compatible with the LGA2011 platform. Unfortunately, we have to note once again that the new Flip Mount Super Back-Plate 4, although improves the cooler’s compatibility with mainboards, makes the installation procedure rather too difficult.
The latest breed of mainboards, if used together with appropriate CPUs and graphics cards, can support PCI Express 3.0. The graphics subsystem of our testbed is represented by a Gigabyte GV-R797OC-3GD card, which is a Radeon HD 7970 pre-overclocked from 925 to 1000 MHz.
The original cooling system with heat pipes and three large fans keeps the graphics card cool at a moderate level of noise. It would be quite comfortable if some component didn’t produce a loud squealing sound at high load. Hopefully, this problem is only limited to our sample of the card.
These are all the modifications we’ve done to our testbed. The rest of its components have remained the same.
Operational and Overclocking Specifics
We had absolutely no problems or even difficulties assembling our testbed configuration around the ASUS P8Z77-V Deluxe mainboard. As we’ve noted above, its classic design is very user-friendly. Started up, the mainboard shows an unremarkable picture that fails to remind you about any hotkeys other than Del.
There is no real reason to turn the startup picture off, though. The mainboard still does not tell you anything about hotkeys. The memory frequency is the only useful information because the default rather than actual clock rate is reported for the CPU. ASUS’s Republic of Gamers mainboards have long been able to correctly report the actual CPU clock rate but the company hasn’t added this capability to its ordinary products as yet.
Again, we had no problems installing the OS and running the mainboard at its default settings. It is at overclocking that we encountered some difficulties. First of all, we have to admit that our earlier apprehensions about low overclocking potential of the new Ivy Bridge CPUs seem to be confirmed. We had started our tests using an engineering sample of Core i7-3770K and overclocked it easily to 4.7 GHz, but now that there are serial Ivy Bridge processors available, we guess we should use them in our testbed. The first sample of Intel Core i5-3570K was a little disappointing. It had a lower default voltage. Without increasing the voltage, it could be clocked at 4.3 GHz instead of the previous CPU’s 4.4 GHz. And when its voltage was increased, it could be clocked at 4.6 GHz. That’s not a bad result, but this CPU, despite its lower voltage, had a higher temperature than the engineering sample of Core i7-3770K. The second sample of Core i5-3570K we took next was blameless, though. It could be clocked at 4.4 GHz with its default voltage and at 4.7 GHz with increased voltage, so we are going to use this sample for our mainboard tests.
We found out one peculiarity about all of these CPUs, though. When overclocked, they could successfully pass through hard stability tests with LinX and Prime95 but then produced errors or BSODs in an ordinary application or game. At first we thought there was something wrong with the P8Z77-V Deluxe but later had the same problems with mainboards from other makers.
As a matter of fact, overclocking an Ivy Bridge is the same as overclocking any other CPU. You increase its clock rate, increase its voltage and check out its stability at such settings. You just need to run as many stability tests as possible because one or two stress tests may not be enough. After a substantial increase in voltage, our CPU was stable at a clock rate of 4.7 GHz.
We also want to remind you about the difficulties of cooling Ivy Bridge CPUs. While running LinX, our CPU overclocked to 4.7 GHz would get as hot as 97-98°C, occasionally reaching 100°C when it was hot in our lab. This overclocking is hardly safe considering that the frequency throttling of the new CPUs is triggered on at 105°C. We used an open testbed, so if the mainboard with CPU were put into a system case and if the room temperature were higher, the thermal throttling would enable protective mechanisms and the overclocked system would perform slower rather than faster. Therefore we had to limit ourselves to 4.6 GHz. The memory was overclocked to 1867 MHz.
We always overclock mainboards in such a way that they could be used permanently in such mode. Therefore we do not disable any features, e.g. onboard controllers, and try to keep the CPU’s power-saving features up and running. The P8Z77-V Deluxe was overclocked in this manner, too. When idle, it lowered the CPU’s voltage and frequency multiplier to save power.
Performance Comparison
As usual, we are going to compare the mainboards speeds in two different modes: in nominal mode and during CPU and memory overclocking. The first mode is interesting because it shows how well the mainboards work with their default settings. It is a known fact that most users do not fine-tune their systems, they simply choose the optimal BIOS settings and do nothing else. That is why we run a round of tests almost without interfering in any way with the default mainboard settings. Since Asus P8Z77-V Deluxe is the first and so far the only Intel Z77 Express based mainboard we reviewed individually in our lab, we will compare its performance in nominal mode against the performance in overclocked mode.
We used Cinebench 11.5. All tests were run five times and the average result of the five runs was taken for the performance charts.
We have been using Fritz Chess Benchmark utility for a long time already and it proved very illustrative. It generated repeated results, the performance in it is scales perfectly depending on the number of involved computational threads.
A small video in x264 HD Benchmark 4.0 is encoded in two passes and then the entire process is repeated four times. The average results of the second pass are displayed on the following diagram:
We measured the performance in Adobe Photoshop using our own benchmark made from Retouch Artists Photoshop Speed Test that has been creatively modified. It includes typical editing of four 10-megapixel images from a digital photo camera.
In the archiving test a 1 GB file is compressed using LZMA2 algorithms, while other compression settings remain at defaults.
Like in the data compression test, the faster 16 million of Pi digits are calculated, the better. This is the only benchmark where the number of processor cores doesn’t really matter, because it creates single-threaded load.
Since we do not overclock graphics in our mainboard reviews, the next diagram shows only CPU tests from the 3DMark11 – Physics Score. This score is obtained in a special physics test that emulates the behavior of a complex gaming system working with numerous objects:
We use FC2 Benchmark Tool to go over Ranch Small map ten times in 1920×1080 resolution with high image quality settings in DirectX 10.
Resident Evil 5 game also has a built-in performance test. Its peculiarity is that it can really take advantage of multi-core processor architecture. The tests were run in DirectX 10 in 1920×1080 resolution with high image quality settings. The average of five test runs was taken for further analysis:
Batman: Arkham City game also reacts eagerly to any changes in the CPU clock frequency, but it uses DirectX 11. We ran game’s integrated benchmark five times with high image quality settings and then take the average of the five runs for the diagrams.
The tested configuration accelerates by about 30% in most of the computing tasks when overclocked. Of course, the performance benefits are smaller in games where the graphics card’s speed is more important, but we can see them anyway.
Power Consumption
We performed our power consumption measurements using an Extech Power Analyzer 380803. This device is connected before the PSU and measures the power draw of the entire system (without the monitor), including the power loss that occurs in the PSU itself. In the idle mode we start the system up and wait until it stops accessing the hard disk. Then we use LinX to load the CPU. For a more illustrative picture there are graphs that show how the computer power consumption grows up depending on the number of active execution threads in LinX (both at the default and overclocked system settings).
The power consumption of the system in idle mode is almost the same whether it is overclocked or not. In both cases the power-saving technologies lower CPU voltage and clock rate (to 1600 MHz). But we can see a difference even at low single-threaded load because the voltage and frequency begin to differ.
We can see the price we have to pay for overclocking at increased voltage: the system accelerates by less than 30% when overclocked while its power consumption grows by almost 40%.
Exclusive Software Bundle
We don’t often cover software bundled with mainboards in our reviews, just because these are usually sloppily made utilities with ugly interface and vague functionality. ASUS mainboards are different in this respect as they come with a whole lot of various tools designed in a consistent style and combined under the common shell called ASUS AI Suite II. You don’t have to install all of the utilities. Just choose the ones you need.
After installing AI Suite II and rebooting your system, you will see a new icon in the bottom right, next to the clock. It opens as a panel.
You can click on the section buttons and then select the utility you want.
Or you can choose any utility from the menu that opens after a click with the right mouse button.
ASUS TurboV EVO is the first utility in the Tool section. This tool allows you to enter overclocked parameters, save them into a profile or trigger on automatic overclocking (in the Auto Tuning subsection).
We examined the ASUS DIGI+ Power Control utility in an earlier review, and you can see its old interface on the CPU Power Control and DRAM Power Control tabs. By default it opens on the Smart DIGI+ tab, though.
The default power consumption of our Intel Core i5-3570K processor is 77 watts but we can instantly lower it to 45 or even 35 watts. This is accomplished by limiting the top value of the CPU frequency multiplier at high load. This value is x36 by default, but when the CPU’s power consumption is limited to 45 and 35 watts, the frequency multiplier can get no higher than x22 and x18, respectively.
The ASUS EPU utility helps you find the optimal balance between performance and power consumption. ASUS Fan Xpert 2 sets up the behavior of each fan individually. Unfortunately, the mainboard can only regulate CPU fans with 4-pin connectors.
The ASUS Probe II tool can be used to monitor the current values and set up permissible ranges for voltages, temperatures and fan speeds.
ASUS Probe II is complemented by ASUS Sensor Recorder which can build graphs to show how voltages, temperatures and fan speeds change over time. These data can be written into a file.
ASUS Wi-Fi GO! is a new set of utilities referring to the mainboard’s wireless capabilities. You can use them to connect to the PC from your smartphone or tablet and type in text, play music, share files, etc.
ASUS Wi-Fi Engine can transform your computer into a router for sharing an internet connection among all your mobile devices. ASUS Ai Charger+ helps quickly recharge mobile gadgets. ASUS USB Charger+ can recharge a mobile device from a dedicated USB port even when the computer is turned off or in standby.
ASUS USB 3.0 Boost can boost the data-transfer rate over USB using UASP or Turbo mode. There’s another new tool here, called ASUS Network iControl. It can help you connect to the internet and manage bandwidth prioritization among different applications.
We’ve already tested ASUS SSD Caching, which is similar to Intel’s Smart Response technology and helps accelerate a conventional hard disk, connected to the Marvell 88SE9128 controller, by using an SSD as a cache.
There are two tools in the Monitor section: Sensor and CPU Frequency. You’ve already seen their screenshots above. The CPU Frequency window automatically opens to the right of ASUS TurboV EVO whereas the sensor data can be viewed in ASUS Fan Xpert 2, ASUS Probe II and ASUS Sensor Recorder. These two tools can be used as standalone utilities as well.
In the Update section: the ASUS Update tool does just what it names suggests, ASUS My Logo can change the startup picture, and ASUS USB BIOS Flashback can find and save a new BIOS version to a USB flash drive for further update.
Mainboard, CPU and memory parameters can be viewed in the System Information section. The Settings section refers to the individual tools as well as to the ASUS AI Suite II shell in general.
The extensive capabilities of ASUS AI Suite II are impressive indeed. Unfortunately, the old problem of ASUS’s exclusive software persists: it does not uninstall correctly. When removed, these utilities leave a lot of folders with files and we can only imagine how much garbage remains forever in the Windows registry after them.
Conclusion
The recent CPU, chipset and platform releases from Intel have happened without much fanfare. The clock rate of the Ivy Bridge series hasn’t increased much over their predecessors’ and there are very few changes in the microarchitecture except for the revised integrated graphics core. As a result, the new CPUs are about as fast as the previous series but, due to the reduced CPU die size and the different thermal interface between the die and the heat-spreading cap, they are hotter and, consequently, overclock less successfully than their predecessors, although we might have expected the opposite outcome from the die shrink. The additional problem is that there is no test tool capable of proving that an Ivy Bridge configuration is stable. High-load tests like LinX or Prime95 do not guarantee anything anymore. There is only one point on which the new CPUs are undoubtedly better than the older ones. Their default voltage is about 1 volts, which is 20% lower compared to the Sandy Bridge series. Thus, you may want to prefer a newer CPU just because it’s more economical.
As opposed to CPUs, mainboards with old 6 series chipsets are still viable. The USB 3.0 interface available in Intel’s new chipsets was long ago implemented by means of additional controllers, so there is in fact no difference between the older and newer mainboards in terms of functionality. But of course, we will be now reviewing the newer products with 7 series chipsets, with the Intel Z77 Express in the first place.
Opening our new series of reviews, the ASUS P8Z77-V Deluxe made a very good impression. It is a well-designed mainboard with all modern interfaces, including wireless ones, and a good selection of accessories. It’s got a user-friendly BIOS with lots of flexible settings. We have no doubt it will be competitive against other brands’ mainboards we are going to review in the near future. The only aspect the P8Z77-V Deluxe may be inferior to other products in is its power consumption. Notwithstanding the advanced digital power system and exclusive power-saving technologies, ASUS mainboards often need more power than their counterparts from other manufacturers. The difference is small but you should be aware of it. On the other hand, ASUS mainboards have a unique advantage in the form of the ASUS AI Suite II software bundle which includes all manner of exclusive tools for various purposes. No other mainboard maker offers such extensive support for its products on the software side, so this is yet another reason to prefer mainboards from ASUS.
Summing up everything just said, we would like to award Asus P8Z77-V Deluxe with our Editor’s Choice title for being a great Intel Z77 Express based LGA 1155 mainboard for enthusiasts: