Asus Rampage IV Formula – Best Mainboard for LGA 2011 CPU Overclocking

This new mainboard from Asus belongs to the “Republic of Gamers” series for gamers and overclocking enthusiasts. It has excellent set of features, proved to be a great overclocking platform, and the Rampage IV Formula/Battlefield 3 modification also has a free game coupon to sweeten the deal even more.
If you are reading this article, then you must be really interested in the new mainboards for LGA 2011 processors. In this case you must have already checked out our previous reviews of the new mainboards for the today’s highest-performing platform. We started with Asus P9X79 Deluxe, which made a great overall impression and scored very high in our tests. We even assumed that it will be among the best if not “the” best among other similar products. After that we checked out Gigabyte GA-X79-UD7. The major intrigue of this review was the fact that Gigabyte’s new mainboard lineup has finally transitioned to UEFI BIOS. We were also overall pleased: the new “3D Power” technology was up to contemporary standards, and “3D BIOS” gave us the opportunity to see the traditional BIOS in the new light. However, Intel DX79SI mainboard was more of a disappointment, unfortunately. It didn’t allow us to overclock our test processor as successfully as other mainboards did, and it proved suspiciously slow in identical testing conditions. Considerably lower power consumption allowed this mainboard to make up for its slow speed, but it definitely was not what we had expected from a flagship product.
We revisited the conclusions of our previous reviews for a reason: to ensure that you have a complete picture in front of you, because our today’s main character will change it completely. We are about to check out another Asus mainboard called Asus rampage IV Formula from the “Republic of Gamers” series (RoG), which is targeted for gamers and overclocking enthusiasts. LGA 2011 platform was launched last November and Battlefield 3 game came out just a few weeks earlier. Even at the development stage it was the talk of the town among gaming fans and numerous previews predicted its unprecedented success that is why Asus decided to team up with the game developers on this one. Besides the regular Asus Rampage IV Formula mainboard, they also released a special Battlefield 3 modification with a free game coupon inside. This is the model we are going to discuss in our today’s review.
Packaging and Accessories
The design of the Asus Rampage IV Formula/Battlefield 3 box is dramatically different from the traditional Republic of Gamers packages, which allows you to easily distinguish between this special model with a game coupon inside and the regular one.
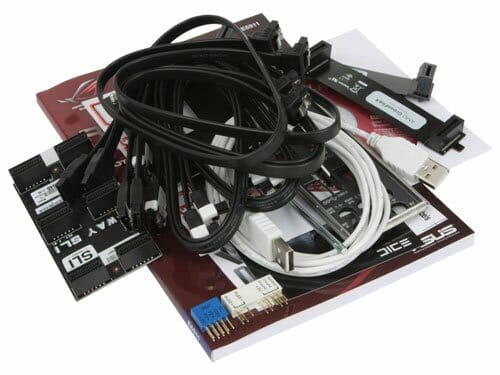
The front flip cover of the package reveals a large window, through which you can see pretty much the entire board. Numerous accessories are packed into an individual box:
- Eight SATA cables with metal connector locks, half of them with L-shaped locks and another half – with straight ones. Two pairs designed for SATA 6 Gbps devices (with white inserts in the connectors);
- “12-in-1 ROG Cable Label” – a sheet with twelve paper labels for marking SATA cables;
- A flexible bridge for two-way AMD CrossFireX graphics configurations;
- A flexible bridge for two-way Nvidia SLI graphics configurations;
- A hard bridge for three-way Nvidia SLI graphics configurations;
- “Asus Q-Connector Kit” including adapters for easy connection of the system case front panel buttons and indicators and a USB port;
- “ROG Connect Cable” – a cable with two USBs to connect to other PCs;
- I/O Shield for the back panel;
- Backplate and a hex key for “X-Socket”;
- “ROG Theme Label” a 3D sticker with the “Republic of gamers” logo;
- “Powered by Republic of Gamers” sticker;
- User manual;
- DVD disk with software and drivers (including DAEMON Tools Pro Standard and a one-year Kaspersky lincense).
All “Republic of Gamers” mainboards come with extended accessories bundles, but there are no questions about the included items, in general. The only thing we would like to comment on is the backplate with a hex key and the idea behind “X-Socket” feature. The retention holes on LGA 2011 mainboards are laid out in exactly the same way as on LGA 1366 mainboards, but the cooler retention itself has changed, so you can’t use old coolers on the new mainboards. However, this is where “X-Socket” feature steps in. Using a special key, you remove the default backplate and replace it with a special one included with the accessories, which will allow you to install a cooler originally designed for LGA 1366 platforms. This feature works fine on Asus Rampage IV Formula and Rampage IV Extreme mainboards, and the list of compatible coolers is available here for your reference. We didn’t use this feature, because we have a variety of LGA 2011 coolers to choose from, but it will definitely be very handy for those who upgrade from LGA 1366 to LGA 2011.
The regular Rampage IV Formula comes with exactly the same accessories and the only differences between the regular board and the Battlefield 3 edition one is a Battlefield 3 key band with a clasp and a game access coupon.
PCB Design and Functionality
Like all “Republic of Gamers” mainboards, Asus Rampage IV Formula/Battlefield 3 is designed in series traditional black-and-red colors. However, the board has a few other interesting features besides the color scheme.
I believe I should start with the processor voltage regulator. “Extreme Engine Digi+ II” is a highly efficient, stable and long-lasting system due to the use of high-quality electronic components and adjustable pulse-width modulation frequency of the digital CPU and memory voltage regulators. The heat-dissipating components of the voltage regulator circuitry are topped with a large heatsink, which is connected to another large heatsink at the back panel with a heatpipe. All heatsinks, including the chipset one, are attached with screws. By the way, some of the processor voltage regulator components on all LGA 2011 mainboards are moved to the bottom of the PCB, but only on Asus mainboards these components have a heat-dissipating metal plate covering them.
There are a lot of additional components next to the 24-pin power connector. The ones that stand out the most are Power On and Reset buttons, POST-code indicator and a switch that allows turning off PCI Express x16 slots in random order. Besides that, there is also a set of onboard voltage read points called “Probelt”, “GO” button that allows immediate system overclocking according to previously set parameters. It may also function as “MemOK!” during system boot-up allowing to boot even if there are problems with the installed memory modules. There is a row if diodes called Q-Led that will help identify the problems during startup and a row of diodes called “Voltiminder LED II”, which will signal if any of the voltages are approaching dangerous levels. Moreover, there is also a “BIOS Switch” button, which will let you switch rapidly between two independent BIOS chips, and an entire group of components facilitating overclocking with liquid nitrogen: “LN2” jumper, “Slow Mode” switch and “Q reset” button.
The board has two PCI Express 2.0 x1 slots and four PCI Express 3.0/2.0 x16 slots, which means you can use up to four graphics cards at the same time. Although, you will need to purchase the special bridge for 4-way Nvidia SLI configurations separately, as it is not included into the accessories bundle. The graphics card slots also work in a non-conventional way. Of course, in case you only have one or two graphics cards in the system, they will work at full PCI Express 3.0/2.0 x16 speed, which is a feature of the Intel X79 Express chipset. The configuration with three graphics cards is unusual, however. Two cards continue working at full speed and the lanes are not distributed and the slots work as x16/x8/x16. Only with four graphics cards installed simultaneously we see the redistribution of the PCI Express lanes among the slots, though the first card will still continue working at its full speed: x16/x8/x8/x8.
The back panel of Asus Rampage IV Formula/Battlefield 3 has the following ports and connectors:
- PS/2 connector for keyboard or mouse;
- Six USB 2.0 ports, eight more are laid out as four onboard pin-connectors;
- “Clear CMOS” button;
- Optical S/PDIF and six analogue audio-jacks provided by eight-channel Realtek ALC898 codec;
- “ROG Connect” button;
- Four USB 3.0 ports (blue connectors) implemented via two ASMedia ASM1042, the third controller like that provides an additional internal pin-connector for two more USB 3.0 ports;
- Two eSATA 6 Gbps ports implemented via ASMedia ASM1061 controller, second controller like that provides two additional internal SATA 6 Gbps ports;
- A local network port (network adapter is built on Gigabit Intel 82579V network controller).
I would like to specifically stress that “ROG Connect” button and a special white USB 2.0 port not only allow controlling the system through a different computer using the technology of the same name, but also help to easily reflash the mainboard BIOS using “USB BIOS Flashback” button. Just connect the drive with the new BIOS version, press the button and wait. There is no need for any special utilities, no need to access the BIOS or load the operating system, there is even no need to completely assembly the computer system. This technology should work even without the CPU and memory installed: all you need is power.
Like other Asus mainboards, Asus Rampage IV Formula/Battlefield 3 uses very convenient wide “Q-Slot” locks on the graphics card slots and single-sided “Q-DIMM” memory slot locks. There are eight four-pin fan connectors onboard: two for processor fans, three for system fans, and three additional connectors right next to the thermal diode headers. There are a few red LEDs in the lower left corner on the back of the mainboard, which light up the clear track and the “Republic of Gamers” logo.
Despite extended functionality, numerous additional controllers, various control chips and informational components, the developers managed to keep the classical PCB layout and stay within the ATX size standards. This is obviously one of the advantages of this mainboard, especially since the developers of Asus P9X79 Deluxe and Gigabyte GA-X79-UD7 had to get beyond the standard ATX dimensions. The mainboard can accommodate only four memory modules, just like the Gigabyte board, but the latter is larger than the ATX standard in all dimensions.
BIOS Functionality
In our previous reviews of Asus products we have already talked about Asus EFI BIOS – an overall very successful implementation of the UEFI standard (Unified Extensible Firmware Interface). However, the BIOS of “Republic of Gamers” mainboards differs not only by its unique color scheme and extended functionality, but also by the fact that “Extreme Tweaker” section with most overclocking and fine-tuning options is the first section that you see when you access it. You can chance frequencies, multipliers and voltages in the main section window. You don’t need to go to the monitoring section to check on the current voltages, as they are all displayed right here, next to the corresponding parameters that allow adjusting them as needed. Very convenient implementation!
As usual, some parameters are singled out on separate pages to unload the main section a little bit. Namely, the memory timings have been moved into a separate page. Unlike regular Asus mainboards, here we see a few preset profiles, “Rampage Tweak” parameter allows switching between the compatibility mode and performance or overclocking mode, and the scroll bar indicates that the list of timings available for adjustment is truly gigantic. We are going to show only the first screen here:
Parameters responsible for processor, memory and chipset voltages are also singled out in a separate sub-section:
There is no need to access the “CPU Performance Settings” sub-section, because the board will automatically adjust the power consumption depending on the overclocking settings selected.
The “GPU.DIMM Post” sub-section contains the basic graphics card and memory modules settings.
I have always doubted the practical value of the “GPU.DIMM Post” sub-section. For example, in the memory page we can only see the current operation mode for the memory modules.
The graphics card page will show the current operation mode for the graphics cards in exactly the same way.
However, this time “GPU Post” page contained a new sub-section called “PCIe Lane Simulator”. In the previous chapter of our review we dedicated an entire paragraph to describing the way PCI Express x16 slots work depending on the number of graphics cards installed in them. I hope you understood everything at that point, but if you didn’t, this simulator will visualize how the operation modes will change if the number of graphics cards in the system changes.
In the end of the “Extreme Tweaker” section there are three sub-sections containing additional options for configuring the CPU, memory and chipset.
The next section is the well-familiar “Main”, where you can change not only date and time but also the interface language.
We are already well familiar with the functionality of the sub-sections in the “Advanced” section, which is also pretty clear from their names.
The “CPU Configuration” sub-section contains basic information about the processor and allows us to manage some processor technologies.
All parameters related to power-saving have been singled out into a separate page called “CPU Power Management Configuration”.
“Monitor” section allows controlling the temperatures, voltages and fan rotation speeds, which are arranged on different pages.
“Voltage Monitor” page shows current voltages.
“Temperature Monitor” page shows temperature readings including those taken off additional diodes.
The rotation speeds of all connected fans are reported on the “Fan Speed Monitor” page:
The fan rotation speeds can be adjusted on a separate page called “Fan Speed Control”. You can select one of the preset modes for the processor and case fans (Standard, Silent or Turbo), or manually adjust the settings to your liking. As for the rotation speed of additional fans, it may be set in the interval between 50 and 90% or tied up to the corresponding thermal diodes.
The “Boot” section allows adjusting the settings, which will be applied during system startup.
There is an option in the “Tools” section that will let you turn of the PCB glowing LEDs. There are also a few sub-sections.
The built-in utility for BIOS updating called “EZ Flash 2” is one of the most convenient and functional utilities of the sort. However, once Asus transitioned to EFI BIOS, it has slightly changed for the worse. Namely, now the current BIOS version is by default saved only in the root folder of the connected drive, while previously it could be saved in any selected folder.
Just like on mainboards from many other manufacturers, we can check the info recorded in the memory modules SPD.
Asus mainboards allow saving and quickly loading up to eight full BIOS settings profiles. Each profile may have a short name reminding of its contents. Since there are two BIOS chips on this board, the total number of profiles that can be saves is twice that amount and equals 16.
You can switch between the two BIOS chips by pressing the corresponding button or in the “BIOS FlashBack” sub-section. The second option in this sub-section will allow you to copy the contents of one BIOS chip into another one.
By saving the necessary settings in the “Go Button File” sub-section, you will be able to instantly overclock the system by simply pressing the “GO” button.
The last section is “Exit”, where you apply all changes, reset all settings to defaults or switch to “EZ Mode”.
However, this time “EZ Mode” turned out to be almost completely nonoperational, which didn’t really matter to us, because it was of no practical value to begin with.
Overall, Asus EFI BIOS could be a great example of one of the most successful transitions from the regular BIOS to UEFI BIOS. Its RoG modification not only looks different, but also offers an extended list of adjustable settings. Unfortunately, some of the inconvenient implementations we pointed out haven’t been fixed yet, even though it’s been over a year since Asus EFI BIOS first came out. It is even more upsetting that we occasionally uncover new issues, which we are going to discuss in detail in the chapter on mainboard operational and overclocking specifics.
Testbed Configuration
We carried out our tests on a testbed that included the following components:
- Asus Rampage IV Formula/Battlefield 3 rev.1.03 mainboard (BIOS version 1005);
- Intel Core i7-3930K CPU (3.2-3.8 GHz, Sandy Bridge-E rev.C2, 32nm, 130 W, LGA 2011);
- 4 x 4 GB DDR3 SDRAM Corsair Vengeance CMZ16GX3M4X1866C9R (16 GB, 1866 MHz, 9-10-9-27 timings, 1.5 V voltage);
- MSI N570GTX-M2D12D5/OC graphics card (Nvidia GeForce GTX 570, GF110, 40 nm, 786/4200 MHz, 320-bit GDDR5 1280 MB);
- Crucial m4 SSD (CT256M4SSD2, 256 GB, SATA 6 Gbps);
- Noctua NH-D14 CPU cooler;
- ARCTIC MX-2 thermal interface;
- CoolerMaster RealPower M850 PSU (RS-850-ESBA);
- Open testbed built using Antec Skeleton system case.
We used Microsoft Windows 7 Ultimate SP1 64 bit (Microsoft Windows, Version 6.1, Build 7601: Service Pack 1) operating system, Intel Chipset Software Installation Utility version 9.3.0.1019, Nvidia GeForce Driver 285.62 graphics card driver.
We had a few minor problems during the system assembly on Asus Rampage IV Formula/Battlefield 3 mainboard. The thing is that despite a lot of additional controllers and other components on the PCB, it meets the ATX dimensions standards, unlike larger LGA 2011 models from Gigabyte and Asus, which we tested before. In fact, it is one of the mainboard’s advantages, but it was a pretty tight fit. As a result, the graphics card installed into the first PCI Express x16 slot was dangerously close to Zalman CNPS12X CPU cooler, and the memory modules with tall heat-spreaders, had to be installed at a small angle even when using the farthest DIMM slots from the CPU socket. However, the latter problem got resolved on its own. The tall heat-spreaders on Corsair Vengeance CMZ16GX3M4X1866C9R memory modules are designed not as traditional thick plates, but are made of thin aluminum, which is of about the same thickness as the food cans. So, we removed two heat-spreaders in order to be able to use the Zalman CNPS12X cooler, and left the other two on. However, you have to apply some force when pushing the modules into the DIMM slots. In this case the relatively thin heat-spreaders got slightly bent and reshaped and eventually one of them fell off by itself and the other one needed just a little bit of help from us. Of course, only those users who install and remove memory modules frequently may eventually face the same problem, and the majority will most likely never experience it. Moreover, this isn’t really a problem, because DDR3 memory modules working at 1.5 V nominal voltage do not heat up even under heavy load, so the heat-spreaders perform mostly aesthetic functions.
Operational Specifics and Automatic Overclocking
During system startup only Asus mainboards from the “Republic of Gamers” series can display the actual processor frequency, even if the CPU has been overclocked. All other mainboards, including the regular Asus boards, display the nominal CPU frequency or nothing at all, just like Intel boards and Gigabyte boards after transitioning to UEFI BIOS.
With default settings Asus Rampage IV Formula mainboard worked perfectly fine, but as soon as we increased the memory frequency we faced the same exact problem as before with Asus P9X79 Deluxe. Intel Turbo Boost technology doesn’t work correctly any more, the processor clock frequency multiplier increases to the maximum possible value for the particular processor model even under heavy load and not to whatever is required by the specifications. So the only way to return the mainboard back to normal operational mode is by adjusting the parameters manually. Moreover, we uncovered one more issue, which we haven’t yet seen on any other Asus mainboard before: “CPU Power Phase Control” parameter in the mainboard BIOS turned out non-operational at all. If we selected the “Optimal” setting for it, the board started fine, but then inevitably hung right after the OS finished loading.
You may have noticed that the mainboard BIOS had a lot of new features related to automatic system overclocking.
Even common Asus mainboards have “CPU Level Up” parameter that allows increasing the processor clock frequency to the set level. In our case, when we set it to “Auto”, the base clock frequency increased to 106 MHz. As a result, the CPU frequency accordingly rose to 4028 MHz and the processor core voltage – to 1.25 V. It is also possible to use overclocking profiles instead of “CPU Level Up”. For example, there is a Normal OC Profile, in which case the base clock will increase to 125 MHz, the processor clock multiplier will be set at a fixed value of 35x resulting in 4375 MHz clock frequency. In this case the processor Vcore will be raised to 1.4 V and the memory frequency – to 2000 MHz; all power-saving technologies will be disabled. If you select gaming profile, then the base and memory frequency will remain at their nominal values, the CPU Vcore will increase to 1.4 V and its clock multiplier will vary between 44x and 47x depending on the load type. With the Extreme (Low Current) overclocking profile the base clock will increase to 131 MHz, the multiplier – to 38x, which will make the CPU work at 4985 MHz with all power-saving technologies disabled and the memory – at 2100 MHz. The CPU Vcore in this case will be raised to 1.55 V. In case of Extreme (High Current) profile everything will be exactly the same, only the CPU Vcore will be set even higher: at 1.6 V.
There are many different ways to overclock, but in my opinion, none of them are optimal. Even if the power-saving technologies aren’t forced off, they will still remain only partially operational, because in all cases the processor core voltage is increased and locked at a certain level, which means that it won’t reduce in idle mode. It seemed that we had tried everything automatic overclocking had to offer, but then we suddenly uncovered one more possibility. I believe you rarely pay attention to the list of “hot” keys in the lower right corner of the screen, and that turns out to be a big mistake.
For example, when we talked about the BIOS functionality, we forgot to mention F3 key that launches the menu that will help you switch to a desired page much quicker.
Moreover, there is also F6 key that enables new automatic overclocking function called “Asus ratio Boost”. This is not a completely new technology, because Asus P9X79 Deluxe also featured it, though we missed it in our review. By pressing F6 you get a warning message that the system will be rebooted.
The funny thing is that by electing any of the above described methods of automatic overclocking the system would restart on its own without any special warnings, but in this case it doesn’t restart even though the warning message is displayed. So, we restart the system manually after applying all settings changes and then we realize that “Asus Ratio Boost” increases the CPU clock frequency multiplier to its maximum allowed by Intel Turbo Boost technology. At the same time, all power-saving technologies remain fully operational therefore we can definitely recommend this particular automatic overclocking method when you need to overclock your processor quickly, relatively safely and in an energy-efficient manner. Although in this case the resulting frequency will be pretty close to the nominal. However, everyone knows that no automatic overclocking can get even remotely close to what one can achieve by carefully adjusting all settings manually. In our case, this process turned out to be extremely complicated and painful, although we shouldn’t blame Asus Rampage IV Formula mainboard for it: the circumstances simply weren’t favoring us at that point.
Manual Overclocking
So far we have been using Intel Core i7-3960X Extreme Edition processor for our mainboard tests. It wasn’t the best CPU, at least because of its recommended price of over $1000. Moreover, it was an engineering sample based on pre-production C0 core revision, while the processors that hit the stores were already C1. Therefore, as soon as C2 processors came out, we got our hands on as many as three Intel Core i7-3930K CPUs, which differed from the exact same C1 processors by SPOKY marking. The only significant difference between this CPU and the top model is 12 MB L3 cache instead of 15 MB and 100 MHz lower nominal clock frequency, which, however, doesn’t really matter since its clock frequency multiplier is unlocked anyway. However, the MSRP of this processor is almost half of what the top model costs, which is still a lot, but definitely more acceptable.
The nominal clock frequency of the Intel Core i7-3930K processor is 3.2 GHz, but it is just a formality. In reality, Intel Turbo Boost technology makes the CPU work at 3.5 GHz even under heavy loads, and if only one processor core is utilized, the frequency may increase to 3.8 GHz. All three processors proved capable of working at 4.6 GHz frequency, which is more than the previous maximum of 4.4 GHz achieved on the old Intel Core i7-3960X Extreme Edition. We were hoping to hit 4.7 GHz, but we couldn’t get our system to work stably at this frequency. So, we ended up selecting the CPU with the lowest nominal core voltage, overclocked it to 4.6 GHz on our Asus Rampage IV Formula mainboard, and ran our performance and power consumption tests after that.
For comparison purposes we needed to obtain similar results on some other mainboard, but we have suddenly come across unexpected problems. Asus mainboards traditionally compete against those from Gigabyte, but we couldn’t overclock our processor to the same 4.6 GHz on the previously tested Gigabyte GA-X79-UD7. We didn’t test the stability at lower frequencies, because we were looking to compare mainboards against each other in identical operational conditions. So, we decided not to waste any time and try the Asus P9X79 Deluxe instead, which made a very good impression on us during the review process and received our highly positive remarks. However, this board also was unable to overclock the new processor to 4.6 GHz frequency. Having assumed that this processor could only overclock well on an Asus Rampage IV Formula mainboards, we took a different CPU sample, because all three Intel Core i7-3930K processors we had on hand were capable of reaching 4.6 GHz frequency with our test board. Nevertheless, nothing changed and we could only go as far as 4.4 GHz.
Quite unexpectedly, Intel DX79SI mainboard saved the day. In the past we weren’t particularly happy with its not very high performance. Moreover, at that time it was unable to overclock our processor to the same heights as Asus P9X79 Deluxe and Gigabyte GA-X79-UD7. However, a new BIOS version for this mainboard came out in the end of January, which helped this mainboard to overclock the CPU to 4.6 GHz and also almost completely eliminated the performance lag, as we will see in the next chapter of our review. It is still occasionally unable to load the operating system and throws in a BSOD every now and then during system reboot shut down, but these could be the issues associated with our specific mainboard sample. In any case, only Intel DX79SI mainboard could replicate the same overclocking results, as on Asus Rampage IV Formula, while all other mainboards failed to do so.
I have to say that during numerous test sessions and multiple CPU and mainboard replacements it turned out that the Zalman CNPS12X cooler wasn’t well suited for frequent mounting and dismounting. One of the hexagon retention screws came completely loose, and we ended up replacing the cooler with Noctua NH-D14, so that some of the tests on Asus P9X79 Deluxe and the final round of tests on Intel DX79SI were performed with the Noctua cooler. This cooler turned out to be not as gigantic as it seemed from the photographs and reviews and is quite comparable to Zalman CNPS12X in size. It is a little longer, mostly because of the external fan, but not as wide, so it won’t interfere with the graphics card installed into the slot closest to the processor socket as frequently anymore. The heatsink fin array starts higher above the PCB, so there won’t be any conflict with the memory modules featuring tall heat-spreaders. Noctua NH-D14 cooler is much easier to install, with just a regular screwdriver instead of a special wrench, which can be held vertically instead of being held at an angle, which was necessary with Zalman CNPA12X. Therefore, we have no concerns about the ability of this cooler to survive multiple installations.
Two fans of the Noctua NH-D14 cooler consume a little less energy than three fans of the Zalman CNPS12X, which required additional power consumption tests to be run on Asus Rampage IV Formula. Moreover, we also had to check the system stability once again, to ensure that with the new cooler the mainboard was still ca[able of overclocking our processor to 4.6 GHz. In our “Super 5” roundup of LGA 2011 coolers the winners were Phanteks PH-TC14PE and Zalman CNPS12X, while Noctua NH-D14 SE2011 stayed only in the fourth place. In our case the maximum CPU temperature during overclocking to 4.6 GHz immediately dropped 6 degrees lower than with Zalman CNPS12X cooler (75°C vs. 81°C)! Of course, we didn’t closely monitor the differences in ambient temperature, so there could be some room for error, but it could under no circumstances be as high as 6°C. Besides, all temperature readings are relative, and we decided to give it another shot and try conquering the notorious 4.7 GHz once again. Unlike Zalman CNPS12X cooler, which we used in the beginning of our test session, we managed to succeed with Noctua NH-D14!
It is hard to tell what caused such a big difference. First of all, the contact between the base of Noctua NH-D14 cooler and the CPU heat-spreader is excellent over the entire surface of the CPU. Moreover, the lower central fan cools processor voltage regulator circuitry components much better than Zalman CNPS12X, so the CPU doesn’t receive additional heat from the neighbors. We used a regular Noctua NH-D14 with a separately purchased retention kit for LGA 2011 so that we could also use it on other platforms when necessary, because the Noctua NH-D14 SE2011 modification is deg=signed exclusively for LGA 2011 processors.
We always overclock mainboards in such a way that they could be used for a prolonged period of time in this mode. We do not try to make our life easier by disabling any of the mainboard features, such as onboard controllers, for example. We also try to keep the CPU’s power-saving technologies up and running normally to the best of our ability. And this time all power-saving technologies remained up and running even in overclocked mode lowering the CPU voltage and frequency multiplier in idle mode.
Of course, as soon as we achieved stability at 4.7 GHz CPU frequency under Noctua NH-D14 cooler, all our hopes for a fair comparison in identical operational conditions vanished. Well, looks like Asus Rampage IV Formula simply doesn’t have worthy competitors in overclocked mode at this point. To be more exact, they could be out there, but we haven’t met them yet.
Performance Comparison
As usual, we are going to compare the mainboards speeds in two different modes: in nominal mode and during CPU and memory overclocking. The first mode is interesting because it shows how well the mainboards work with their default settings. It is a known fact that most users do not fine-tune their systems, they simply choose the optimal BIOS settings and do nothing else. That is why we run a round of tests almost without interfering in any way with the default mainboard settings. For comparison purposes we will also include the results of the previously reviewed Intel DX79SI mainboard. The results on the diagrams are sorted out in descending order.
We used Cinebench 11.5. All tests were run five times and the average result of the five runs was taken for the performance charts.
We have been using Fritz Chess Benchmark utility for a long time already and it proved very illustrative. It generated repeated results, the performance in it is scales perfectly depending on the number of involved computational threads.
A small video in x264 HD Benchmark 4.0 is encoded in two passes and then the entire process is repeated four times. The average results of the second pass are displayed on the following diagram:
We measured the performance in Adobe Photoshop using our own benchmark made from Retouch Artists Photoshop Speed Test that has been creatively modified. It includes typical editing of four 10-megapixel images from a digital photo camera.
In the archiving test a 1 GB file is compressed using LZMA2 algorithms, while other compression settings remain at defaults.
Like in the data compression test, the faster 16 million of Pi digits are calculated, the better. This is the only benchmark where the number of processor cores doesn’t really matter, because it creates single-threaded load.
Since we do not overclock graphics in our mainboard reviews, the next diagram shows only CPU tests from the 3DMark11 – Physics Score. This score is obtained in a special physics test that emulates the behavior of a complex gaming system working with numerous objects:
We use FC2 Benchmark Tool to go over Ranch Small map ten times in 1920×1080 resolution with high image quality settings in DirectX 10.
Resident Evil 5 game also has a built-in performance test. Its peculiarity is that it can really take advantage of multi-core processor architecture. The tests were run in DirectX 10 in 1920×1080 resolution with high image quality settings. The average of five test runs was taken for further analysis:
We see a great illustration of the known fact that related mainboards working in identical testing conditions demonstrate about the same performance. Now that we have a new BIOS version in place, Intel DX79SI doesn’t fall behind so dramatically anymore and the difference in mainboards’ almost never exceeds 1%. Only in 7-zip and FarCry2 tests it is a little higher than usual.
Unfortunately, we were unable to compare mainboards in identical conditions during CPU overclocking, because of all mainboards we tested only Intel DX79SI could overclock our CPU to 4.6 GHz, while all others failed to do so. In the meanwhile, Asus Rampage IV Formula allowed us to overclock the same processor to 4.7 GHz that is why it is obviously faster in all tests for objective reasons.
Power Consumption
We performed our power consumption measurements using an Extech Power Analyzer 380803. This device is connected before the PSU and measures the power draw of the entire system (without the monitor), including the power loss that occurs in the PSU itself. In the idle mode we start the system up and wait until it stops accessing the hard disk. Then we use LinX to load the CPU. For a more illustrative picture there are graphs that show how the computer power consumption grows up depending on the number of active execution threads in LinX (both at the default and overclocked system settings). The mainboards on the diagrams are sorted out in alphabetical order.
We often point out that on many mainboards certain power-saving technologies are disabled by default. Therefore, besides power consumption in nominal mode with all default settings, we also measured the power consumption of test systems with all power-saving technologies (including the proprietary ones) manually enabled. The difference between these two tests is usually quite obvious. Here is what it looks like for Asus Rampage IV Formula
You can clearly see that if all power-saving technologies, including Asus’ proprietary ones, are manually enabled, the mainboard power-consumption is slightly lower in all modes. I have to remind you that this time we were unable to take advantage of the non-operational “CPU Power Phase Control” parameter, meaning that the special technology, which dynamically changes the number of active phases in the processor voltage regulator circuitry depending on the operational load, didn’t work. Had it been otherwise, the difference could be greater. However, when we tested the Intel DX79SI board, we didn’t detect any difference in power consumption at all. So, we should give Intel due credit for making sure that all power-saving technologies work on their mainboard absolutely correctly right from the start, so enabling them manually doesn’t have any effect on the system power consumption. This is definitely an advantage, but there is also another side to it. The new BIO finally has the options for configuring the proprietary power-saving tools, such as intelligent dynamic adjustment of the number of phases in the processor voltage regulator circuitry depending on its operational load. “Processor Power Efficiency Policy” parameter allows selecting different operational modes, but unfortunately, we didn’t detect any difference once we enabled the “Balanced” mode. Therefore, in this case, just like on Asus mainboard, there is no additional benefit from using the balanced or optimized mode.
As a result, if we compare the power consumption readings taken off tested mainboards in nominal mode, Intel board will always be more energy-efficient than Asus board, because it has all power-saving technologies up and running right from the start.
If we enable all existing power-saving features, the power consumption of Asus mainboard will reduce, but Intel board is still unattainably better.
And of course, during overclocking Asus’ power consumption levels are indisputably higher, because it overclocks CPUs better, among other things.
However, we have also measured the power consumption of both mainboards when the CPU was overclocked to 4.6 GHz on both of them. In this case, the obtained results will be a little different from what we have seen earlier.
In idle mode and under small operational loads Intel mainboard is still ahead, but under heavy loads its power consumption increases dramatically and Asus mainboard takes the lead.
Conclusion
I assume that those who have just read this review have no doubts whatsoever that Asus Rampage IV Formula will get the most positive verdict from us. And it is really well-deserved: the board is neatly and securely packed, comes with excellent set of accessories, which include a themed key-strap and a Battlefield 3 coupon for the Asus Rampage IV Formula/Battlefield 3 model. Despite a large number of additional controllers and other components, the PCB is laid out in very smart and convenient way and even fits into the ATX standard. “Extreme Engine Digi+ II” voltage regulator supplies stable power flow to the processor; its heating components are topped with heatsinks using reliable screw-on retention. Four graphics card slots allow building AMD Quad-GPU CrossFireX or NVIDIA 4-Way SLI graphics configurations, with special accelerated operation modes kicking in for configurations with three or more cards. SupremeFX III technology enabling protection against EMI and offering special PCB paths layout ensures high sound quality and gold-plated connectors minimize output distortions.
In fact, there are features and technologies for any situation. “X-Socket” technology will let you use the old LGA 1366 cooler, “ROG Connect” will allow you to manage your system via a different PC, “GameFirst” technology will allow you to control network traffic. The extended functionality includes two BIOS chips, two connectors for processor fans, three additional fans that can also take thermal diodes. There are a lot of buttons that make working with this mainboard much easier, POST-code indicator and Q-Led diodes will help identify the issues that occur on system startup. “Probelt” onboard voltage read points and “Voltiminder LED II” diodes will assist in voltage monitoring. US BIOS Flashback technology eliminates any possible incompatibility with the new processor models. Very convenient Q-DIMM and Q-Slot connectors will ensure that the system assembly will go smoothly and replacing graphics cards or memory modules will be easy. We also shouldn’t forget about an entire group of components that make overclocking with liquid nitrogen much easier: LN2 jumper, Slow Mode switch and Q reset button.
The modification of Asus EFI BIOS for “Republic of Gamers” mainboard series not only looks different, but contains more parameters than the BIOS of regular mainboards. Overall, this BIOS is very convenient to work with, although most of our comments did refer to the issues we uncovered with some of its features and functionality. We are already familiar with some of them for more than a year, but they haven’t been fixed yet: now you can save the BIOS only in the root folder of the drive, you can’t save the turned off startup logo in the settings profiles, “EPU Power Saving Mode” technology gets turned off frequently. We have serious concerns that one more issue, which we came across on two different Asus mainboards, may join them shortly: when the memory frequency gets changed, Intel Turbo Boost technology stops working correctly. And on top of that we uncovered yet another problem: non-operational “CPU Power Phase Control” parameter, which actually prevented us from using the board’s ability to dynamically change the number of active phases in the processor voltage regulator circuitry depending on the current operational load.
However, despite these little issues, the board boasts an unprecedented number of indisputable advantages. Even if we forget for a second about all its highs (which is virtually impossible), it would still get our Editor’s Choice just for its overclocking potential alone. No other mainboard we tested so far can compete with Asus Rampage IV Formula in this aspect that is why we are proud to award it with our Editor’s Choice title
At the same time, it is really upsetting that Asus P9X79 Deluxe was also one of them, although in the beginning we had very high hopes about it. At the same time we were very pleased with Intel DX79SI, which fell just a tiny bit behind the leader and improved its performance dramatically with the new BIOS version. And of course, we should give due credit to Noctua Company for a very high-quality, well-made and securely packaged, easy to use and most importantly, extremely efficient Noctua NH-D14 cooler, which helps Asus Rampage IV Formula mainboard to fully reveal its undefeated overclocking potential.