Biostar TA990FXE: First Mainboard with Native Bulldozer Support

At first glance Biostar mainboards are exactly the same as all others, but if you take a closer look at them you will find a lot of peculiarities and distinguishing features. Biostar TA990FXE is based on a combination of AMD 990FX North Bridge and AMD SB950 South Bridge, so it will be interesting to find out how it is different from similar products from other mainboard makers available today.
Standardization is one of the base principles, which helped personal computers to spread practically all over the place. For the users it means that they do not need to wait until someone designs and manufactures a computer of the user’s desired configuration. No, we take a mainboard of choice, install our CPU and cooling system, and pair them with a suitable graphics card and memory. Then we install the drives and power supply unit into the system case, connect the monitor, keyboard and mouse and here we are – the fully-functional computer system is all set and ready to go. Even if it differs from a mass production model, the difference is only for the best, because all the components have been carefully selected to meet our specific needs and abilities.
The only problem DIY users face these days is the problem of choice. There are a lot of almost identical memory modules using the chips from the same maker and featuring similar characteristics. Many graphics cards differ only by their packaging, bundles accessories and stickers. Even mainboards may often be very similar to one another even though they have different cooling systems, different variety of onboard controllers and different individual components layout. However, there is one mainboard maker, whose mainboards are always a little different. No, I am not talking about the mainboards from the biggest CPU maker. The mainboards from Biostar Company don’t look strange or unusual at first glance, and in fact, they even seem to be just like most other mainboards out there. However, if we take a real close look at these products, we will notice a lot of unique distinguishing features that make them stand out.
Today we are going to talk about Biostar TA990FXE mainboard for AMD Socket AM3+ processors from Bulldozer family. It is based on a combination of AMD 990FX North Bridge and AMD SB950 South Bridge, so it will be interesting to find out how it is different from similar products, which we have already reviewed before. We are going to compare this mainboard against Asus Crosshair V Formula, Gigabyte GA-990FXA-UD7 and MSI 990FXA-GD80, which we reviewed within the same roundup as well as against Asus Sabertooth 990FX.
Packaging and Accessories
Biostar TA990FXE mainboard is shipped in a vertical box of standard size without a carry-handle or any other additions. The package is designed primarily in red:

The last Biostar mainboard (TZ68K+ model), which we tested in our lab, arrived in a blue box that is why we assumed that they color coordinate the mainboards with either AMD or Intel platform: mainboards for Intel processors use blue packaging, while mainboards for AMD processors – red packaging. However, this assumption didn’t prove to be correct. Previously we have come across Biostar mainboard packaging of many different colors including gold and black. Moreover, Biostar TP67XE was also shipped in a red box, although it was based on an Intel chipset and supported Intel processors.
Besides the mainboard inside an antistatic pouch, you also get the following few accessories:
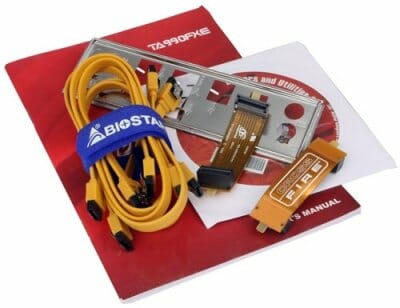
- Four Serial ATA cables with straight metal connector locks;
- Velcro tie with the Biostar logo;
- Two flexible bridges for AMD CrossFire graphics configurations;
- I/O Shield for the back panel;
- User manual;
- CD disk with software and drivers.
You don’t really need flexible bridges to build an AMD CrossFire graphics sub-system that is why they aren’t included with all the graphics cards out there, but this mainboard comes with two bridges like that. Another piece of luxury, in my opinion, is the reusable Velcro tie, which is bundled with all or almost all Biostar mainboards. It is very convenient for cable management inside or outside the system case.
Design and Functionality
As we have been promised and as we have expected, Biostar TA990FXE doesn’t strike us in any particular way with its exterior looks. It looks like a common mainboard, with the nearly classical and therefore most convenient design. So, how does it differ from the other manufacturers’ mainboards, which we tested before?
As for the supported CPU types, everything is exactly the same here. The board can work with the new Socket AM3+ as well as the older Socket AM3 with up to 140 W TDP. However, it only supports no more than 16 GB of system memory, while all others allow installing up to 32 GB. However, this is the information from the manufacturer web-site, while the user manual included with the board promises up to 32 GB RAM support. The graphics card slots also work differently. The mainboard formally supports up to three graphics cards, as you can guess by looking at three PCI Express 2.0 x16 slots and two flexible bridges for AMD CrossFire configurations included with the accessories. But in reality the mainboard is designed to only work with two graphics cards. Why? Not only because the third graphics card slot has only four PCI-E lanes from the South Bridge at its disposal, which will have its toll on performance. But mostly because the second and third graphics card slots are located to close to one another, so that the dual-slot cooling system of the graphics card installed into the second slot will block the third slot completely.
In fact, I am not really upset about this whole situation and do not consider it an issue that the board can only work with only two graphics cards simultaneously. Not that many users work with dual-card configurations, and triple-card configurations are even rarer. Instead, the functionality of the AMD 990FX chipset allows the two graphics cards in a system like that to work at full PCI Express 2.0 x16 speed without any limitations. The only drawback in this case is that the mainboard doesn’t support Nvidia SLI and you can only use AMD based graphics accelerators for multi-card configurations. Another shortcoming is the lack of fan connectors. There are only three of them on Biostar TA990FXE, and only the rotation speed of the processor fan can be adjusted. The heatsinks on the chipset North Bridge and on the processor voltage regulator components are pretty massive and are connected with each other via heatpipe, but all three mainboard heatsinks use a pretty weak and unreliable retention – plastic push-pins with springs.
I am afraid you couldn’t notice it on the photographs, but even if you look at the pretty rough components layout, you will see a row of LEDs in the upper left corner of the PCB, right above the eight-pin ATX12V CPU power connector. These are NB/CPU Status LEDs, which allow users to visually monitor the status of Biostar’s proprietary technology, which dynamically changes the number of active phases in the processor voltage regulator circuitry depending on the operational load. You will find the Power On and Reset buttons in the lower right corner of the board alongside with the POST-code indicator. However, I have to admit that I only called these two identical and barely noticeable stumps “buttons” from force of habit. They could definitely use some caps and maybe even highlighting. However, the POST-code indicator will come in handy not only if you want to determine the cause of startup issues. After the startup is complete it will display lower CPU temperature read off a diode from somewhere around the CPU socket.
These are the ports and connectors available on the Biostar TA990FXE back panel:
- PS/2 connectors for keyboard and mouse;
- Coaxial and optical S/PDIF and six analogue audio-jacks provided by eight-channel Realtek ALC892 codec;
- Only four USB 2.0 ports, with only four more laid out as two onboard pin-connectors;
- IEEE1394 (FireWire) port implemented via VIA VT6315N controller, the second port is available as onboard pin-connector;
- eSATA port implemented via AMD SB950 South Bridge with five remaining SATA 6 Gbps ports laid out as onboard connectors;
- Two USB 3.0 ports (blue connectors) implemented via ASMedia ASM1042 controller, second controller like that provides an additional internal pin-connector for two more USB 3.0 ports;
- A local network port (network adapter is built around Gigabit Atheros AR8151 network controller).
The table below sums up all the technical characteristics of Biostar TA990FXE mainboard:
At this point we can conclude that Biostar TA990FXE mainboard is almost the same as other products based on the same chipset we have tested so far. The difference is that the four memory DIMMs it can accommodate can only add up to 16 GB total RAM size, while others support up to 32 GB. The preferable graphics card configuration with this mainboard can only include two graphics cards, and Nvidia SLI is not supported at all. You can connect three cooling fans to this mainboard, with only one (processor) fan supporting rotation speed adjustment. It doesn’t have any additional drive controllers, is equipped with two ASMedia ASM1042 controllers for USB 3.0, which we have only seen on Asus mainboards before, and for the Gigabit network they use Atheros AR8151, which we have never seen before on any other mainboards. Out of fourteen USB 2.0 ports originally supported by the chipset, there are only eight on Biostar TA990FXE: four on the back panel and four in the form of onboard pin-connectors. The cooling system heatsinks use not very secure and reliable push-pin retention.
BIOS Functionality
When we power on the board we usually see a startup image. If you disable the startup image, you will see the mainboard model name, BIOS version, current processor and memory frequencies and the list of hot keys.
You need to press F9 to launch a boot-up menu, and F12 will open the BIOS updating utility.
In our Biostar TZ68K+ review we already discussed the interface of the Biostar UEFI BIOS. Overall, everything we said back then is true for the Biostar TA990FXE mainboard, too, although there still are a few distinguishing differences. When you enter the BIOS you get to the “Main” page, as usual. However, the list of BIOS sections has been shifted to the bottom of the screen for some reason. Although the text is also duplicated as icons and the name of the current section is highlighted.
The functionality of sub-sections in the “Advanced” section can be easily guessed from the sub-section names.
First let’s check out the “CPU Configuration” section, where we can find basic information about the system processor and configure some processor technologies. You notice immediately that C1E is disabled by default and there is no HPC Mode parameter, which should prevent the CPU frequency from dropping under heavy load.
The “SMART FAN Control” sub-section allows us to select one of the preset fan modes for the CPU fan: Quiet or Aggressive. You can also adjust the settings manually, if you wish. It is very convenient that the system allows you to calibrate the fan first to make sure that the settings are what they say they are. Only the processor fan speed can be adjusted, although unlike the Biostar mainboard for Intel processors, this one also supports three-pin fans. Unfortunately, the rotation speed of two other fans cannot be adjusted in any way.
“PC Health Status” section reports current voltages, temperatures and fan rotation speeds.
“Chipset” section includes three sub-sections: “North Bridge”, “South Bridge” and “Onboard Device”. It allows configuring the SATA ports, enabling and disabling USB, audio, network and FireWire controllers.
“Boot” section allows configuring startup parameters: prompt timeout length, startup logo display, boot-up devices order, etc.
Despite a lot of information you see in the “Security” section, the only thing you can do is set the user or administrative password.
Most settings that you will use to configure or overclock your system are gathered in “O.N.E.” section. Unfortunately, Biostar’s proprietary ability to select on its own a BIOS section as a startup page, which we really liked, is no longer here. Moreover, this section has been segmented into numerous sub-sections.
“Over Voltage Configuration” page allows you to control and adjust the voltages. All parameters only add certain values to the nominal settings, but you can set the memory voltages below the nominal, which is a great feature if you are using low-voltage memory modules. If the set values are very far from their nominal originals, the settings will be highlighted yellow, and then red. The only inconvenience is that we do not know what the current voltages are, and need to return to the “PC Health Status” section to find this out.
“Biostar Memory Insight” sub-section shows the timings recorded in the memory modules SPD.
“AMD Pstate Configuration” page allows changing the processor clock frequency multiplier, CPU core and North Bridge voltages, North Bridge frequency.
You configure the frequency and width of the HyperTransport bus in “Hyper Transport Configuration” sub-section.
If you have already forgotten what memory timings you need to set, you will have to go a few pages back to the “Biostar Memory Insight” sub-section first, because the next page in our list called “DRAM Timing Configuration”. This is where you adjust your memory frequency and timings.
Although configuring memory frequency and timings may seem very simple and obvious, you can still make mistakes here. The frequency can be set between 800 and 1600 MHz, higher frequencies are available only if you overclock your system by raising the base clock frequency. By the way, Asus mainboards allow setting the memory frequency at 2133 MHz. As for the memory timings, you can configure them for each memory channel separately, or for both of them at the same time. Of course, I decided to go with the second option and was very surprised when I discovered after rebooting my system that the timings hadn’t actually changed. Setting “Both” for the “DRAM Timing Mode” parameter doesn’t at all mean that you will be changing the memory timings for both memory channels at the same time. I had to pay attention to the scroll bar on the right: set the timings for one channel and then scroll the page down and repeat the same for the second channel. As far as I remember, MSI mainboards used to employ this extremely inconvenient way of configuring memory, but they have got rid of this unnecessary complexity long time ago.
At the same time we uncovered yet another problem with the new UEFI BIOS of the Biostar mainboards: the window for the text info is not big enough. There is a pretty large company logo at the top of all screens, with smaller section icons beneath it and the section names written above them. As a result, there is not that much space left for the actual BIOS parameters.
“MCT Configuration” page has a few more parameters related to the memory sub-system.
As for the last sub-section called “G.P.U. Phase Control”, it has nothing to do with the graphics cores. “G.P.U.” stands for Green Power Utility. It allows disabling automatic adjustment of the number of active phases in the processor voltage regulator circuitry depending on its load. This function is enabled by default, which we are very pleased with.
“Save & Exit” section has some profile-related options: you can save and quickly restore up to five different settings profiles. Unfortunately, you no longer can name the profiles to your liking. Only the date and time get recorded automatically for each saved profile.
The transition of Biostar mainboards to UEFI BIOS has been an overall success, but numerous little issues are, frankly, quite disappointing. It is very inconvenient that the sections menu is at the bottom of the page, the window for the text information is way too small, so you have to use the scroll bar most of the time. It is difficult to adjust voltages without knowing their current values, the memory timings need to be set twice, individually for each of the memory channels. The rotation speed of the case fans cannot be adjusted either. For some reason they got rid of the option that could allow you to select a BIOS section as a startup page, which we really liked. You no longer can provide your individual settings profile with a descriptive name. Of course, these are just the first versions of the new UEFI BIOS, the company developers constantly continue to improve it and a lot of these issues may be fixed later on. We hope all the upcoming changes will be only for the best.
Testbed Configuration
We carried out our tests on a testbed that included the following components:
- Mainboard: Biostar TA990FXE ver. 5.0 (BIOS version 99FAD907);
- AMD FX-8150 CPU (3.6 GHz, Zambezi (Bulldozer), AM3+);
- 2 x 2048 MB DDR3 SDRAM Patriot Extreme Performance Viper II Sector 5 Series PC3-16000, PVV34G2000LLKB (2000 MHz, 8-8-8-24 timings, 1.65 V voltage);
- MSI N570GTX-M2D12D5/OC graphics card (Nvidia GeForce GTX 570, GF110, 40 nm, 786/4200 MHz, 320-bit GDDR5 1280 MB);
- Kingston SSD Now V+ Series (SNVP325-S2, 128 GB);
- Scythe Mugen 2 Revision B (SCMG-2100) CPU cooler and an additional 80×80 mm fan for cooling of the area around the CPU socket during overclocking experiments;
- ARCTIC MX-2 thermal interface;
- CoolerMaster RealPower M850 PSU (RS-850-ESBA);
- Open testbed built using Antec Skeleton system case.
We used Microsoft Windows 7 Ultimate SP1 64 bit (Microsoft Windows, Version 6.1, Build 7601: Service Pack 1) operating system, Nvidia GeForce Driver 280.26 graphics card driver.
Operational and Overclocking Specifics
The system assembly on Biostar TA990FXE didn’t pose any problems. The only difficulty we had was to find a rotation speed variator for the additional fan. Despite weak retention of the cooling system heatsinks, they all heated up substantially even when the system worked in nominal mode. Therefore, additional cooling was absolutely necessary, though the board is only capable of adjusting the rotation speed of one fan – the processor fan. One of the board’s indisputable advantages is the fact that it has native support for the new Bulldozer processors. It booted immediately with our AMD FX-8150 processor: we didn’t need to search for some old Socket AM3 CPU in order to reflash the BIOS. Unlike other similar mainboards, which have been in the development stage since summer and some of them even since spring, Biostar TA990FXE was released not too long ago. There is one single BIOS version available on the web-site from September 7, 2011. Despite this fact, this BIOS version is current; it supports new processors and contains the latest revision 1.1.0.0 of AGESA codes. So, when you are purchasing a new AMD FX processor for your Biostar TA990FXE, you do not need to worry about compatibility, as they should work perfectly fine together.
Unfortunately, when we discussed the BIOS functionality of this mainboard we pointed out that there was no “HPC Mode” parameter in the BISO options, which should prevent the lowering of the CPU clock frequency under heavy load. It means that you won’t be able to overclock new processors on Biostar TA990FXE. In other words, you will be able to overclock the processor, but you won’t achieve stability, because under heavy loads its frequency will drop to 3.3 GHz, which is even below the nominal values, so any type of stability testing makes absolutely no sense in this case. It was even more surprising to learn that this particular mainboard received an “Overclockers Choice Award” from one Russian web-site. However, since there were no actual photographs f the mainboard or benchmark results of any kind in that “review”, the editor didn’t ever hold Biostar TA990FXE mainboard in his hands. We, however, decided to do whatever it took to succeed at least a little bit and began our overclocking experiments with the automatic CPU overclocking system implemented on Biostar TA990FXE.
There is “OverClock Navigator” option in the “O.N.E.” section of the mainboard BIOS, which is set to “Normal” by default. You can only get full access to the options in this section if this parameter is set to “Manual”. If you set it to “Auto”, you will be able to use “Auto OverClock System” parameter. If it is set to “V6-Tech Engine”, the board increases its base clock to 210 MHz, and for “V8-Tech Engine” the frequency is increased to 215 MHz. the system will be overclocked to its maximum of 220 MHz base clock at “V12-Tech Engine” setting. However, in case of heavy load the processor clock multiplier will still drop to 16.5x, which makes this particular overclocking technique completely useless for the new processors overclocking. Even if we disregard the fact that new processors have an unlocked clock frequency multiplier and therefore are easier to overclock by raising the multiplier, and not the base clock.
The next idea was to use the company’s proprietary “T-Overclocker” utility. It looks like Biostar web-site has been dramatically redesigned this year, although the copyright symbol still indicates 2004-2009 timeframe. Despite this fact, it is still fairly difficult to locate the latest version of their T-Overclocker utility there, which was exactly what happened to us. We had to use the version available on the bundled CD disk. Unlike Biostar TZ68K+, which refused to work with this utility altogether, this time we were lucky and got it working. Although our joy was overrated.
The startup screen of this program displays the basic info about the processor and mainboard. I believe that there should be a CPU logo displayed in the lower right corner instead of the empty rectangle. Then you can check the data on the memory modules, and unlike the mainboard BIOS, this utility can’t read the modules’ X.M.P. profiles. The last tab will let you monitor the current voltages, temperatures and fan rotation speeds. Now let’s dwell on the “OC Tweaker” tab.
Unfortunately, the only things this program allows you to do are to change the base clock frequency and the PCI Express bus frequency. It is even unable to change the processor clock frequency multiplier, so it won’t be able to help us in any way during our overclocking attempts.
In conclusion we checked out the solution proposed by Biostar, according to which disabling “CPB Mode” parameter in the BIOS alongside with all options related to power-saving technologies should prevent processor frequency from dropping under heavy operational load. Unfortunately, it didn’t help and the frequency continued to drop and the only logical outcome resulting from disabling all power-saving technologies was increased to 130 W power idle mode consumption. So, on the one hand it is great that Biostar TA990FXE has native new Bulldozer processors support, but it is very disappointing that this support is, in fact, incomplete, and the mainboard doesn’t allow to fully overclock them.
We described this situation in detail to Biostar guys and even made a few short videos showing dynamically how the board drops the CPU frequency to 3.3 GHz under heavy load. Our efforts weren’t vain and in a few days we received a beta version of the new BIOS with the long-anticipated “High Performance Computing Mode” parameter (“HPC Mode”) in the “CPU Configuration” section of the BIOS.
Armed with this few option we continued our Bulldozer overclocking experiments, but to our regret the results didn’t prove up to our expectations. We were still unable to overclock our AMD FX-8150 processor, but instead we revealed a few more issues with the board. The more you work with a certain mainboard, the more unique things you learn about it. Unfortunately, all these new discoveries were primarily negative in nature.
You need to raise the CPU core voltage in order to overclock the processor. It may seem super easy to just add the necessary value to the defaults in the “over Voltage Configuration” page of the “O.N.E.” section of the BIOS. However, it turned out that “CPU Vcore” parameter supports an increment of 0.05 V, which is way too high for contemporary processors.
However, the “AMD Pstate Configuration” page offers one more option that could help increase the processor core voltage – “Core VID” parameter allows adjusting the Vcore with an acceptable increment of 0.0125 V. However, this parameter alone will not be enough for serious overclocking, so you will need to use both options at the same time, because “Core VID” allows setting the voltage no higher than 1.4 V. there are higher values available, too, but when we selected them the mainboard froze dead on boot-up. Only Clearing CMOS could get it out of that state, which is when we realized that that Clear CMOS jumper is indeed in a very inconvenient spot.
It is hard to remember when was the last time that the location of the Clear CMOS jumper was considered an issue. I think it has never come up, because the jumper on many mainboards has long been replaced with a much more convenient to use button. However, contemporary mainboards rarely need their CMOS to be cleared to begin with. “Watchdog Timer” technology monitors the POST process and in case of a freeze reboots the system in safe mode. Unfortunately, Biostar TA990FXE mainboard doesn’t have a Clear CMOS button. It also doesn’t have the “Watchdog Timer” technology, or maybe it was simply non-operational in these cases. So we had to use the jumper located on the right side of the PCB a little above the battery.
At first glance this location doesn’t strike you as inconvenient. But imaging an assembled system, when the memory modules are to the left of the jumper, the mainboard power connector in to the right and the graphics card is right beneath it. On an open testbed you can easily clear CMOS by disconnecting the power cable first. If you need to do this in a fully assembled system case, then you might also have to remove the memory modules or the graphics card, but most likely all of the above.
Unfortunately, all our efforts were in vain and the board still didn’t let us overclock our test CPU. No matter what frequency we set, there were errors during the stability tests, but in most cases the system would simply hang. The Reset or Power Off buttons didn’t help in getting the board out of the hanging state and we had to completely unplug the power cable, so that it could start again. We started at 4.5 GHz and little by little lowered the frequency to 4.2 GHz. This is when we stopped. AMD FX-8150 processor with only one utilized core is capable of increasing its frequency to 4.2 GHz due to Turbo technology. Even if the mainboard remained stable at lower clock speeds, the overclocked CPU would still be slower than the one working at its nominal speed and such “overclocking” makes absolutely zero practical sense. It is sad but we have to conclude that the current implementation of Biostar TA990FXE is unable to overclock Bulldozer processors.
Performance Comparison
As usual, we are going to compare the mainboards speeds in two different modes: in nominal mode and during CPU and memory overclocking. The first mode is interesting because it shows how well the mainboards work with their default settings. It is a known fact that most users do not fine-tune their systems, they simply choose the optimal BIOS settings and do nothing else. That is why we run a round of tests almost without interfering in any way with the default mainboard settings. For comparison purposes we also included the results from the recently tested flagship Bulldozer mainboards from Asus, Gigabyte and MSI, as well as Asus Sabertooth 990FX. I would only like to remind you that Asus Crosshair V Formula mainboard by default set the memory timings at 9-9-9-24-1T, Gigabyte GA-990FXA-UD7 – at 7-7-7-20-2T and only on Asus Sabertooth 990FX, Biostar TA990FXE and MSI 990FXA-GD80 mainboards we saw the correct timings from the memory modules SPD – 7-7-7-20-1T.
The results are sorted out in descending order on the diagrams and Biostar TA990FXE results are marked with darker color for your convenience.
We used Cinebench 11.5. All tests were run five times and the average result of the five runs was taken for the performance charts.
We have been using Fritz Chess Benchmark utility for a long time already and it proved very illustrative. It generated repeated results, the performance in it is scales perfectly depending on the number of involved computational threads.
A small video in x264 HD Benchmark 4.0 is encoded in two passes and then the entire process is repeated four times. The average results of the second pass are displayed on the following diagram:
We measured the performance in Adobe Photoshop using our own benchmark made from Retouch Artists Photoshop Speed Test that has been creatively modified. It includes typical editing of four 10-megapixel images from a digital photo camera.
In the archiving test a 1 GB file is compressed using LZMA2 algorithms, while other compression settings remain at defaults.
Like in the data compression test, the faster 16 million of Pi digits are calculated, the better. This is the only benchmark where the number of processor cores doesn’t really matter, because it creates single-threaded load.
Since we do not overclock graphics in our mainboard reviews, the next diagram shows only CPU tests from the 3DMark11 – Physics Score. This score is obtained in a special physics test that emulates the behavior of a complex gaming system working with numerous objects:
We use FC2 Benchmark Tool to go over Ranch Small map ten times in 1920×1080 resolution with high image quality settings in DirectX 10.
Resident Evil 5 game also has a built-in performance test. Its peculiarity is that it can really take advantage of multi-core processor architecture. The tests were run in DirectX 10 in 1920×1080 resolution with high image quality settings. The average of five test runs was taken for further analysis:
Biostar TA990FXE mainboard didn’t demonstrate anything remarkable in nominal mode. Since most of the time it fell into the lower portion of the diagram rarely making it to the middle, we even checked again to make sure that the settings didn’t differ from the nominal ones. Everything was in order: memory frequency and timings, North Bridge frequency and HyperTransport bus frequency. Turbo technology also worked fine increasing the CPU clock frequency when necessary. The explanation is that Biostar TA990FXE is simply not very fast. However, it is not that much slower than the competitors. In most cases it is about 1-1.5% behind one of the fastest products, Asus Sabertooth 990FX, and only in games this difference exceeds 2%. As for the overclocking tests, we had to give them up this time, because Biostar TA990FXE doesn’t overclock Bulldozer processors.
Power Consumption
We performed our power consumption measurements using an Extech Power Analyzer 380803. This device is connected before the PSU and measures the power draw of the entire system (without the monitor), including the power loss that occurs in the PSU itself. In the idle mode we start the system up and wait until it stops accessing the hard disk. Then we use LinX to load the CPU. For a more illustrative picture there are graphs that show how the computer’s power consumption grows up depending on the number of active execution threads in LinX (both at the default and overclocked system settings). The mainboards are sorted in alphabetical order on the diagrams.
We often point out that on many mainboards certain power-saving technologies are disabled by default. This time we decided to illustrate our discontent with this issue with numbers. We measured the power consumption of test systems in idle mode with default settings and then with all power-saving technologies manually enabled.
Biostar mainboards are usually quite economical, but this time we didn’t notice any significant differences from the other testing participants. By default the mainboard has almost all power-saving technologies up and running including the company’s own technology that dynamically changes the number of active phases in the processor voltage regulator circuitry depending on the operational load. Only C1E parameter was disabled for some reason. Despite our expectations, enabling it helped significantly lower the system power consumption.
As for the power consumption under heavy load, Biostar TA990FXE did just like all other testing participants in nominal mode. The tests in overclocked mode were not performed this time for the reasons explained above.
Conclusion
When we discussed Biostar TA990FXE mainboard, we were always bringing up certain issues. We still do not know for sure what the maximum supported system memory size is. Nvidia SLI graphics card configurations are not supported for some reason. The board has connectors only for three cooling fans, only one of which (the processor fan) allows adjusting its rotation speed. Out of fourteen USB 2.0 ports, which are supported in the chipset, the board only has eight – four on the back panel and four as two internal onboard pin-connectors. The cooling system heatsinks are fastened with not very reliable plastic push-pins with springs. The Power On and Reset buttons are hard to notice and inconvenient to use. “Watchdog Timer” technology is missing or doesn’t always do its job. There is no Clear CMOS button and the Clear CMOS jumper is in a very inconvenient spot. Numerous little issues in the BIOS are quite disappointing. It is very inconvenient that the sections menu is at the bottom of the page, the window for the text information is way too small, so you have to use the scroll bar most of the time. It is difficult to adjust voltages without knowing their current values; you need to use two parameters on two different pages to adjust the processor Vcore. The memory timings need to be set twice, individually for each of the memory channels. The rotation speed of the case fans cannot be adjusted at all. For some reason they got rid of the option that could allow you to select a BIOS section as a startup page and you no longer can provide your individual settings profiles with descriptive names.
Despite all these numerous shortcomings, there are a few very pleasant features, such as the company’s brand name reusable Velcro tie, which will be irreplaceable for cable management inside or outside the case. This is the first mainboard that has native support for the new Bulldozer processors and doesn’t require a BIOS update with an old CPU model. At the same time it is the first mainboard that didn’t allow us to overclock our test processor despite the fact that all necessary options and settings were formally present.
However, Biostar TA990FXE mainboard has one very strong response that may make up for all little issues and inconveniences mentioned above -extremely affordable price of about $130. I am sure a lot of users will be ready to compromise and disregard some of the issues if the price of the mainboard is justified by its functionality and meets their expectations. However, do not forget that there is another mainboard based on AMD’s flagship 990FX chipset – ASRock 990FX Extreme 3. This solution has more fan connectors, more USB 2.0 ports, and Nvidia SLI support. Maybe it is even capable of overclocking new processors, who knows? Overall, as we have already mentioned in the beginning of this article – the biggest challenge for the DIY users is to make the choice. We, in our turn, are simply trying to make sure you have everything you need to make this choice and be certain that it is the right one.