MSI Z87-G43 Review: Micro-Star’s Motherboards Were Changed

They feature absolutely new power scheme, layout and circuit board as well as a lot of software and hardware improvements. Moreover, instead the terrible Click BIOS II, contemporary MSI’s motherboards had received the brand new Click BIOS 4. We have a closer look at all of these features by reviewing mainstream Intel Z87-based motherboard by MSI.
Micro-Star Corporation currently outputs an extensive range of products under the MSI brand, from small things like USB splitters to large and expensive servers. But it began as a manufacturer of mainboards and this product category remains prominent in what MSI has to offer. In our latest reviews of MSI mainboards we were not very enthusiastic about them for a number of reasons. Notwithstanding the general appearance of overclocker-friendliness, they only let you increase their voltage by fixing it at a certain level. Since power-saving technologies are supposed to lower the CPU’s clock rate and voltage at low loads, that peculiarity made energy-efficient overclocking impossible. The second reason for our gripes was the fact that the BIOS parameters of MSI mainboards were interrelated in some complex and inexplicable ways. When we changed one option, we had to make sure this hadn’t affected some others. Otherwise, we might end up with quite different system settings from what we wanted.
It takes a lengthy and meticulous examination with various peripherals and applications to check out each of a mainboard’s features and capabilities. Our tests are brief so we can only learn about the behavior of the tested mainboard at its default settings and in overclocked mode. We also benchmark its performance and measure its power consumption. Yet even though we use but a limited selection of hardware components and software applications, we have had a lot of problems testing MSI mainboards. We had problems updating their firmware and saving BIOS settings in profiles. We couldn’t use their BIOS restore feature properly although the very fact that the BIOS had to be restored was a problem already. The last pair of MSI mainboards proved to be slower, even though not by much, than similar products from other brands. The only thing we could give MSI credit for was that its mainboards were generally more economical than their competitors.
So we used to be quite critical about MSI mainboards based on different chipsets and intended for different CPUs, but the company has done some good work prior to the release of Intel’s 8 series chipsets. MSI has taken over a year to develop the new product series which is said to be dramatically different from the previous one from such aspects as power system, PCB layout and design, etc. Instead of the familiar MSI Control Center the mainboards now come with the new exclusive utility MSI Command Center but it has a similar scope of capabilities. The sloppily made and much criticized MSI Click BIOS II is replaced with MSI Click BIOS 4, skipping the version number 3 for some reason. With so many changes to check out, we were looking forward to testing MSI’s new product series and learning if they had got rid of their past problems without acquiring new ones.
We are currently in the first stage of our series of reviews of Z87-based mainboards. We started out by testing the ASUS Z87-K, then proceeded to the Gigabyte GA-Z87X-D3H and finally checked out the Z87 Extreme4 from ASRock. We are yet to review flagship and special models targeted at gamers and enthusiasts while the tested mainboards are all midrange or even entry-level products. The Z87-G43 model we’ve picked up from MSI’s product range is in the same category. We’ll use it to evaluate the changes MSI has introduced in its mainboards recently.
Packaging and Accessories
MSI’s new product packaging looks different, yet its design follows the same principles as before. On the front of the box we can see the product’s model name and the logos of its technologies. For detailed descriptions of the mainboard’s features and capabilities, refer to the back of the box. You can also find the product specs there.
The mainboard is wrapped into an antistatic pack. Below it, under a sheet of cardboard, there are accessories. Since the MSI Z87-G43 is an entry-level product, its accessories aren’t numerous. You just get the basic things necessary to use the mainboard:
- Two Serial ATA cables with metal connector locks, half with L-shaped locks and another half – with straight ones. All cables are designed for SATA 6 Gbps devices;
- I/O Shield for the back panel;
- User manual;
- A booklet about the MSI Z87-G43-based system assembling;
- DVD disk with software and drivers.

Design and Features
Show us the logo of a new mainboard series, and we’ll tell you the name of the marketing department’s head. We’re joking, of course, yet the parallel approaches of the mainboard makers do make us suspect that their marketing people are constantly moving from one company to another or study at the same establishments, or just watch closely what their competitors are doing. Just consider: the ASUS Z87-K features a set of engineering solutions known under the name of 5X Protection. The Gigabyte GA-Z87X-D3H has Ultra Durable 5 Plus technologies. The ASRock Z87 Extreme4 supports many of ASRock’s A-Style capabilities. It is no wonder then that MSI’s LGA1150 mainboards sport Military Class 4 (which means high-quality components) and Military Class Essentials (tolerance to high humidity, EMI, electrostatic discharges and high temperatures).
Mainboards from all the major mainboard makers have black PCBs these days. As opposed to the downright gloomy models from ASRock and Gigabyte, the Z87-G43 has such embellishments as blue slots and decorative inserts on its heatsinks.
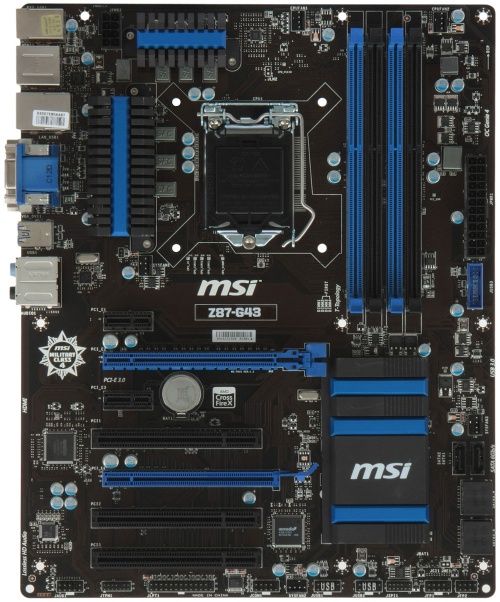
The mainboard’s voltage regulator doesn’t incorporate a lot of power phases, yet is sufficient for powering any modern 4th generation Intel Core processor. Rather large heatsinks are secured with screws on its hottest components. The Z87-G43 being an entry-level model, it cannot share the CPU-integrated PCIe lanes between two graphics slots and doesn’t support Nvidia SLI technology. A discrete graphics card is supposed to be plugged into the top PCIe 3.0 x16 slot whereas the second PCIe x16 slot (at x4 speed) is based on the chipset’s PCIe 2.0 lanes. You can use the two to build an AMD CrossFireX configuration. Besides them, the mainboard offers two PCIe 2.0 x1 and as many as three PCI slots for expansion cards.
The Intel Z87 chipset is responsible for the mainboard’s six SATA 6 Gbit/s ports. Two of the SATA connectors are vertical, so you can choose the more convenient way of plugging the cables in. The Z87-G43 has no additional controllers for more SATA, eSATA, USB or FireWire ports. Out of the chipset’s six USB 3.0 ports, only four are implemented: two as back-panel connectors and two as a single onboard header.
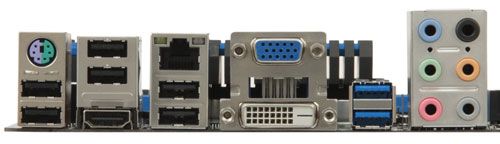
Here is the full list of the mainboard’s back-panel connectors:
- Universal PS/2 connector for keyboard or mouse;
- Six USB 2.0 ports, another four are laid out as three onboard pin-connectors;
- D-Sub, DVI-D, HDMI for displays;
- One local network port (network adapter is built on Gigabit Realtek RTL8111E network controller);
- Two USB 3.0 ports (blue connectors) implemented in the Intel Z87 chipset, another internal pin-connector allow two more USB 3.0 ports;
- One local network port (network adapter is built on Gigabit Intel WGI217VB network controller);
- Six analogue audio-jacks provided by eight-channel Realtek ALC892 codec.
MSI mainboards now feature PCBs made of tightly woven fabric while the number of PCB layers can be counted by the number of squares in the bottom left corner. The Z87-G43 has a 4-layer PCB. Things are not so clear in the bottom right corner, though. The leftmost connector in the photo is labeled, so we can easily identify one of the two onboard USB 2.0 headers but what do the other three connectors do?
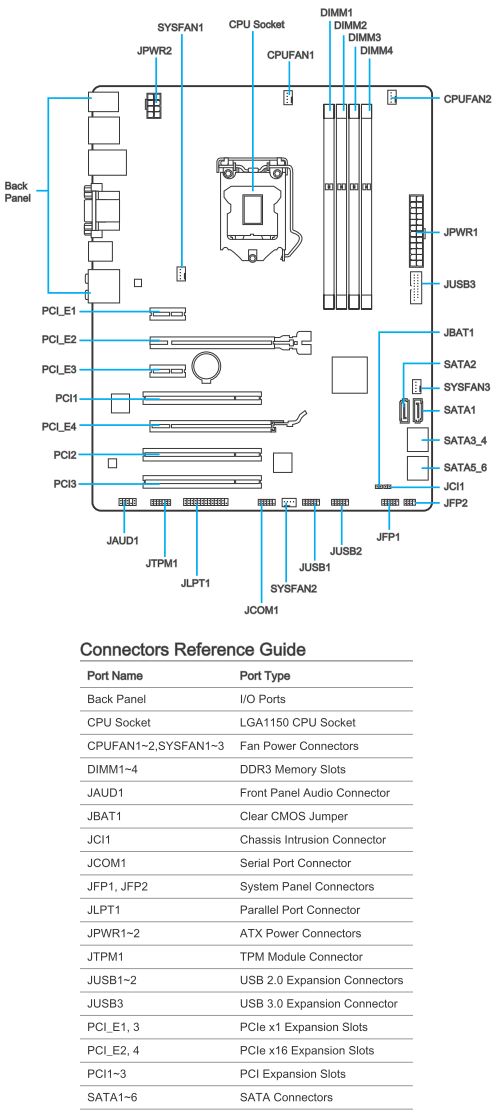
Some of them must be meant to connect to the computer case’s buttons and indicators. There are usually labels on the PCB to indicate which connectors serve that purpose, but we don’t see them here. MSI mainboards often come with M-Connectors that have labeled pins and simplify the connecting of the front-panel buttons and indicators but the Z87-G43, being an entry-level product, lacks them. It is only in the user manual that you can find how to use the rightmost JFP1 and JFP2 connectors. The purpose of the JSPI1 connector still remains unclear as it is missing in the flowchart pictured in the user manual.
We can figure out a few more peculiarities in the Z87-G43 design from its flowchart. For example, like on mainboards from some other makers, there are two CPU fan connectors. The Z87-G43 offers five fan connectors in total, and all of them are of the 4-pin variety. The COM port is not obligatory for modern mainboards but the Z87-G43 complements it with the even rarer LPT. It lacks any extras we’ve come to expect such as onboard buttons, POST indicators or voltage check points, yet we don’t count this in as a downside. The Z87-G43 is an entry-level mainboard and the extra capabilities would only make it too expensive for its market positioning.
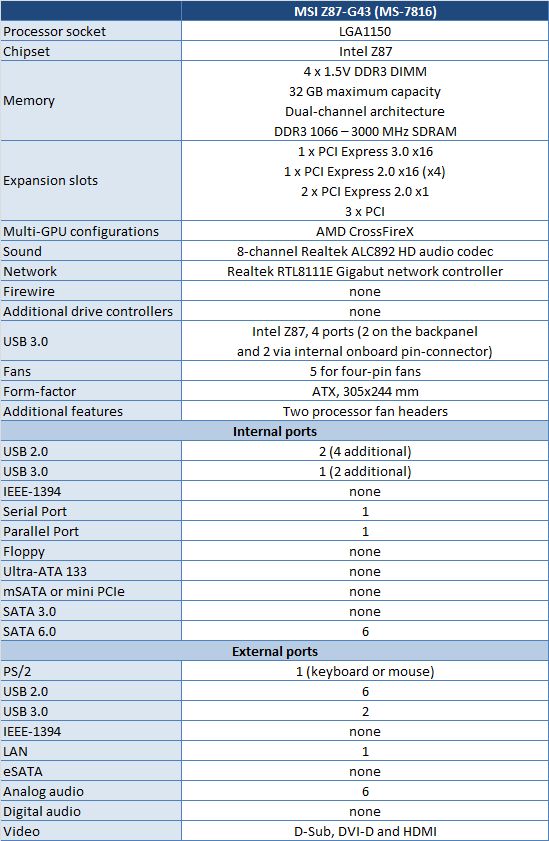
We’ve summed up the basic specs of the MSI Z87-G43 mainboard in the following table. Clicking on it will open a comparative table with specs of all previously tested mainboards, namely ASUS Z87-K, ASRock Z87 Extreme4 and Gigabyte GA-Z87X-D3H.
BIOS Capabilities
Most of our criticism about earlier products from MSI was somehow connected to their BIOS functionality, so we were looking forward to checking out the new MSI Click BIOS 4. To our surprise, its interface turned out to be much the same as the older MSI Click BIOS II.
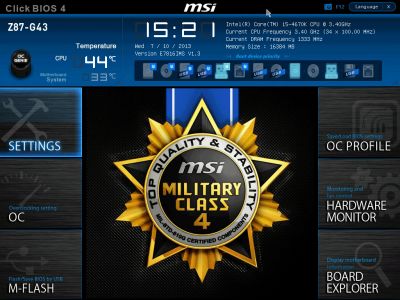
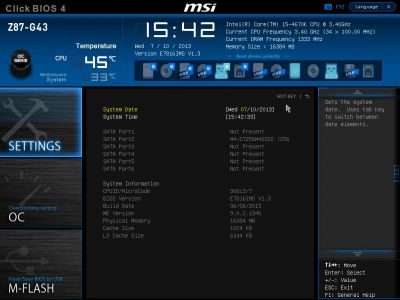
In the top of the start screen you can see an info panel with current date and time, CPU and mainboard temperatures. You cannot change the date and time here, though. Some basic system information is reported as well: the mainboard’s model name and BIOS version, base clock rate and CPU frequency multiplier, and the total amount and clock rate of system memory. All of this information isn’t vital, however. You could see it without even entering the BIOS by simply turning off the startup picture.
The center of the screen is where BIOS options are displayed, but now it is occupied by the Military Class 4 logo. There are icons of the main BIOS sections on both sides of it.
The current trend in BIOS design is to let the user customize the BIOS interface. So it would be much better if the central part of the start BIOS screen showed user-defined options instead of the logotype. In the current BIOS interface, the start screen is virtually useless. It only reports information we can get elsewhere. The dropdown menu in the top right corner lets you choose the interface language. The OC Genie button on the left is for automatic system overclocking. You can also specify the boot order by moving the boot device icons with your mouse. That’s all that you can do in the BIOS start screen. You have to move down into any of the BIOS sections to do more.
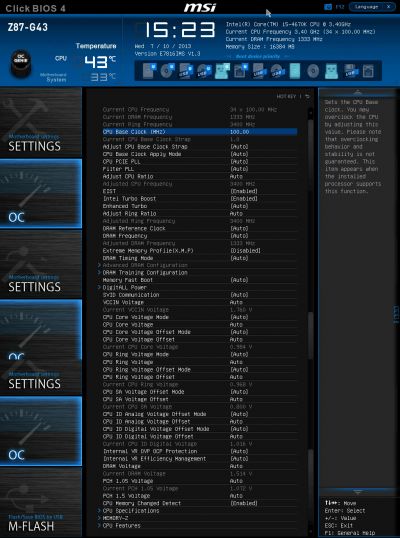
As usual, the Settings section goes first, but we go right into the next OC section which probably contains the most setup options. Here you can find almost everything you need to fine-tune and overclock. A number of info parameters report the current status of your computer.
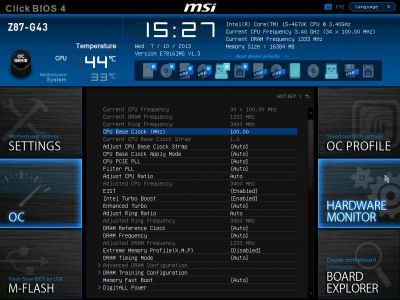
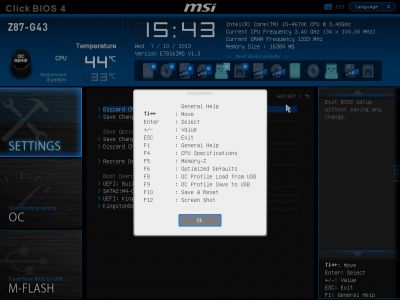
The new MSI Click BIOS 4 brings back the help system that disappeared in the earlier versions. When you select any of the BIOS parameters, you will get context-sensitive information about its purpose and value range in the panel on the right. And when you move your mouse pointer to the right edge of the screen, the hidden section icons will re-appear, so you can use them for quick navigation.
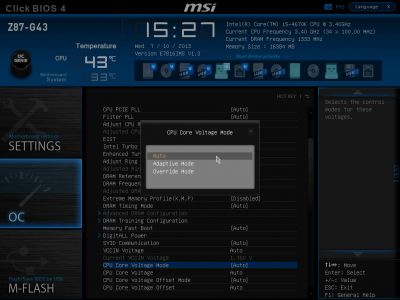
The My OC Genie subsection is nowhere to be found. This feature allowed you to overclock your computer automatically by specifying the desired values of certain parameters. The good news is that you can now not only fix the CPU voltage at a certain level, but also change it in the offset mode, just like on the majority of mainboards from other brands.
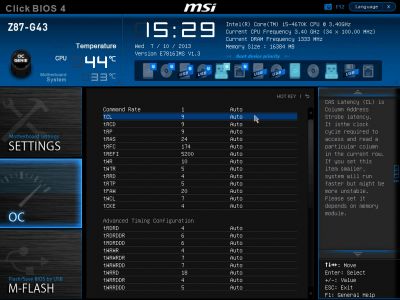
Some of the numerous settings of the OC section are located on individual pages. For example, there is a special page for memory timings (which can be the same or different for each of the memory channels).
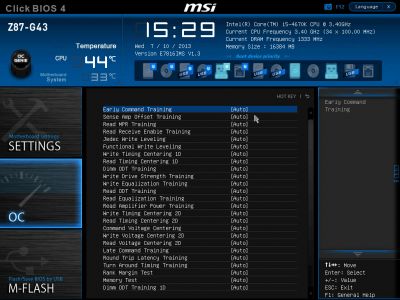
The new DRAM Training Configuration subsection is where you choose the required options.
The DigitALL Power page contains settings pertaining to the digital CPU voltage regulator.

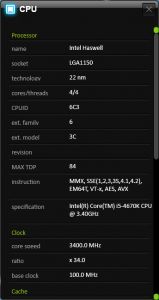
The CPU Specifications and Memory-Z subsections are purely informational. The former provides some basic info about the installed CPU.
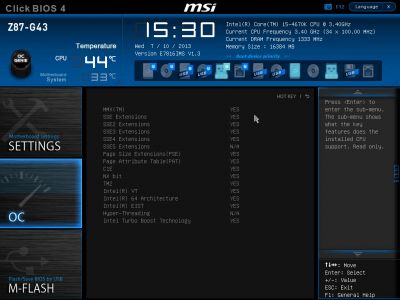
You can go further and learn about technologies supported by your CPU.
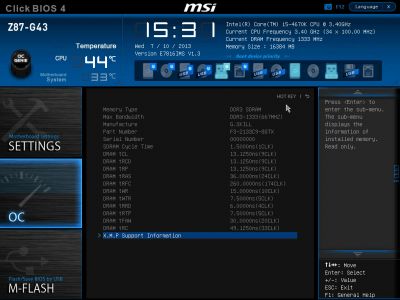
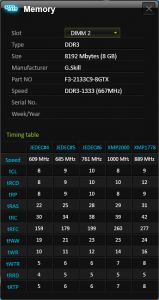
In the same way, the Memory-Z subsection shows you information about your memory modules (taken from their SPD). It is these settings that the mainboard applies by default.
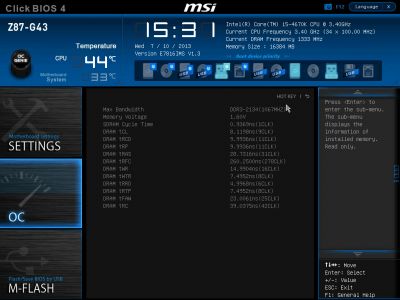
The real capabilities of the memory modules are defined in their XMP profile and you can take a look at them, too.
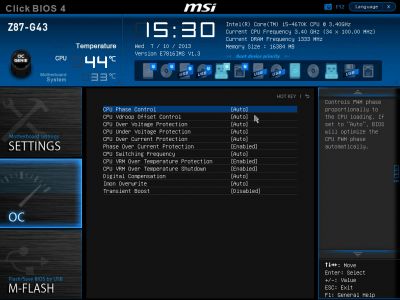
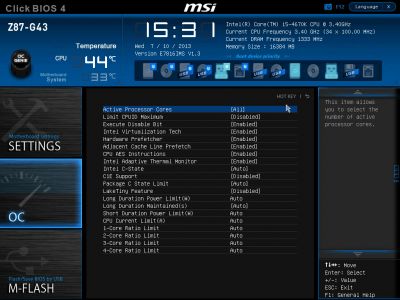
In the CPU Features subsection you control CPU frequency multipliers, power targets and various CPU-related technologies. This very important subsection goes last in our description, but you can access it easily since the subsections of the OC section are closed in a loop. You don’t have to scroll down to the bottommost parameters by pressing the Arrow Down key a lot of times. Just press the Arrow Up key once and you get right there.
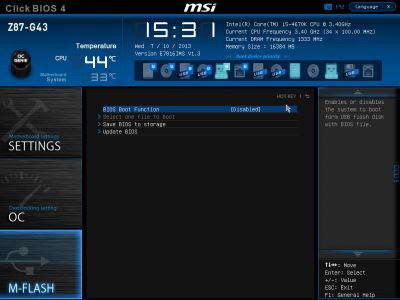
The OC section used to include a page called M-Flash, but now it is one of the main sections in its own right. Here you can boot up using a BIOS image from a USB drive. You can also save the current firmware or update it. There are certain restrictions. BIOS images are saved in the drive’s root folder only. They must also be placed there for updating. There is no file manager of any kind. NTFS is not supported, so the drive must be formatted as FAT or FAT32.
We never tried to boot up from a BIOS image located on a USB drive. We just never needed that. This time around we gave this feature a try, but got an error message in response.

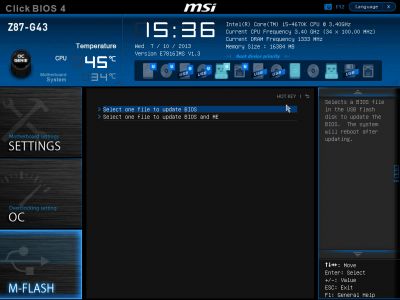
MSI’s firmware update procedure has become somewhat more sophisticated recently. There used to be only one option suggesting that you choose a firmware file to update to. Now there is a second option that lets you update both BIOS and Intel Management Engine simultaneously. It may be confusing for the user to choose between the two options, but MSI has assured us that they are going to change this and leave only one and unequivocal option in their BIOS update tool.
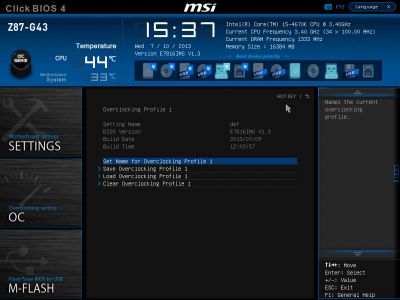
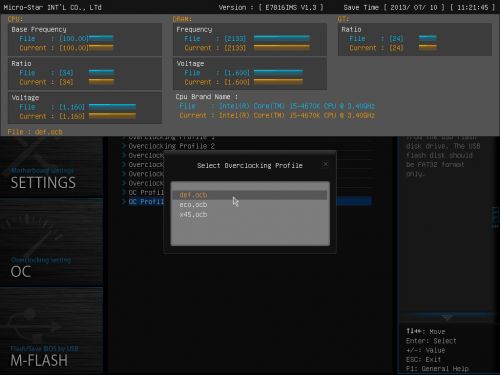
The next section, OC Profile, used to be an individual page of the OC section, too. Now it is independent and can store up to six full profiles with BIOS settings. Settings can be saved to and loaded from external drives. It is still not convenient that the BIOS interface doesn’t make it immediately clear which profiles are already in use.
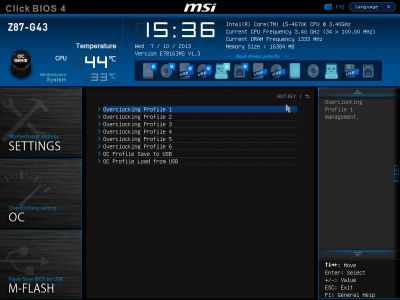
Otherwise, the profiles are easy to deal with. For each profile, its creation date and time and the BIOS version it refers to are saved automatically. Profiles can be given descriptive names and, when necessary, deleted.
One of the most anticipated innovations in the MSI Click BIOS 4 is the ability to compare BIOS profiles. The OC Profile Preview feature can be used to compare the current BIOS settings with those of a profile located on an external drive by several parameters. We’ll discuss it in more detail shortly.

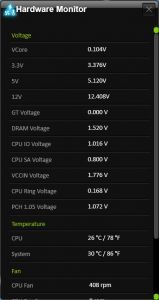
The Hardware Monitor section used to be hidden deep in the Settings section but now it is quite prominent. It has been redesigned, so instead of conventional text parameters we can see a chart that shows the correlation between the speed of the first CPU fan and the CPU temperature. Yellow and green lines appear on the right and start crawling leftwards. Since the CPU temperature is shown to the right of the diagram in yellow and the speed of the CPU fan is shown in green, we can surmise that the diagram represents the two parameters visually. The Fan Control panel below the diagram allows you to set up how the selected fan’s speed must vary depending on temperature. You can set the minimum and maximum temperatures and the corresponding speed of the fan by moving the sliders. Your changes are instantly reflected in the diagram. If you uncheck the Target Temperature checkbox, the dynamic fan regulation is disabled, so you can fix the speed at a certain constant level. The info panel at the bottom of the screen shows you the values of key system voltages.
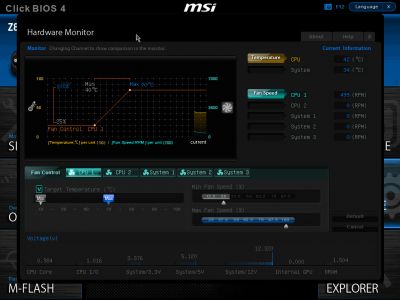
Unfortunately, neither of the two CPU fan connectors can regulate 3-pin fans as the system fan connectors do. The BIOS interface doesn’t have gaudy colors, but the traces of the previous BIOS screen left around the edges of the new window distract the eye. It would be better if the Hardware Monitor window opened in full-screen mode, completely covering the previous screen. It would also be useful if the user had an option to switch from the graphical to text-based interface.
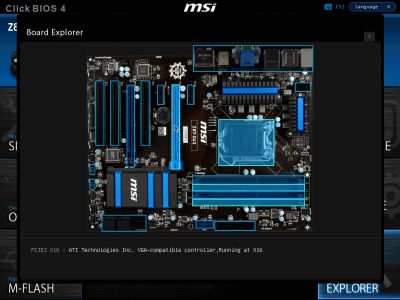
Next goes the new Board Explorer section, which is analogous to the System Browser section of ASRock’s BIOS. It shows a rather accurate picture of the mainboard, so you can learn about its components by moving your mouse pointer over it. As in the Hardware Monitor section, the previous screen can be seen around the section window.
Now let’s get back to the very first Settings section and browse through it a little.
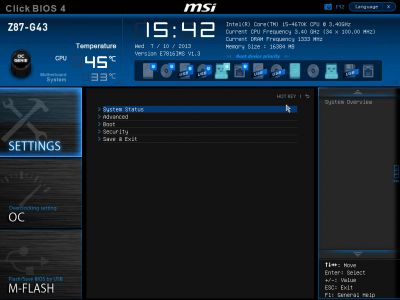
The System Status subsection is in fact the start screen you see when you enter the BIOS. It reports some basic system information.
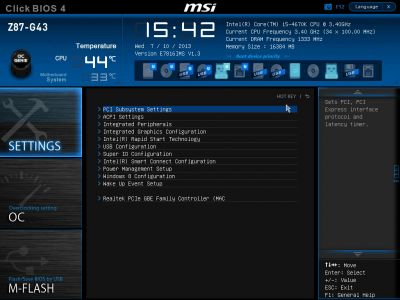
The Advanced subsection contains the same features as were present in the previous BIOS version. Here you can set up chipset-specific technologies like Intel Rapid Start and Intel Smart Connect. You can enable Windows 8 boot mode or speed up the startup procedure on the Windows 8 Configuration page.
The Boot subsection is where you define the boot device order and some other boot-related settings.
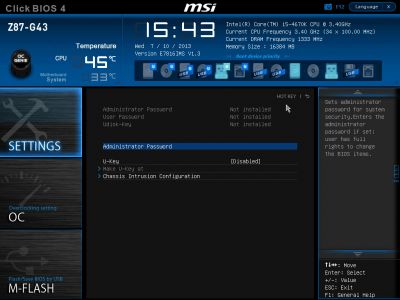
The earlier Security section is now available as a single page in the Advanced subsection. Besides enabling passwords like on other mainboards, you can use a regular USB drive as your access key. It is a special feature of MSI products.
The Save & Exit options are self-explanatory.

At any time and in any place you can hit F1 to output basic help information. Unfortunately, MSI has not implemented a hotkey for undoing your actions and returning to the previous parameter values. This can be done by means of Discard Changes in the Save& Exit subsection, so the free F7 key might be used for that purpose.
Our overall impression about the new MSI Click BIOS 4 is positive. The start screen now doesn’t have the ECO section that used to duplicate CPU power saving options and show current voltages. The Browser section was removed as it was rather useless and required installing the Winki 3 OS. Some programs were removed from the Utilities section, too. Instead, we have the more helpful M-Flash section for firmware updates and OC Profile for saving and loading BIOS profiles. The infrequently used Security section is transformed into a single page in the Settings section, just where it belongs. Context-sensitive help information about BIOS options is available. There is a new subsection DRAM Training Configuration and MSI’s mainboards now offer the same CPU voltage tweaking options as mainboards from other brands. The new Board Explorer section is hardly a valuable addition, but it does no harm, either.
Unfortunately, there are a few downsides that must be mentioned. The Hardware Monitor section was brought to the start screen from the depths of the BIOS interface, which is good. But the section itself is too sophisticated and unintuitive, so you have to spend some time figuring out what you can do with its options. The start screen has meager functionality. There are no interface customization options. The OC Profile Preview feature for comparing BIOS profiles proved to be useless as we will explain below. Some BIOS parameters are still ambiguous. It is unclear whether you should turn them on or off, and you just have to choose Auto and hope that the mainboard knows what to do.
So while there are numerous positive changes, we wish even more. In fact, we have the same MSI Click BIOS II but corrected. It would be appropriate to call it MSI Click BIOS 2.1 rather than give it the much higher version number which only reminds us of our unfulfilled expectations.
Exclusive Software
MSI provides a substantial software bundle for its mainboards. It includes a lot of exclusive utilities such as MSI Live Update 5 for updating firmware, drivers and other software or Super Charger for quick recharging of mobile gadgets connected to the mainboard. Sound Blaster Cinema will help you set up audio effects. Network Genie lowers network latencies. Intel Extreme Tuning Utility helps control system parameters and change them as necessary. Most of these tools are already familiar to us, so we will only discuss the new ones.
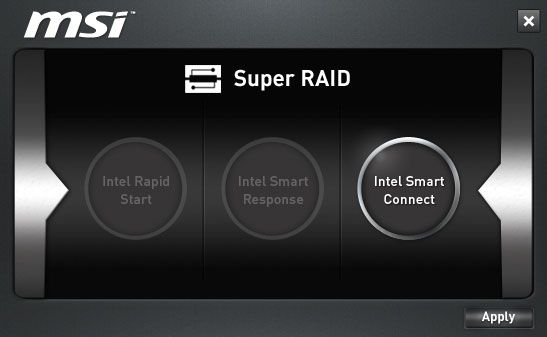
The name of the Super RAID utility isn’t quite appropriate. If you google it, you will get information about the namesake technology used in MSI notebooks. However, the Super RAID tool, like Gigabyte’s EZ Setup, is only meant to help you quickly and easily enable such technologies as Intel Rapid Start, Intel Smart Response and Intel Smart Connect.
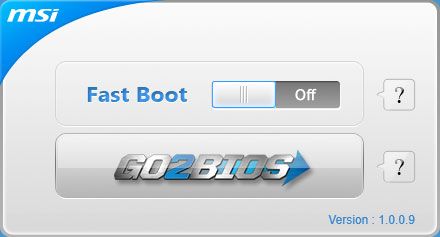
We like the Fast Boot tool. Like ASUS Boot Setting for ASUS mainboards and Restart to UEFI for ASRock mainboards, it reboots your computer right to the BIOS interface upon your choosing the GO2BIOS option. You don’t have to press any keys for that. Besides that, it lets you enable the fast boot mode.
Building, fine-tuning and overclocking their computers with their own hands, many enthusiasts take it for granted that other people do the same. However, the majority of PC users don’t really do anything like that. An experienced one would only go into the BIOS to Load Optimal Defaults and leave the rest of the settings as they are. The memory frequency is often left at its minimum, so there’s no talking about memory timings or other parameters that affect performance or usability or anything else.
We can remind you as an example that ASUS mainboards introduced the Fast Boot feature for starting up faster. It was enabled by default. So the mainboard would for the first time start at its normal speed but then the startup process would get so fast that it was just impossible to hit the BIOS loading key at the right moment. To avoid this problem, you had to disable the Fast Boot option or run the ASUS Boot Setting utility. Many users didn’t think about that, however, and there were a lot of tech support requests from people who couldn’t enter their mainboard’s BIOS. As a result, every ASUS mainboard is now accompanied with an Exclusive Boot Features brochure which explains such technologies as Fast Boost, ASUS Boot Setting, Direct BIOS Access and Windows 8 BIOS Boot Settings. The brochure is small but, if you multiple its production cost by the number of manufactured mainboards, there’s some substantial financial loss from the Fast Boot feature being enabled by default. Moreover, many users don’t read manuals, so we guess that ASUS’s tech support still spends a lot of time explaining how to enter the mainboard’s BIOS instead of solving really serious problems. Besides the financial losses, ASUS’s image may suffer. ASUS mainboards have always been regarded highly, but now they seem to start up in the “wrong” way!
Mainboards from ASRock, Gigabyte and MSI have fast boot options, too. Fortunately, they are turned off by default. This guarantees that there are no problems with entering the BIOS but many users will just never learn about that capability. If we take the MSI Z87-G43, you have to open the BIOS, choose Settings -> Advanced, find the Windows 8 Configuration page and enable the accelerated boot option. These actions can be done in just a few seconds, actually, yet most people won’t do them anyway. That’s why it is appropriate that the tiny utility Fast Boot not only helps enter the BIOS of MSI mainboards but also lets you enable the fast boot option. ASRock’s Restart to UEFI tool cannot do that whereas the ASUS Boot Setting utility hides this option among its settings.
The most notable change in MSI’s exclusive software bundle is the replacement of the earlier multifunctional tool MSI Control Center with another utility. The latter offers similar functionality, though, and even has a similar name, MSI Command Center. The info panel above shows the temperature and some basic facts about the OS, BIOS version, CPU and mainboard model names. Using the toolbar below you can switch to other program windows, return to default settings, apply your changes, and save or load a settings profile. The program opens on the CPU tab where you can control and adjust CPU-related parameters.
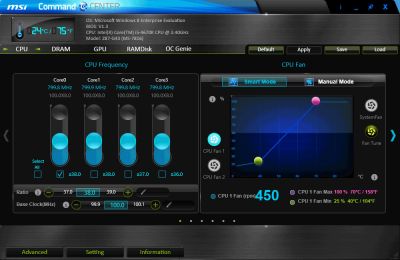
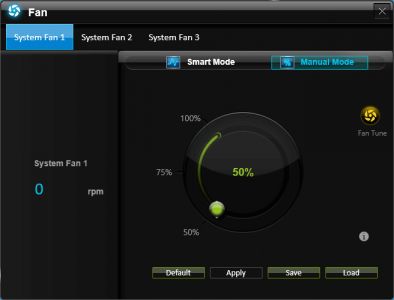
The diagram on the left shows the CPU’s current clock rate and frequency multipliers. The graph on the right reflects the correlation between the speed of the first CPU fan and the temperature. You can adjust it manually, use the automatic regulation (Fan Tune option) or fix the speed at a constant level. The second CPU fan and the system fans are regulated in the same way, but a popup window appears in the latter case.
There are three more buttons at the very bottom of the MSI Command Center window. When you click Advanced, labeled icons will slowly crawl onto the panel.
Clicking on the Voltage icon will open a voltage tuning window.
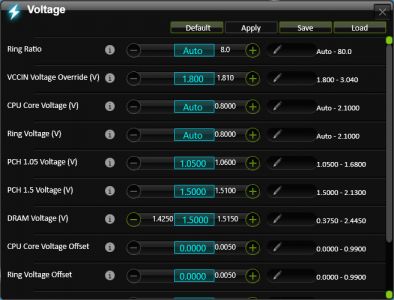
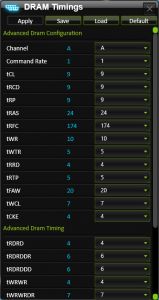
The Fan icon opens the fan setup window we’ve already seen. The DRAM icon helps adjust memory timings.
The Setting button in the bottom panel will show two more icons.

The Record button will give you another popup window where you can mark any voltages, fan speeds, temperature and specify an update rate for these parameters, so that they were recorded and visualized as a diagram.

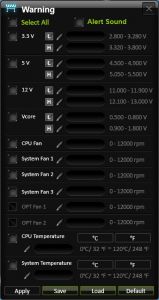
The Warning button will show you a window where you can specify adjustment ranges for such parameters as voltage, temperature and fan speed.
The Information button gives you as many as four icons.

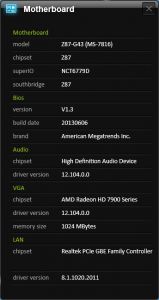
Clicking on the Motherboard, CPU, Memory and HW Monitor icons will open popup windows with corresponding information.
Now we move on from the CPU to the DRAM tab of MSI Command Center. The large CPU voltage regulator catches the eye but you can also notice two small windows on the right with memory frequency and voltage options.
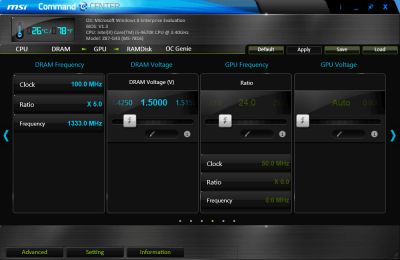
By the way, you can switch between the tabs by means of the blue arrows on the sides of the program window. The dots at the bottom indicate your current location. The active tab is marked with a green dot. It is somewhat confusing that the program has five tabs whereas the dots are six in number.
Now we move to the GPU tab and see one half of the screen occupied by the memory settings we’ve already seen. They are followed by options to change the frequency and voltage of the CPU-integrated graphics core.
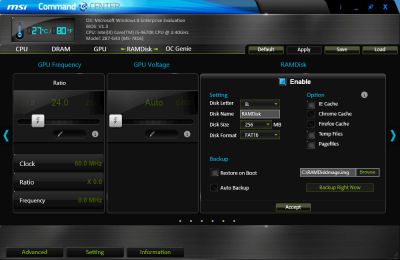
The RAMDisk tab will first show you the integrated graphics setup window but its main purpose is to create a virtual drive in the system memory. Like the XFast RAM feature of ASRock mainboards, it will make the computer more responsive by moving system cache from the conventional storage into the faster system memory. The virtual drive can be used as a regular storage device. Its contents can be saved as an image file and restored when the computer is restarted.
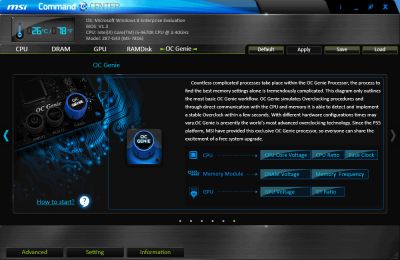
The OC Genie tab is about the namesake technology for automatic overclocking. We’ll tell you shortly how it works and what you can get by using it.
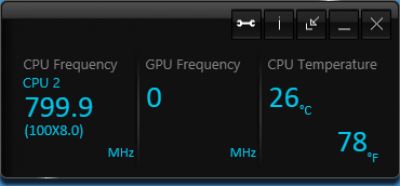
54The icons in the top right corner of the MSI Command Center application let you learn its version and close or minimize its window. You can also reduce it to a small info widget.
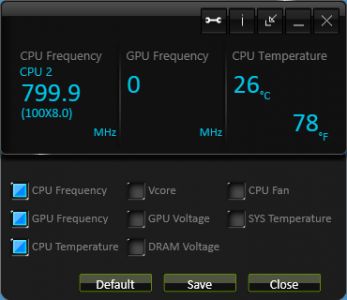
The intuitive wrench icon will open an additional panel with interface settings.
After using MSI Command Center for a while, we don’t think it’s a user-friendly application. Its interface is poorly designed. There are a lot of duplicate options and annoying popup windows.
Since a large part of the application window repeats the previous information in most of the screens, save for the first and last ones, it might have been reduced in size by half. The first screen should be split up into two separate tabs: CPU and Fan. The last screen, OC Genie, is not necessary at all since it contains just a single button which might be placed in the top panel, just like in the BIOS interface. As a result, we’d have a much smaller application window whose content would be much easier to take in. The application would only have five tabs, and the content of each tab would correspond exactly to its name. That would help avoid the duplicates. These are just a few improvements that come to mind right away. A professional interface designer would certainly come up with more solutions and would also think of a way to limit the number of popup windows or even get rid of them altogether.
Testbed Configuration
We performed all our tests on a testbed built with the following components:
- MSI Z87-G43, MS-7816 mainboard (LGA1150, Intel Z87, BIOS version V1.3);
- Intel Core i5-4670K CPU (3.6-3.8 GHz, 4 cores, Haswell, 22nm, 84 W, LGA 1150);
- 2 x 8 GB DDR3 SDRAM G.Skill TridentX F3-2133C9Q-32GTX (2133 MHz, 9-11-11-31-2N timings, 1.6 V voltage);
- Gigabyte GV-T797OC-3GD (AMD Radeon HD 7970, Tahiti, 28 nm, 1000/5500 MHz, 384-bit GDDR5 3072 MB);
- Crucial m4 SSD (CT256M4SSD2, 256 GB, SATA 6 Gbps);
- Scythe Mugen 3 Revision B (SCMG-3100) CPU cooler;
- ARCTIC MX-2 thermal interface;
- Enhance EPS-1280GA 800 W PSU;
- Open testbed built using Antec Skeleton system case.
We used Microsoft Windows 8 Enterprise 64 bit (Microsoft Windows, Version 6.2, Build 9200) operating system, Intel Chipset Device Software driver package version 9.4.0.1017, AMD Catalyst 13.4 graphics card driver.
Working in Default and Overclocked Mode
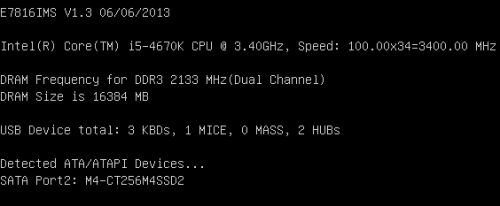
The picture the MSI Z87-G43 shows you while starting up resembles the design of its product box. Some of the active hotkeys are mentioned at the bottom of the screen, although the Tab key, which removes the startup picture, is not listed among them.

The active hotkeys will still be mentioned even when the startup picture is turned off with Tab or with the related BIOS option. At the top of the screen the information is outputted about the mainboard’s model name and BIOS version, memory frequency and amount, and connected USB devices and drives. The installed CPU is named correctly but its frequency is not always reported accurately. It is based on the Adjust CPU Ratio option in the BIOS’s OC section, but the actual CPU clock rate is going to be higher thanks to the Intel Turbo Boost technology. Moreover, the frequency multipliers of the CPU cores can be adjusted in the CPU Features subsection, and this is not counted in, either.
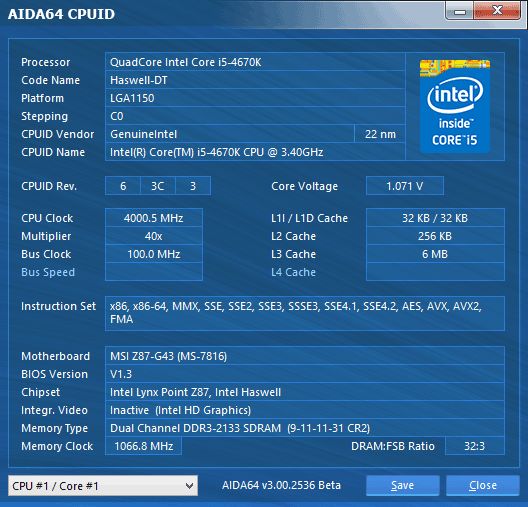
After the OS had been booted up, we found the CPU working in a nonstandard mode. At any load its frequency multiplier would be at the maximum which is normally used by Intel Turbo Boost for single-threaded loads only. For our CPU, it means a constant clock rate of 3.8 GHz instead of changing in a range of 3.6 to 3.8 GHz. If you want your CPU to work under standard conditions, you should just turn off the Enhanced Turbo option in the mainboard’s BIOS. That feature works by default, being set at Auto.
As we noticed above, MSI mainboards have always been economical and the new model carries this tradition on, as we will see shortly in our power consumption tests. However, if you manually change all the power-saving options of the CPU Features section in the mainboard’s BIOS from Auto to Enabled, the power draw will be significantly reduced. In other words, the Z87-G43 doesn’t use all of the power-saving techniques by default. This is typical of all LGA1150 mainboards we’ve tested so far. And the C1E Support option is even explicitly turned off by default on MSI mainboards.
Before experimenting with manual tuning and overclocking, we decided to check out the automatic overclocking feature OC Tuner. When you press the namesake button in the mainboard’s BIOS or in MSI Command Center, your computer will be rebooted and automatically overclocked. The XMP profile was used in that case for our memory modules, so their clock rate was increased to 2133 MHz and their timings were adjusted accordingly. Some other technologies of this kind omit to give a boost to system memory, which is not right. You need to overclock every component to reach maximum performance. The CPU was overclocked to 4.0 MHz. That’s not much but such modest overclocking is guaranteed to work with nearly any CPU and any cooler. The only downside we could see was that the frequency multiplier of the overclocked CPU wouldn’t go down at low loads.
MSI mainboards used to have a My OC Genie page in their BIOS where you could specify some of the automatic overclocking options. You can’t do that anymore, so when you start up your mainboard with OC Tuner enabled, you are warned against changing any overclocking related settings.

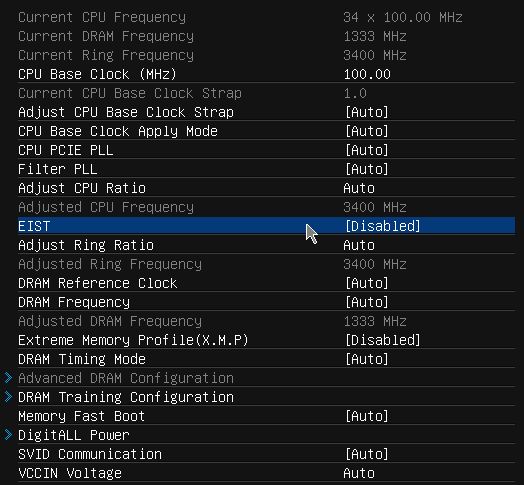
Still, we risked and tried to correct the single downside of the OC Tuner technology, but to no effect. The EIST option that controls Enhanced Intel SpeedStep turned out to be blocked in the BIOS, so we just couldn’t change it.
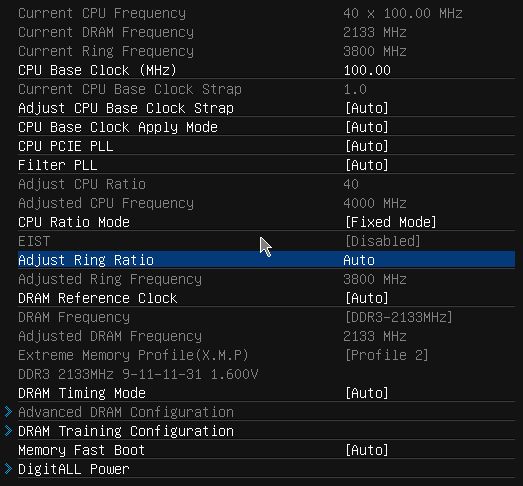
As we found out later, the EIST option becomes disabled and blocked even after your changing the Adjust CPU Ratio option. To avoid this, you have to change your CPU frequency multipliers in the CPU Features subsection.
Thus, the main downside of OC Tuner is that it disables power-saving CPU modes. Moreover, when you turn the overclocking feature off, the BIOS options do not return to their previous or default values. You have to change them manually (the EIST option appears again after your turning OC Tuner off, but it is disabled).
Then we wanted to check out if the MSI Z87-G43 could be overclocked without any volt-modding, so that Intel’s power-saving technologies were all up and running. In our tests of the Gigabyte GA-Z87X-D3H we found such overclocking possible and it is possible with the Z87-G43 as well. If you leave the CPU voltage option at Auto, it will not be increased by the mainboard, so the CPU-integrated voltage regulator won’t be increase it too much at high loads, either. The resulting voltage was somewhat different from what we had had with other mainboards at similar settings, though. We’ll explain this shortly.
Energy efficient overclocking is only possible if you don’t increase voltage. It will ensure higher performance and, despite the increased power consumption, you can expect long-term savings due to the reduced amount of energy spent for each computation. Energy efficient overclocking is going to be environment-friendly as we showed in our Power Consumption of Overclocked CPUs review. However, when we test mainboards, we want to check them out under different conditions and loads, so we choose what overclocking method ensures the highest results. Higher clock rates and voltages mean harsher test conditions and it is under such conditions that we can better see any flaws or problems in mainboard design. That’s why we overclock our CPU to 4.5 GHz in our mainboard reviews, fixing the voltage at 1.150 volts and using the XMP settings for our memory modules.

The MSI Z87-G43 could do that as well, but it was odd that the CPU voltage was about 1.140 volts instead of the expected 1.150 volts. The voltage regulator integrated into Haswell-based CPUs is highly precise, so we checked out everything and found that we hadn’t done anything wrong. The voltage was indeed set at 1.150. However, it was actually 1.140 volts after the OS had been booted. And the Current CPU Core Voltage option in the mainboard’s BIOS reported that it was 1.160 volts.
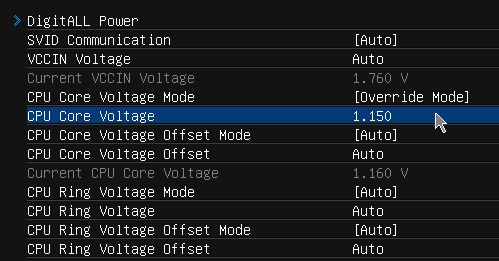
Despite this confusion, which is not typical of regular LGA1150 mainboard, we didn’t change anything in these overclocking settings. After all, our testbed would pass all the tests successfully even though the CPU voltage was lower in the OS and higher in the BIOS than we had selected.
When we overclock by fixing the CPU voltage at a certain level, some of the power-saving technologies get disabled. The CPU’s frequency multiplier is lowered at low loads but its voltage always remains high. Anyway, we stick to this overclocking for the duration of our tests, especially as it doesn’t affect the computer’s idle power draw much.

Now we want to devote the rest of this section to the new BIOS feature which is called OC Profile Preview. We got interested in it as soon as we heard about its existence. Of course, when you put much time and effort into fine-tuning your computer, you keep all the details in your head. So when you have a BIOS profiled named “def”, it obviously contains default system settings whereas a profile named “x45” is for overclocking the CPU to 4.5 GHz. However, after a few weeks or months, you will hardly remember the difference between two profiles you’ve named “x45-1” and “x45-2”. It is in this case that the comparison feature comes in handy, helping you quickly see any discrepancies.
Unfortunately and somewhat paradoxically, OC Profile Preview cannot be used to compare BIOS profiles. We couldn’t even find it at first. It is not mentioned in the user manual, so we had to contact MSI. It turned out that OC Profile Preview can only compare the current settings with a BIOS profile stored on a USB drive. That’s a downside as you have to load one profile into the BIOS and another to an external drive in order to compare them. The second downside is that the comparison is based on only six criteria: base clock rate, CPU frequency multiplier, CPU voltage, memory frequency, memory voltage, and frequency multiplier of the integrated graphics core. You won’t see any difference between the two profiles unless it affects these parameters. In fact, the CPU frequency multiplier is no use for the comparison because OC Profile Preview uses the Adjust CPU Ratio value in the BIOS’s OC section whereas we change CPU frequency multipliers in the CPU Features subsection (to avoid turning off EIST). In this case, OC Profile Preview won’t spot any difference between profiles.
That’s not the only problem, though. Before updating the mainboard’s BIOS we saved the settings for overclocking the CPU (to 4.5 GHz) and memory to a USB drive into a profile named “x45”. Then we decided to save the rest of the profiles, too. So we loaded the standard settings and saved them as a “def” profile. Then we manually enabled all power-saving technologies and saved this as an “eco” profile. Every profile works well and changes BIOS settings appropriately when loaded. However, OC Profile Preview cannot find any difference between the overclocked and default settings as in the example below. The same goes for the comparison with the eco profile – we don’t see any differences.
As a matter of fact, there is a correctly working feature for comparing BIOS profiles – but not in MSI mainboards. It has been quietly and successfully implemented by ASUS as you could learn from our ASUS Z87-K review. After loading a profile, you can easily see its differences from the current BIOS settings in the BIOS Setting Change window. As for MSI’s OC Profile Preview, it is too complex and imperfect to be truly useful. MSI should have hidden it until correction instead of touting as an advantage.
Performance Comparison
We usually benchmark mainboards in two test modes: at the default settings and with the CPU and memory overclocked. The first mode is interesting because it shows how well the mainboards work with their default settings. It is a known fact that most users do not fine-tune their systems, they simply choose the optimal BIOS settings and do nothing else. That is why usally we run a round of tests almost without interfering in any way with the default mainboard settings.
But this time we had to make some changes in settings. Only the Gigabyte GA-Z87-D3H works with processor true nominal mode by defaults. For Asus Z87-K mainboard we had to manually input nominal multipliers for all processor cores in the mainboard BIOS in an attempt to prevent the frequency from dropping, while for ASRock Z87 Extreme4 we had to manually disable Power Saving Mode. As for MSI Z87-G43, we had to disable Enhanced Turbo feature for it. The results are sorted in the descending performance order.
Nominal Mode
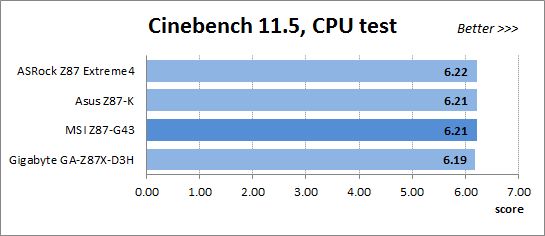
We used Cinebench 11.5. All tests were run five times and the average result of the five runs was taken for the performance charts.
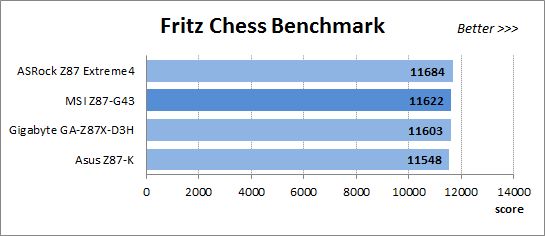
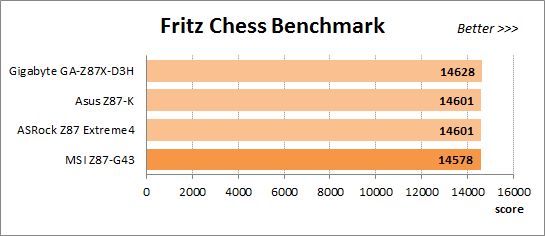
We have been using Fritz Chess Benchmark utility for a long time already and it proved very illustrative. It generated repeated results, the performance in it is scales perfectly depending on the number of involved computational threads.
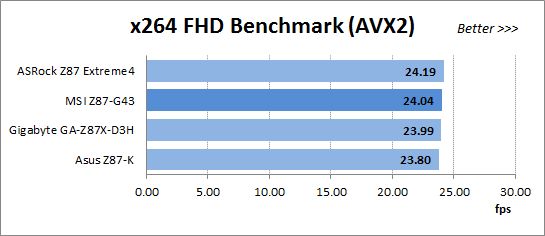
x264 FHD Benchmark v1.0.1 (64 bit) allows us to compare the system performance during video transcoding against the results in the database. So far this is the only utility in our testing suite that supports AVX2 instructions implemented in Haswell processors. The average results of the five test runs are displayed on the following diagram:
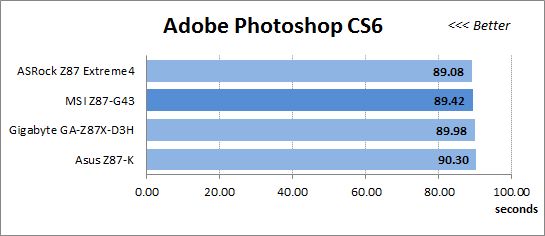
We measured the performance in Adobe Photoshop CS6 using our own benchmark made from Retouch Artists Photoshop Speed Test that has been creatively modified. It includes typical editing of four 24-megapixel images from a digital photo camera.
In the archiving test a 1 GB file is compressed using WinRAR archiving tool with maximum compression level.

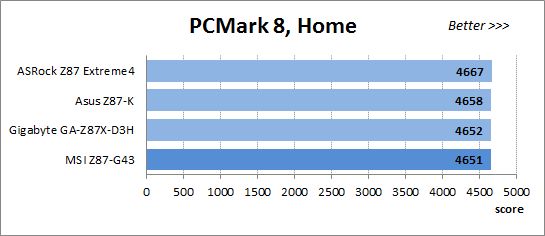
The recently released PCMark 8 suite allows us to assess the overall system performance, the efficiency of its storage sub-system, measure the battery life of a mobile device. We use the “Home” test package that includes typical home use applications: web browsing, creating and editing documents, simple games, photo editing, video chatting.
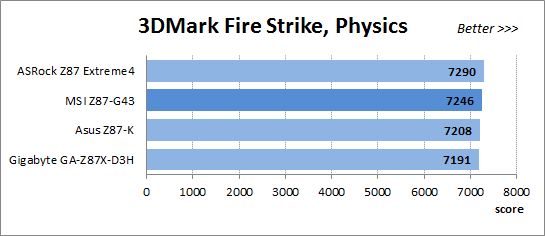
The next diagram shows only CPU tests from the 3DMark Fire Strike. This score is obtained in a special physics test that emulates the behavior of a complex gaming system working with numerous objects:
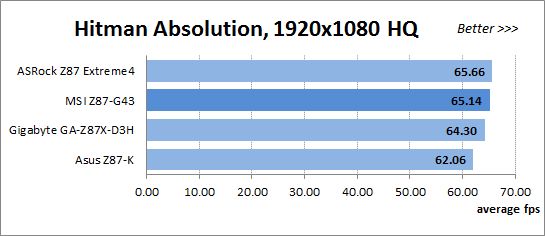
The benchmark integrated into the Hitman Absolution game turned out very convenient. It can be launched directly from the game, from the game launcher utility and even from the command prompt. We use maximum quality settings from the “Ultra” profile and a pretty high screen resolution.
Batman: Arkham City game also reacts eagerly to any changes in the CPU clock frequency, and it uses DirectX 11. We ran game’s integrated benchmark five times with “Very High” image quality settings and then take the average of the five runs for the diagrams.

Overclocked Mode
Now let’s see what performance can be expected from our configuration with their CPU and memory overclocked. We reached the same overclocking results with all these mainboards: a CPU clock rate of 4.5 GHz and a memory clock rate of 2133 MHz (with timings of 9-11-11-31-2N).
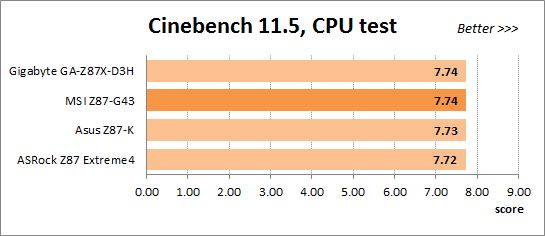
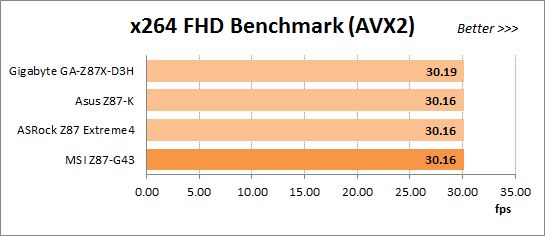
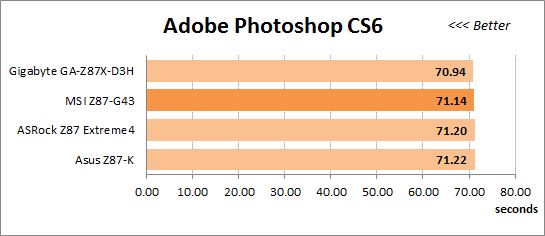
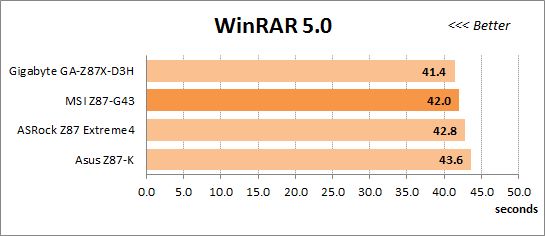
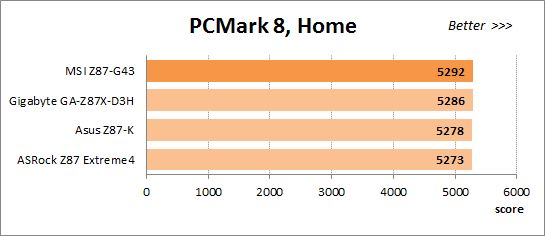
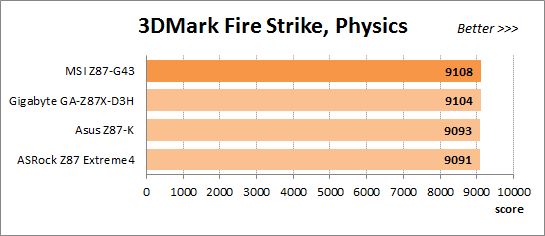
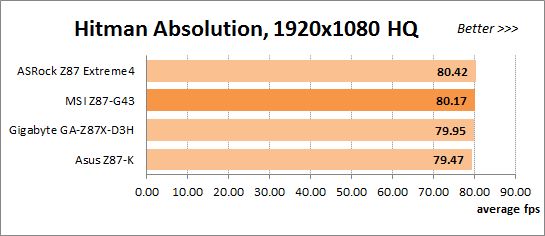
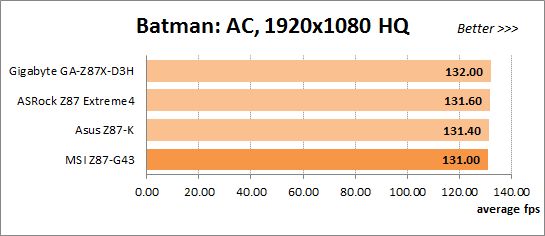
As we wrote in the Introduction, MSI mainboards used to be slower, even though by a small margin, than similar products from other brands. This time around, the MSI Z87-G43 is first in some tests and last in others, yet its gap from the other mainboards is really small, both at the default and overclocked settings. So it looks like MSI mainboards have finally got rid of their sluggishness in our performance benchmarks.
Power Consumption
We performed our power consumption measurements in nominal and overclocked modes using Extech Power Analyzer 380803. This device is connected before the PSU and measures the power draw of the entire system (without the monitor), including the power loss that occurs in the PSU itself. In the idle mode we start the system up and wait until it stops accessing the hard disk. The results on the diagrams are sorted out in ascending order.
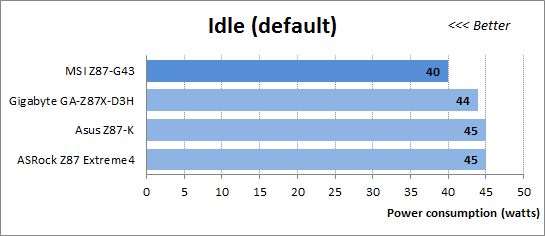
We’ve mentioned the power efficiency of MSI mainboards above, and the idle power consumption diagram is a good illustration of that fact. However, it doesn’t show the full picture.
For all their downsides, Haswell-based CPUs should be given credit for requiring less power in idle mode in comparison with their LGA1155 counterparts. Unfortunately, we can’t see that when the mainboards work at their default settings, so we have an additional test mode called Eco. It means the same default settings but we manually switch all options referring to Intel’s power-saving technologies from Auto to Enabled in the mainboards’ BIOSes. This helps improve the results, lowering the power consumption of our configurations considerably, and the MSI Z87-G43 is still the most economical.
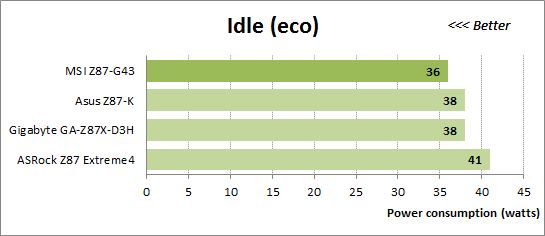
We want to remind you that we install an AMD Radeon HD 7970 graphics card into our test configurations. If we instead used the CPU-integrated graphics core, the overall power draw would be lower than 30 watts. Haswell-based CPUs are indeed very economical when idle, so it is a shame that the mainboards do not ensure this advantage by default. You have to correct some BIOS options for that.
The high load on our Haswell is created by the LinX utility with support for AVX instructions. It is heavier on the CPU than ordinary applications, yet it is just an application nonetheless. It is quite possible that there are some other programs that can be just as heavy. That’s why we stick to using LinX for the purpose of checking the computer out for stability and when measuring its power consumption.
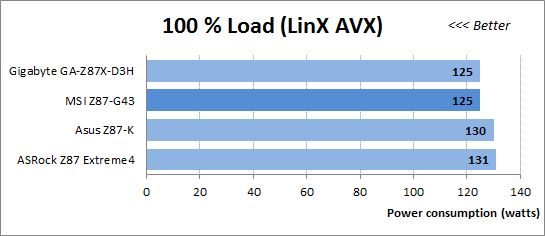
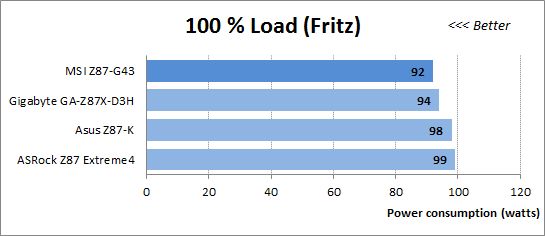
The numbers are high, but they are close to the highest power consumption possible at all. To measure the power draw of our configurations in typical applications, we used the Fritz benchmark. It doesn’t really matter which exactly application you use for that purpose. Any ordinary program that can run on all four CPU cores will produce the same or comparable results. So it turns out that we shouldn’t worry about the high power draw under the AVX-using LinX. The typical power consumption is actually lower than 100 watts. The MSI Z87-G43 is still the most economical mainboard in comparison with the other models.
By the way, you have to count in the graphics card’s power draw to calculate the overall system consumption. We use CPU loads in our power consumption tests, but if we load the AMD Radeon HD 7970, the total power draw will be close to 250 watts at default settings and even higher at overclocking.
The mainboards don’t differ much in idle mode when overclocked, yet the MSI is the most economical again.

We don’t have a special Eco mode here because we always use as many power-saving technologies as possible while overclocking. The results are paradoxical even. The overclocked systems (working at increased CPU voltage) need as much power as in the Eco mode above and less than at the default settings. It just proves once again how important it is to enable all power-saving technologies if you want your computer to be energy efficient.
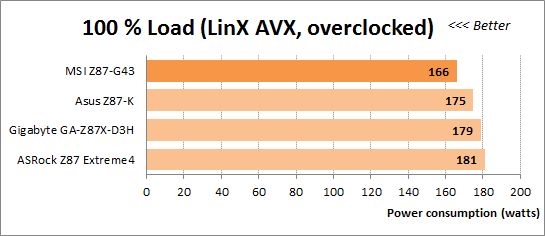
The overclocked systems need much more power at high loads compared to themselves at the default settings. The high frequencies and increased voltages show up then.
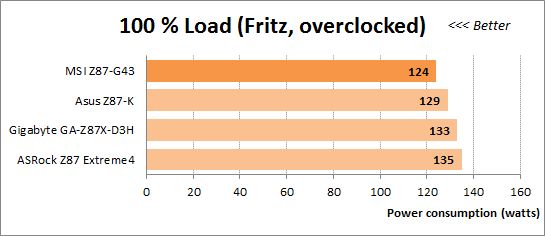
So, the MSI Z87-G43 is the most energy-efficient among the tested mainboards at default and overclocked settings. It is good that, despite all the changes, MSI products are as economical as before.
Conclusion
MSI mainboards have really changed as we’ve made sure in our tests of the Z87-G43 model. Some of those changes are not visible even if you know they exist. The mainboard uses a PCB with tightly woven fabric while the redesigned power system allows not only to fix the CPU voltage at a certain level but also add some value to the base level. Even though the latter volt-modding method has little practical worth today (the CPU-integrated regulator will increase the voltage too much in that case), it is no fault of MSI already.
Most of the changes can be found in MSI Click BIOS 4. It features an updated interface where infrequently used sections have been hidden or removed altogether and replaced with more important ones. The BIOS now offers context-sensitive help information. There is a new DRAM Training Configuration subsection, and you can adjust CPU voltage in adaptive mode. The firmware update system is expected to become simpler in the near future.
Even though the changes are numerous, they are hardly fundamental. And there are quite a lot of things we are not at all happy about. Some of the BIOS options are rather confusing. For example, you cannot enable CPU Phase Control which regulates the number of active phases in the CPU power system. You can only disable it. So, we just had to leave it at Auto and hope that it would work normally. Changing some options may affect others in expected ways: when you set up your CPU frequency multiplier with the Adjust CPU Ratio option, the Enhanced Intel SpeedStep technology becomes disabled. As before, the power-saving option C1E Support is turned off by default.
MSI puts an emphasis on three new features in MSI Click BIOS 4: Board Explorer, Hardware Monitor and OC Profile Preview. The first of them doesn’t provide any special advantages. The Hardware Monitor section is questionable and we’d like to have it in the more conventional text-based form (by the way, MSI Click BIOS 4 lacks any interface customization options we’ve seen in modern products from other brands). As for OC Profile Preview, this feature is absolutely useless as it compares monitoring data rather than BIOS profile data. The new software tool MSI Command Center isn’t good, either, as it has an unfriendly interface.
Despite the downsides we’ve mentioned, the MSI Z87-G43 isn’t such a bad product after all. Unlike many other MSI mainboards we had tested earlier, it didn’t cause serious problems for us. It let us easily update its firmware and save BIOS profiles. Although it doesn’t ensure the standard operation mode for the CPU by default, you can correct it manually. It allows overclocking the CPU and memory, but there’s a confusing difference between the CPU voltage values as set by you and reported in the BIOS and the OS. The Z87-G43 is as fast as comparable products from other brands, but is more economical, which is a typical feature and indisputable advantage of all MSI mainboards. So if the mentioned downsides don’t bother you, you may prefer the Z87-G43 just for power-saving reasons.