MSI Z97 MPOWER Mainboard Review: Inflexible Power

MSI mainboards don’t seem to have improved much with the transition from Intel’s Z87 to Z97 chipset. Although they have actually got better in some aspects, there are some “buts” that prevent us from calling the tested model perfect.
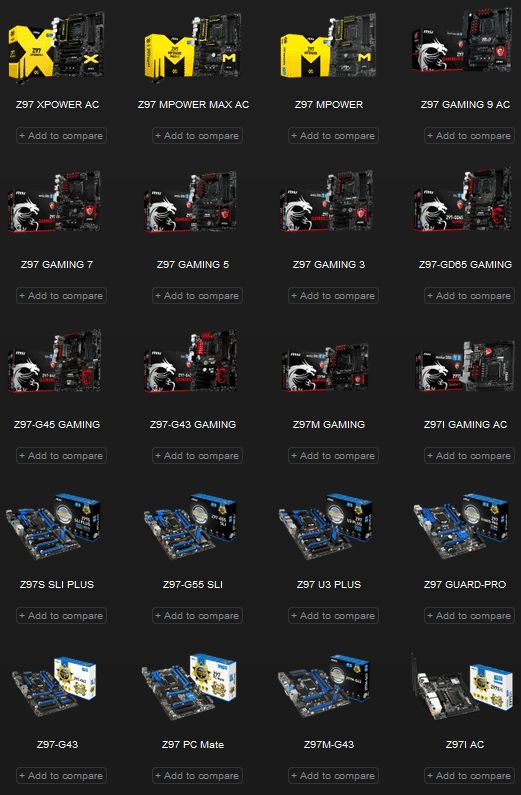
MSI used to have a shorter mainboard model range than other major manufacturers but now, if you visit the company’s website, you will find as many as 20 products based on the Intel Z97 chipset alone. Besides the familiar endings of G43 and GD65, there are a lot of new ones: SLI PLUS, U3 PLUS, GUARD-PRO and a whole series from GAMING 3 up to GAMING 9.
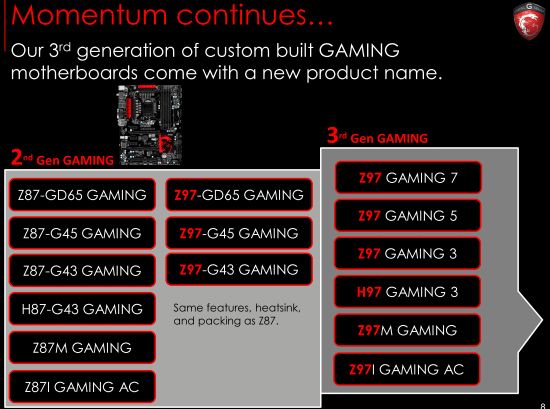
The advantages of particular models are not immediately clear as none of mainboard makers offers an easy-to-use and comprehensible product comparison system at their websites. Fortunately, people from MSI helped us to make everything out for ourselves. The Z87 and Z97 chipsets having similar functionality, a number of new MSI mainboards use the same PCB design as their Z87-based predecessors. They look the same, have the same specs and accessories but come with the newer chipset. We have problem with this solution. Why not re-use a good and time-tested product design so that you could free up your R&D resources to develop a completely new bunch of mainboards which can be distinguished by new names?
To be specific, let’s consider MSI’s gaming LGA1150 product series. The Z97-GD65 GAMING, Z97-G45 GAMING and Z97-G43 GAMING are alike to their Z87-based cousins with similar names whereas the rest of the models, which form the majority, are absolutely new.
It is now clear that we need to choose a mainboard to test from among the new names but there are so many of them! And once again people from MSI were kind to help and offer us several models.
MSI mainboards used to fall into three groups: 1) classic series which feature a blue-dominated color scheme, 2) red-colored gaming products, and 3) overclocker-friendly mainboards which are mostly yellow. This classification wasn’t very strict, though, because the overclocker-friendly models had much in common with the gaming series. The latter in fact continued in the MPOWER and XPOWER models which had the same capabilities with an addition of certain overclocking features. Now the two product lines are separated more sharply. The Z97 GAMING 9 AC is the flagship model of the gaming series whereas the overclocker-friendly mainboards have acquired a laconic, yet quite emphatic logo of their own.

So today we’re going to test the Z97 MPOWER model. It will help us check out the new capabilities offered by MSI’s overclocker-targeted product series.
Packaging and Accessories
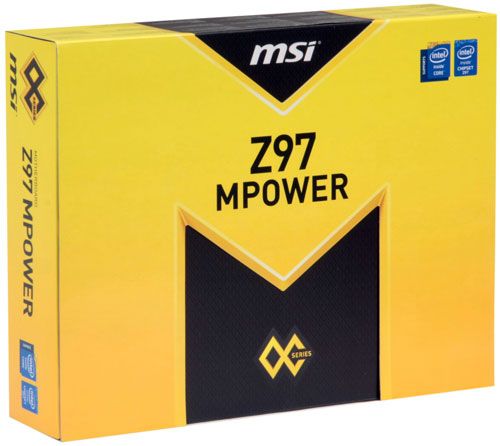
The product box has an M-shaped flap that covers logos of various features and technologies. The description of the mainboard’s capabilities continues on the back of the packaging where you can also see a picture of its back panel and a brief list of its specifications.
Inside, the mainboard resides in an open cardboard pack, on top of a dual-section compartment with the following accessories:
- Six SATA 6 Gbit/s cables with metallic locks (three cables with straight connectors and three cables with L-shaped connectors)
- One flexible bridge to connect graphics cards in SLI mode
- I/O Shield
- Two M-Connector adapters that help you connect the mainboard to the computer case’s buttons and indicators
- Six V-Check cables that enable you to monitor voltages manually with a voltmeter
- User manual
- Brochure about MSI’s exclusive software tools
- Illustrated overclocking manual
- Installation guide
- Small poster depicting the mainboard and its connectors
- Dual-sided door hanger that reads “Out Buying LN2” and “Busy Breaking World Records”
- Large sticker for your computer case with a logo of MSI’s overclocker-friendly mainboard series
- Stickers to mark SATA cables
- DVD with software and drivers
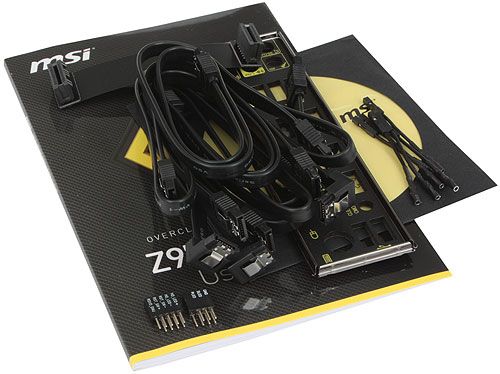
The I/O shield is conveniently soft-padded. The V-Check cables come with a plate that has openings for fixing them in place. The 12 paper stickers can be used to mark SATA cables and easily distinguish them. MSI should be given credit for paying attention to such trifles as they often help to create a more positive impression about a product.
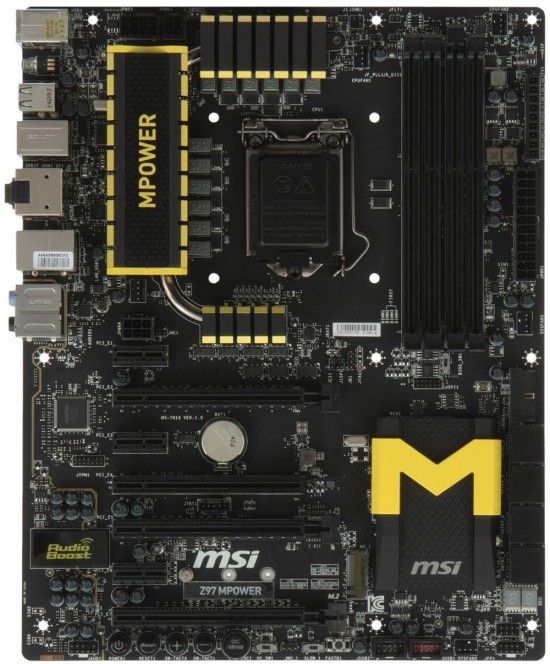
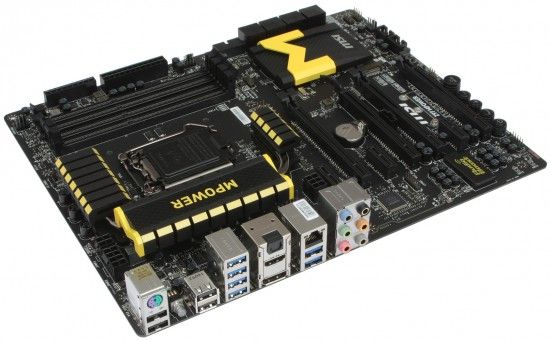
Design and Features
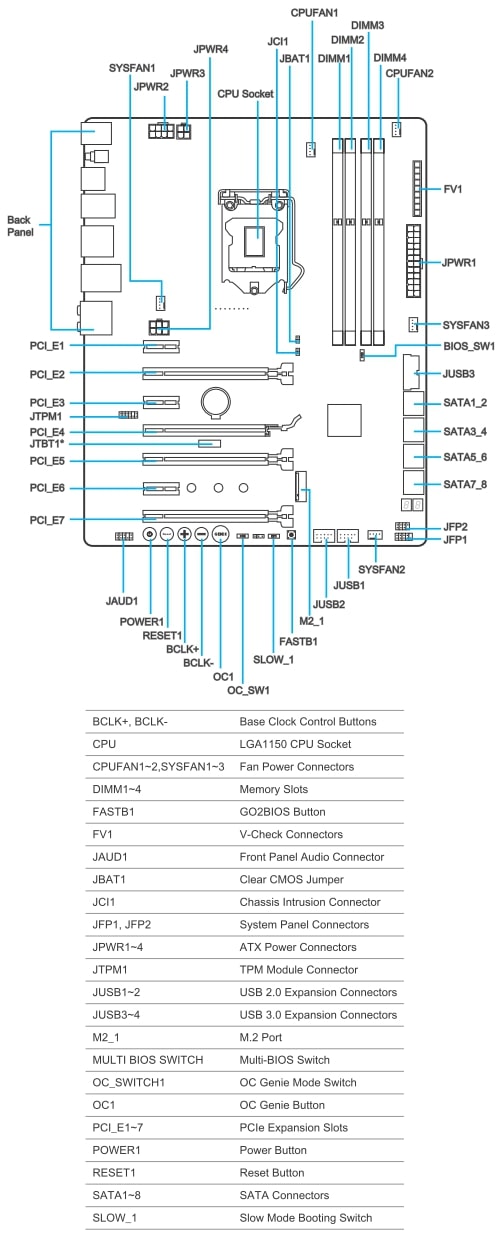
The contrasting black-and-yellow color scheme of the Z97 MPOWER looks good, especially the heatsinks. There are two heatsinks installed on the CPU voltage regulator which has 12 power phases and features premium Military Class 4 components. The CPU can be powered via an 8- or a 4-pin ATX12V connector. The central heatsink doesn’t cool anything by itself. It only helps increase the overall heat dissipation area because the three heatsinks are all joined into a single whole with a thick heat pipe. There’s also a fourth heatsink installed on the chipset. All of them are secured with screws.
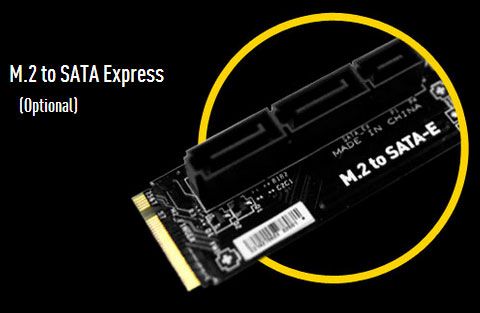
Thanks to the Intel Z97 chipset, the mainboard offers six SATA 6 Gbit/s ports. Two more such ports are implemented via an ASMedia ASM1061 controller. Two of the chipset’s SATA ports will become unavailable if you install an M.2 drive (the mainboard supports SSDs which are 42, 60 or 80 mm long). Today’s users will hardly be disappointed at the lack of SATA Express, yet this new interface might come in handy in the future. MSI’s website mentions an optional accessory that can help in this case. It is an M.2->SATA Express adapter.
The mainboard makes full use of the chipset’s abilities to share CPU-based PCIe lanes among multiple graphics cards. A single card will work in the full-speed PCIe 3.0/2.0 x16 mode. Two cards will share the bandwidth fifty-fifty. And three cards will have a speed formula of x8/x4/x4. The mainboard supports both AMD CrossFireX and Nvidia SLI configurations. The fourth PCIe 2.0 x16 slot is based on the chipset’s PCIe lanes and works at x4 speed. If in use, this slot will disable the three PCIe 2.0 x1 slots which share the same bandwidth. The graphics slots feature handy broad latches. The mainboard itself has a 6-layer PCB as you can count up by the series of squares in the bottom left corner.
The mainboard’s back panel is densely populated:
- One PS/2 connector for keyboard or mouse
- Four USB 2.0 ports (with four more available via two onboard headers)
- Highlighted Clear CMOS button
- Six USB 3.0 ports (blue connectors, based on the Intel Z97 chipset and an ASMedia ASM1074 hub, with two more available via a single onboard header)
- DisplayPort and HDMI video outputs
- Gigabit Ethernet connector (based on an Intel WGI218V controller)
- One optical S/PDIF and six analog audio outputs (based on an 8-channel Realtek ALC1150 codec)
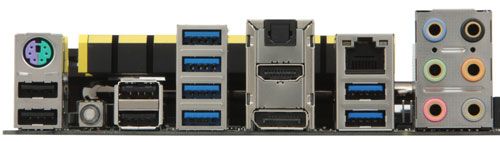
The back-panel audio connectors are gold-plated, which is a visual sign of the MSI Audio Boost technology. The latter also encompasses an advanced 8-channel audio codec Realtek ALC1150 (SNR = 115 dB), dual 600-Ohm headphone amplifier, and premium capacitors. The audio subsystem area is isolated from the rest of the mainboard components to minimize interference. The separating line and the Audio Boost logo are highlighted but you can turn the highlighting off in the BIOS.
We can count up five 4-pin fan connectors in the mainboard’s schematic. Two of them are meant for a CPU cooler, but they can’t regulate 3-pin fans. We can also find the so-called OC Essentials which are meant to aid you in your overclocking endeavors. Coupled with the included set of cables, the V-Check Points 2 panel lets you easily monitor main voltages with a voltmeter. The panel now has as many as three “ground” connectors, so you can use up to three voltmeters simultaneously to keep track of three voltages. The Power and Reset buttons are part of the Easy Buttons 3 set which also includes the BCLK+ and BCLK- buttons (to adjust the mainboard’s base clock rate with a step of 1 MHz), the GO2BIOS button (to load the BIOS interface without pressing any other buttons), and the OC Genie button (for automatic overclocking). The OC Genie Mode switch is for choosing how hard the computer will be overclocked. The JBAT1 jumper duplicates the function of the back-panel Clear CMOS button. The Slow Mode Booting switch may be necessary for booting up while the POST indicator will help to uncover any errors during the boot-up process.
The MSI Z97 MPOWER features a set of protective technologies called Guard-Pro. They make the mainboard more tolerant to high humidity, EMI, static discharges and high ambient temperature.
BIOS Features
MSI’s Click BIOS 4 debuted in the company’s Z87-based mainboards. It is now used in the Z97-based products as well, seemingly in an unaltered form.
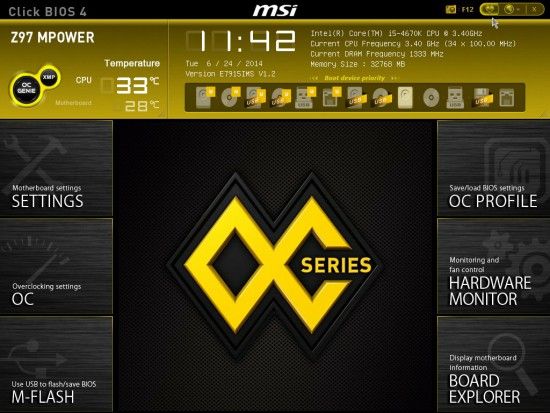
There’s an info panel in the top of the start BIOS screen where you can check out (but cannot change) the current date and time as well as CPU and mainboard temperatures. Some basic system information is reported, too: the mainboard’s model name and BIOS version, the CPU’s base clock rate and frequency multiplier, and the amount and clock rate of system memory. BIOS options are displayed in the center of the screen but at first it is occupied by the new logo of MSI’s overclocker-friendly mainboards, with icons of BIOS sections placed on its sides. The only setup option we can see here is the boot device order which you can adjust by moving device icons with your mouse (the icons of currently active devices are highlighted). There’s an XMP button next to the OC Genie feature. MSI mainboards used to apply an XMP profile to speed up system memory when the computer was overclocked with the OC Genie technology, but now you can easily apply that profile yourself right in the start BIOS screen.
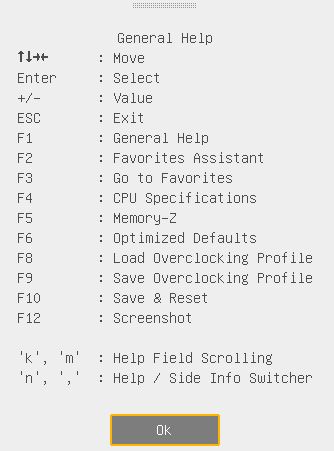
The start screen is inferior in functionality to what we have with other brands’ mainboards. There even seem to be no new features at all. After browsing through the main BIOS sections where we could find nothing particularly interesting, we pressed the F1 key to see if the list of hotkeys now included the Discard Changes option. It is still not there, so you have to go to the Save & Exit page for it, but there are two new hotkeys: F2 for Favorites Assistant and F3 for Go to Favorites. One more new feature can be spotted in the top right corner of the start screen. Next to the camera icon (which hints that you can make a BIOS screenshot by pressing F12), the X icon for leaving the BIOS and the globe icon for changing the language, there’s a new heart-shaped icon. That’s the long-awaited customization option. We point at it with our mouse in the screenshot above, yet it is still rather inconspicuous.

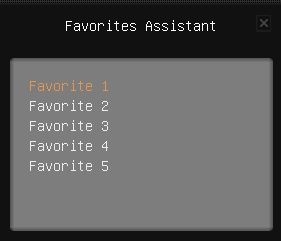
If you select a BIOS option you want to add to your favorites and press the F2 key, or if you just click it with your right mouse button, the Favorites Assistant window will open so you can save that option to one of the five available tabs. The five tabs help categorize BIOS options. There seems to be no limit on how many options you can save on a single tab.
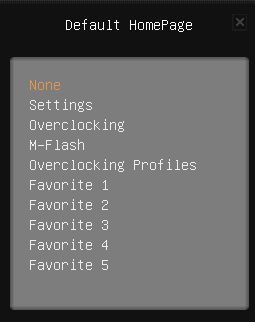
Pressing F3 or clicking the heart icon in the top right corner of the start screen will open a window where you can choose any group of favorite options.
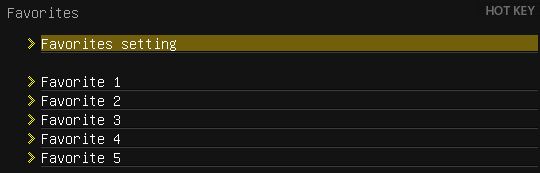
The Favorites Setting option can be used to set any of the five user-defined tabs with favorites or any of the main BIOS section as the start screen.
The customization opportunities provided by MSI Click BIOS 4 have been anticipated and we like that BIOS options can be added to favorites in any order and sorted afterwards. The only problem is that this customization option is so inconspicuous that you can easily miss it altogether. MSI plans to dedicate a special section of its website to describing the new BIOS features but at the time of our writing this there were only a few general words about them on the product pages.

Now let’s have a look at the setup options offered by MSI Click BIOS 4 starting from the Settings page which goes first.
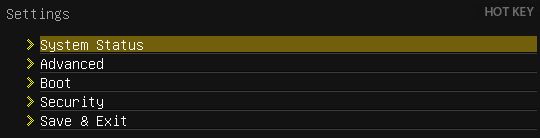
The System Status subsection is in fact the start screen you saw when you entered the classic BIOS interface. It reports some basic system information and lets you set up date and time. There are several pages in the Advanced subsection. Here you can set up chipset-specific technologies like Intel Rapid Start and Intel Smart Connect. You can enable Windows 8 boot mode or speed up the startup procedure on the Windows 8 Configuration page. The Boot subsection is where you define the boot device order and some other boot-related settings. The old Security section is now available as a single page in the Settings subsection. Using a regular USB drive as your access key, as is possible on some other MSI products, is not supported by the Z97 MPOWER, though. The Save & Exit subsection might be removed altogether as it is duplicated by the hotkeys. However, when you hit F1 or click Hot Key with your mouse, you won’t see the Discard Changes option which is only available in the Save& Exit subsection. Instead, you will see options for viewing CPU and memory information (which might be replaced with the more advanced capabilities of the OC section) and for managing profiles via a USB drive.
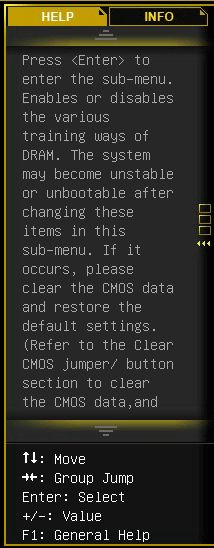
When you select a BIOS option, relevant information about its purpose and adjustment range is displayed in the Help panel on the right. If you switch to the Info tab, you will see the values of main voltages.
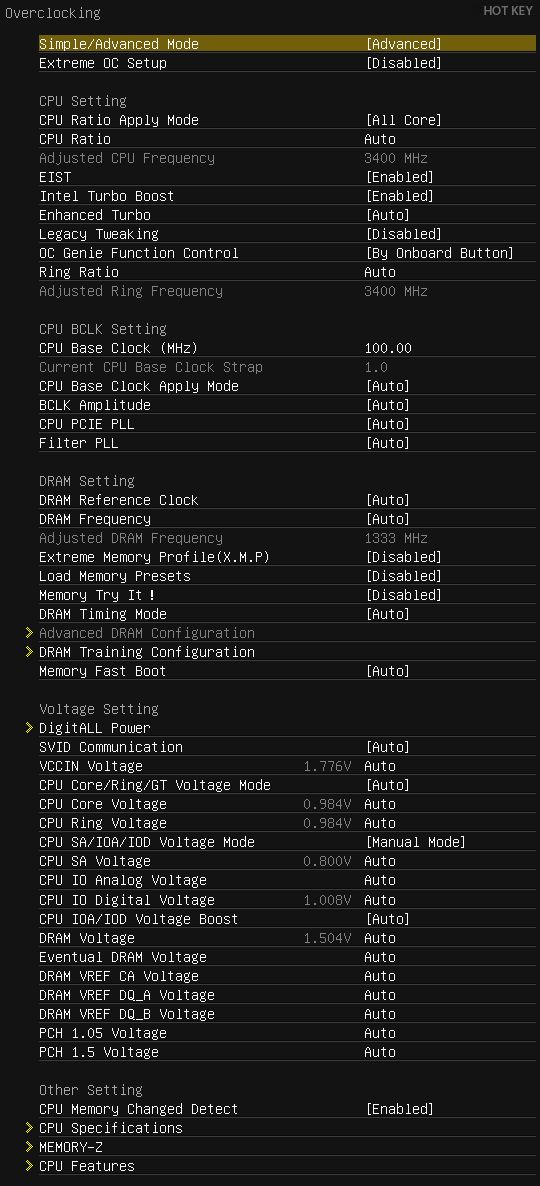
The OC section contains a lot of options for fine-tuning and overclocking. A number of informational parameters report the current system status. The gigantic section is structured into several parts. “CPU Setting” goes after a couple of auxiliary options. CPU BCLK Setting is about the base clock rate and related options while DRAM Setting is about the memory subsystem. The most numerous Voltage Setting group lets you adjust your voltages, setting them higher or lower than their default levels. The current levels are reported right here, next to the corresponding parameters, which is very handy. The OC section ends in a few more parameters and Other Settings.
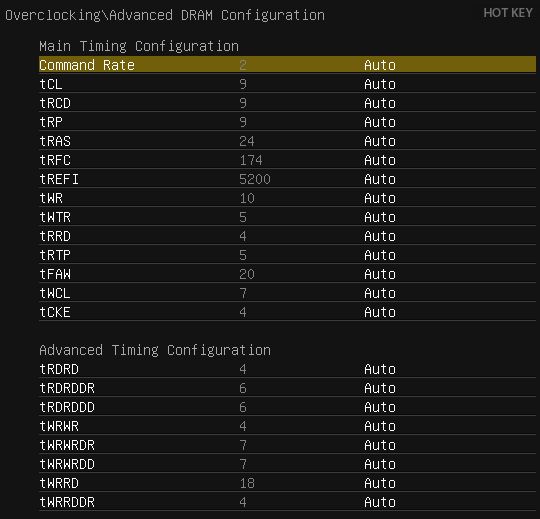
Some of the numerous settings of the OC section are located on individual pages. For example, there is a special page for memory timings (which can be the same or different for each of the memory channels).
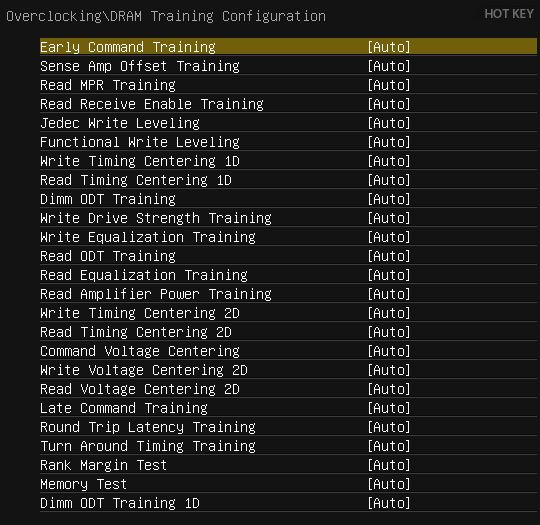
A unique feature of MSI’s BIOS, the new DRAM Training Configuration subsection helps you reach higher memory clock rates.
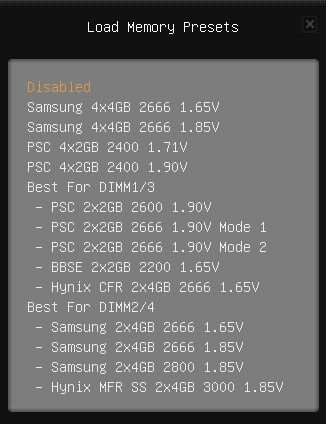
You can Load Memory Presets although the contest help informs you (and quite rightly so) that choosing optimal values manually is going to lead to a better effect.
The new feature called “Memory Try It!” also helps you set up your memory subsystem correctly. First you choose a value for CAS Latency and then, a high-performance or high-compatibility set of timings.
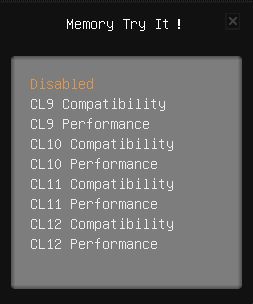
An appropriate memory clock rate is selected then. After that, the mainboard will automatically enable compatible memory settings.

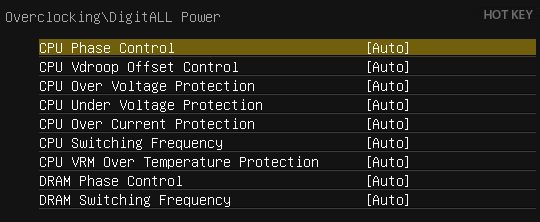
The DigitALL Power page contains settings pertaining to the digital CPU power system.
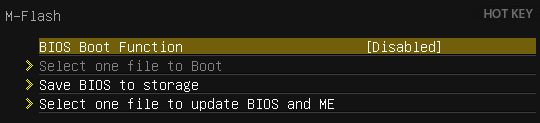
The OC section used to include a page called M-Flash, but now it is one of the main sections in its own right. Here you can boot up using a BIOS image from a USB drive. You can also save the current firmware or update it. There are certain restrictions. BIOS images are saved in the drive’s root folder only. They must also be placed there for updating. There is no file manager of any kind. NTFS is not supported, so the drive must be formatted as FAT or FAT32. MSI’s firmware update procedure used to offer two options: update the BIOS code only or update both BIOS and Intel Management Engine simultaneously. Now there is only one option available, which helps avoid any confusion on the user’s part.
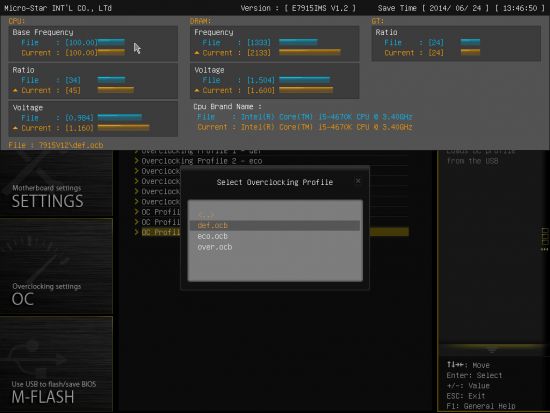
The next section, OC Profile, used to be an individual page of the OC section, too. Now it is independent and can store up to six full profiles with BIOS settings. Settings can be saved to and loaded from external drives. The profiles are easy to deal with. For each profile, its creation date and time and the BIOS version it refers to are saved automatically. Profiles can be given descriptive names and, when necessary, deleted.

The BIOS interface didn’t make it immediately clear which profiles were already in use, but now occupied profile slots are indicated with the profile names, which can be conveniently long and detailed.
There’s a primitive file manager provided for managing BIOS profiles you save to and load from external media, which means you can access profiles in any folder, not only in the root directory. We wonder why such a file manager is not provided for choosing a firmware file when updating the mainboard’s BIOS.
The OC Profile Preview feature has been but slightly modified. Contrary to its name, it is virtually useless as a means to compare BIOS profiles. The comparison is based on only six criteria: base clock rate, CPU frequency multiplier, CPU voltage, memory frequency, memory voltage, and frequency multiplier of the integrated graphics core. You won’t see any difference between the two profiles unless it affects these parameters. Earlier you had to write one profile you wanted to compare to a USB drive but now there’s the new option “OC Profile Load from ROM” which lets you compare any of the six BIOS profiles as well (it doesn’t work correctly so far, though, and many show you changes which are not actually present). Moreover, OC Profile Preview doesn’t use the data written in the profiles but compares monitoring data recorded when the profile was saved to the USB drive. To see the difference, you have to apply a profile first, then write it to your USB drive, and only then you will be able to compare it with the current settings.
It may sound too complicated, really. Well, there’s no need to gripe about the imperfect OC Profile Preview because every time you save your BIOS settings, you see the following window:

You can save or discard your changes as usual, but you can also use the Change Settings Info feature to see what exactly changes are going to be applied.
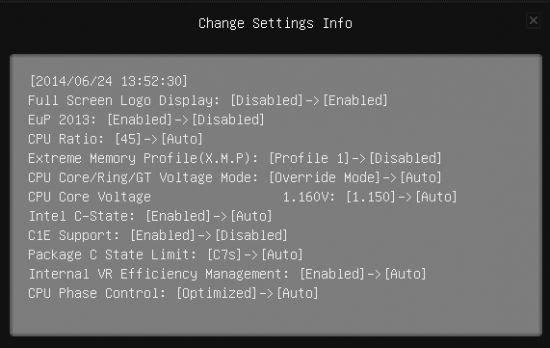
The key purpose of this window is in allowing you to check out your changes prior to applying them. Besides, you can load a previously saved BIOS profile and see in what points it differs from the current settings – not only across the six parameters as with OC Profile Preview.
The Hardware Monitor page used to be hidden in the depths of the Settings section but now is much easier to access. It’s been redesigned so the fan speed/temperature graph has become more intuitive. You can choose which of the two CPU and three system fans the graph refers to from the panel above. Dragging the colored dots in the graph specifies the desired correlation between temperature and speed. If you want to fix the speed of a fan at a constant level, uncheck the Target Temperature option. There will be yellow and green graphs crawling across the diagram: yellow for the CPU temperature and green for the CPU fan’s speed. Main voltages can be monitored in the info panel at the bottom of the screen.
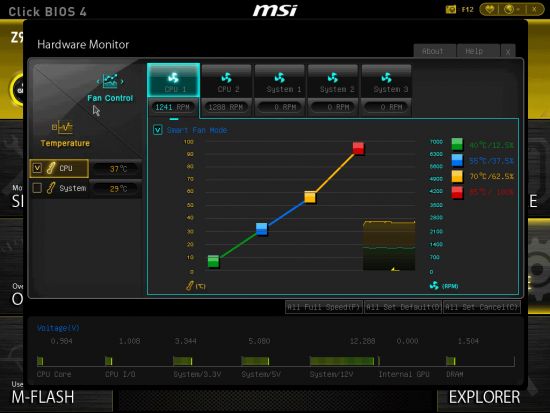
Unfortunately, neither of the two CPU fan connectors can regulate 3-pin fans as the system fan connectors do. The BIOS interface doesn’t have gaudy colors, but the traces of the previous BIOS screen left around the edges of the new window distract the eye. It would be better if the Hardware Monitor window opened in full-screen mode, completely covering the previous screen. It would also be useful if the user had an option to switch from the trendy graphical to conventional text-based interface.
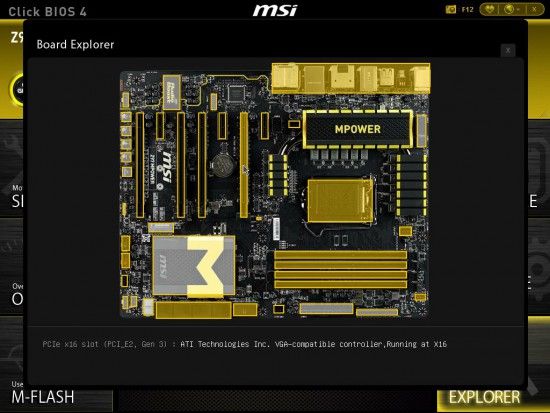
Next goes the Board Explorer section which shows a rather accurate picture of the mainboard, so you can learn about its components by hovering your mouse pointer over it (we point to a slot with a discrete graphics card in the illustration below). As in the Hardware Monitor section, the previous BIOS screen can be seen around the section window.
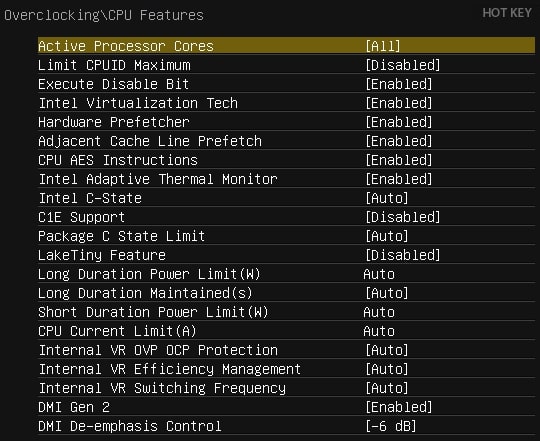
Overall, MSI’s revised Click BIOS 4 is the same as before, yet with a number of minor improvements. It has a new memory set-up feature (“Memory Try It!”) and there are new voltage-related options among the CPU Features. The Hardware Monitor section and the OC Profile Preview feature have been revised while the firmware update procedure has been simplified. The most important, yet also very inconspicuous, new feature is that the user is allowed to select frequently used BIOS options for fast access and choose what BIOS page should work as the start one. The Change Settings Info window lets you check out what changes are going to be applied, although it is not implemented perfectly. With ASUS mainboards, for example, the window with changes appear when you try to apply them, so you can apply, discard or cancel your changes. With the Z97 MPOWER, you have to open that window first, then close it, and only after that you either apply or discard your changes. That’s too complicated to be convenient.
Talking about downsides, we don’t think the Memory-Z section is handy despite its numerous options. It is ASRock mainboards that show SPD information in the handiest way: right on the BIOS page where you adjust memory timings. The Hardware Monitor section, even though revised, is still far from perfect. It is not intuitive and takes some time to get used to. Another downside is that MSI mainboards still cannot regulate 3-pin CPU fans although the rest of the manufacturers implement this feature in their products.
As for the upside, MSI mainboards do have advantages in terms of their BIOS interface. Important options pertaining to CPU power-saving technologies are not hidden deep in the BIOS structure as with other brands’ mainboards, which is due to the suboptimal layout of the AMI BIOS interface which serves as the basis for modern UEFI BIOS implementations. MSI mainboards have those options easily available in the CPU Features subsection, which is in the main OC section. Many changes in the new revision of MSI Click BIOS 4 are not perfect, yet it’s good to see the manufacturer trying to improve its BIOS. We can hope that MSI’s BIOS implementation will be getting better and better in the future.
Exclusive Software Tools
Exclusive software tools may add substantially to mainboard functionality. We cover them in our reviews periodically, usually after a major upgrade of a product range. So the last time we tried MSI’s utilities it was in our review of the MSI Z87-G43 which was based on the then-new Intel Z87 chipset. Now let’s see what tools are offered by MSI for Microsoft Windows 8.1.
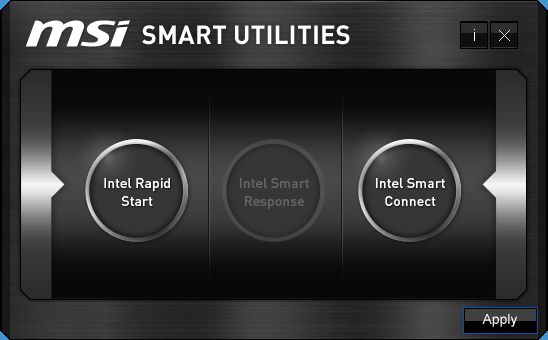
The name of the Super RAID tool has been changed into the more fitting “Smart Utilities” but its capabilities, design and purpose have remained the same. It makes it easy to enable Intel’s Rapid Start, Smart Response and Smart Connect technologies.
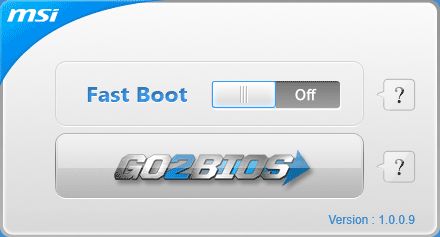
The small Fast Boot tool hasn’t changed at all and even has the same version number but it doesn’t call for any improvements, actually. It reboots your computer right to the BIOS interface. Besides that, it lets you enable fast boot mode.
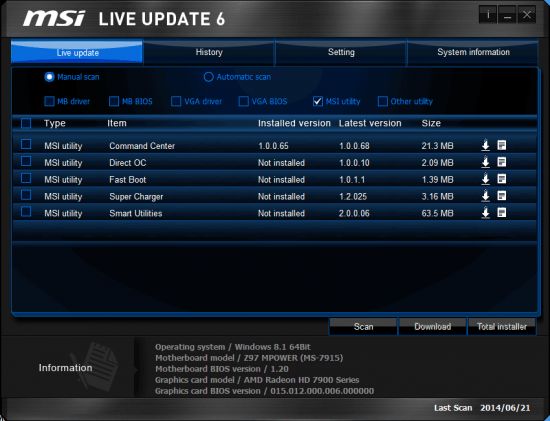
The MSI Live Update 6 utility has grown by 1 in terms of its version number and still lets you check out and download firmware updates, drivers and utilities for MSI mainboards either manually or automatically.
The large ECO Power caption in the top left corner of the MSI ECO Center utility looks like a button, yet is not clickable. So how do you enable energy-efficient operation mode?
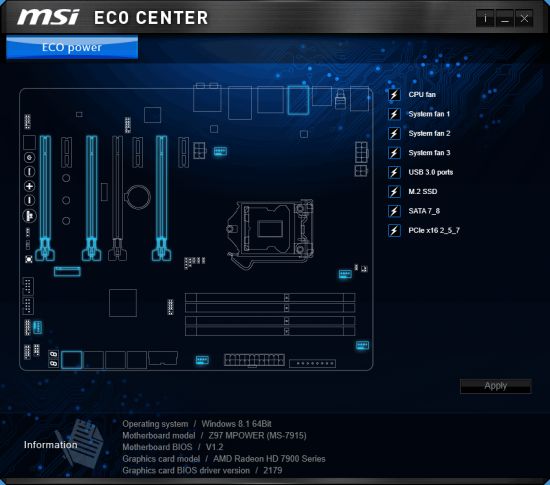
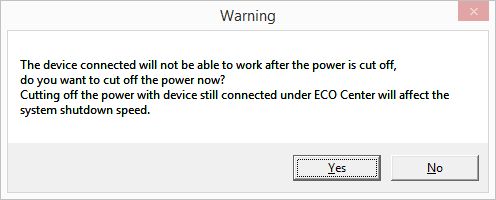
The utility turned out to be able to power down unused components. You just select which components in the list on the right. Every time you do that you will see a warning as in the picture below. The list of powered-down devices is not saved, so you have to specify them again after you reboot your computer. Overall, this utility doesn’t look useful to us. It is simpler to disconnect unused devices physically or in the BIOS. As for turning off the CPU fan, it is even a dangerous feature. An appropriate fan regulation algorithm, which slows the fan down or even halts it at low loads, would be a much safer solution.
The multifunctional MSI Command Center seems to be completely new but the changes boil down to its interface on closer inspection. We gave you a description of this utility in our earlier review. You can refer to it for details.

Windows-based overclocking utilities have become popular because they are easier to use than the BIOS interface. Even some hardware reviewers have started to use similar tools, like Intel’s Extreme Tuning Utility (which is suggested for MSI mainboards, too). The problem is that BIOSes often have bugs and defects which sum up with those of the Windows-based program, especially if the program is written by obscure programmers with questionable qualifications. Investing some time into learning your BIOS settings will give you total control over your computer, which can hardly be achieved with Windows-based tools.
Testbed and Methods
We performed all our tests on a testbed built out of the following components:
- Mainboard: MSI Z97 MPOWER, MS-7915 ver.1.0 (LGA1150, Intel Z97, BIOS 1.2)
- CPU: Intel Core i5-4670K CPU (3.6-3.8 GHz, 4 cores, Haswell, 22nm, 84 W, LGA1150)
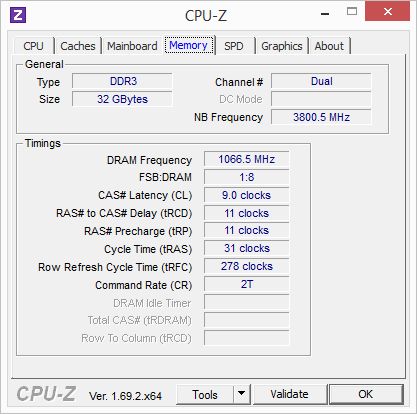
- DDR3 SDRAM: 4x8GB G.SKILL TridentX F3-2133C9Q-32GTX (2133 MHz, 9-11-11-31-2N, 1.6 volts)
- Graphics card: Gigabyte GV-R797OC-3GD (AMD Radeon HD 7970, Tahiti, 28 nm, 1000/5500 MHz, 3072 MB of GDDR5 memory with 384-bit bus)
- Disk subsystem: Crucial m4 SSD (CT256M4SSD2, 256 GB, SATA 6 Gbit/s)
- Cooling system: Noctua NH-D14
- Thermal grease: ARCTIC MX-2
- PSU: Enhance EPS-1280GA (800 W)
- Computer case: open testbed based on the Antec Skeleton case
We used Microsoft Windows 8.1 Enterprise 64-bit (Microsoft Windows version 6.3 build 9600) with latest updates and the AMD Catalyst 14.4 drivers.
Operational specifics
As with other modern mainboards from MSI, it was easy to assemble our configuration with the MSI Z97 MPOWER and update its firmware to the latest version. The picture it shows you while starting up features the new logo of the overclocker-friendly product series. Some of the active hotkeys are mentioned at the bottom of the screen, although the Tab key, which removes the startup picture, is not listed among them for some reason.
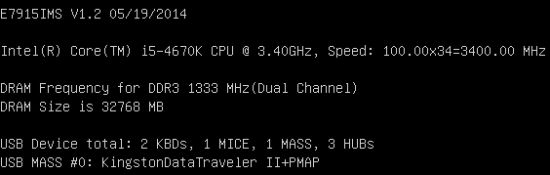
The active hotkeys will still be mentioned at the bottom of the screen even when the startup picture is turned off with Tab or with the related BIOS option. At the top of the screen the information is output about the mainboard’s model name and BIOS version, memory frequency and amount, and connected USB devices and drives. The installed CPU is identified correctly but its frequency is only reported accurately when you overclock your CPU and use the same fixed frequency multiplier for each of the CPU cores. Without overclocking, the CPU clock rate is going to vary due to Intel Turbo Boost technology (the dynamic adjustment of the CPU frequency multiplier can be used in overclocked mode too, but it is not counted in by the mainboard when reporting the CPU clock rate in this startup screen).

As opposed to LGA1150 products from some other brands, MSI ones enable standard settings by default. However, if you manually change all the power-saving options of the CPU Features section in the mainboard’s BIOS from Auto to Enabled, the power draw will be significantly reduced. In other words, the Z97 MPOWER doesn’t use all of the available power-saving techniques by default. This is typical of all LGA1150 mainboards we’ve tested so far. And the C1E Support option is even explicitly turned off by default on MSI mainboards.
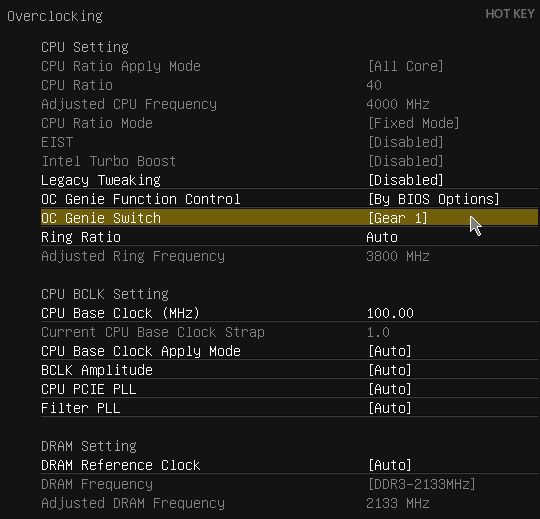
Using the Enhanced Turbo option in the BIOS’s OC section, you can increase multithreaded performance a little by setting the CPU frequency multiplier at the maximum which is normally used by Intel Turbo Boost for single-threaded loads only. Well, every automatic overclocking feature is imperfect, including the hardware OC Genie button and the BIOS feature that goes under the same name. You don’t even have to test it in practice. Just use the button and enter the OC section to see what changes are going to be applied.
The CPU clock rate is going to be raised up to 4 GHz. The dynamic regulation of CPU clock rate is disabled, so the CPU is always clocked at 4 GHz, even at low loads. Intel’s power-saving technologies are turned off, meaning that the CPU will always work at high voltage, too. It is impossible to manually change that parameter as it has become inactive. Moreover, when OC Genie is turned on, the mainboard will warn you against changing anything in the BIOS every time it starts up. So the CPU is overclocked in an inefficient way by default, even though the memory is sped up to 2133 MHz. You can use the other overclock method by means of the onboard OC Genie Mode switch or by setting the OC Genie Switch at Gear 2 in the BIOS.
The power-saving EIST feature will be disabled and inaccessible in this case, too, but you can make it work by turning OC Genie off and on again. We doubt that inexperienced users will do so and, in any case, this overclocking method sets the CPU voltage too high (up to 1.240 volts at high loads, which is too much for our CPU).
By the way, when you click the OC Genie button again to undo the overclocking, you cannot be sure that all of BIOS parameters will return to their initial values. The Discard Changes option comes in handy then, but you have to use it in the Save & Exit subsection (or add it to your favorite settings beforehand) since it is missing among the hotkeys.
It is much better to choose optimal overclocking settings manually rather than rely on automatic methods. We recommend overclocking without increasing CPU voltage, but the Z97 MPOWER turned out to be unable to support this method. It must be due to the extended set of CPU voltage adjustment variants available in the new MSI mainboards. There are usually three variants for LGA1150 processors. The voltage can be fixed at a certain value (Override Mode), added to or subtracted from the default level (Offset Mode) or adjusted adaptively. We discussed these modes in our ASUS Z87-K review. The Z97 MPOWER adds two more modes which combine the Offset Mode with the two others.

The purpose of those combined modes is unclear because Haswell-based CPUs only need two: 1) no voltage adjustment and 2) higher voltage fixed at a certain level. If any other method is used, the CPU-integrated regulator will increase voltage further at high loads, provoking overheat and throttling. We guess that the combined modes may occasionally be useful, but the CPU Core / Ring / GT Voltage Mode cannot be set at Normal, as with Gigabyte mainboards. Earlier, MSI mainboards wouldn’t automatically increase CPU voltage if it was set at Auto but now they do (and the CPU-integrated regulator increases that voltage even more at high loads).
Energy efficient overclocking is only possible if you don’t increase voltage. It will ensure higher performance and, despite the increased power consumption, you can expect long-term savings due to the reduced amount of energy spent for each computation. Energy efficient overclocking is going to be environment-friendly as we showed in our Power Consumption of Overclocked CPUs review. However, when we test mainboards, we want to check them out under different conditions and loads, so we choose what overclocking method ensures the highest results. Higher clock rates and voltages mean harsher test conditions and it is under such conditions that we can better see any flaws or problems in mainboard design.
We used to increase voltage in the offset mode and the LGA1150 CPUs also support a similar adaptive mode, but such methods do not work well with Haswell-based CPUs. The fact is as soon as the default voltage is changed even by a tiny value, the Haswell’s integrated regulator will spot it and increase the voltage further at high loads, which means high heat dissipation, high temperature and, eventually, overheat. To avoid this, the Haswell must be overclocked at a constant voltage. The downside is that the CPU’s power-saving technologies cease to work: the CPU frequency multiplier drops at low loads but the voltage doesn’t drop anymore and always remains at the constant and high level. This is the only way to deal with the integrated voltage regulator, though. Moreover, it doesn’t affect the computer’s power draw in idle mode. That’s why we overclock our CPU to 4.5 GHz in our mainboard reviews, fixing the voltage at 1.150 volts and using the XMP settings for our memory modules.
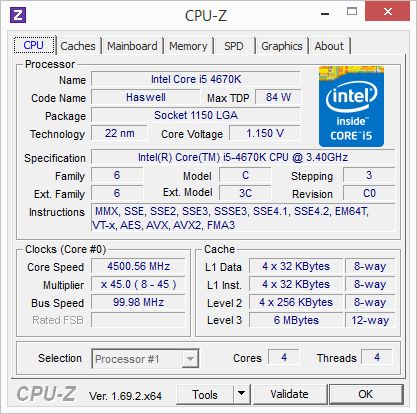
When we overclock by fixing the CPU voltage at a certain level, some of the power-saving technologies get disabled. The CPU’s frequency multiplier is lowered at low loads but its voltage always remains high. Anyway, we stick to this overclocking for the duration of our tests, especially as it doesn’t affect the computer’s idle power draw much.

By the way, earlier we published an article called Haswell and LGA 1150 Platform: Right Operation and Overclocking where we explained the basic rules for optimizing LGA1150 platform parameters and for overclocking Haswell-based CPUs on mainboards from different brands. There you will find our illustrated recommendations on enabling Intel’s power-saving technologies and increasing CPU power targets as well as on how to overclock Haswell-based CPUs with and without voltage adjustment. Although that article’s recommendations about optimizing MSI mainboards in standard operating mode stay true, its overclocking recommendations have become outdated. MSI’s newer products make it easier to adjust the CPU frequency multiplier (in the OC section only rather than duplicated in the CPU Features section) and provide more flexibility in adjusting CPU voltage. However, the Z97 MPOWER proved to be unable to be overclocked without increasing its CPU voltage.
Performance
Nominal mode
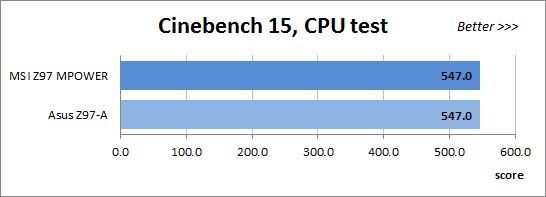
We usually benchmark mainboards in two test modes: at the default settings and with the CPU and memory overclocked. The first mode is interesting because it shows how well the mainboards work with their default settings. It is a known fact that most users do not fine-tune their systems, they simply choose standard BIOS settings and do nothing else. So here is the performance you can expect from the mainboards if you don’t tweak their settings (the results of the MSI Z97 MPOWER are colored differently).
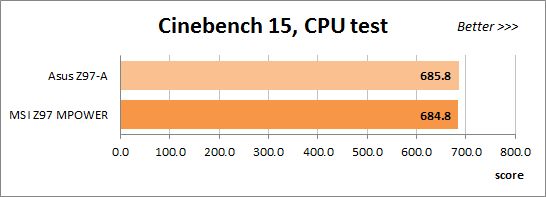
We run the CPU test of the 3D rendering suite Cinebench 15 five times and calculate the average result.
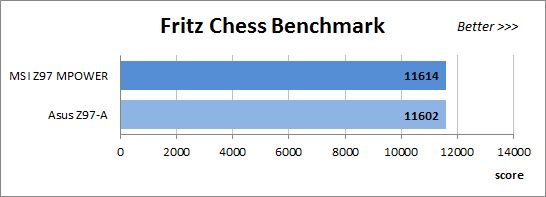
51We have been using Fritz Chess Benchmark for a long time already and it proves very illustrative. It generates repeatable results and its performance scales perfectly depending on the number of computing threads.
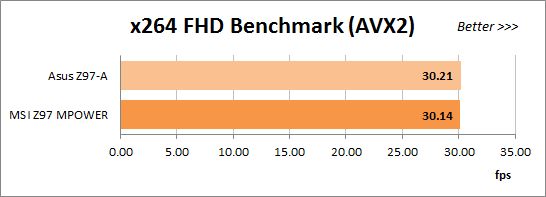
x264 FHD Benchmark v1.0.1 (64-bit) helps us test video transcoding performance. The original version of the benchmark with the version r2106 coder could make use of AVX instructions but we use version r2334 to enable the new AVX2 instruction set available on Haswell-based CPUs. The results are the average of five runs of the benchmark.

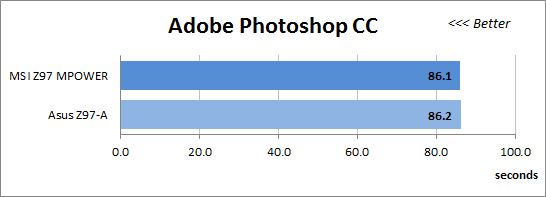
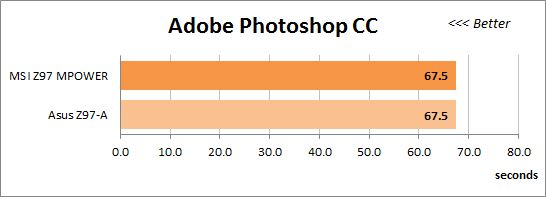
We benchmark performance in Adobe Photoshop CC using our custom test that is based on the Retouch Artists Photoshop Speed Test and consists of typical processing of four 24-megapixel images captured with a digital camera.
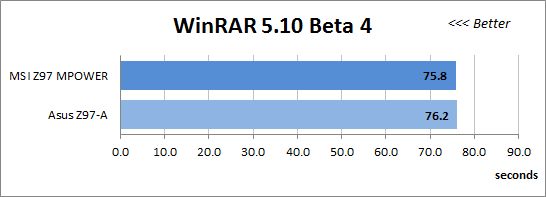
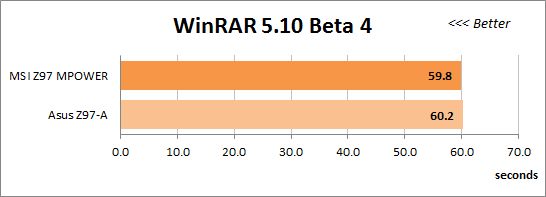
We use WinRAR 5.10 Beta 4 to benchmark the speed of archiving an Adobe Photoshop CC distribution.
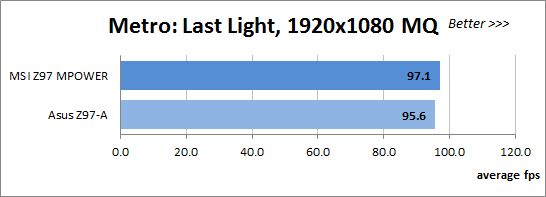
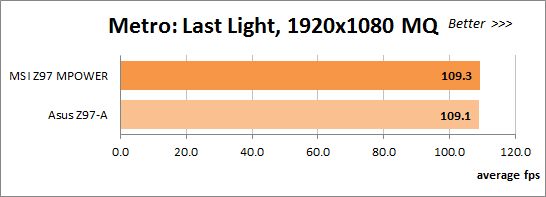
Metro: Last Light is a very beautiful video game but its frame rate depends heavily on the graphics card. So we had to use the Medium Quality settings to maintain playability at a screen resolution of 1920×1080 pixels. The diagram shows the averaged results of five runs of the integrated benchmark.
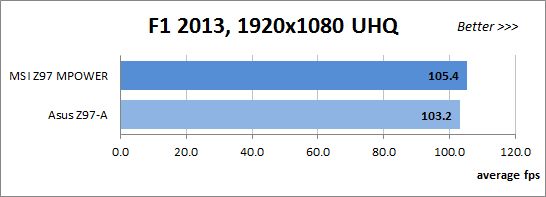
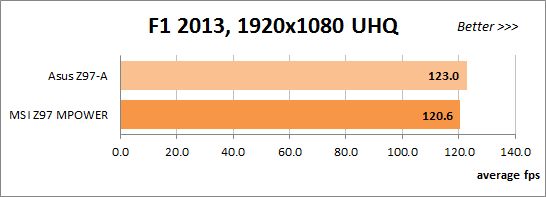
F1 2013 is less demanding on the graphics subsystem than the previous game. At 1920×1080 pixels we chose the highest settings by enabling Ultra High Quality and all image-enhancing options. The diagram shows the averaged results of five runs of the integrated benchmark.
56The new version of Thief is not acclaimed by critics, yet its visuals are top-notch. It’s got an integrated performance benchmark and lets you enable AMD’s Mantle technology. We had to choose Low Quality settings to see any effect from overclocking the computer. You wouldn’t need to overclock your CPU to enjoy the game, though.
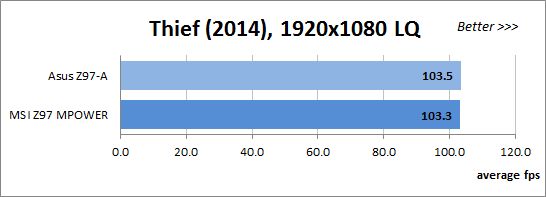
Similar mainboards are prone to deliver similar performance under the same conditions, just as we see in the diagrams. The ASUS Z97-A and the MSI Z97 MPOWER win in some tests and lose in others but the difference between them is always small. The MSI is just a little faster than average in a couple of games. Now let’s see what performance they can show with their CPU and memory overclocked.
Overclocked mode
![59 overclocked fritz ]](/wp-content/uploads/2021/04/59-overclocked-fritz-.jpg)

The difference is small again except that the MSI falls behind in F1 2013 for some reason although it was ahead of its opponent at the default settings.
Power Consumption
We perform our power consumption measurements with an Extech Power Analyzer 380803. This device is connected before the PSU and measures the power draw of the entire system (without the monitor), including the power loss that occurs on the PSU itself. In the idle mode we start the computer up and wait until it stops accessing the system drive. The mainboards are sorted in the order of ascending power consumption.
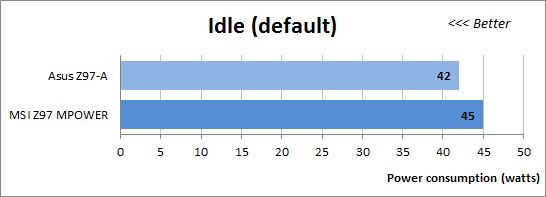
The higher power draw of the MSI mainboard isn’t a serious problem because the difference is small and neither mainboard uses optimal settings by default. Let’s enable all power-saving technologies to see a more accurate picture.
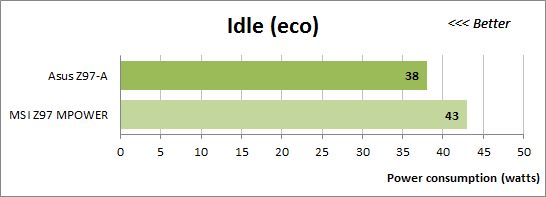
Both configurations consume less power now but the gap has grown bigger. The ASUS Z97-A looks more economical as its power draw has been reduced by 4 watts whereas the MSI mainboard’s, by 2 watts only. On the other hand, we should keep it in mind that the ASUS is a rather simple model while the MSI is a more sophisticated, higher-class product. So even though the MSI is less economical in this comparison, we should wait for tests of other mainboards to find it if it really consumes more power than average.
We want to remind you that we install an AMD Radeon HD 7970 graphics card into our test configurations. If we instead used the CPU-integrated graphics core, the overall power draw would be lower than 30 watts. Haswell-based CPUs are indeed very economical when idle, so it is a shame that the mainboards do not ensure this advantage by default. You have to correct some BIOS options for that.
For power consumption tests under high load we run the LinX 0.6.4 utility, which is a graphics shell for Intel’s Linpack test and supports AVX instructions. It is heavier on the CPU than ordinary applications, yet it is just an application nonetheless. It is quite possible that there are some other programs that can be just as heavy. That’s why we stick to using LinX for the purpose of checking the computer out for stability and for measuring its power consumption.
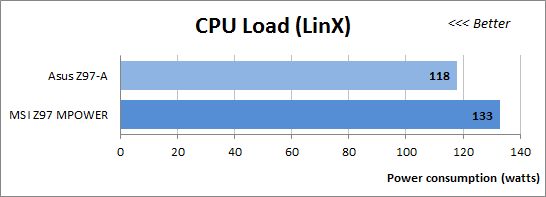
At high loads the gap between the mainboards is very large but the MSI model is not to be blamed for that. On the contrary, it is the ASUS which drops its CPU clock rate, which leads to lower power consumption but also to lower performance. This difference is only going to be tangible at high loads. We didn’t see any difference between the two mainboards in our performance benchmarks in the previous section of our review.
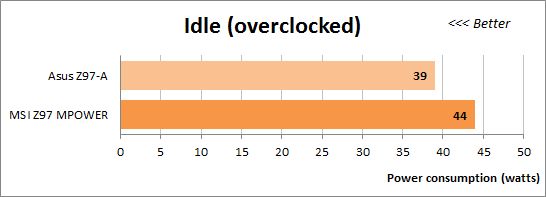
Now let’s see how much power the mainboards need in idle mode when overclocked. We don’t have a special Eco mode here because we always use as many power-saving technologies as possible while overclocking. That’s why the standings are the same as in the Eco mode without overclocking. Compared to the Eco mode, the mainboards need 1 watt more power and the gap between them remains the same. The MSI has higher power consumption. Take note that both mainboards consume less at the overclocked settings with increased voltage than in the first diagram (i.e. at their default settings). It proves once again that default settings are not optimal and you should enable power-saving technologies on your LGA1150 mainboard manually in order to achieve minimum power consumption.
By the way, you have to count in the graphics card’s power draw at high loads to calculate the overall system consumption. We use high CPU loads in our power consumption tests, but if we load the AMD Radeon HD 7970 by running some heavy game, the total power draw will be close to 250 watts at default settings and even higher at overclocking.
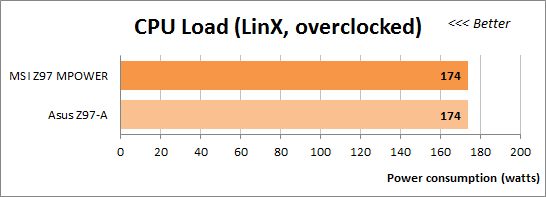
The two configurations need the same amount of power when overclocked and working at high loads. So it looks like the ASUS wasn’t particularly economical when idle. It was the MSI mainboard which needed too much then.
Conclusion
It was during the transition from the LGA1155 to the LGA1150 platform that MSI mainboards changed the most. They got rid of their inability to be overclocked in the energy-efficient way (by increasing voltage in the offset mode). They also got less economical but didn’t get too voracious, either. They got free from their old problems with saving BIOS profiles or damaged BIOS chips.
The transition from the Intel Z87 to the new but comparable Z97 chipset seems to bring about much fewer innovations, yet we can still spot quite a few of them and they really make the mainboard better and easier to use. On the other hand, there are some downsides that prevent us from praising the mainboard as a perfect product.
MSI mainboards have changed visually, the overclocker-friendly series sporting a new eye-catching logo. The bright-yellow “dotted” heatsinks of the Z97 MPOWER model look so good against the black background that it’s a real shame to hide this mainboard inside a computer case with blank walls. It will look splendid in a windowed case. The mainboard is designed in a user-friendly way and boasts broad functionality. Its MSI Click BIOS is still version 4, yet comes with quite a few changes. It has a new memory set-up feature (“Memory Try It!”) and there are new voltage-related options among the CPU Features. The Hardware Monitor section and the OC Profile Preview feature have been revised while the firmware update procedure has been simplified. The most important, yet also very inconspicuous, new feature is that the user is allowed to select frequently used BIOS options for fast access and choose what BIOS page should work as the start one. The Change Settings Info window lets you check out what changes are going to be applied, although it is not implemented perfectly. There are some downsides, too, yet MSI mainboards seem to be developing, adding new features and correcting bad ones along the way. We can really hope that they are going to get even better in the future.
So, what’s our problem with the MSI Z97 MPOWER? It just doesn’t support energy-efficient overclocking. MSI mainboards weren’t very overclocker-friendly in the past as they didn’t let you increase voltage in the offset mode. We could enable the loadline calibration feature to achieve the same results as with other brands’ mainboards, though, without disabling power-saving technologies. But now MSI mainboards seem to have lost the ability to overclock without increasing voltage. Most overclockers won’t notice this downside if they try to reach maximum rather than energy-efficient results and the MSI Z97 MPOWER won’t be any worse than other products in this case but we think that a really good mainboard must support all overclocking methods possible. And if you don’t intend to overclock at all, a simpler model would suffice.