Asus F2A85-V PRO Mainboard Review: Very Good Socket FM2 Mainboard

This mainboard looks great, is convenient to work with, offers rich functionality and high performance. However, its price is pretty high and the board is not very energy-efficient. It does have other advantages and a few other drawbacks, which we will unveil in the following review.
We started our new review series dedicated to mainboards on AMD A85X chipset for Socket Fm2 processors with a not very traditional article called “FM2 Platform: Gigabyte GA-F2A85X-UP4 Mainboard and AMD A10-5800K Processor Review”. In fact, the part discussing the actual mainboard is quite common. Yes, we started using new Microsoft Windows 8 operating system, partially updated the benchmark list, but nothing really changed in the overall perspective. The uniqueness of this article is that most of it is dedicated to the specifics of the new platform and AMD A10-5800K processor in particular. We were disappointed that in the nominal mode the system consumes about the same amount of power as a testbed with one of the LGA 1155 mainboards and an Intel Core i5-3570K processor offering incomparable performance. An even more shocking discovery was lying ahead. It turned out that an overclocked Socket FM2 platform can consume even more power than that!
We decided to figure out which of the platform components is the one to blame for making it some incredibly energy-inefficient and which one contributes the most to the performance increase. It is a known fact that AMD processors are not the best in terms of power consumption and performance ratio, so it didn’t come as a surprise that computing cores bear the principal responsibility for the high system power consumption. AMD A10-5800K overclocking boosts the computing cores performance, but not dramatically, because its nominal frequencies are set at very high values to begin with. At the same time, the graphics performance in games and other applications doesn’t increase at all, while the total power consumption snowballs rapidly.
The experiments with the graphics core integrated into the processor produced very interesting results. It turned out that it is the increase in its clock frequency and not CPU overclocking that determines the increase in the system power consumption in idle mode. Moreover, graphics core overclocking may have a negative effect on performance in computing tasks, although this negative effect is minimal and may be neglected altogether. However, it was quite disappointing that graphics core overclocking doesn’t serve its true purpose effectively – to ensure the performance boost in games and graphics applications. The acceleration proved to be minimal and could only be noticed in diagrams and tables, but not during the actual system operation.
However, the main character here turned out to be the memory. All our previous reviews showed that faster system memory had very little effect on system performance. This is an unbreakable rule that applies to all platforms no matter what their functionality is and who is the developer. We investigated whether it made sense to select faster memory for LGA 1156 Clarkdale processors, which memory was the best for Socket AM3 Phenom II X6. We compared the modules for LGA 2011, and which modules would be the best choice for LGA 1155 processors. The specific recommendations could vary, but the overall conclusion remained the same: one shouldn’t neglect high-speed memory, but it could be wrong to overestimate its potential. Why has everything changed for Socket FM2 all of a sudden?
At first I could say that not everything has changed, because the new platform wasn’t developed from scratch and therefore inherited some aspects from the previous systems. The performance gain from using high-speed memory is often quite minimal and the specific numbers in most cases depend heavily on the load type created by the application. The gain is barely noticeable in computing-intense applications, more noticeable during data archiving, but most of the potential can be unveiled only in graphics applications. The thing is that the graphics core uses part of the operating memory for video memory and its higher speed provides this phenomenal performance boost. Namely, the speed gets bumped up by at least one third when the memory frequency changes from 1333 MHz to 1867 MHz. It is also extremely important that despite this significant performance increase, the power consumption doesn’t rise.
Despite the overall positive feedback the Socket FM2 platform received, we were quite disappointed with the AMD A10-5800K processor. Substantial power consumption and low computing power are definitely not the features to be proud of. However, we didn’t really have high expectations in this aspect, but merely hoped that the relatively powerful graphics core would outweigh the shortcomings and make it look good. True, integrated AMD Radeon HD 7660D graphics is quite capable of replacing entry-level discrete graphics accelerators, which will help you to put together an inexpensive non-gaming computer system, which could still be used for occasional gaming. However, this system will never become a fully functional gaming platform, because its graphics sub-system is not powerful enough to satisfy the needs of contemporary 3D games, even at the lowest resolution and with the minima image quality settings.
So, now that we know all this, we can proceed with a more traditional mainboard review. Asus mainboard have long been primary rivals to the products from Gigabyte, therefore our choice of the next review subject was actually quite predictable. Gigabyte GA-F2A85X-UP4 mainboard is the top model in Gigabyte’s Socket FM2 line-up that is why for the sake of a fair comparison we selected Asus F2A85-V PRO mainboard, which tops the FM2 series of Asus products.
Packaging and Accessories
Just like in case of Gigabyte’s packaging, the box with Asus F2A85-V PRO is very recognizable due to typical design and colors. The company uses the same packaging design for all their products with the exception of “Republic of Gamers” and “The Ultimate Force” series, which also have unified design across the series, but with different distinguishing characteristics and color choices.
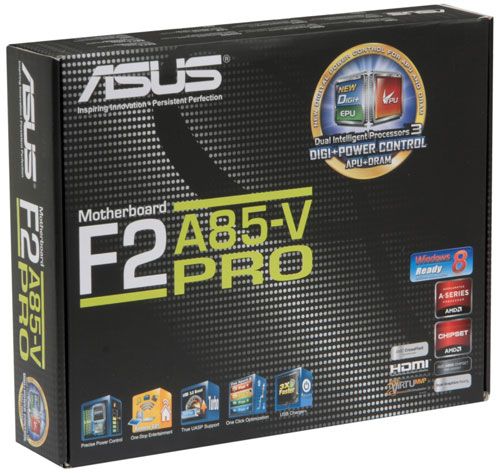
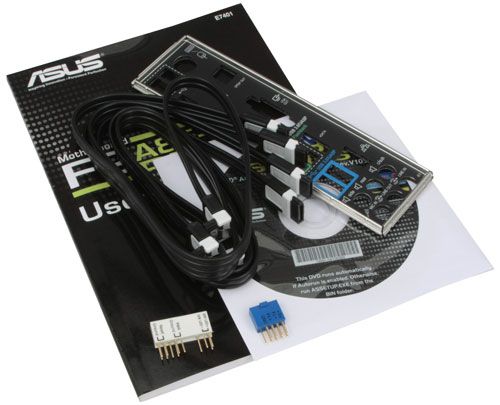
On the very front of the box we see a large Asus F2A85-V PRO model name and an array of icons and logotypes indicating the board’s functionality and supported technologies. There is a mainboard photo on the back of the box with a list of technical specifications and a brief description of its key features and functions. The mainboard inside the box is packed in an anti-static pouch, and all accessories are arranged beneath it and are separated with a cardboard divider:
- Four Serial ATA cables with metal L-shaped connector locks. The ones specifically designed for SATA 6 Gbps devices have white inserts in the connectors;
- I/O Shield for the back panel;
- “Asus Q-Connector” kit including adapters for easy connection of the system case front panel buttons and indicators and a USB 2.0 port;
- User manual;
- DVD disk with software and drivers.
It is not surprising to see no plastic carry handle or a colorful flip-cover on the front of the box. The modest accessories bundle is also something we have expected to see. Mainboards for Socket FM2 processors cannot be too pricy and therefore, we can’t consider this thriftiness to be a drawback, more like an advantage.
PCB Design and Functionality
Just like with the packaging, some of the design features in F2A85-V PRO indicate clearly that it is an Asus product. The mainboard itself looks quite common. We can just take it for granted, but we can also be surprised about it. A lot of mainboards for Socket FM2 processors have some very unique distinguishing features, which tell you that it is a simple and inexpensive model. Among them are smaller PCB dimensions, four-pin ATX12V power connector, the absence of additional heatsinks or something similar. Asus F2A85-V PRO doesn’t have anything like that. It looks like a real fully functional mainboard without any “ifs” or “buts”.
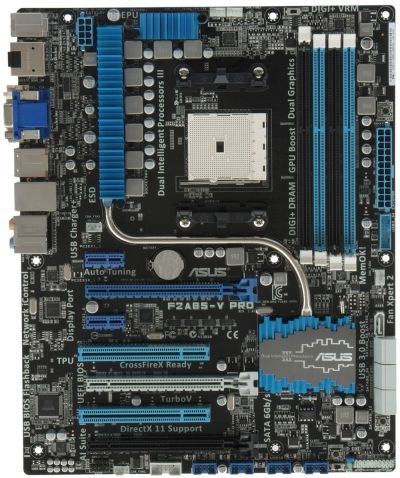
The mainboard is equipped with a pretty powerful voltage regulator that works as 6+2. The new “DIGI+Power Control” voltage regulator circuitry guarantees stable settings as well as simple and precise voltage adjustment not only for the processor and the integrated graphics core in it, but also for the memory. It supports all contemporary Socket FM2 processors, and four memory DIMM slots can fit up to 64 GB of RAM. The voltage regulator components that may run warm during operation are fully covered with two additional heatsinks, and the cooling contour includes a heatpipe connecting one of them with the heatsink on the chipset.
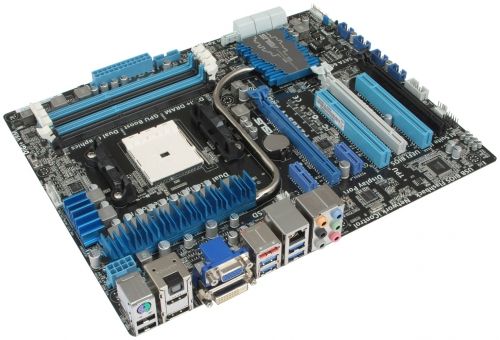
AMD A85X chipset provides support for AMD CrossFireX graphics configurations. You can use two PCI Express 2.0 x16 slots that share 16 PCI-E lanes as well as the third slot working at x4 speed. Besides that the expansion cards may be installed into two PCI Express 2.0 x1 and two PCI slots. Out of eight SATA 6 Gbps ports available in the mainboard chipset, we have seven plus one eSATA on the back panel.
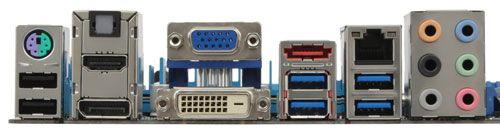
The mainboard back panel has the following ports and connectors:
- Universal PS/2 connector for keyboard or mouse;
- Four USB 2.0 ports, another eight ports are laid out as four onboard pin-connectors;
- D-Sub, DVI-D, HDMI and DisplayPort video outs;
- eSATA 6 Gbps port implemented via AMD A85X chipset, like seven internal SATA 6Gbps ports;
- Four USB 3.0 ports (blue connectors), two of which are implemented via ASMedia ASM1042 controller. Another two ports and one more internal pin-connector for two additional USB 3.0 ports are provided by the mainboard chipset;
- A local network port (network adapter is built on Gigabit Realtek RTL8111F controller).
- An optical S/PDIF and six analogue audio-jacks provided by eight-channel Realtek ALC892 codec.
Just like all the other mainboards from Asus, F2A85-V PRO uses wide Q-Slot latches on the graphics card slots. TPU switch (TurboV Processing Unit) will allow you to automatically overclock the processor, while the EPU switch (Energy Processing Unit) will enable more energy-efficient operational mode. USB BIOS Flashback button will help update the mainboard BIOS by using the namesake utility even when the system hasn’t yet been fully assembled: you do not need to install the processor, memory, graphics card or connect the monitor to run the update tool. Just plug in the power cable, insert the USB flash drive into the corresponding port and press and hold the BIOS Flashback button. Moreover, there is MemOK! button that will let the mainboard boost successfully even if memory problems occur. There is a new button there called “DirectKey”, by pressing which you can automatically enter the mainboard BIOS Setup. There are five four-pin fan connectors onboard: one processor fan connector and four system fan connectors.

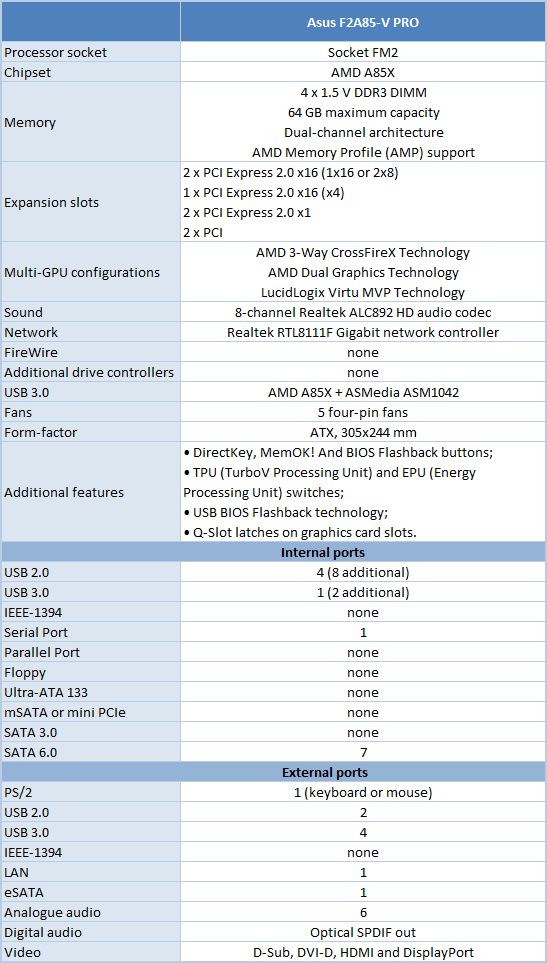
For your convenience we summed up all the mainboard characteristics and specifications in the following table:
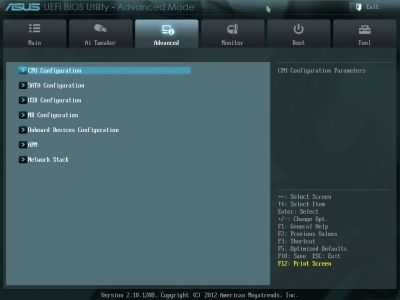
BIOS Setup
In our previous reviews of Asus products we have already talked about Asus EFI BIOS – an overall very successful implementation of the UEFI standard (Unified Extensible Firmware Interface). Therefore today we are going to briefly refresh your memory of the major BIOS sections and their parameters and settings.
By default, there is “EZ Mode” enabled in the BIOS. It performs mostly informational functions, because there are barely any configurable parameters there. You can check the basic system settings, some monitoring data, select an energy-efficient or performance mode and set the order of boot-up devices by simply dragging and dropping them with the mouse pointer.
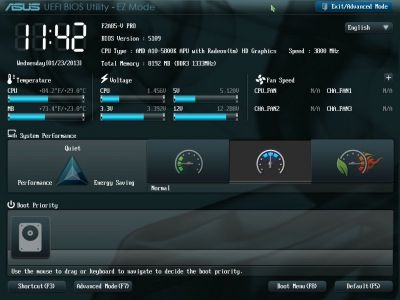
You can quickly switch from “EZ Mode” to “Advanced Mode” by pressing F7, or use the F3 hot key to jump over to one of the most frequently used BIOS sections.
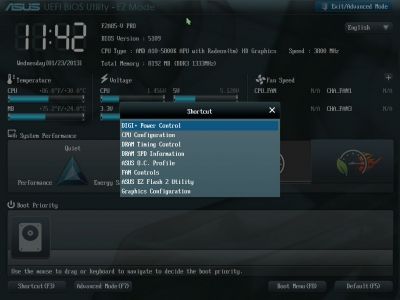
You can switch from “EZ Mode” to “Advanced Mode” every time you enter the BIOS, or press F3 key which also works if pressed while in any other BIOS section, yet it could be much more convenient if you made “Advanced Mode” a default setting. In this case the first section you see will be the familiar “Main” section, where you can receive some basic system information, change the interface language and set up date and time.
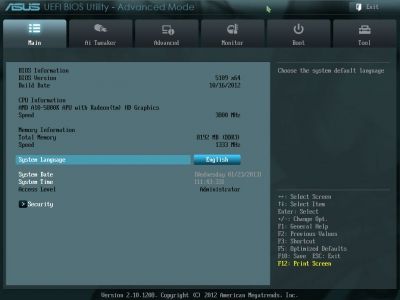
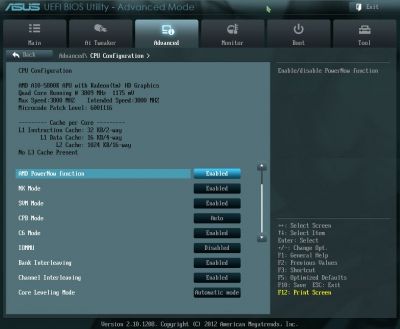
Most of the overclocking-related options are traditionally gathered in the “Ai Tweaker” section. The main section window allows you to change the frequencies, multipliers and voltages. You don’t need to go over to the “Monitoring” section to check the current voltages, as they are all listed right here next to each of the parameters used for changing these voltages, which is highly convenient. The voltages may be set above or below their nominal values.
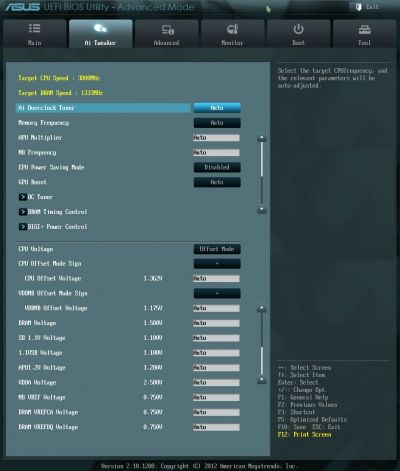
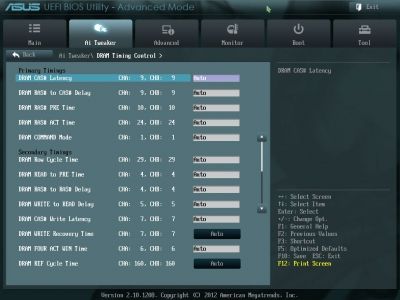
As usual, some parameters are singled out into individual sub-sections in order to unload the main section a little bit. “OC Tuner” parameter only looks like a sub-section, but in reality it helps to automatically overclock the system. The memory timings can be configured on an individual page. They are indeed very numerous, but still very easy to work with. You can see all timings that the mainboard sets for each of the two memory channels. And you can adjust only a few selected timings, such as the main ones, for example, leaving all other settings at defaults.
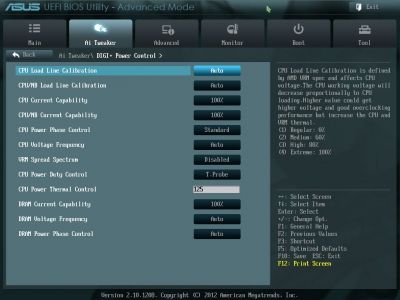
You can’t help noticing numerous options related to the power and energy-efficiency of the digital DIGI+ Power Control voltage regulator. You can configure Asus’ proprietary power-saving technologies that allow changing the number of active phases in the voltage regulator circuitry depending on the CPU utilization right in the BIOS. “CPU Load-Line Calibration” technology that prevents the CPU Vcore from dropping under heavy load may be not only enabled or disabled, but also adjusted to deliver the desired effect.
The functionality of the parameters in the sub-sections of the “Advanced” section is quite clear from their names. There is only one new parameter designated to Thunderbolt port.
The “CPU Configuration” sub-section reports the basic info about the processor and allows managing some processor technologies.
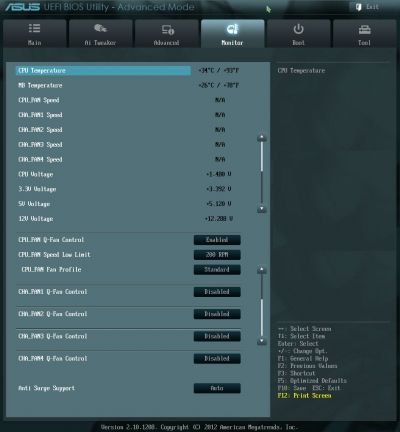
“Monitor” section tells us the current temperatures, voltages and fan rotation speeds. You can select one of the preset modes for the processor and two case fans from a pretty standard list including “Standard”, “Silent” and “Turbo” modes. You can also select the parameters manually. All system fan connector allow lowering the rotation speed of all fans, including the ones with three-pin connectors. However, the processor fan connector doesn’t support it. It can only adjust the rotation speed of the four-pin processor cooling fans.
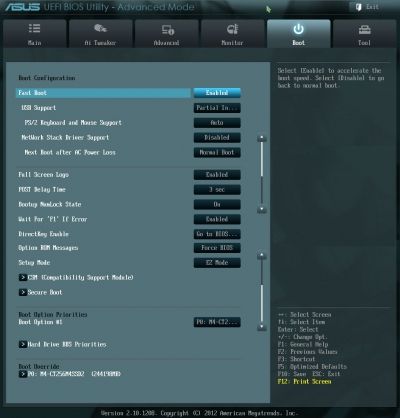
The “Boot” section allows you to adjust your boot-up parameters that will be applied on system start-up. By the way, this is where you have to replace the default “EZ Mode” with “Advanced Mode”.
Now let’s quickly refresh the functionality of the “Tools” section.
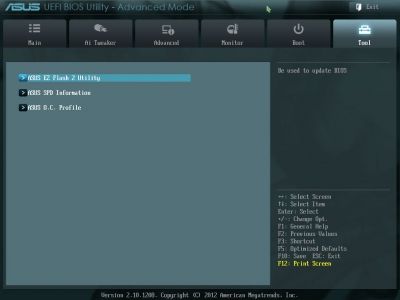
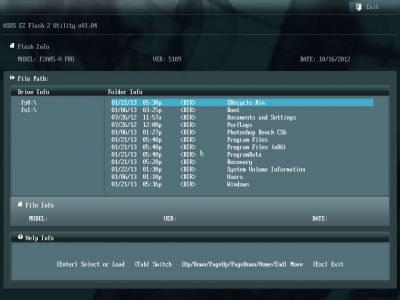
The built-in “EZ Flash 2” utility for BIOS reflashing is one of the most convenient and functional programs of the kind. Unfortunately, they have eliminated the option that allowed saving the current BIOS version before reflashing a new one.
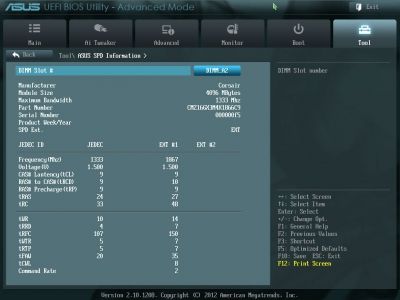
Just like on mainboards from many other makers we can read the information in the memory modules SPD, including the AMD Memory Profile (AMP) or XMP (Extreme Memory Profile).
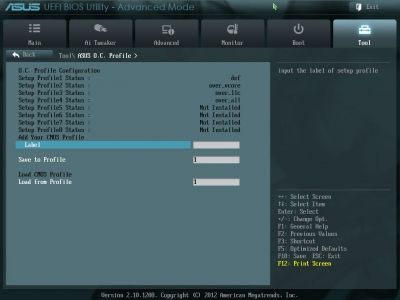
Asus mainboards allow saving and quickly loading eight full BIOS settings profiles. Each may have a brief descriptive name. They haven’t yet fixed the issue with saving the disabling of the startup image, it is no longer possible to exchange settings profiles, save on external media or load from them.
The last section is called “Exit”. Here you can apply the changes, restore the defaults or go back to the “EZ Mode”.

Testbed Configuration
We carried out our tests on a testbed that included the following components:
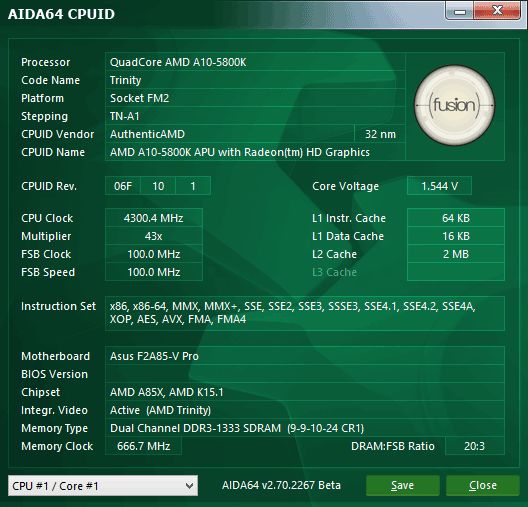
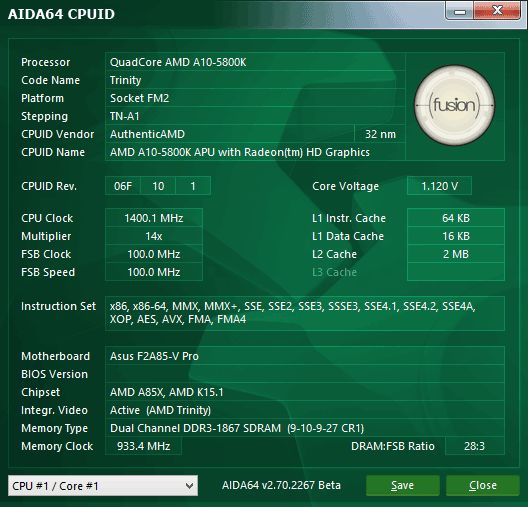
- Asus F2A85-V PRO rev.1.03 mainboard (Socket FM2, AMD A85X, BIOS version 5109);
- AMD A10-5800K CPU (3.8-4.2 GHz, 4 cores, AMD Radeon HD 7660D 800 MHz, 32 nm, 100 W, 0.825-1.475 V, FM2);
- AMD Radeon HD 7660D integrated graphics (800 MHz, 384 ALU, 32 nm, DirectX 11);
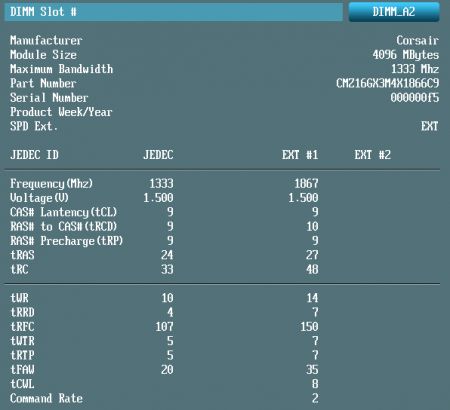
- 2 x 4 GB DDR3 SDRAM Corsair Vengeance CMZ16GX3M4X1866C9R (1866 MHz, 9-10-9-27 timings, 1.5 V voltage);
- Crucial m4 SSD (CT256M4SSD2, 256 GB, SATA 6 Gbps);
- Noctua NH-D14 CPU cooler;
- ARCTIC MX-2 thermal interface;
- Enermax NAXN ENM850EWT PSU;
- Open testbed built using Antec Skeleton system case.
We used Microsoft Windows 8 Enterprise 64 bit (Microsoft Windows, Version 6.2, Build 9200) operating system, AMD Chipset Drivers version 12.10, AMD Catalyst graphics card driver version 12.10.
Operational and Overclocking Specifics
The assembly of an Asus F2A85-V PRO based testbed didn’t cause any problems. The first system boot also ran smoothly. Upon system boot the board displays a startup image, which, unfortunately, still doesn’t contain any hints about the list of available hot keys, unlike the products from other mainboard makers. For example, they could mention that F8 leads to a menu where you could select a boot-up device, while pressing the Tab key would hide the startup image altogether.
You can hide the startup image not only for the current system boot-up by pressing the Tab key, but also completely disable it with the help of the “Full Screen Logo” option in the BIOS itself. Although, this setting will not stick in the BIOS profiles. If you disable the startup image, the system will display the correct processor frequency, memory frequency and size, as well as information about the connected external devices and drives.
However, contemporary Asus mainboards start so quickly that you will hardly be able to register this information anyway. Fast boot-up and transition to OS loading is a definite advantage of any mainboard, but it becomes a shortcoming at the system configuration stage. It may become very annoying when you simply miss the right moment to press the Del key in order to access the BIOS Setup. Therefore, the above mentioned DirectKey button could receive a highly positive welcome on our part, had it not been for some of the unique peculiarities in the implementation of this feature.
The first time we came across a GO2BIOS button with similar functionality was during our MSI Z77 MPOWER mainboard review. Back then we simply mentioned the new button, because its functionality was quite straight-forward and obvious, so there was no read need in any additional comments. By pressing this GO2BIOS on the MSI mainboard leads you to the BIOS during next system boot-up or restart without any action on user’s part. You could press this button at any time: when the system is powered off, when you are in the BIOS or when the operating system has been loaded. The DirectKey button on Asus F2A85-V PRO mainboard works differently. It sort of duplicates the Power On/Off button by adding the automatic BIOS access feature. It is very convenient when you power on the system with this button and immediately access the BIOS, however, at the system configuration stage you usually require a system reboot, rather than power on. Imagine that you made some changes in the BIOS Setup, noticed some issues after the OS has been loaded and wish to go back into the BIOS to correct the settings. In case of an MSI board you would push the GO2BIOS button and enter the BIOS Setup automatically after the system reboots. In case of an Asus board you will push the DirectKey button, the system will power off. Then you power it back on and only after that you get redirected to the BIOS Setup. In other words, there is an additional step – powering the system off and on, which could be pretty inconvenient.
However, the mainboard functionality allows to avoid using DirectKey button at all and at the same time have no negative experience neither during system configuring nor during regular work. “POST Delay Time” parameter allows to delay the start by up to 10 seconds, so almost anyone can manage to hit the Del key within this time to access the BIOS. And those who need even more time could prohibit OS loading until the Ecs key has been pressed. This allows us to increase the startup delay to our liking for system configuring purposes and lower it to minimum afterwards in order to enjoy the almost momentary boot-up.
In our Gigabyte GA-F2A85X-UP4 review we pointed out that it provided the correct nominal mode, only the memory was working at the correct frequency of 1333 MHz, but instead of the 9-9-9-24 timings recorded in the modules SPD we saw 9-9-10-24. Strange as it might seem, but the same is true for Asus F2A85-V PRO mainboard as well. Actually, you can see in the BIOS that the board reads the modules SPD absolutely correctly, but for some reason sets slightly different timings. However, the differences are minimal and therefore not critical. It could be that both mainboards simply take into consideration some peculiarities of the memory controller in the AMD processors.
It looks like one of the mainboard’s most obvious and predictable, but not any less upsetting shortcomings uncovered during our test session is its inability to adjust the rotation speed of the processor fans with three-pin connectors. Our Noctua NH-D14 CPU cooler has two fans and both of them are three-pin fans. With Gigabyte mainboard we used an enclosed Y-splitter to connect the fans and enjoyed our system, which adjusted the fan rotation speeds on its own depending on the operational mode and load type. With Asus mainboard we had to use a ZM-MC1 adapter that was left from one of the Zalman coolers to connect to the 5 V plugs and switching to full speed during system overclocking.
However, before we proceed with the discussion of our overclocking experiments, we would like to clarify a few things. In our Gigabyte GA-F2A85X-UP4 mainboard review we learned that increasing the graphics core frequency didn’t affect the system power consumption that much, but this negative effect was constant and could be observed even when the system stayed idle. At the same time we could even notice some performance drop in computing-intensive tasks, but most importantly the performance in graphics applications didn’t improve that much at all. Processor overclocking also didn’t help much in terms of improving the computing performance and proved practically completely useless for graphics applications and games. Moreover, it was the increase in the CPU frequency and higher voltages that triggered rapid increase in system power consumption. All this suggested that processor overclocking wasn’t such a good idea after all for both: computing as well as graphics cores. However, we did encourage everyone to increase the memory frequency. It had practically no effect on the power consumption, but could do a lot of good for almost any type of tasks, and would ensure a remarkable performance boost in games.
So, why do we go down the same path again and start overclocking the processor? The response is obvious: we need to run a standard check and tell you all we know about the peculiarities of this particular mainboard. Our story would be incomplete without the overclocking coverage, but most importantly overclocking allows us to test any mainboard in the most efficient and productive manner. If a mainboard works correctly during overclocking or in any other non-nominal mode, then we could be almost 100 % certain that in favorable conditions it will also be stable. Overclocking of all system components is not a goal, but merely a tool, an efficient way of checking out a mainboard. Please, do not take it as a call for immediate action. We still recommend to only increase the memory frequency in all Socket FM2 systems and not to overclock anything else.
As usual, Gigabyte mainboards do not have any tools for automatic overclocking in their BIOS, the manufacturer recommends using their proprietary Easy Tune 6 utility. Only if you enable Turbo CPB parameter in the BIOS, the processor clock frequency multiplier will always increase to the maximum value allowed for this model by the Turbo Core technology under heavy load. In our case it is 42x. As for Asus mainboards, their BIOS has a special OC Tuner parameter, which allows you to overclock the system automatically. After we rebooted the system, the graphics core frequency increased from 800 to 950 MHz and the CPU got overclocked to 4.3 GHz.
The disadvantages of this automatic overclocking are obvious. The processor and graphics core frequencies have been increased, but the memory frequency remained the same. In other words, this OC Tuner parameter does exactly the opposite: it increases the settings that we do not recommend increasing at all, but doesn’t touch the one that we encourage to bump up. All power-saving technologies stay up and running and in idle mode the CPU clock speed will drop to 1.4 GHz and the Vcore will go down as well, which is undoubtedly a good thing. Too bad that Turbo Core technology doesn’t get disabled. In our previous review we saw that AMD A10-5800K processor could be considered excessively overclocked. It is simply unable to handle its original nominal frequencies. Turbo Core technology can increase its clock speed to 4.2 GHz only under very low operational loads, while under heavy loads the frequency drops even below the nominal value, to 3.4 GHz. So, it doesn’t really matter that the OC Tuner parameter increased the CPU clock frequency to 4.3 GHz, this number could be even higher, but under heavy load it will still drop anyway that is why we cannot declare the automatic overclocking on Asus F2A85-V PRO a success.
However, manual overclocking went smoothly in all respects. The mainboard’s specifications list AMD Memory Profile (AMP) support, but the mainboard still allowed us to use the settings from the Extreme Memory Profile (XMP) and even slightly adjust the timings afterwards. We managed to push the CPU clock speed to 4.5 GHz, while Turbo Core technology was disabled, so the frequency wouldn’t drop under heavy loads.

However, it will drop in idle mode, because all power-saving technologies remained intact. The processor Vcore would also be lowered in idle mode.
The graphics core frequency was boosted from 800 to 1086 MHz.

As a result, we ended up with the same exact overclocking results as with Gigabyte GA-F2A85X-UP4. Moreover, we have no concerns regarding the user-friendliness of the Asus F2A85-V PRO overclocking process, unlike Gigabyte mainboard, which doesn’t have the most convenient implementation of the graphics core frequency increase function. Its BIOS allows adjusting the frequency with 1 MHz increments, but the problem is that the clock frequency generator changes the frequency with a variable increment that is why we had to identify the most optimal frequencies by trial and error method. The GPU Boost parameter on the Asus mainboard offers us to choose from two preset overclocking profiles for the integrated graphics core, which can increase its frequency to 950 or 1013 MHz. If we decide on manual overclocking, the mainboard will offer us a frequency selection that will actually correspond to the graphics core overclocking pattern.
Performance Comparison
As usual, we are going to compare the mainboards speeds in two different modes: in nominal mode and during overclocking of all system components: processor, integrated graphics core, memory. The first mode is interesting because it shows how well the mainboards work with their default settings. It is a known fact that most users do not fine-tune their systems, they simply choose the optimal BIOS settings and do nothing else. That is why we run a round of tests almost without interfering in any way with the default mainboard settings. The results on the diagrams are sorted out in performance descending order.
Nominal Mode
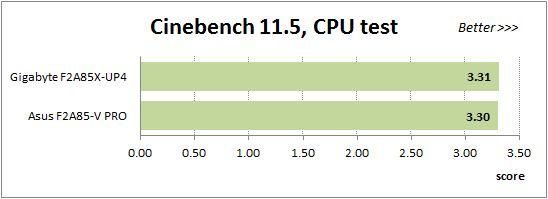
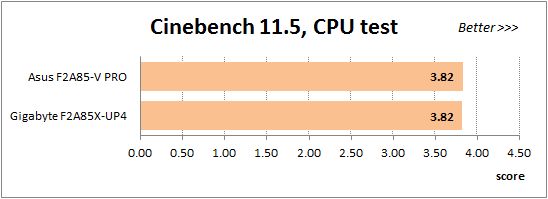
We used Cinebench 11.5. All tests were run five times and the average result of the five runs was taken for the performance charts.
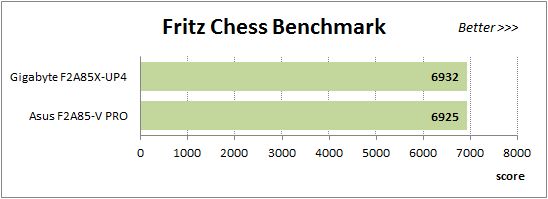
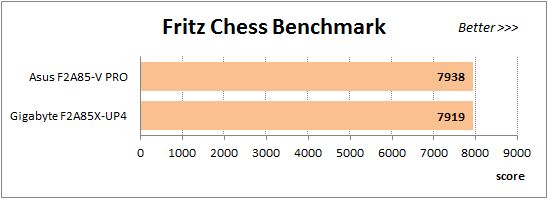
We have been using Fritz Chess Benchmark utility for a long time already and it proved very illustrative. It generated repeated results, the performance in it is scales perfectly depending on the number of involved computational threads.
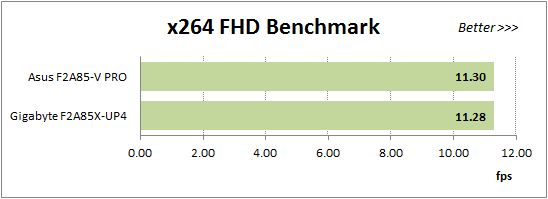
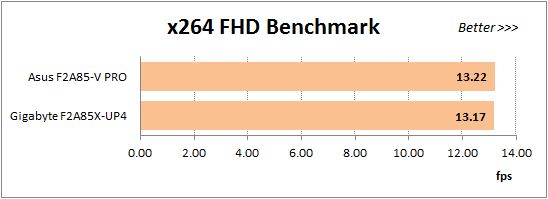
x264 FHD Benchmark v1.0.1 (64bit) test allows to compare the system performance against an existing database of results. The average of five consecutive passes is presented on the diagram below:
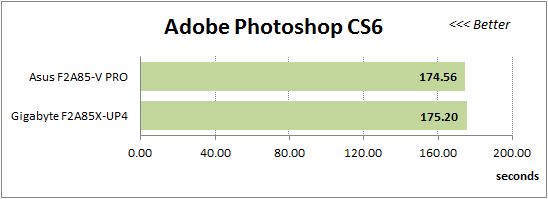
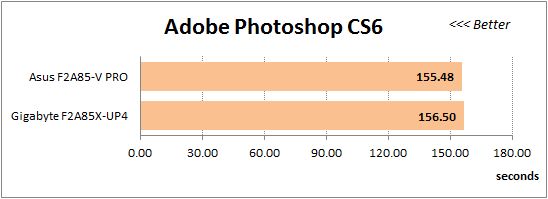
We measured the performance in Adobe Photoshop CS6 using our own benchmark made from Retouch Artists Photoshop Speed Test that has been creatively modified. It includes typical editing of four 24-megapixel images from a digital photo camera.
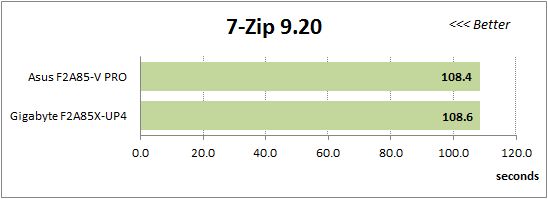
In the archiving test a 1 GB file is compressed using LZMA2 algorithms, while other compression settings remain at defaults.
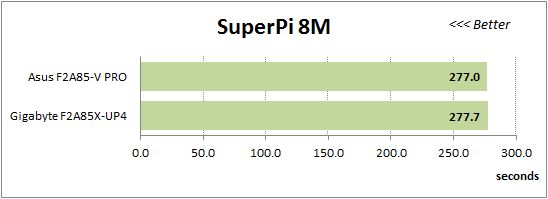
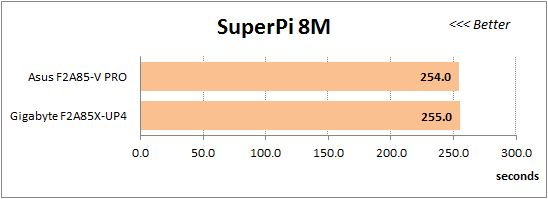
Like in the data compression test, the faster 8 million of Pi digits are calculated, the better. This is the only benchmark where the number of processor cores doesn’t really matter, because it creates single-threaded load.
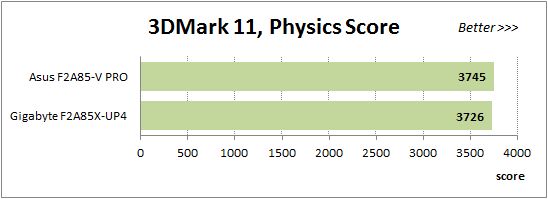
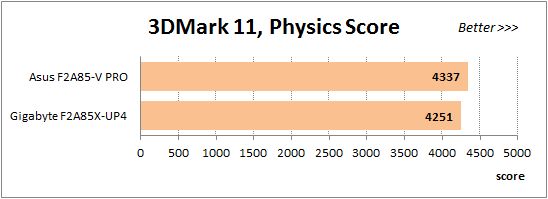
The next diagram shows the results of 3DMark11 CPU tests – Physics Score. This score is obtained in a special physics test that emulates the behavior of a complex gaming system working with numerous objects:
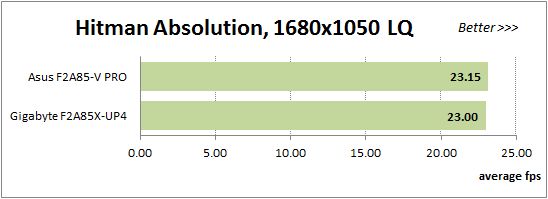
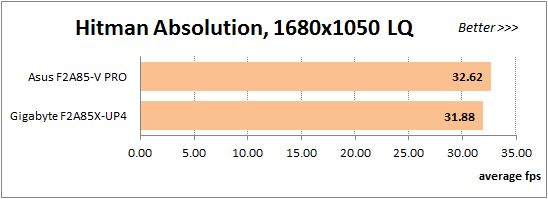
The benchmark integrated into the Hitman Absolution game turned out very convenient. It can be launched directly from the game, from the game launcher utility and even from the command prompt. In order to get the minimal acceptable results, we had to use the lowest image settings and use one of the lower resolutions.
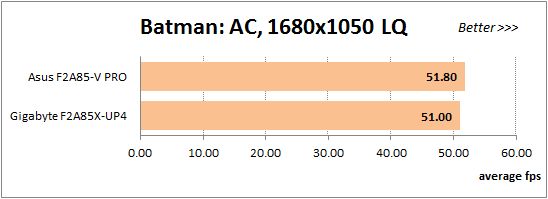
Batman: Arkham City game also reacts eagerly to any changes in the CPU clock frequency, but it uses DirectX 11. We ran game’s integrated benchmark five times with high image quality settings and then take the average of the five runs for the diagrams.
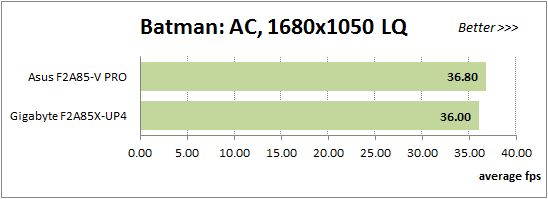
Depending on the application, the leaders alternate throughout the entire session in the nominal mode. However, you can hardly see that on the diagrams: you will have to check a comparative table with the exact scores to see the difference. It is a known fact that related mainboards working in identical conditions show about the same performance, which is exactly what we see here. Only in Batman: Arkham City the performance difference is more obvious and is a little above 2%, but in absolute values it is actually less than 1 frame per second, so it will not be noticeable in reality.
Overclocked Mode
During overclocking both mainboards achieved the same results for the CPU, integrated graphics core and memory components that is why we anticipate about the same performance numbers in our performance tests, too.
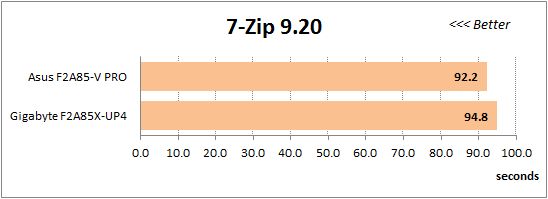
All in all, the results during overclocking are quite predictable. The two mainboard performed almost identically with two small differences. First of all, by looking at the diagrams you may think that all results on them have been sorted out in alphabetical order, because the Asus mainboard is always on top of the list. Moreover, in some applications the performance difference turned out a little higher than we had expected, as Asus mainboard seems to be working with the memory in a slightly more efficient manner. Namely, when we compressed the files in the 7-zip program, its performance advantage was approaching 3%. In fact, it doesn’t change anything for the user, as both systems will create an archive in about a minute and a half, and I doubt that anyone would notice the difference between 92 and 95 seconds. However, we will have to take this fact into account during final mainboard scoring.
Power Consumption
We performed our power consumption measurements using an Extech Power Analyzer 380803. This device is connected before the PSU and measures the power draw of the entire system (without the monitor), including the power loss that occurs in the PSU itself. In the idle mode we start the system up and wait until it stops accessing the hard disk. Then we use LinX to load the CPU, and LinX and MSI Kombustor working simultaneously – to create complex heavy load.
Since Turbo Core technology lowers the processor frequency below the nominal value under heavy CPU load, the actual system power consumption in nominal mode is impossible to measure accurately. Therefore, we had to find a compromise and disable the CPB Mode parameter in the mainboard BIOS. This is a pretty serious allowance, which changes the system behavior dramatically, but nevertheless we believe that the obtained results are credible enough. The thing is that LinX utility loads the CPU extremely heavily, much more than you would anticipate from regular programs. As a result, despite the fact that CPB Mode parameter has been disabled, the measured system power consumption under heavy load created by LinX turns out about the same as we observed in real applications launched with enabled Turbo Core technology. We applied the same principle when we selected utilities for creating complex system workload. When we chose programs responsible for heavily loading individual system components, we made sure that they created about the same need for power as real application would in every-day usage scenarios. The results on the following diagrams are arranged in an ascending order for power consumption.
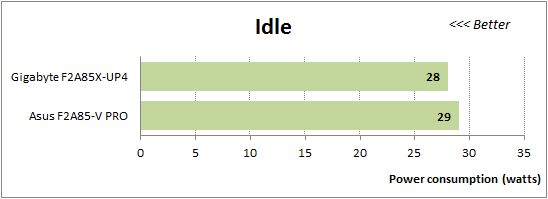
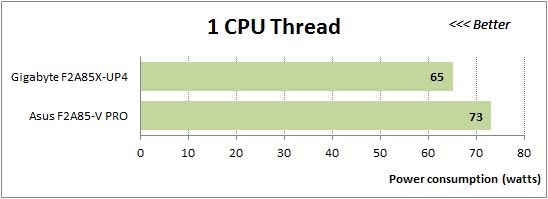
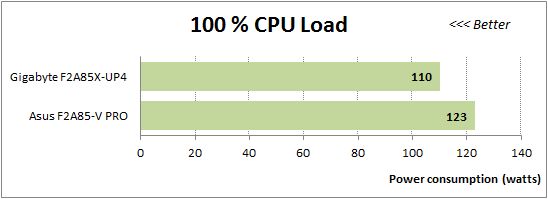
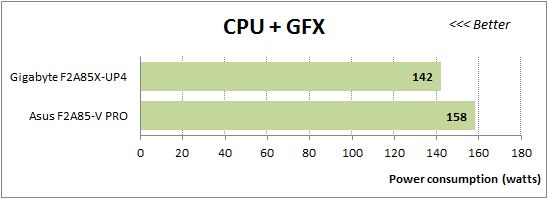
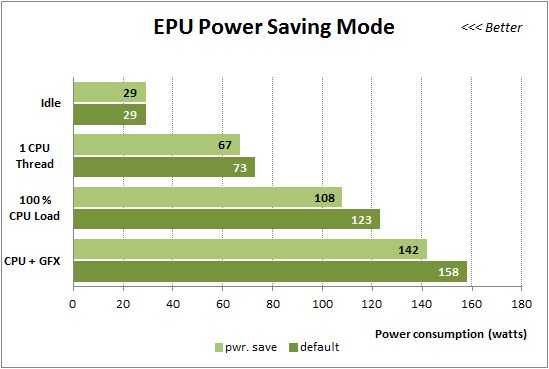
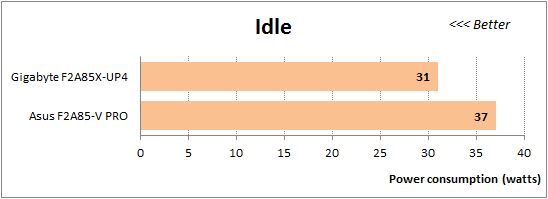
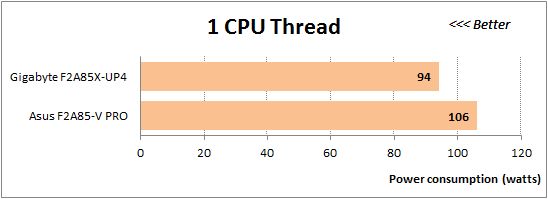
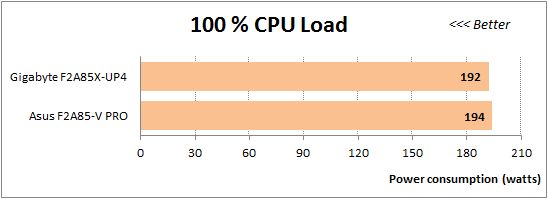
Throughout this review we most often saw Asus mainboard slightly ahead of the competition, but things changed to their complete opposite during the power consumption tests: this is where Gigabyte mainboard consumes less power. Unlike the performance tests, the difference here is obvious and sometimes even extremely significant. However, Asus F2A85-V PRO mainboard does have a few reserves left: you can disable the EPU Power Saving Mode parameter in the mainboard BIOS. You may adjust the savings range to your liking, depending on the specific system functionality and usage model. As for us, we decided to leave it at Auto. In this case the power consumption of systems based on different mainboards becomes comparable. The next diagram shows the difference between the nominal and power-saving mode on the same Asus mainboard.
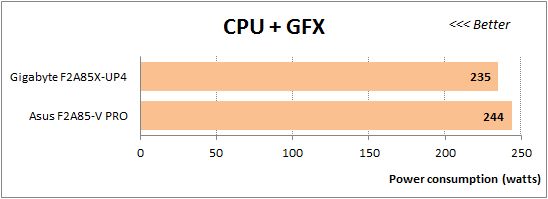
However, once we get to overclocking, Gigabyte mainboard again takes the lead away from Asus: it consumes less power in any operational mode and under any type of load. The systems power consumption will be very similar only in very compute-intense applications. In all other cases Asus mainboard will be consuming more energy, while its performance will be practically the same.
Conclusion
Throughout this review Asus F2A85-V PRO made a very positive impression. It does have some shortcomings, like any other mainboard from any other mainboard maker, but they are not critical. However, when it comes to advantages, they are quite numerous. So far we have tested only two mainboards as part of our Socket FM2 mainboard review series, therefore, it is extremely convenient to perform side by side comparison between Asus F2A85-V PRO and Gigabyte GA-F2A85X-UP4. Both mainboards are the top products in their respective lineups, they features and functionality are similar and quite comparable. These are full-size mainboards, they support AMD CrossFireX graphics configurations which can be built using three PCI Express 2.0 x16 slots (1×16, 2×8 or x8/x8/x4). Asus mainboard has two PCI Express 2.0 x1 and two PCI slots for expansion cards, while Gigabyte mainboard has three PCI Express 2.0 x1 slots and one PCI slot. Asus product boasts an intricate cooling contour with a heatpipe that covers all components in the processor voltage regulator circuitry that may run hot during work. Gigabyte mainboard doesn’t have a heatpipe and is missing a heatsink. Asus’ additional functionality includes EPU and TPU switches, DirectKey, MemOK! And BIOS Flashback buttons. Gigabyte mainboard boasts Power On, Reset and Clear CMOS buttons, POST-code indicator, DualBIOS and Ultra Durable 5 technologies.
If we compare the BIOS functionality then Asus mainboard will look somewhat more attractive. It has automatic overclocking function, the adjustment of the graphics core frequency has been implemented in a much more convenient way. However, it is important to remember that both mainboards both mainboards overclocked all system components identically. Both of them can save up to eight BIOS settings profiles, but Gigabyte mainboard may save and load the profiles to and from external media. Moreover, it also automatically saves the profile after every successful system start. Asus mainboard can’t boast anything like that. Just like other company mainboards it doesn’t save the disabled startup image in the profiles and has no mention of the system hot keys on the screen beneath the startup image. Instead, it allows to very flexibly adjust the startup delay, and if the startup image has been disabled, it will display correct system information on the screen. An obvious shortcoming of the Asus F2A85-V PRO mainboard is its inability to allow adjusting the rotation speed of the three-pin processor cooling fan, while all four system fan connectors can lower their rotation speed with either connection. Gigabyte mainboard has automatic adjustment of the processor fan rotation speed, but only one system fan can allow adjustment with a three-pin fan. The boards perform almost equally fast in nominal as well as in overclocked mode, though Asus mainboard is often ahead of Gigabyte. However, it yields to Gigabyte in energy-efficiency, and sometimes this difference is quite substantial. Moreover, while the boards are priced in the same range, the Asus product is a little bit more expensive.
We started our review of the Asus F2A85-V PRO mainboard by saying that it looked like a real fully functional mainboard, however, Socket FM2 system owners may not appreciate this to the fullest, because the majority of them pay more attention to the lower price, and this isn’t Asus’ strength. However, this is hardly a disadvantage. Asus is more than capable of producing and supporting a wide variety of mainboards. The company has less expensive mainboards on AMD A85X and even cheaper mainboards on AMD A75 and A55 chipsets. So, I am sure anyone can find a product that will meet their specific needs and wants. As for Asus F2A85-V PRO, a product like that was not only desired, but also necessary, as it is intended for those users who are not willing to compromise and always go for the best.