Gigabyte GA-Z87X-OC Review: Special for Overclockers

Gigabyte GA-Z87X-OC motherboard is targeted for open testbeds and overclocking experiments. That is why it has a bunch of special and very interesting distinctive features. But this mainboard is not optimal for ordinary desktops and in this review we tell you why.
Gigabyte’s special mainboards for gamers and enthusiasts have appeared but recently in the company’s long history. On the other hand, they have been around for quite a while considering how many chipset generations have been announced and got outdated over this time. So it all began in 2011 when the G1-Killer series was launched consisting of three models: G1.Assassin, G1.Sniper and G1.Guerrilla. There was also an overclocker-friendly GA-X58A-OC model. Each of them was based on the Intel X58 Express chipset and represented the LGA1366 platform. You can check out our reviews of the G1.Sniper and GA-X58A-OC, by the way. Gigabyte has never attempted such a massive assault since then, yet the G1-Killer series has been developing steadily. The G1.Assassin 2 with Intel X79 Express chipset was released for the high-performance LGA2011 platform while the mainstream segment was covered by several models. To support LGA1155 processors, the G1.Sniper 2 with Intel Z68 Express chipset was introduced. It was later followed by the G1.Sniper 3 and the micro-ATX G1.Sniper M3, both based on the Intel Z77 Express. The overclocker-friendly series was continued as well, but could easily be overlooked. The LGA2011 Gigabyte GA-X79-UD7 or the LGA1155 Gigabyte GA-Z77X-UP7 don’t imply any overclocking with their names but seem to be similar to the GA-P67A-UD7 or GA-Z68X-UD7-B3, which are top-end models of regular product series.
That’s the past. As for the present moment, Gigabyte has announced as many as five special LGA1150 mainboards despite the manufacturers’ claims of lowering sales and profits and the analysts’ predictions of the end of the PC era. The announcement is quite surprising, yet there is some solid thinking behind it. If you had bought a new mainstream home or office PC some two or three years ago, it would be still good enough today for web-browsing and text processing. You might have specialized further by installing an HTPC in your living room, a work PC in your study, one more PC for your children, perhaps another one in your kitchen, but you had to stop somewhere. And there is no need for new PCs now just because the old ones keep on working well. That’s the main reason of the slumping sales. But when it comes to gaming PCs, they really get outdated in 2-3 years, preventing you from playing at maximum visual quality settings. New CPUs come out each year, too, and computer enthusiasts won’t sleep well until they overclock them. So, despite the overall decline in demand, there’s still high interest towards gaming and special products and the manufacturers now focus on them more.
ASRock used to release individual models in the Fatal1ty series but now it has announced as many as three such mainboards for the LGA1150 platform and also three models in the overclocker-friendly OC Formula series. ASUS’s increased-reliability TUF series now includes the Vanguard model with Intel B85 chipset whereas the company’s gaming ROG series stretches from full-size to mini-ITX mainboards. MSI’s rare Big Bang series products have transformed into the exceptional XPOWER model. And besides it, MSI offers the overclocker-friendly MPOWER series as well as the separate GAMING series. The trend is obvious, so Gigabyte just follows suit.
Three out of Gigabyte’s five special LGA1150 mainboards belong to the gaming series G1-Killer. Besides the flagship G1.Sniper 5 we already tested there is the micro-ATX G1.Sniper M5 and the intermediate G1.Sniper Z87 model. The company’s special overclocker-friendly products cannot be confused with regular ones anymore as they have the “OC” suffix in their names. There are not one but two such models available. The senior model Gigabyte GA-Z87X-OC Force is in many ways the same as the feature-rich G1-Killer flagship. Both offer a lot of graphics slots, an integrated PLX PEX 8747 switch adding more PCI Express lanes. A Marvell 88SE9230 controller endows them with four additional SATA 6 Gbit/s ports and both mainboards come with a bundled Wi-Fi/Bluetooth card and are equipped with two Gigabit Ethernet controllers. We will probably test the senior model in the future, but it is expensive and this limited in terms of is target audience. That’s why today we will take a look at the less advanced but more affordable Gigabyte GA-Z87X-OC.
Packaging and Accessories
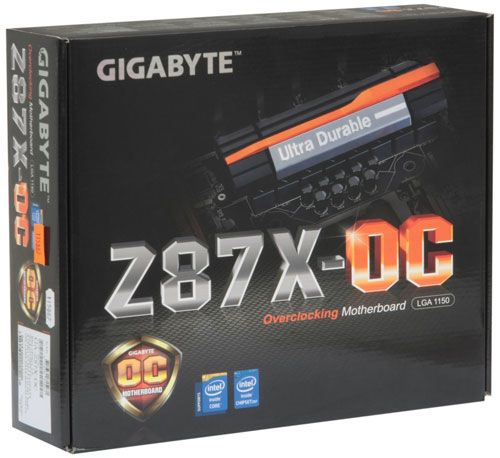
It is only flagship products that come in huge boxes while the GA-Z87X-OC is shipped in a standard box designed like the packaging of other LGA1150 mainboards from Gigabyte. Besides the name, the overclocking positioning of the model is indicated by the orange elements in its packaging design.
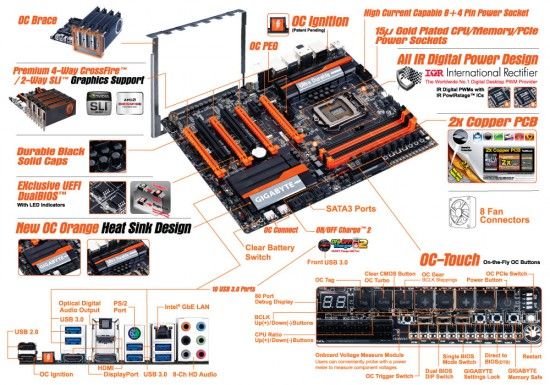
A brief specifications list can be found on the back of the box. There is also a picture of the mainboard there with its key features indicated as in the illustration below.
The mainboard is shipped with the following accessories:
- Four SATA 6 Gbit/s cables with metallic locks (two cables with straight connectors and two cables with one straight and one L-shaped connector)
- OC Brace for fastening expansion cards
- I/O Shield
- Flexible bridge to connect graphics cards in AMD CrossFireX mode
- Flexible bridge to connect graphics cards in Nvidia SLI mode
- 12 cables to measure voltages manually via a voltmeter
- User manual
- Installation guide
- DVD with software and drivers
- Gigabyte sticker for your computer case
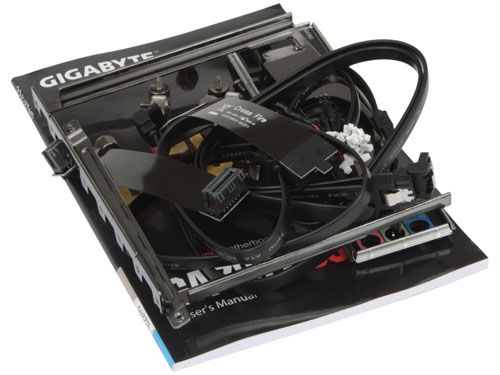
We’ve seen most of these accessories with mainboards from Gigabyte as well as other brands, excepting the OC Brace. As we’ll see shortly, this mainboard is optimized for being used as an open testbed. The OC Brace is one of these optimizations. Installing a graphics card on an open testbed is not a problem usually as it sits tight in its slot. However, problems may arise when you have several cards or a card with liquid cooling system whose stiff pipes and massive heat-spreader may twist the card out of its slot. The OC Brace prevents that by ensuring strong connection. Using the included frame and screws, you attach the OC Brace to the mainboard opposite the expansion slots. Now you can fasten your expansion cards as securely as inside a computer case.

PCB Design and Features
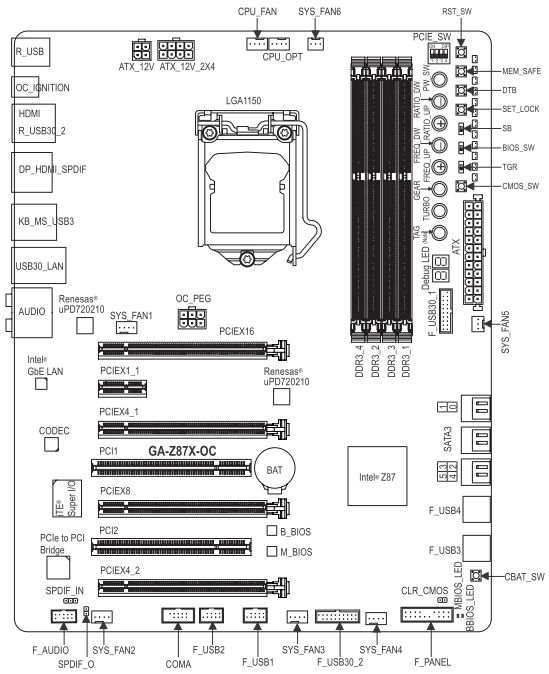
It is easy to identify an overclocker-friendly mainboard from Gigabyte by its orange-colored elements. The GA-Z87X-OC has a number of special and even unique features, but let’s start with what it has in common with other LGA1150 products. Its digital power system with International Rectifier’s PWM controllers and PowIRstage regulators consists of 16 phases and ensures stable power for the CPU and memory. It supports each and every modern LGA1150 CPU while its four memory slots can take in up to 32 gigabytes of DDR3 SDRAM and clock it at frequencies up to 3000 MHz. Some of the special features can be noted already: the memory slots have one-sided latches while the CPU is powered via two ATX12V connectors, one of which is 8-pin and another is 4-pin. There are quite a lot of PSUs that offer two such connectors, so you will be able to do without any adapters.
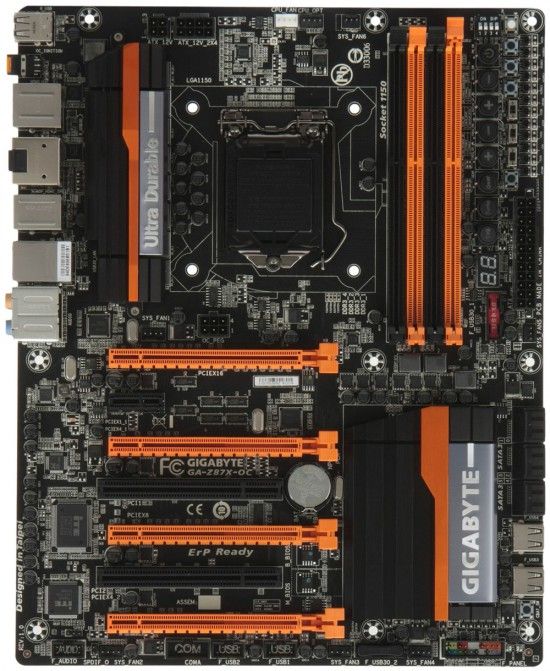
The mainboard has no additional disk controller. Its Intel Z87 chipset provides six SATA 6 Gbit/s ports, which should be enough for most scenarios. There are two onboard USB 2.0 connectors that make it more convenient to use the mainboard as an open testbed: you can connect USB devices easily irrespective of how you orient the mainboard on your desk.

There are other mainboards with four graphics slots, but the GA-Z87X-OC doesn’t rely on an additional PCIe controller to provide them. Its three PCIe 3.0 x16 slots make full use of the chipset’s capabilities in sharing CPU-integrated PCIe lanes. Depending on the number of installed graphics cards, the slots will use the following speed formulas: x16, x8/x8, x8/x4/x4. The fourth slot is based on the chipset’s PCIe 2.0 lanes, ensuring a max speed of x4. Graphics cards can be combined in 4-/3-/2-way CrossFireX or 2-way SLI configurations. The graphics slots are equipped with handy broad latches. Besides them, the mainboard offers one PCI Express 2.0 x1 and two PCI slots for expansion cards.
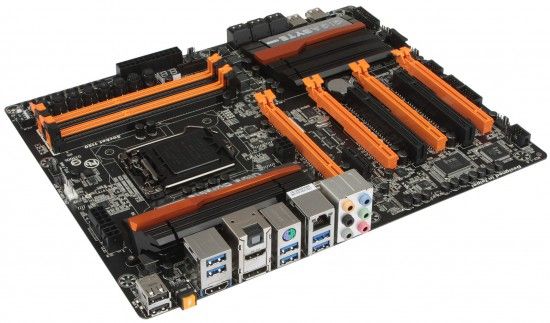
There’s a number of additional elements in the top right of the PCB, including a large group of buttons and switches. In the top row, there is a POST indicator followed by an OC Tag button. The latter loads user-defined settings previously saved in the BIOS. The OC Turbo button is for automatic overclocking. The “+” and “-“ buttons step the CPU frequency multiplier and base clock rate up or down on the fly whereas the Gear button selects the adjustment step: 1 MHz or 0.1 MHz. Next goes a Power On button and a set of OC PCIe switches that let you selectively disable your PCI Express 16 slots. After you’ve secured your graphics cards with the OC Brace, it is easier to use the switches to change your graphics subsystem configuration than to physically remove unnecessary cards.
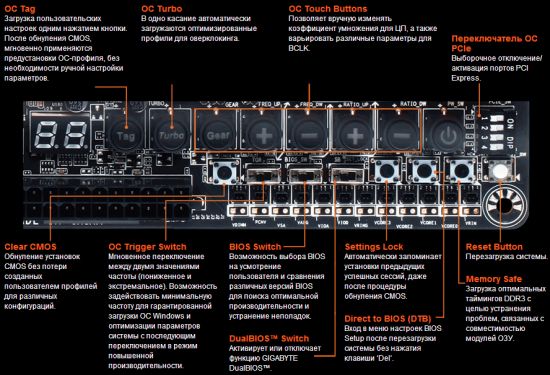
The second row starts with the Clear CMOS button followed by the OC Trigger Switch which lets you load your computer at lowered clock rates and then switch to higher ones. There are two switches referring to the mainboard’s two BIOS chips. The DualBIOS switch lets you choose the operation mode: two independent chips or DualBIOS (i.e. one chip serves as a backup for the main chip). You select the active chip with the BIOS switch. The Settings Lock button saves the current settings so you could return to them even after pressing Clear CMOS. The next two buttons have self-explanatory names: Direct to BIOS opens the BIOS interface automatically when you next restart your computer whereas Memory Safe will help you start up with slackened memory subsystem settings. The last button in the row is Reset. The bottom row includes connectors and check points for measuring voltages with a voltmeter.
That’s not all about the buttons. In the bottom right of the mainboard there is a button that has the same effect as removing the battery. And the OC Ignition button on the mainboard’s back panel shuts the computer down, leaving the fans and drives powered up. It may come in handy when you need to warm the CPU up to a temperature necessary to start up or while deploying your liquid cooling system or to show your modding without turning on the whole computer.
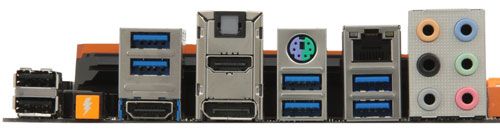
Overall, the mainboard offers the following components on its back panel:
- Two USB 2.0 ports (there are also two onboard OC Connect ports and two onboard headers for four more USB 2.0 ports)
- OC Ignition button
- Six USB 3.0 ports (blue-colored connectors) based on the Intel Z87 chipset and two Renesas uPD720210 splitters (there are also two onboard headers for four additional USB 3.0 ports)
- One DisplayPort and two HDMI outputs
- PS/2 connector for keyboard or mouse
- LAN connector (based on a Gigabit Ethernet controller Intel WGI217V)
- Optical S/PDIF and six analog audio connectors based on an 8-channel Realtek ALC892 codec
We can count up as many as eight fan connectors in the scheme. Four of them are 4-pin. There are two CPU fan connectors, which may come in handy for dual-fan CPU coolers or liquid cooling systems where you have to connect both the fan and the pump. Both can regulate 3-pin fans, which is not typical of modern mainboards from other brands. One more feature of this mainboard is that the CPU, memory, power and PCIe slots and connectors are all gold-plated.
Gigabyte mainboards based on Intel’s 8 series chipsets feature the Ultra Durable 5 Plus set of technologies. Ultra Cool is a reference to the new design of the heatsinks which ensure efficient cooling of key mainboard components. Depending on the particular model, it can be passive, active or liquid cooling. Ultra Performance refers to the use of PWM controllers and PowIRstage voltage regulators from International Rectifier in the mainboard’s digital power system. Ultra Safe means the exclusive DualBIOS technology whereas Ultra USB3+ refers to the ten USB 3.0 ports available on the mainboard. Besides the mentioned four Ultra technologies, Ultra Durable 5 Plus includes a lot of other features such as long-lasting solid-state capacitors, short circuit and electrostatic discharge protection, double-thickness copper interconnects, and resistance to high humidity.
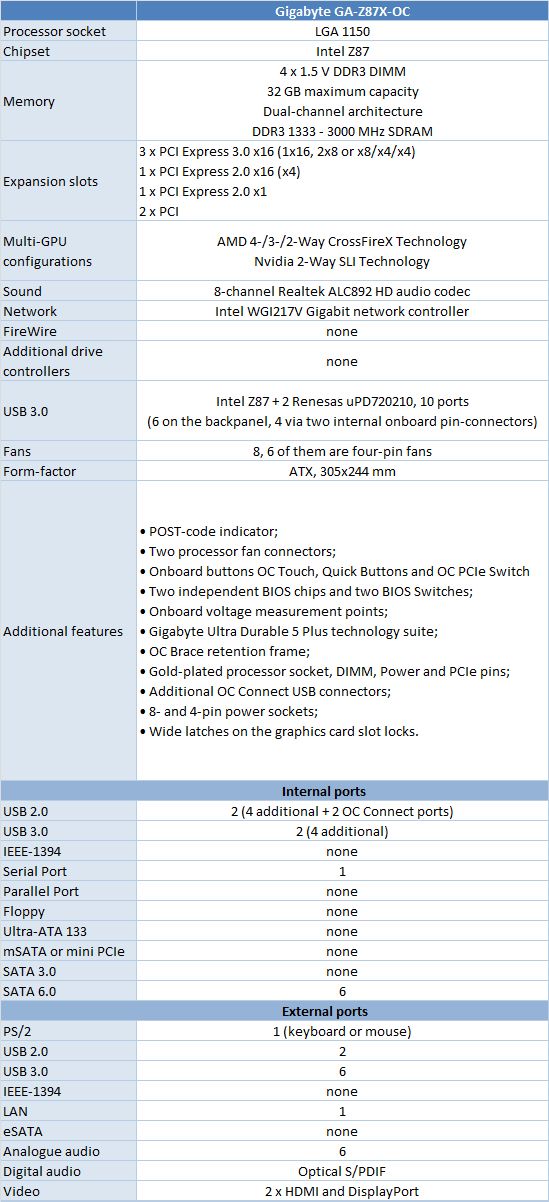
You can see the specifications of the Gigabyte GA-Z87X-OC in the summary table.
BIOS Functionality
Today’s mainboards all use the BIOS code from AMI, so they all have similar capabilities and even the same names of some options. However, each mainboard maker introduces special features and Gigabyte’s advantages can be spotted right away. We mean the fantastically rich customization options. The BIOS of the GA-Z87X-OC is Gigabyte’s generic but with orange elements in its interface design.
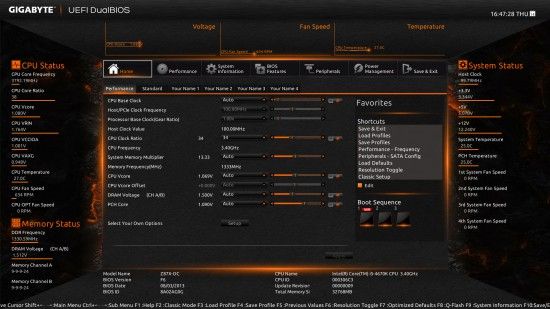
The first BIOS screen shows you a lot of diverse parameters, so you can adjust clock rates, frequency multipliers and voltages, but that’s just a basic set that you can edit if you want to. In the same way you can edit the contents of the next five pages. In other words, you have six customizable BIOS pages which you can fill in with any BIOS options and in any order you prefer.
The Shortcuts in the right part of the screen are a list of frequently accessed BIOS options. The list is editable. You can open it anywhere in the BIOS interface by simply clicking with your right mouse button. Then you just choose any option or BIOS section from it.
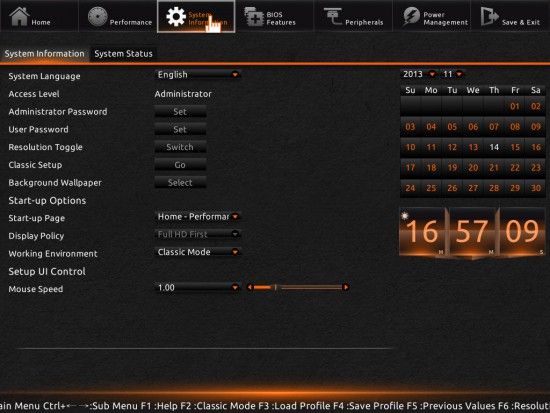
The central window with adjustable BIOS option is surrounded by constantly updated info panels. Below, there is a running line with tips about controls and active hotkeys. Switching to a lower screen resolution will remove the info panels into the respective BIOS sections. The Background Wallpaper option lets you choose any background picture from a connected disk. The Start-up Page option defines which page is to be opened by default when you access the BIOS interface. Display Policy helps you choose a high or low screen resolution. Working Environment switches between the new and classic BIOS interface and Mouse Speed adjusts your mouse sensitivity.
Despite the lack of visual customization options, Gigabyte’s classic BIOS contains the same parameters as the new Dashboard interface, so you can use it just as easily to set up or overclock your computer. You can instantly switch between the two versions of the BIOS interface by pressing the F2 key.
As opposed to other BIOS implementations where fine-tuning and overclocking options are mostly collected all together in a single large BIOS section, Gigabyte puts them into several BIOS pages. There are separate subsections related to the CPU, memory subsystem and voltages, each subsection being split up further into multiple pages. This interface design lets you easily see all the options in a single screen. You don’t have to look up the necessary parameter in a long scrollable list. You can enjoy this advantage in the classic BIOS interface only, though. The modern interface often makes you scroll down, too. Moreover, moving between the numerous subsections and pages may be troublesome and you can easily skip over some group of settings.
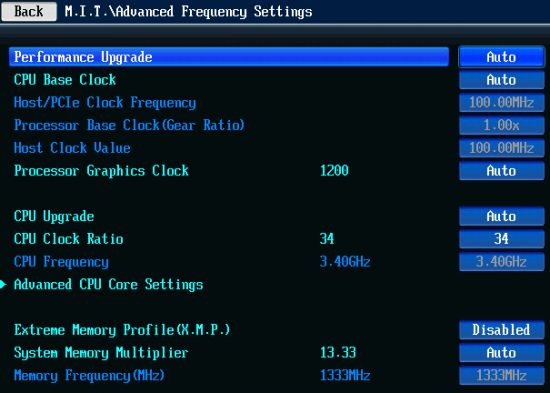
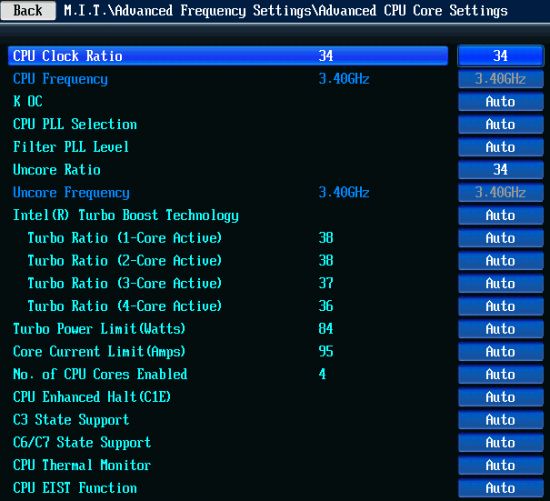
In the Advanced Frequency Settings subsection you can adjust clock rates and frequency multipliers, monitoring the results via the info parameters available right here. The new options CPU Upgrade and Performance Upgrade can help you overclock your CPU and your entire computer automatically.
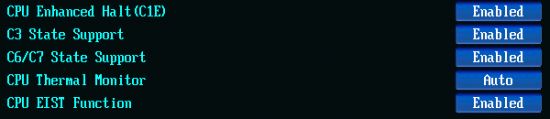
CPU-related technologies, power-saving modes and frequency multiplier settings belong to the Advanced CPU Core Settings.
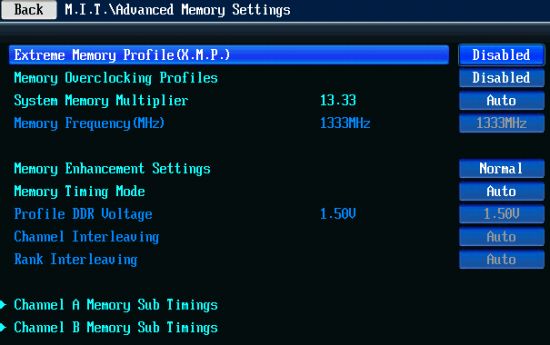
The memory subsystem is set up in a similar way. Clock rates and additional parameters are specified in one screen, and the latencies, in another.
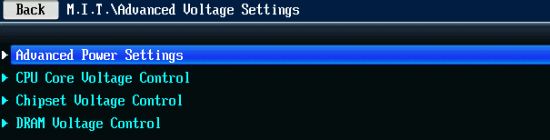
The voltages subsection contains several pages: for the digital power system, for the CPU, for the chipset and for the memory subsystem.
The PC Health Status subsection reports current voltages, temperatures and the speed of the six 4-pin fans (two CPU and four system ones). The two 3-pin fan connectors are not regulated or monitored at all – fans connected to them are going to work at a constant speed.
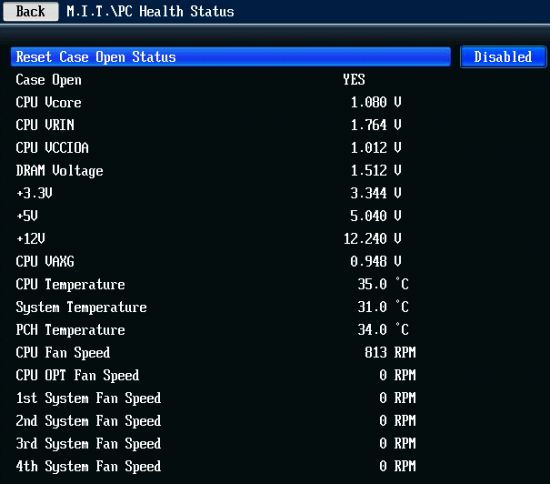
As is typical of Gigabyte mainboards, the second CPU fan can be regulated even via 3-pin connection (this is now supported by ASRock and ASUS’s ROG series mainboards, too). The 4-pin system fan connectors can do such regulation as well. You can choose one of the two predefined fan regulation modes (Normal or Silent), enable full speed or set everything up manually.

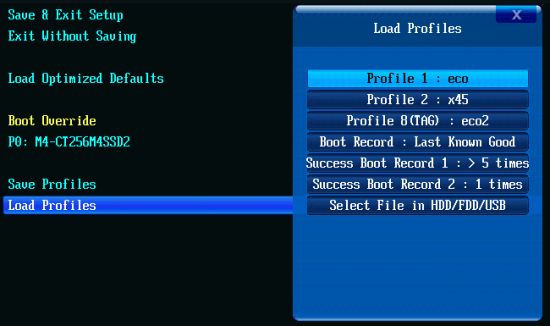
The Save & Exit section is where you can apply your changes, exit without saving or load default BIOS settings. You can also manage BIOS profiles from here. The mainboard stores up to eight BIOS profiles which can be given descriptive names. The profiles can be saved to external disks or loaded from them. A unique feature of Gigabyte mainboards, the current BIOS settings are saved automatically after the mainboard starts up successfully – even the total number of successful starts is recorded. Thus, you can get back to a working BIOS profile even though you have not explicitly saved it. The GA-Z87X-OC differs from Gigabyte’s ordinary mainboards in allowing you to loading the eighth profile without entering the BIOS. Just press the OC Tag button and the profile will be applied on the next restart.
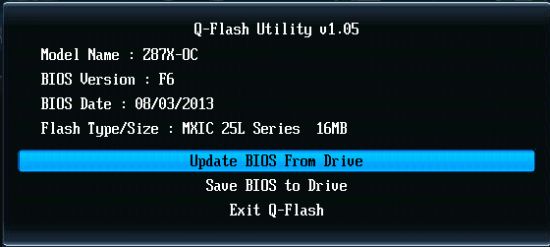
We should remind you of the integrated firmware update tool called Q-Flash. It is evoked by pressing F8 in the BIOS interface or the End key while starting up. As opposed to such tools on ASRock and ASUS mainboards, Q-Flash allows to save the current firmware version prior to updating.
We’ve given you a brief description of the key features of Gigabyte’s new UEFI DualBIOS that differentiate it from BIOSes of other mainboards. If you want more details, you can refer to our review of Gigabyte G1.Sniper 5. The new Dashboard interface is covered in the former whereas the latter is about the classic BIOS interface.
Testbed and Methods
We performed all our tests on a testbed built out of the following components:
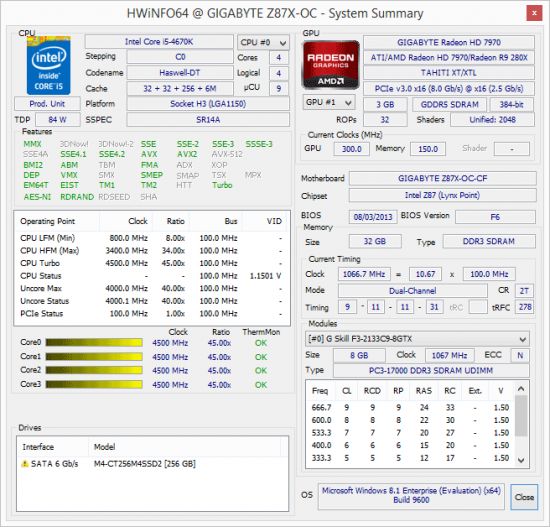
- Mainboard: Gigabyte GA-Z87X-OC rev. 1.0 (LGA1150, Intel Z87, BIOS version F6)
- CPU: Intel Core i5-4670K CPU (3.6-3.8 GHz, 4 cores, Haswell, 22nm, 84 W, LGA1150)
- DDR3 SDRAM: 4x8GB G.SKILL TridentX F3-2133C9Q-32GTX (2133 MHz, 9-11-11-31-2N, 1.6 volts)
- Graphics card: Gigabyte GV-R797OC-3GD (AMD Radeon HD 7970, Tahiti, 28 nm, 1000/5500 MHz, 3072 MB of GDDR5 memory with 384-bit bus)
- Disk subsystem: Crucial m4 SSD (CT256M4SSD2, 256 GB, SATA 6 Gbit/s)
- CPU cooler: Scythe Mugen 3 Revision B (SCMG-3100)
- Thermal interface: ARCTIC MX-2
- PSU: Enhance EPS-1280GA 800 W
- Computer case: Antec Skeleton
We used Microsoft Windows 8.1 Enterprise 64-bit (Microsoft Windows version 6.3 build 9600), Intel Chipset Device Software version 9.4.0.1027, and the AMD Catalyst 13.9 graphics card driver.
Operational and Overclocking Specifics
We had no problems assembling our testbed around the Gigabyte GA-Z87X-OC mainboard. It started up successfully, showing us the familiar picture with information about active hotkeys. You can enter the BIOS interface by pressing the Del key. The F9 key will open up a system info window, the same as you get when you press the same key in the BIOS. F12 shows a list of devices you can boot from. The End key launches the integrated BIOS update tool Q-Flash.
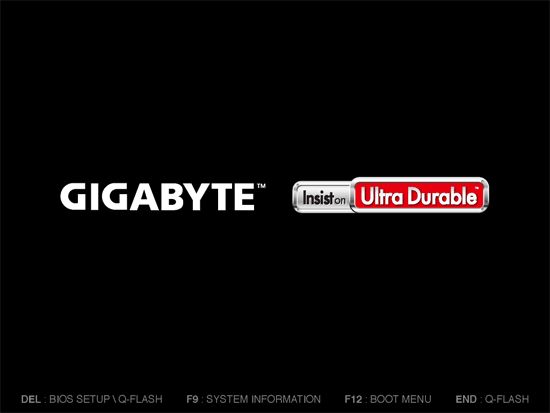
You can turn off the startup picture in the BIOS but there is no point in doing this. The mainboard will only show you the AMI logo but won’t tell anything about the startup procedure. It is hardly a downside because today’s mainboards start up very fast and you can’t read anything from the screen anyway. To make the process even faster, you can enable Fast Boot in the BIOS.
As opposed to many LGA1150 mainboards, Gigabyte ones set standard settings when you choose Load Optimized Defaults in their BIOS. However, you can lower the idle power consumption considerably if you enable all of the power-saving technologies available in the BIOS.
To overclock the CPU or the whole computer automatically, you can use the recently implemented CPU Upgrade and Performance Upgrade features but, like any other automatic overclocking technology, they are imperfect. Moreover, they only work when you’ve got all of the BIOS settings at their defaults – this is mentioned in the user manual. The same requirement applies to the automatic overclocking via the OC Turbo button, making it far less convenient.
We like the OC Tag button, though. It can be pressed to load a user-defined set of parameters. You may want to use it to get back to the default settings or to load some basic failsafe overclocking profile from which to move further. We had to press the Direct to BIOS button often, too. Like the GO2BIOS button on MSI mainboards, it lets you enter the BIOS interface when starting up or rebooting rather than after first shutting the computer down completely (as is required for the DirectKey feature from ASUS). The single inconvenience is that when you prefer the classic BIOS interface, the Direct to BIOS button will get you into the insignificant System section where you can only adjust such parameters as date, time and interface language. It would be handier to find yourself right in the M.I.T. section where the bulk of overclocking options are.
The mainboard carrying a lot of buttons and switches, it may help to have the user manual open so that you could look up their purpose. Even despite the lack of free space, there is a shortened name next to each button, switch and other element written on the PCB, giving you a hint of what they do.
It is quite acceptable to achieve a small but instantaneous performance boost by changing Intel Turbo Boost parameters via BIOS options like Multi Core Enhancement or Enhanced Turbo. In this case, the CPU can increase its frequency multiplier at high loads to the maximum level which is normally used by Turbo Boost for single-threaded loads only. For example, with our Intel Core i5-4670K, the clock rate will be 3.8 GHz at any load instead of changing dynamically from 3.6 to 3.8 GHz. Gigabyte mainboards offer a more productive version of the enhanced Turbo mode, which is enabled via the “K OC” option. It increases the CPU frequency multiplier by x2 not only at peak load but at other loads as well. As a result, the CPU will be clocked at 3.8 GHz at high loads, at 3.9 (instead of 3.7) GHz when three of its cores are in use, and at 4.0 GHz when only one or two CPU cores are in use.
Overclocking without changing any voltages is optimal for any CPU, and it is easy to do so on Gigabyte LGA1150 mainboards. You just switch the CPU Vcore and CPU Vcore Offset options in their BIOS from Auto to Normal. After that, the mainboard will keep its voltages at the default level rather than increase them automatically. And thanks to Intel’s power-saving technologies, the voltages will be lowered in idle mode.

Energy-efficient overclocking is even easier to do on MSI mainboards. If you leave the CPU voltage at Auto, it won’t be increased by the mainboard automatically after you adjust the CPU frequency multiplier. There are some nuances with MSI mainboards, though. The CPU frequency multiplier has to be changed in a special BIOS subsection, for example. On the other hand, when you set the above-mentioned options at Normal in Gigabyte’s BIOS, you can be sure that the voltages will stay that way. “Auto” is just too ambiguous.
Energy efficient overclocking is only possible if you don’t increase voltage. It will ensure higher performance and, despite the increased power consumption, you can expect long-term savings due to the reduced amount of energy spent for each computation. Energy efficient overclocking is going to be environment-friendly as we showed in our Power Consumption of Overclocked CPUs review. However, when we test mainboards, we want to check them out under different conditions and loads, so we choose what overclocking method ensures the highest results. Higher clock rates and voltages mean harsher test conditions and it is under such conditions that we can better see any flaws or problems in mainboard design.
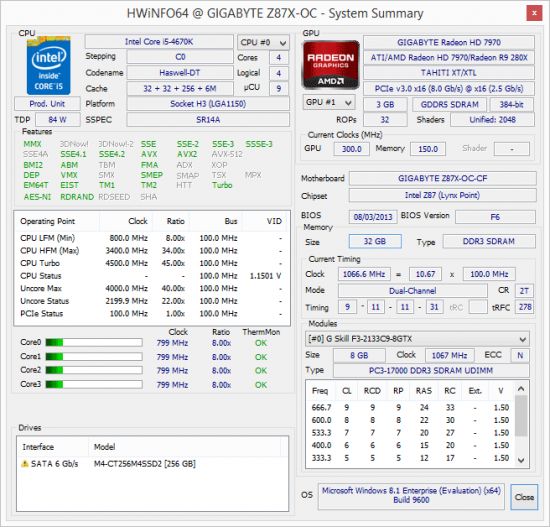
We used to increase voltage in the offset mode and the LGA1150 CPUs also support a similar adaptive mode, but such methods do not work well with Haswell-based CPUs. The fact is as soon as the default voltage is changed even by a tiny value, the Haswell’s integrated regulator will spot it and increase the voltage further at high loads, which means high heat dissipation, high temperature and, eventually, overheat. To avoid this, the Haswell must be overclocked at a constant voltage. The downside is that the CPU’s power-saving technologies cease to work: the CPU frequency multiplier drops at low loads but the voltage doesn’t drop anymore and always remains at the constant and high level. This is the only way to deal with the integrated voltage regulator, though. Moreover, it doesn’t affect the computer’s power draw in idle mode. That’s why we overclock our CPU to 4.5 GHz in our mainboard reviews, fixing the voltage at 1.150 volts and using the XMP settings for our memory modules.
When we overclock by fixing the CPU voltage at a certain level, some of the power-saving technologies get disabled. The CPU’s frequency multiplier is lowered at low loads but its voltage always remains high. Anyway, we stick to this overclocking for the duration of our tests, especially as it doesn’t affect the computer’s idle power draw much.
By the way, earlier we published an article called Haswell and LGA 1150 Platform: Right Operation and Overclocking where we explained the basic rules for optimizing LGA1150 platform parameters and for overclocking Haswell-based CPUs on mainboards from different brands. There you will find our illustrated recommendations on enabling Intel’s power-saving technologies and increasing CPU power targets as well as on how to overclock Haswell-based CPUs with and without voltage adjustment.
Performance
Nominal Mode
We usually benchmark mainboards in two test modes: at the default settings and with the CPU and memory overclocked. The first mode is interesting because it shows how well the mainboards work with their default settings. It is a known fact that most users do not fine-tune their systems, they simply choose the optimal BIOS settings and do nothing else. However, most of the LGA1150 mainboards we’ve tested so far call for some tuning in order to put them under the same conditions. We had to publish a long list of our adjustments to their settings, so the default test mode nearly lost its meaning. Instead of benchmarking the mainboards at their default settings, we would show the nearly identical results of our correction.
In the new series of reviews of LGA1150 mainboards we want to make our default test mode more informative. So we don’t change or correct anything. What settings a mainboard prefers to use by default are used in our default test mode, even if they diverge from standard settings. It must be noted that in this case it is bad when a mainboard is slower than others, but it is also bad when it is much faster, meaning that it just doesn’t use standard settings by default. It is desirable to get average results since we know that similar mainboards are going to deliver similar performance under the same conditions. We even thought about giving up showing the best results in the diagrams, but eventually decided to sort the results out in the order of descending performance.
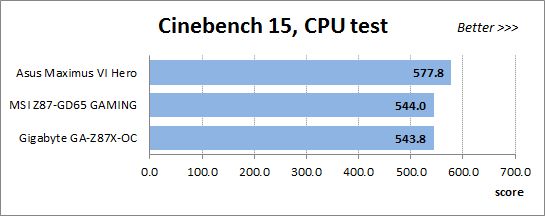
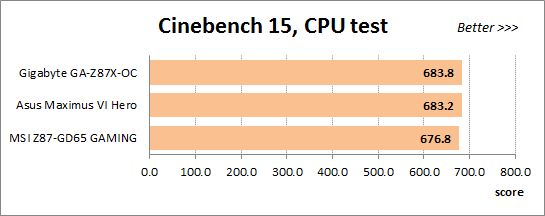
We run the CPU test of the 3D rendering suite Cinebench 15 five times and calculate the average result.
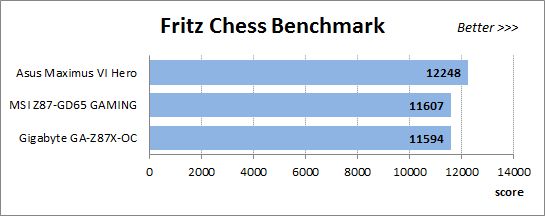
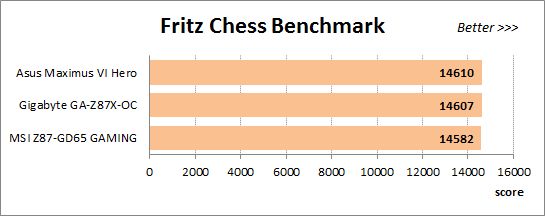
We have been using Fritz Chess Benchmark for a long time already and it proves very illustrative. It generates repeatable results and its performance scales perfectly depending on the number of computing threads.
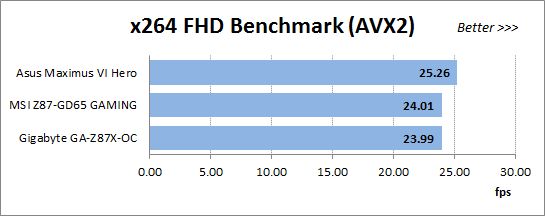
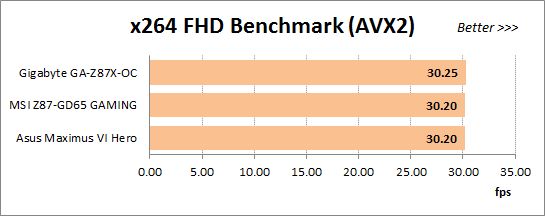
x264 FHD Benchmark v1.0.1 (64-bit) helps us test video transcoding performance. The original version of the benchmark with the version r2106 coder could make use of AVX instructions but we use version r2334 to enable the new AVX2 instruction set available on Haswell-based CPUs. The results are the average of five runs of the benchmark.
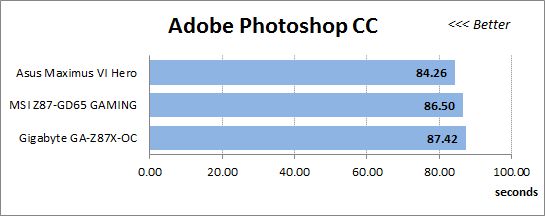
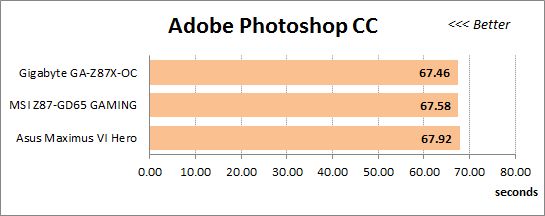
We benchmark performance in Adobe Photoshop CC using our custom test that is based on the Retouch Artists Photoshop Speed Test and consists of typical processing of four 24-megapixel images captured with a digital camera.
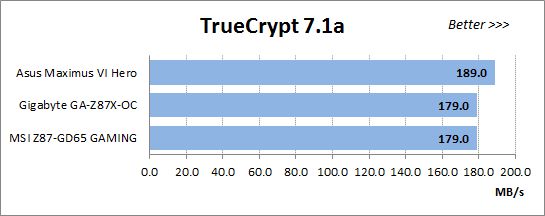
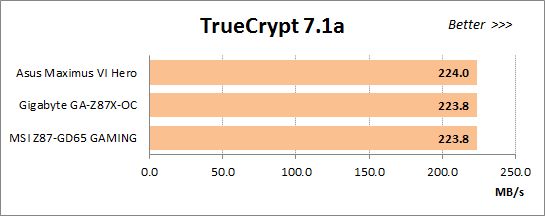
The mainboards’ performance in cryptographic tasks is measured with the built-in benchmark of the popular TrueCrypt utility that uses triple AES-Twofish-Serpent encryption with a 500MB buffer. Besides optimizations for multi-core CPUs, it supports the AES instructions.
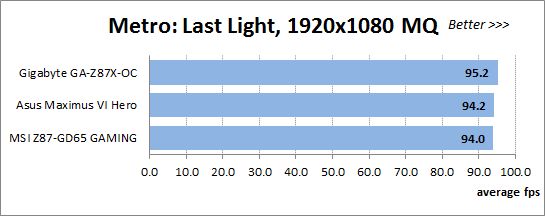
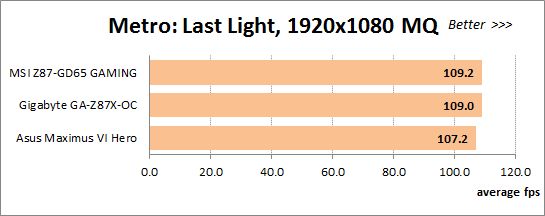
Metro: Last Light is a very beautiful video game but its frame rate depends heavily on the graphics card. So we had to use the Medium Quality settings to maintain playability at a screen resolution of 1920×1080 pixels. The diagram shows the averaged results of five runs of the integrated benchmark.
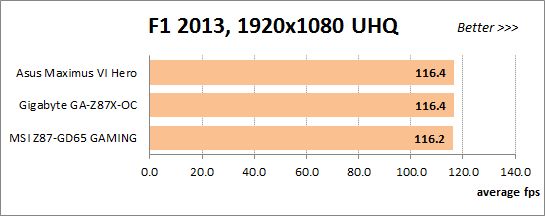
F1 2013 is less demanding on the graphics subsystem than the previous game. At 1920×1080 pixels we chose the highest settings by enabling Ultra High Quality and all image-enhancing options. The diagram shows the averaged results of five runs of the integrated benchmark.
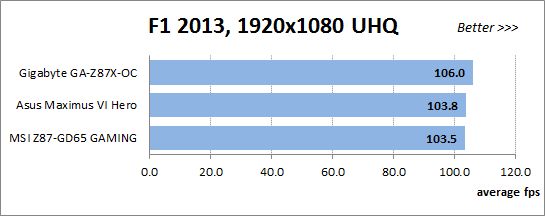
The ASUS Maximus VI Hero is considerably faster than its opponents in most of our tests, which indicates that it doesn’t use standard settings by default. In fact, it increases the CPU clock rate by 200 MHz at multithreaded loads. We can remind you that the same effect can be achieved with the Enhanced Turbo option on the MSI mainboard whereas Gigabyte’s K OC option will even boost performance higher in some of the tests. The way to make the Maximus VI Hero work at standard settings is easy but not obvious. Interestingly, even the higher CPU clock rate doesn’t help the ASUS mainboard win every test although its power consumption is surely higher compared to the others. The Gigabyte GA-Z87X-OC is ahead in the gaming tests, which is suspicious, too. However, we couldn’t spot any deviation from standard settings with the Gigabyte mainboard.
Overclocked Mode
Now let’s see what performance can be expected from our configurations with their CPU and memory overclocked. We reached the same overclocking results with all these mainboards: a CPU clock rate of 4.5 GHz (with the voltage fixed at 1.150 volts) and a memory clock rate of 2133 MHz (with timings of 9-11-11-31-2N according to the XMP profile).
As expected and contrary to the default settings, the mainboards are comparable in performance when their CPU and memory are overclocked. It is only in Metro: Last Light that the ASUS falls behind the others more than in the rest of the tests.
Power Consumption
We perform our power consumption measurements with an Extech Power Analyzer 380803. This device is connected before the PSU and measures the power draw of the entire system (without the monitor), including the power loss that occurs on the PSU itself. In the idle mode we start the computer up and wait until it stops accessing the system drive. The mainboards are sorted in the order of ascending power consumption.
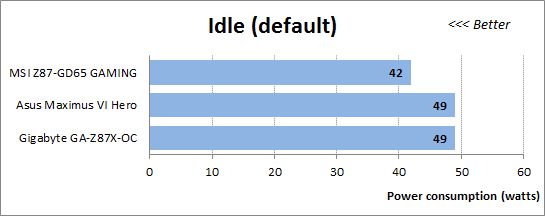
We know that MSI mainboards are generally economical, so the performance of the MSI Z87-GD65 GAMING isn’t surprising. Judging by our earlier tests of LGA1150 mainboards, the average level is about 45 watts, but the mainboards from ASUS and Gigabyte need considerably more power.
For all their downsides, Haswell-based CPUs should be given credit for requiring less power in idle mode in comparison with their LGA1155 counterparts. Unfortunately, we can’t see that when the mainboards work at their default settings, so we have an additional test mode called Eco. It means the same default settings but we manually switch all options referring to Intel’s power-saving technologies from Auto to Enabled in the mainboards’ BIOSes.

The results are better now and the ASUS-based configuration needs much less power. The results of the MSI mainboard are almost the same, though. According to our measurements, the power savings amounted to a mere 1 watt but we explained the reason in our previous review. The MSI Z87-GD65 GAMING just doesn’t allow you to enable each and every power-saving feature, which is why it is inferior to the ASUS Maximus VI Hero which uses them all. On the other hand, it is better than the Gigabyte GA-Z87X-OC which doesn’t benefit much from the power-saving modes.
We want to remind you that we install an AMD Radeon HD 7970 graphics card into our test configurations. If we instead used the CPU-integrated graphics core, the overall power draw would be lower than 30 watts. Haswell-based CPUs are indeed very economical when idle, so it is a shame that the mainboards do not ensure this advantage by default. You have to correct some BIOS options for that.
For power consumption tests under high load we run the LinX utility, which is a graphics shell for Intel’s Linpack test and supports AVX instructions. It is heavier on the CPU than ordinary applications, yet it is just an application nonetheless. It is quite possible that there are some other programs that can be just as heavy. That’s why we stick to using LinX for the purpose of checking the computer out for stability and for measuring its power consumption.

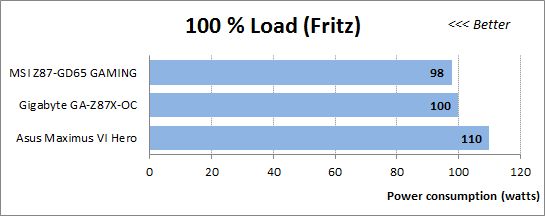
The ASUS Maximus VI Hero needs more power than its opponents because it doesn’t use standard CPU settings by default. It increases the CPU clock rate, which explains the difference from the mainboards that ensure standard CPU settings.
The numbers are high overall, but they are close to the highest power consumption possible at all. To measure the power draw of our configurations in typical applications, we used the Fritz benchmark. It doesn’t really matter which exactly application you use for that purpose. Any ordinary program that can run on all four CPU cores will produce the same or comparable results. So it turns out that we shouldn’t worry about the high power draw under the AVX-using LinX. The typical power consumption is about 100 watts whereas the most economical mainboards need even less. The only difference is the ASUS Maximus VI Hero which consumes more power due to its nonstandard operating mode.
By the way, you have to count in the graphics card’s power draw at high loads to calculate the overall system consumption. We use high CPU loads in our power consumption tests, but if we load the AMD Radeon HD 7970 by running some heavy game, the total power draw will be close to 250 watts at default settings and even higher at overclocking.
Now let’s see how much power our configurations need when overclocked and working in idle mode. Since we try to enable all CPU-related power-saving technologies even when we overclock, the standings are the same as at the Eco settings without overclocking. The mainboards from ASUS and MSI don’t need much more power here, and the ASUS is ahead of the MSI since the latter is unable to support certain power-saving states.
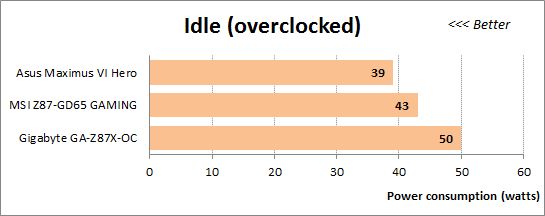
First of all, these Gigabyte mainboards need more power than average. Second, their power consumption gets higher in the overclocked mode whereas other LGA1150 mainboards have about the same power draw (perhaps a mere 1 watt higher) as at the Eco settings (without any overclocking). The GA-Z87X-UD4H and GA-Z87X-UD5H increased their power consumption by 4 watts, yet remained more economical than at their default settings. The GA-Z87X-OC also needs 4 watts more but benefits less from the power-saving technologies. As a result, it is the first LGA1150 mainboard we’ve tested which at low loads consumes more power in the overclocked mode than at the default settings. This seems to indicate certain problems with the power system Gigabyte implements in its mainstream and top-end mainboards.
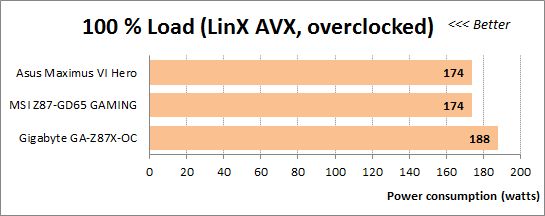
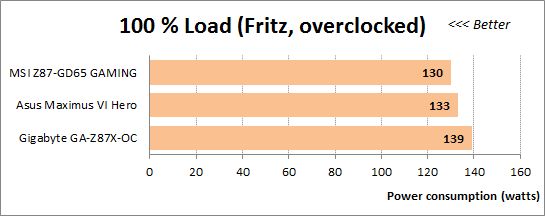
When the overclocked configurations have some work to do, their power consumption is expectedly much higher than at the default settings due to the increased clock rates and voltages. The ASUS and MSI are comparable in that case whereas the Gigabyte GA-Z87X-OC remains the least economical among them.
Conclusion
The Gigabyte GA-Z87X-OC is a special mainboard optimized for overclockers. It is designed to be used as an open testbed for overclocking experiments and some of its features have already been implemented in other products. For example, it has switches that let you change the configuration of your PCI Express x16 slots without physically removing your graphics cards. It offers connectors and check points for measuring voltages manually with a voltmeter. It also has some unique features like the OC Brace for fastening expansion cards and the OC Ignition button for shutting the computer down while keeping the fans and drives powered up. It uses an unconventional speed formula for the PCI Express x16 slots, allowing you to install up to four graphics cards without using additional PCIe switches.
This mainboard has few additional controllers, actually. And even though the Intel Z87 chipset is very functional, the GA-Z87X-OC may not be quite appropriate for a home PC. Its numerous onboard buttons, switches and connectors won’t be accessible in a closed computer case. Moreover, like some other mainstream and top-end Gigabyte mainboards, it is not economical and has some problems with power-saving technologies.
Thus, the GA-Z87X-OC is best used for its intended purpose, i.e. for overclocking on an open testbed. For a home PC, you may want to prefer some other models, perhaps even from some other brand, considering that Gigabyte’s LGA1150 products are somewhat inferior in terms of power consumption.