How To Overclock a CPU
Glory days of CPU overclocking are long gone. Back in the day, you could get a completely new CPU simply by increasing the clock of your current processor. These days, both AMD and Intel push their CPUs to limits with dynamic boost features so there’s not a lot you can do to get extra performance.
That said, overclocking your CPU can give you extra frames in games and noticeably shorter render times. Just don’t expect miracles. Today, we’re going to answer the question of how to overclock your CPU. We will also explain the differences in overclocking Intel and AMD CPUs.
Before we start, do note that overclocking modern CPUs won’t give you a whole lot of extra performance. Flagship CPUs are already pushed to their limits with aggressive boost clocks. Their specs include single-core boost clocks that are often higher than potential all-core overclock maximum values.
This can lead to degradation in performance, especially when playing games that are very sensitive to higher single-core clocks. In some cases (like when using AMD’s PBO 2) you can get higher .1 performance, which can lead to more fluid gameplay. You’ll see performance gains in multithreaded loads, but they won’t be anything to awe at. Okay, let’s start with Intel.
How to Overclock Intel CPUs
Unlike Ryzen CPUs, which include several ways to overclock, Intel CPUs use the good old manual OC that includes tweaking the frequency multiplier. First of all, let’s gloss over the apps you’ll need for overclocking.
What You Need
First of all, you’ll need a CPU stress test utility. Prime95 is still the best choice but we would also like to mention OCCT, which comes with a plethora of stress tests that are handy for overclocking the CPU, but also for OCing the memory or the GPU.
For performance testing, there’s Cinebench (it doesn’t matter whether you’re using version 20 or 23) and you can also get a couple of games with built-in benchmarks to test performance and stability.
Next, you need a monitoring app. HWiNFO is the most robust one and we wholly recommend it.
Finally, while we’re explaining the overclock process via BIOS, you can also use Intel’s Extreme Tuning Utility.
Pre-OC Tests And Tweaking BIOS Settings
Okay, before you dive into BIOS settings, test your CPU on stock settings to get the base numbers when it comes to performance and thermals. A couple of runs of Cinebench will do the trick. You could also test a CPU-intensive game (like Shadow of the Tomb Raider) at 1080p and low settings to get the baseline gaming performance numbers.
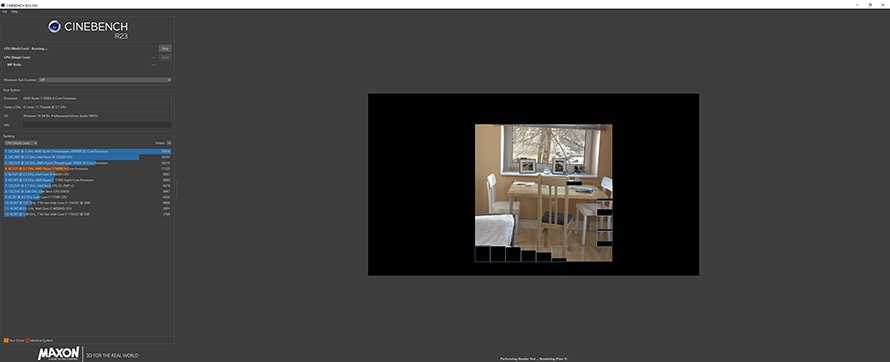
Performance Testing In Cinebench
When it comes to thermals, fire up Prime95’s small FFT test for about 15-20 minutes or use the Linpack test found in OCCT. After thermal testing, you should know if your CPU cooler is up to the challenge. You’ll also have baseline performance metrics to compare with the OC results later.
Now, restart the PC and enter your BIOS settings. These settings differ depending on the board model and manufacturer but they usually include words like overclocking, extreme boost or tweaker, performance boost, overclocking settings, etc.
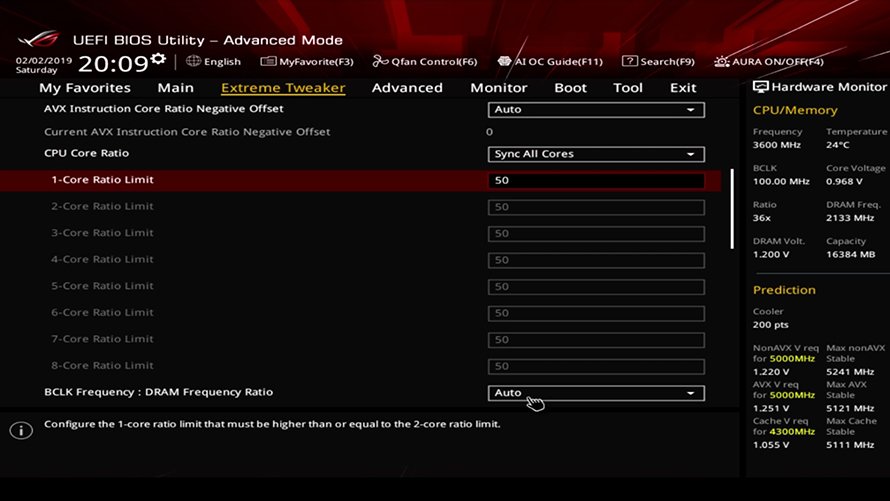
Image Source: Intel
Once in there, you want to find settings called “CPU Core Ratio” and “All-Core Ratio Limit.” First of all, set the CPU Core Ratio to “Sync All Cores.” Next, look for the “AVX Instruction Core Ratio Negative Offset” (it should be in the same menu) and set it to zero. This is to prevent throttling when dealing with AVX instructions.
Remember that CPU overclocking highly depends on your luck in the silicon lottery. If you have a golden sample, you’ll manage to reach higher clocks but if you have a below-average sample, your OC results could be very limited.
Then there’s the cooling performance, memory frequency, and timings, etc. This is why you shouldn’t load up results and settings found online and should start from scratch instead. Each step should be 100MHz. Just check the value of the base multiplier (All-Core Ratio Limit setting) and increase it by one during each OC step.
The base multiplier value, for Intel CPUs, is derived from their all-core boost clock. Officially, this is set at 4.8GHz on the Core i9-10900K. But since many samples casually boost to 4.9GHz the base value should be 49 (49×100=4900=4.9GHz) and the first OC step should be set at 50.
Now, you’ll probably also need to set the manual voltage. This can damage your CPU so be sure to get the right numbers. Just scour the tech forums and look for the right voltage for your processor at different frequencies. Going too high will shut down your CPU once it reaches the thermal throttle limit but remember, there’s always some amount of risk when overclocking.
The setting is labeled as “CPU Core/Cache Voltage” and it should be found in the same overclocking menu as the other two settings. Tweak this at your own risk and do not forget that you can lose the warranty on your CPU if you manually overclock it.
What you also want is to disable the “Adaptive Voltage” setting, which can cause issues when overclocking. You want to set voltages yourself so your CPU can get enough voltage when running overclocked.
Stability Testing
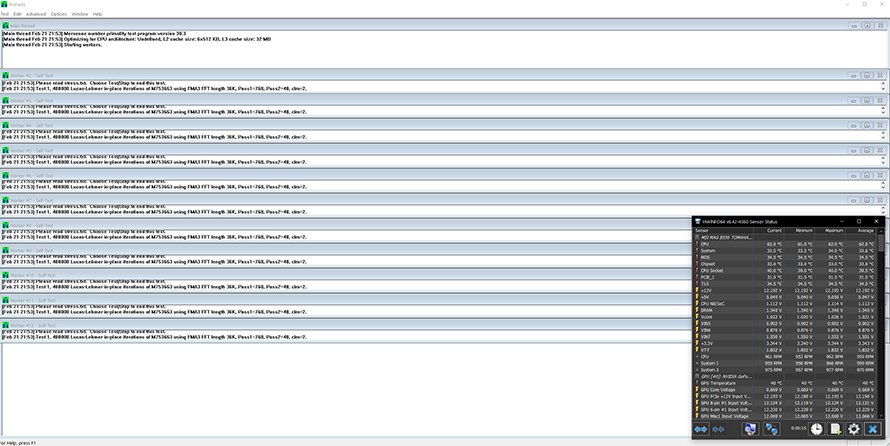
Stability Testing Prime95
Once you set up all needed BIOS settings, save them and reboot. Now’s time for stability and stress tests. The first test is whether the Windows will load and whether it’ll be able to finish one session of Cinebench. Next, fire up Prime95 or OCCT’s Linpack test for about half an hour and look for any error reports.
If you finish the test without errors and with viable thermals, reboot and repeat the BIOS procedure, by raising the multiplier by another step. And once the CPU starts crashing when booting to Windows or when running stress tests, it’s time to return to the last stable OC and keep it.
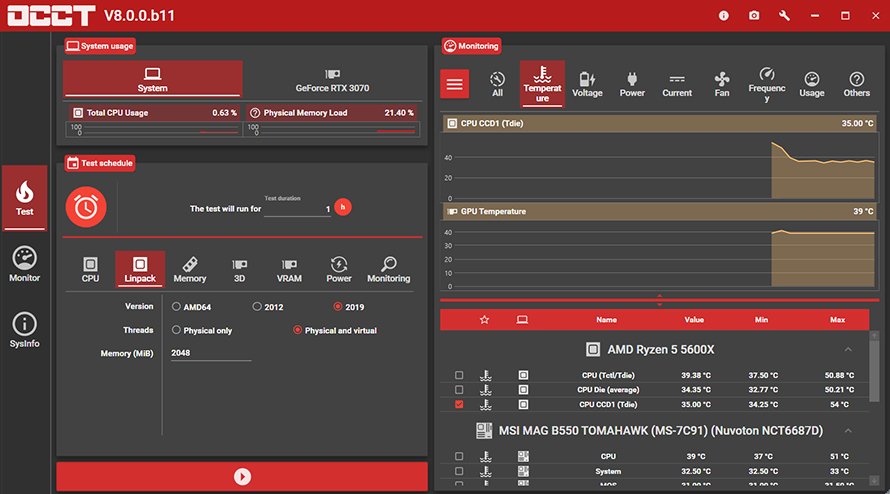
Stress Testing In OCCT
Remember, when overclocking Intel CPUs, you’ll also want to tweak RAM frequency and timings, which can have a big effect on the performance. Also, try setting up the Ring Bus Multiplier as close as possible to your core multiplier. This way, you’ll get a more stable system that can allow for a bit more performance.
How to Overclock Ryzen CPUs
Overclocking AMD CPUs is a bit more complex. First of all, you have a manual and PBO overclock. Next, PBO 2 brought a new feature called curve optimizer that allows tweaking the voltage/frequency curve for individual cores. Finally, each generation of Ryzen CPUs has access to different overclock options.
First-gen Ryzen CPUs can only be manually overclocked. Second-gen CPUs (Ryzen 2000 series) have access to PBO, but only if you have the X version of a CPU. Non-X CPUs can only be manually overclocked. Third-gen Ryzen processors have access to PBO 2 but they cannot use the Curve Optimizer feature due to hardware limitations. Finally, Zen 3 (Ryzen 5000) CPUs have access to PBO 2 with Curve Optimizer.
What You Need
The list of programs you need is the same as when overclocking Intel CPUs. You have download links as well as the list of required programs in the How To Overclock Intel CPUs section.
You could also use the Ryzen Master app for overclocking with PBO if you don’t want to go into BIOS. But today, we’re covering just BIOS overclocking, because PBO 2 and Curve Optimizer aren’t available in the current version of Ryzen Master.
Manual Overclock
Manual Overclock is the simplest but it also brings minimal (if any) performance boost. On Ryzen 5000 CPUs, there’s a high chance of getting worse performance in games after manual overclock.
The thing is, Ryzen 5000 CPUs have their single-core boost clocks set as high as possible. This is the main reason why they are the best gaming CPUs you can buy right now. These clocks cannot be replicated when performing manual all-core overclock because they’re just too high for an all-core OC.
You can get the same performance, or a bit higher if you get a golden sample and push all-core OC to be the same, maybe 100MHz higher than the single-core boost but that’s it. In games, performance will either be worse or the same as it was before overclocked.
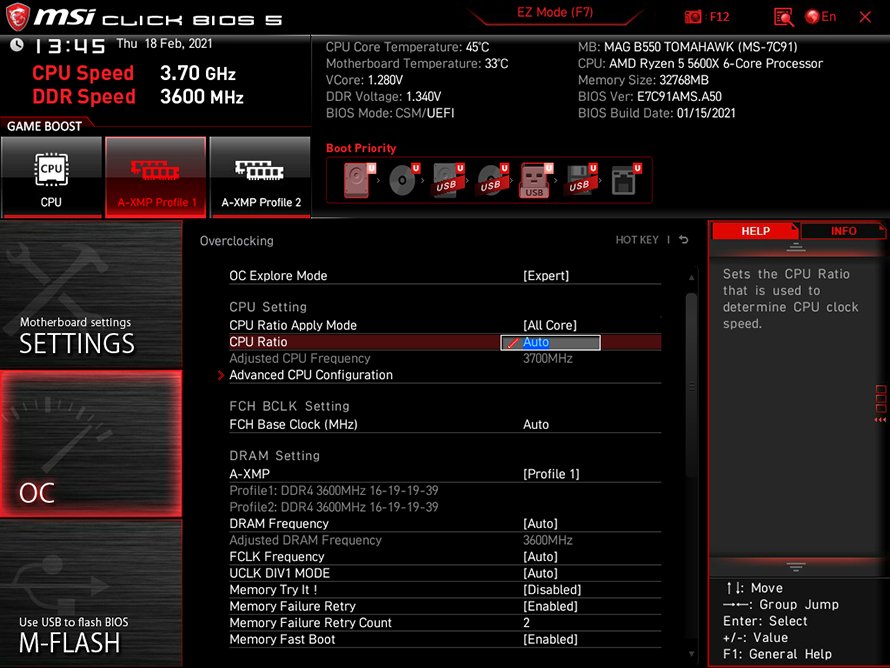
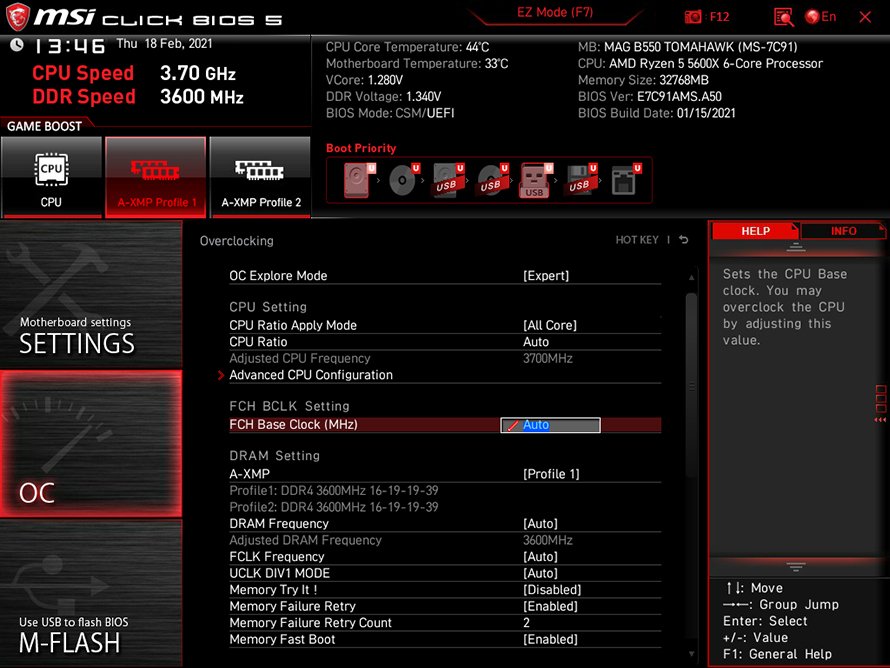
The first thing you want to do is go into BIOS settings and search for overclocking, boost, or similar settings. On MSI boards, look for the OC menu. Once in there, look for the two settings labeled “CPU Ratio” and “FCH Base Clock.” You want to tweak the former. Leave the other setting alone because tweaking it can mess up your memory and PCIe devices.
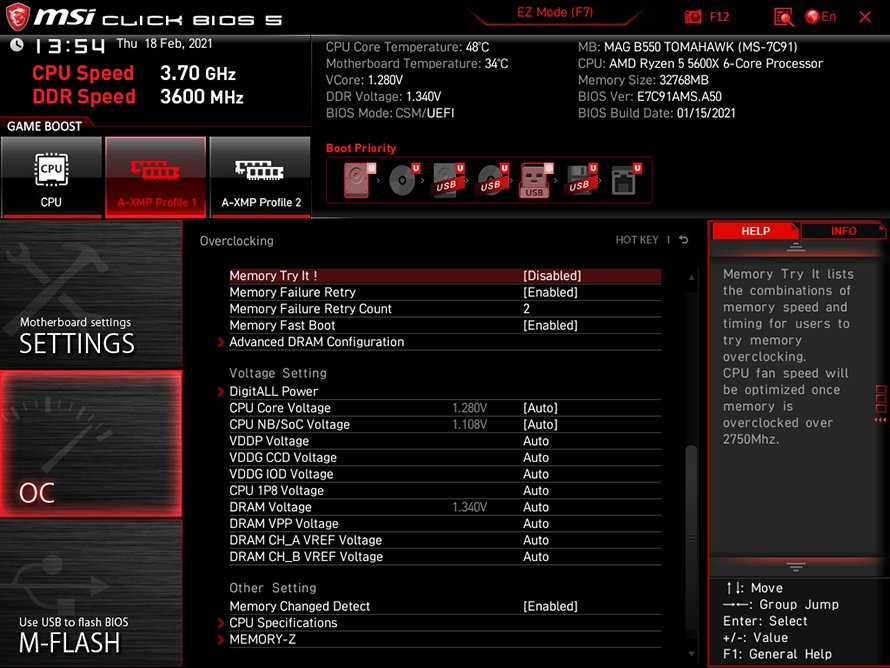
So, find the stock ratio for your processor model and then go from there. You can increase it in 100MHz steps. Another setting you want to tweak is CPU Core Voltage, found in the same overclocking menu. Do this only if a higher voltage is needed for a stable overclock. You can find stable vCore values for your CPU online.
When you finish all that, boot into Windows and repeat the procedure explained in the Intel OC section. A couple of Cinebench runs followed by stress tests with gaming tests as the cherry on the cake. Repeat until you find OC limits for your CPU.
Overclocking Ryzen CPUs With PBO (2.0) And Curve Optimizer
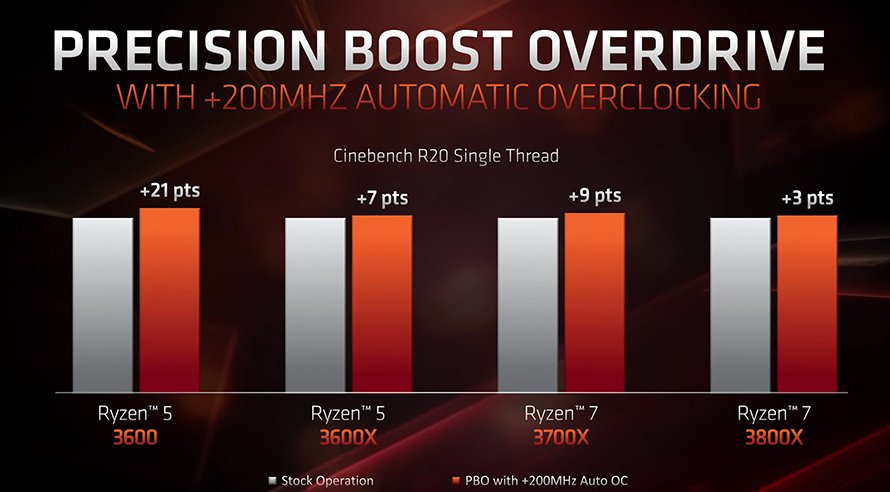
Image Source: Reddit
AMD processors have better results when you overclock them with PBO. This won’t bring you a massive performance boost but you will see slight improvements during multithreaded loads. Games probably won’t see any performance boost, but you could get better .1 percent and 1 percent lows, which should make the gaming experience noticeably smoother.
In this part of the guide, we’ll first go through the PBO and PBO 2 settings and then talk about the curve optimizer. This feature is available only on Ryzen 5000 CPUs so if you don’t have one, forget about using it.
First, a word or two about different PBO settings and what they do:
- PPT Limit (W) – This is the maximum wattage your CPU socket can use. It doesn’t affect the performance and potential overclock results as much as the TDC and EDC values.
- TDC Limit (A) – This is the highest current delivered via the VRM section during longer multicore loads. Like when rendering or doing other stressful (for your CPU) work, like stress testing the CPU. Remember that TDC is lower than EDC, even when you set it higher or at the same value as the EDC.
- EDC Limit (A) – This is the highest current supported by your VRM section while your CPU is boosting. For instance, in games or during short loads. EDC Limit is important for tweaking the maximum multicore boost.
- Boost Override – This is also known as AutoOC. The setting increases the maximum boost frequency of the CPU, in megahertz, by the amount of the value you enter. Enter 100, for instance, and your maximum boost limit will increase by 100MHz.
- Scalar – Scalar supposedly controls core voltages. Higher values, in theory, should allow for higher CPU core voltages but you should leave it at auto and tweak it only if needed.
- Curve Optimizer – A feature exclusive to Zen 3 (Ryzen 5000) CPU lineup. This is a setting that allows users to tweak the voltage and frequency curve of each core individually. It can be used independently of other settings for undervolting Zen 3 CPUs. Results are great and you can even get a slight boost in performance by only performing a simple all-core undervolt procedure.
You can tweak the V/F curve on all cores at once, or per single core. All-core is suitable for undervolting but if you want to squeeze as much performance out of your processor, we suggest manually tweak the V/F curve for each core separately.
To overclock your Ryzen CPU via PBO or PBO 2, enter the BIOS settings and look for overclocking settings. On MSI boards go to the “Overclocking” menu, then click on the “Advanced CPU Configuration”, and then click on the “AMD Overclocking.” You can find the exact settings for your CPU online.
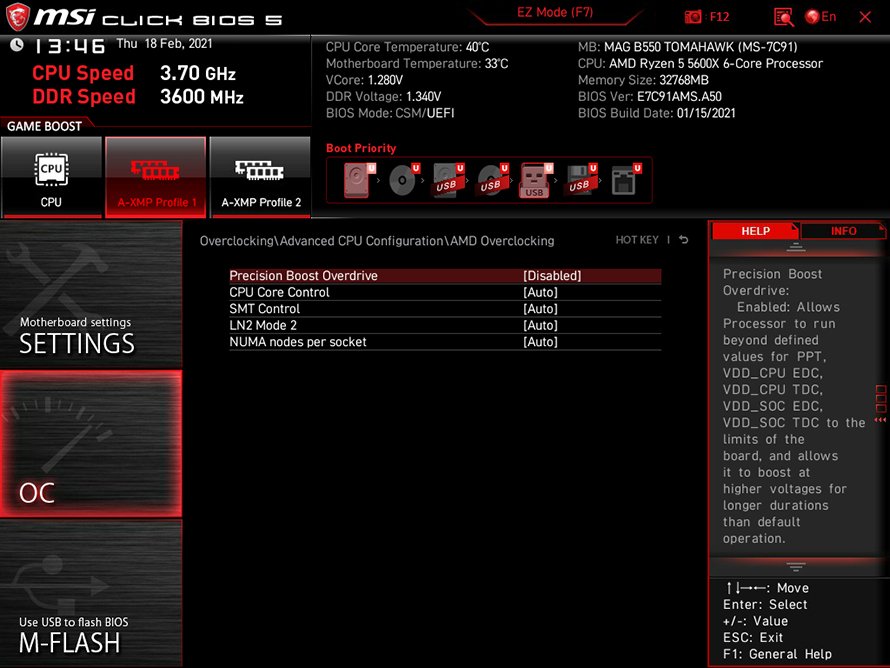
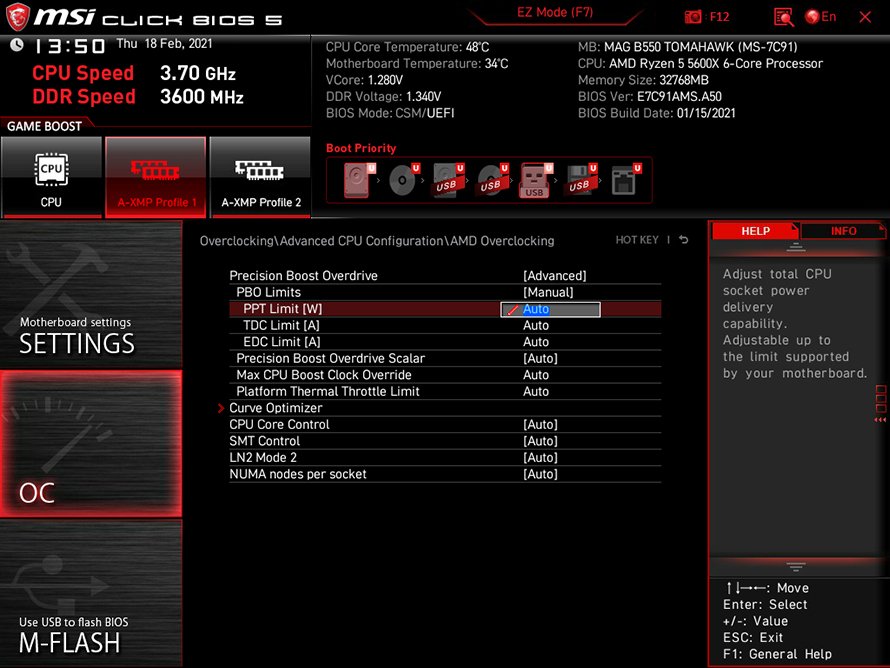
Now, click on Precision Boost Overdrive (PBO) and select “Advanced.” Then, set the PBO limits (switch them to manual and then enter values for all three power limits), the scalar, and boost override. If you have Ryzen 3000 now’s the time to save your settings and move on to testing. You can find the detailed test guide in the Intel OC section.
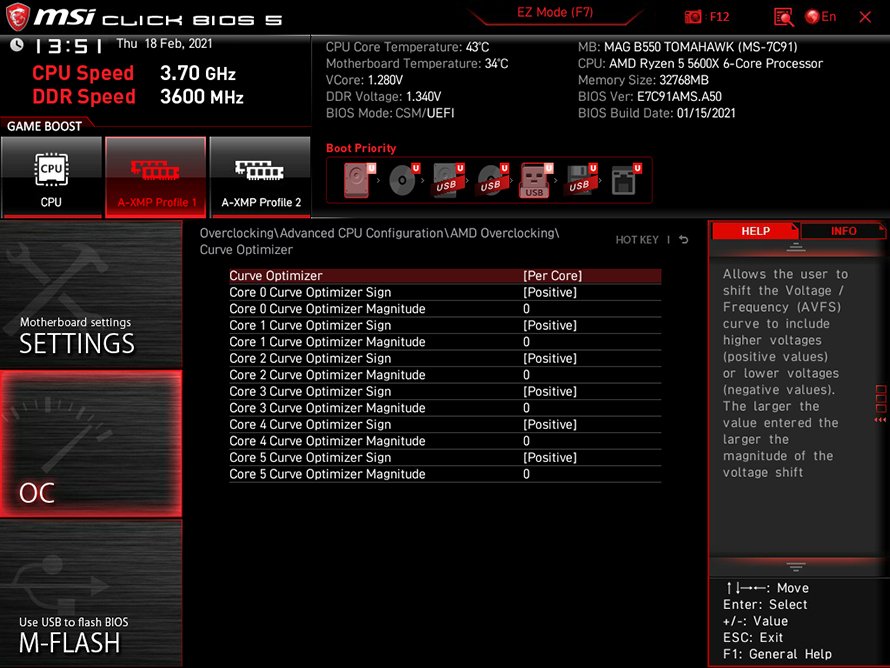
If you have a Ryzen 5000 CPU, it’s time for tweaking the curve optimizer. Enter the “Curve Optimizer” menu and set it to “Per Core.” Next, select the “Negative” sign. The curve optimizer offset values are divided into 30 steps. Each step corresponds to about 3-5mV. You can set values one step at a time, but you could also offset each core by five steps at a time.
Once you’re done with tweaking PBO settings, save them and boot into Windows. Perform the stress and stability tests and if everything works as it should, try tweaking curve optimizer offset values further, until you encounter a crash.
Now, if you want to get into the nitty-gritty regarding the curve optimizer and PBO overclocking in general, check out this guide. It’s extremely detailed and should explain the whole curve optimizer tweaking procedure, which can be a bit frustrating if you want to reach the absolute limits of your processor.
Super lax on the Intel side..It may not be super apparent, but there really is a lot more to it than meets the eye, provided you have a motherboard capable of providing the necessary options 🙂