Applying XMP for the Best RAM Performance. Overclocking But Not Really
Don’t be afraid to push, the worst that can happen is you’ll get an error when testing for stability, or be forced to reset the BIOS.
Though just in case you should verify that you’re able to clear CMOS (to reset the BIOS to default settings) manually.
First of All
Download and install CPU-Z, AIDA64 and Memtest86 (on a USB), and get familiar with those terms:
- CL: Cas Latency – how many clock cycles between a request to RAM and the response from it.
- tRCS: RAS to CAS Delay – the delay between activating the row and then column of a memory location.
- tRP: RAS Precharge – the time between deactivating one line of memory and then activating the next.
- tRAS: Active to Precharge Delay – the waiting time between each memory access operation.
Now open CPU-Z and take notes of the DRAM Frequency and timings from the memory and SDP tabs.
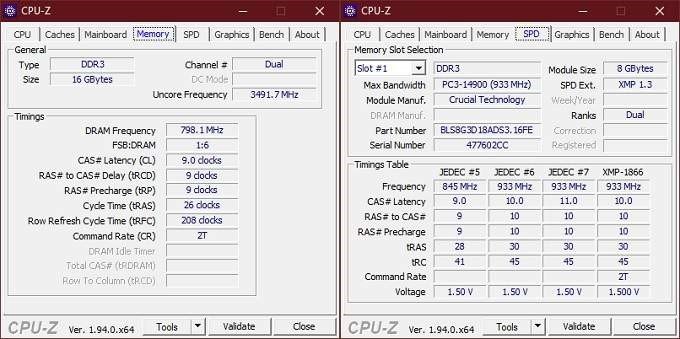
Image Source: CPU-Z
Next, open AIDA64 and run a memory benchmark.
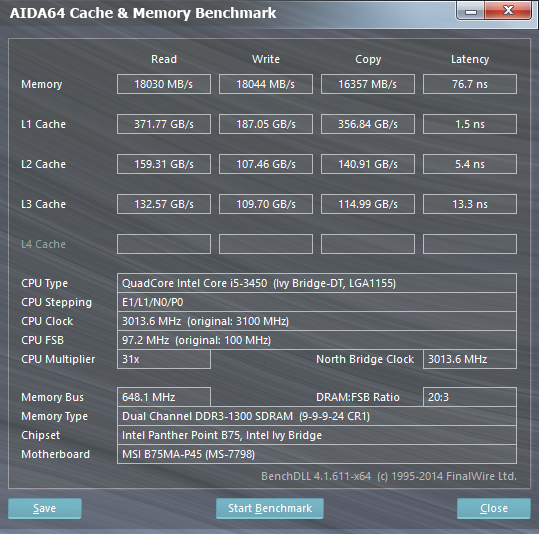
Image Source: AIDA64
Take notes of your readings, and use them to compare after overclocking.
Now you’re ready to head into the BIOS
(Note: If you own an AMD Ryzen CPU you can overclock your RAM without accessing your BIOS with the AMD Ryzen Master software.)
A brief explanation of what you will be doing there (keep in mind that these are general instructions as every BIOS is different):
- First of all you will navigate your advanced manual memory settings and enable the highest XMP settings, which is already an overclock by itself, but we’re looking to push things to the limit and get maximum performance.
- Secondly, you go to the advanced manual memory timings settings and start turning up bit by bit (we will be explaining that in detail.) After each notch-up, you will restart your PC and run memtest86 from a flash drive and execute a stress test. Keep pushing until the highest possible setting without failing the test.
- Then run your PC and go into AIDA64. Play a game or do something taxing and run a benchmark and compare with previous stats.
- Go back and tweak the bios again if you see something going out of hand. Repeat until the balance is achieved.
If you are confident you will succeed you can start right away, or else keep reading for a step-by-step guide.
Here’s an example of how to Overclock DDR4 Ryzen compatible RAM on an ASUS Motherboard:
- Open the BIOS Menu by clicking the “F2” or “Delete” button on PC Boot.
- Go to Advanced Mode.
- Select the Extreme Tweaker / Overclocking tab.
- Select the AI Overclocking Tuner (examples of other motherboards below) to the highest possible XMP setting, which is already Overclocking by itself, but won’t do you much for performance. What you want is to see the maximum DRAM Frequency that the XMP setting pushes and go higher than that, using the manual setting.

Image Source: Asus
- After pushing the DRAM Frequency more than the maximum that the factory overclock offers, restart your PC selecting the “Save and Exit” option and
- Boot Memtest86 benchmark from a USB Stick.
- Select “(S)tart Test” in the Memtest86 home screen and let it run until finish or until errors appear.
- If there are errors, go back and reduce the frequency. If all is well, either go back and notch it up or boot your PC and do something taxing to your RAM, then run a benchmark on AIDA64 or look at live monitoring on the task manager.
- Repeat until the balance between DRAM frequency and benchmark stats is achieved.
- Enjoy your new performance.

Memory Overclocking Problems and their Solutions
There are risks in any overclocking process of the components of a PC. So, you will need to overclock your RAM cautiously. After overclocking you might find problems like the blue screen of death, Restarting/shutting down of PC automatically, PC not turning on properly etc.
If you face such problems then you can be sure that your overclocked RAMs frequency is not suitable for your PC. So, you need to change the frequency again by the same method to a safe and stable condition. And for voltage, you can set 1.5v which is safe. If you face problems you can set it to 1.15v, 1.25v, 1.3v & 1.4v respectively.
In Case of Emergency Reset Your BIOS
So what if everything goes completely wrong, your computer won’t boot at all? No.
You’ll need to reset your BIOS so that the standard settings for your RAM are restored and they can get up and running again. You should consult your motherboard’s manual on how to do this, but in general one of these should work:
- Press the BIOS reset button on the motherboard, if applicable.
- Bridge the BIOS reset jumper on the motherboard, if applicable.
- Remove the CMOS battery, wait a few minutes and replace it. – Works 100% of the time, but the wait can be frustrating.
Once you’ve reset the BIOS setting, everything should be back to normal. You will however have to go through all your settings to make sure they are what they should be.
Final Thoughts
You can easily overclock your memory modules following this guide.
If you have a high-end gaming/workstation PC then you should definitely overclock your RAM.
And for those who are enjoying the stock performance of the RAM, I will say carry on. But there is no meaning in spending the money on expensive high-frequency RAM if you aren’t overclocking them. High speed rated expensive RAM sticks are made for overclocking.
Awesome, Thanks!