How to Use The Interrupt-Affinity Policy Tool
The Interrupt Affinity Policy Tool has been part of the optimization process for PCs in the gaming space for a while. The reason for this is better FPS and better inputs for competitive gamers that want to squeeze every bit of potential performance out of their CPUs.
What Does the Tool Do?
The Interrupt-Affinity tool allows you to set certain devices to specific CPU cores allowing for a better distribution of tasks across the entire CPU. Most applications are made to use the first couple of cores in your CPU meaning that these cores are more often than not working a lot harder than the last couple of cores in your PC.
Using the Interrupt Affinity Policy Tool you can allocate the interrupts of essential devices to the latter cores in your CPU spreading the load more evenly, allowing both the first cores to focus on their main task and improving the performance of the devices that get uninterrupted attention from the last couple of cores.
This process of distributing tasks across the entire CPU core range is effective on modern multi-core CPUs but might cause troubles for older CPUs with fewer cores (4-core CPUs struggle with custom allocation of devices).
How Do You Use the Interrupt-Affinity Policy Tool?
I have conducted different tests to see how you can use the tool properly and this is the final iteration of what I have concluded.
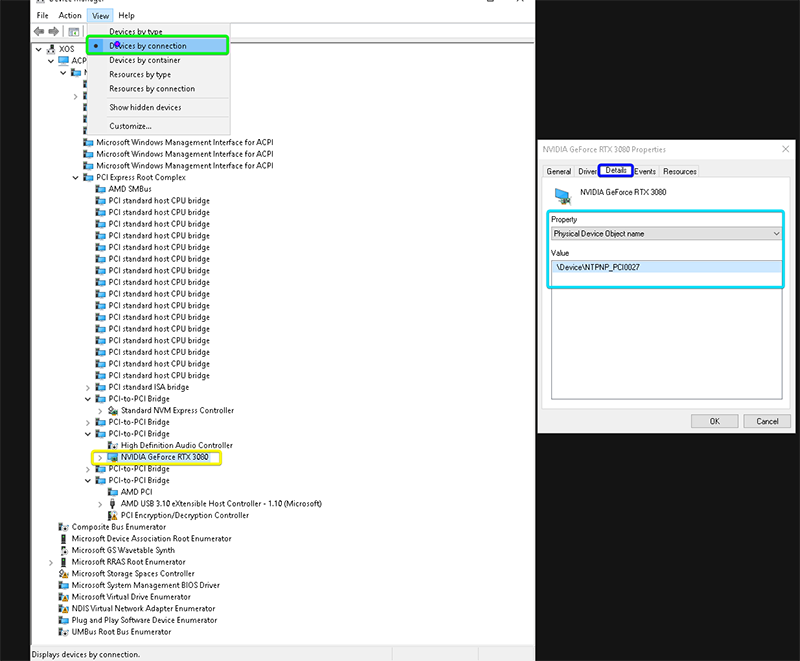
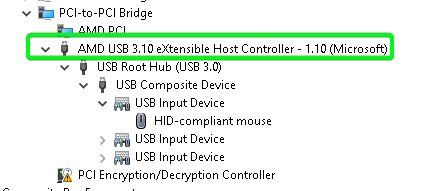
- Open Device Manager and view everything by connection. Open up your PCI-to-PCI bridges to see each device on your PC.
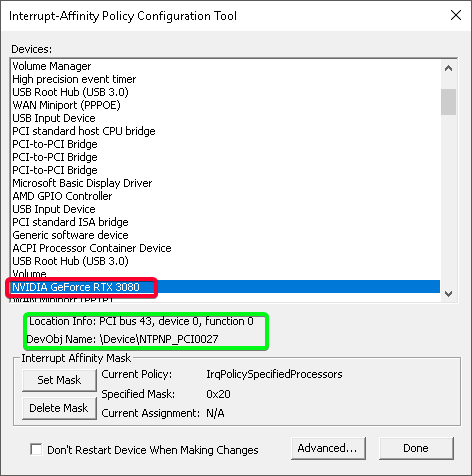
- To identify the device from Device Manager in the Interrupt-Affinity Policy Tool: right-click the device – Properties – Details tab – Physical Device Object name – take note of the name of the device and find it in the affinity tool.
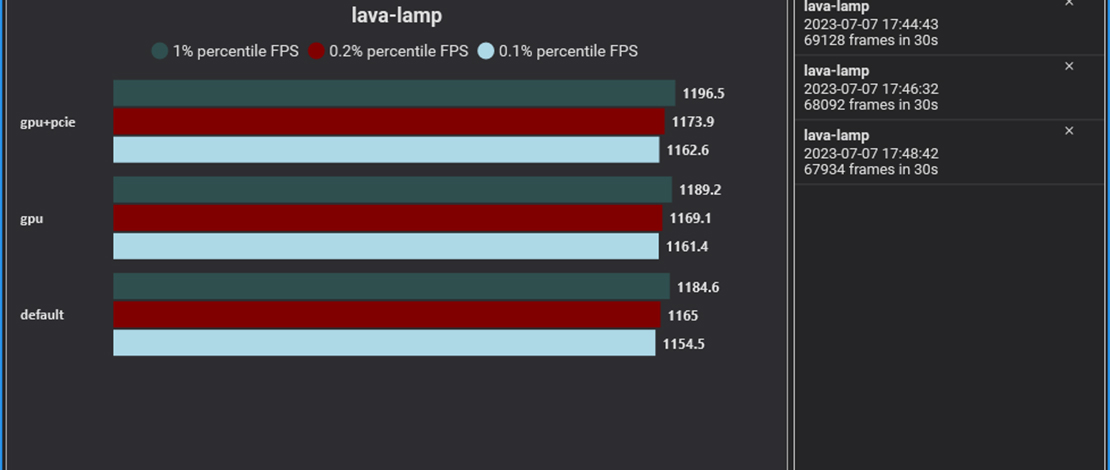
For the GPU you want to set the PCI slot to the same affinity as the GPU itself. As noted in this Tweet, if not done then your GPU performance can suffer. This was confirmed in my own testing.
When it comes to your mouse or keyboard setting the individual device does not actually do anything in terms of affinity. I have tested this claim using the process described in this article and have noted no changes in the most used driver, or ISR/DPC counts.
To effectively bind your mouse or any other USB input to a core you need to bind the USB Host Controller altogether.
If you have multiple USB Host Controllers you can do what I did where I have separated my 4000 Hz mouse to be the single device on one of these, and have plugged every other USB device in the other USB controller. This way I effectively bound my mouse by itself to one core and all my other devices which are a lot less demanding to another core (4000 Hz uses a lot more CPU as denoted by a huge increase in ISR/DPC counts when using it).
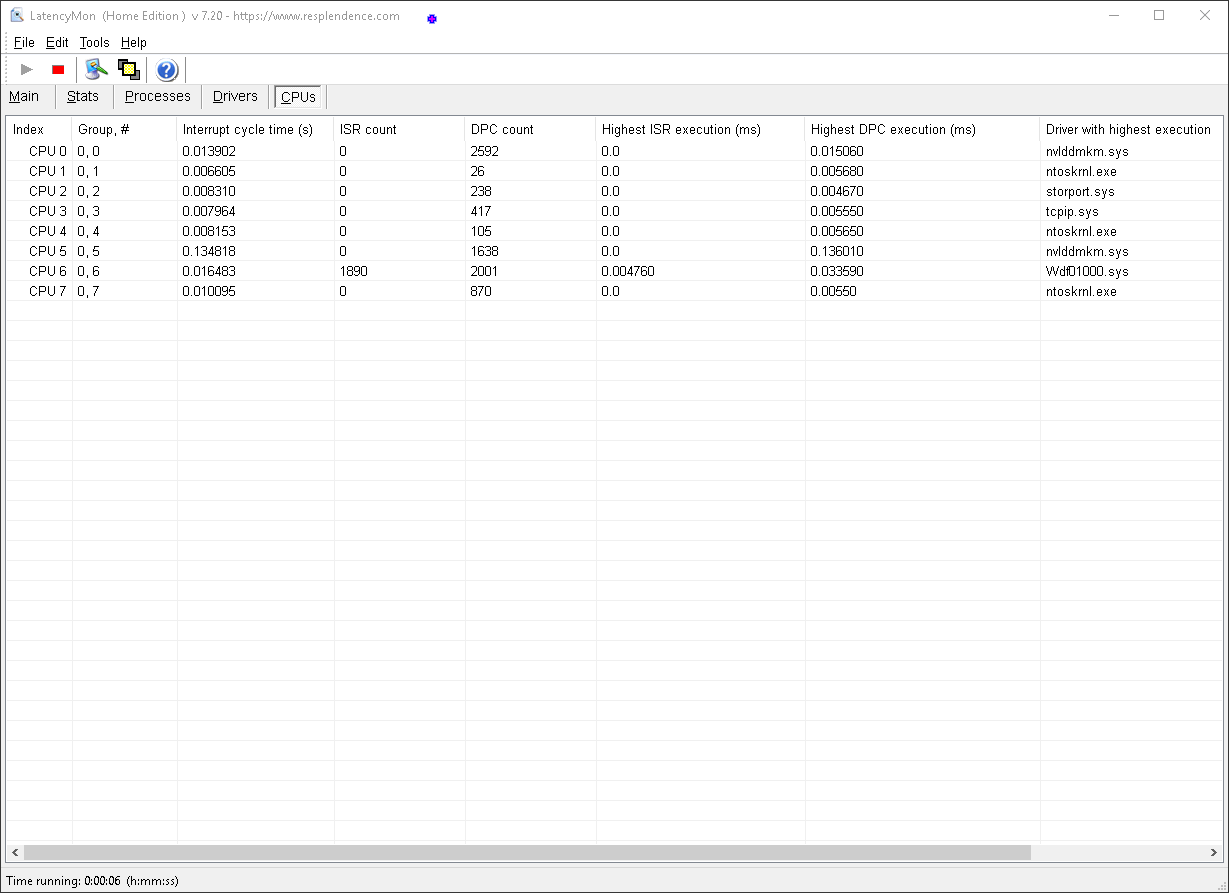
Using LatencyMon I confirmed that both my USB controllers and GPU have been bound to specific CPU cores resulting in a more uniform allocation of tasks across my CPU cores.
What About Other Devices?
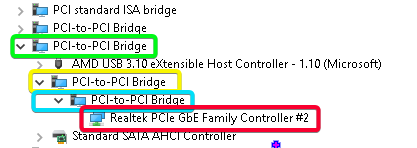
When it comes to binding devices to certain CPU cores you should focus on the big-impact ones like the GPU, USB controllers, and your network card. The issue with using the affinity tool is that in certain cases you can just bind the device itself (like in the case of the GPU and in some cases the network card) but in others, you need to go one step up in the device tree or bind the PCI-to-PCI Bridge altogether.
There is no reliable way of knowing which one will work therefore when assigning affinities you need to test each and confirm your affinity for the core has been set and it works.
The USB Host Controller Dilemma
When you set the affinity of a particular USB controller to one core that means that every device that is plugged into that USB controller is now handled by that specific CPU core. Ideally, you would bind individual devices to CPU cores. Still, after extensive testing with binding only my mouse or USB sound card not working no matter what I did, it became clear the USB Host Controller is the only way to separate your inputs to a different core.
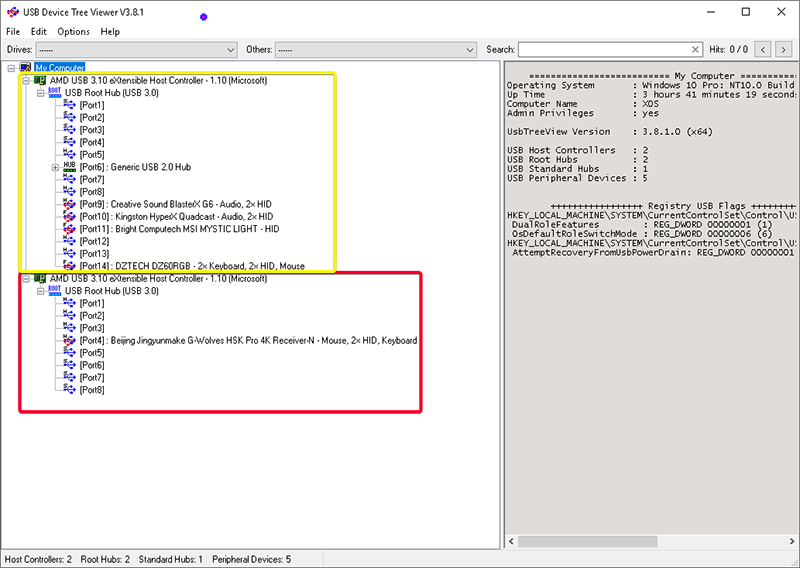
I have 2 USB Host Controllers in my PC, therefore, as mentioned above I separated my devices by how hard they would hit the CPU. Since I have an AMD system where I have a USB controller managed by the CPU and one by the chipset, I have only plugged my 4K Hz mouse into the CPU USB controller because that would be the most latency-sensitive and intense task.
All of my other devices I have plugged into my chipset USB controller. I have tested the core usage with all of them bunched together and it never went beyond 30% for that core, meaning that the core can handle my keyboard, USB audio card, and my USB microphone with no issues.
An easy way to visualize what I did is by using USB Device Tree Viewer which gives you a simple interface that shows which USB device is connected to what USB Host Controller.
I could not find another sensible way to bind my USB devices to a core with my USB sound card changing physical object names every reboot and my mouse/keyboard devices not reflecting any ISR/DPC count changes.
If you have only one USB Host Controller then your options are more limited than in my case. One workaround is to buy a PCIe USB card which will be shown as a separate USB Host Controller meaning you can separate your devices better like I did.
Conclusions
The Interrupt-Affinity Policy Tool is a powerful tool that can help you get better inputs and allow you to optimize the way devices are handled by your CPU. There is quite a bit of testing and poking around while figuring out which devices actually respond to CPU affinity changes but once done you will notice a drop in DPC latency and possibly better performance in games.
I tried to bind my mouse to last core, by device, and whole USB Host Controller, and still not binded to that core.
You can’t bind the mouse by device anyways, but it is weird that you cannot bind the whole USB controller. If you have SMT/HT on make sure you are binding the USB Controller to an actual core not a virtual thread.
good post but i found something interessting, it seems binding the realtek adapter and it‘s pci to pci bridges to a certain core won‘t do much. You can test this by running a speedtest during latencymon and u will nice that ur realtek adapter is still on cpu core 0 instead of the core you just binded it on. Can‘t find a good solution to this problem, do you have any ideas how to fix that?